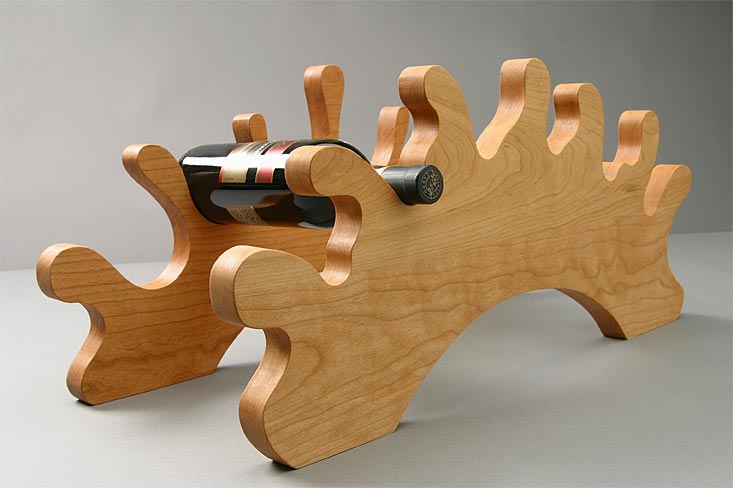
Most of the vintage wines which you now have in your cellar are a lot more than just proper storage and preservation. Wine cellars are often called the entertainment center of an abode and today you can find all kinds of custom-built wine cellar furniture. These furnitures run the whole gamut right from customized chairs and tables to lighting to tableware and other artistic works.
You can equip your cellar with just about any type of wooden wine furniture that will enhance the aesthetic appeal of your home and provide cozy culinary service. If you really prefer timber for your wine cellar furniture, make sure you pick a durable one that will not decay or be affected with mildew in the humid environment of your cellar. Or else what you can do is create a separate room next to your wine cellar for entertaining your guests in order to get rid of the humid environment.
Now that you have the option to select from a wide variety of wood types from top providers, picking your wood species to meet your personal preference is no exception. Undoubtedly, the 4 most popular wood species used these days while building wine cellar furniture are given below:
Pine- Pine, the most common and least expensive of all the popular wood types is used for manufacturing wine storage rack. It is best known for its durability and strength. This wood species is available in faded colors that assist in making it blend well with any interior decoration. The major benefit of pine is that has attractive and consistent grain patterns that can be stained to match the aesthetics of the rest parts of the wine cellar.
Cedar- A durable and light-weighted type of hardwood, slightly pinkish-gold toned cedar is able to resist rotting away of the woodwork. Its grain patterns are more consistent that other wood species and are released easily by sanding the wood. This kind of wood is ideal for giving a simple aesthetic appeal to an abode.
Redwood– Best known for its resiliency and sturdiness, redwood is a beautiful reddish wood species that grows in hot and humid places. Hence, redwood is an ideal choice for wine cellar furniture within the cellar since it contains natural wood preservatives within it that aid in resisting the humid conditions. There are 2 types of redwood and they are:
Premium Redwood– It is the least expensive and has much more variations and color in the wood than All Heart Redwood.
All-Heart Redwood– Its wood is much darker and consistent than Premium Redwood.
Mahogany- The most durable and appealing of all the 4 wood species commonly used in wine cellar doors is mahogany, a reddish-brown color redwood. Neither does it swelled up nor twisted out of shape over time. Apart from that, it is resistant to decay, making it perfect for the higher humidity levels usually found in wine cellars with climate-controlled systems. Those people who want that “furniture-grade look”, mahogany is undoubtedly the perfect choice as it is ideal for both lacquer and stain applications.
Each of them is unique in its own way. Moreover, to help preserve the quality of wines, it is better to avoid using any other wine rack material types rather than the above mentioned wooden wine racks.
Author Bio – Gary Wise, who has decided to go full time to wine writing this year, has recently written a wine article on wine cellar furniture where he shared about how beautifully wine cellar doors displayed his wines in his wine cellar.
Lucia Patterson is the woman behind TheLegalGuides, a blog solely focused on legal guides, tips, and advice. Lucia loves essay writing and blogs at EssayWritingGuides from her college days.
When purchasing a home, people have some projection of the future. However, it is hard to predict everything. This is why we like getting a place with the room for improvement and expansion. The attic is probably one of the first choices for home expansion of growing families. It often seems miraculous the way an empty, or a storage room turns into a comfortable living space.
The purpose :
The purpose of your loft-conversion is an important element of project planning. Some of the most convenient and usual purposes are a playroom, an office, an entertainment room, or a bedroom. Decide the most convenient purpose depending on what you lack space for. Perhaps this can give your children enough space to play when they are indoors, or finally give you the master bedroom you’ve always wanted. The purpose will determine the layout, the amenities, and the type of access.
The access :
Perhaps you are used to using the attic ladder, however, when this becomes a room you use every day, the ladder is no longer acceptable. First of all, consider the space you have. Is there anything on the floor below which will make fitting a staircase difficult? Perhaps in certain scenarios, it could block one of the doors into one of the rooms. Hire a professional to make a plan for the stairs, unless you are a professional, or truly experienced. Safety should be your priority. Also if your loft is meant to be a playroom, you should definitely get a banister and safety get at the top and the bottom.
The style :
Does your attic currently have enough space for your purpose? Is the ceiling high enough? Do you have enough windows? Check your local regulations, get the required licenses and choose the style of the conversion. There are three common styles of the loft conversion, mansard, dormer, and roof light. The roof light is probably the most convenient one as it does not require major alterations to your roof. This is the reason why there is usually no need for planning permits. The other two styles, however, involve creating more space and offer a better choice of windows. You can get more daylight and a possibility of installing shutters and other window treatments greater energy-efficiency.
Electricity/Plumbing/HVAC :
Hire a licensed electrician to establish whether your current system can handle the increase in the electrical load required for the new room. Let them do the wiring. Look for the main stack and plan your bathroom in that area. A professional plumber should have no trouble setting it up. Finally, the last contractor you will need for this type of project is an HVAC specialist. They will tell you if the current system can support another room and set it up.
Insulation :
Insulation is another essential part of the conversion. Perhaps even the most important one. Without it, the room would be impossible to live in due to extreme temperatures. It protects a room from the weather elements and increasing energy efficiency. Hang drywall once you are done insulating.
Flooring :
The floor insulation is not so much for the sake of warmth, but for the sake of noise. Installing floorboards requires an excellent subfloor to reduce the squeakiness. Also, a carpet may be a good choice as it absorbs a lot of noise. While you are at it, carpet tiles are excellent for a playroom. They are not slippery, they absorb sound and they are easily removed and replaced.
The room now fulfills all standards to be lived in. All you are now left with are the finishing touches. You need to select the colors, the furniture, and decor. Do so according to the purpose of the room and your taste.
Bio: David Koller is a freelance blogger passionately interested in minor house fixes and home décor.
Read More :
Natural Ways To Get Rid Of Flea In Your Lawn
Leather Furniture Is An Essential Improvement For Any Home Or Office
Ten Tips To Make Most Out Of Your Outdoor Space
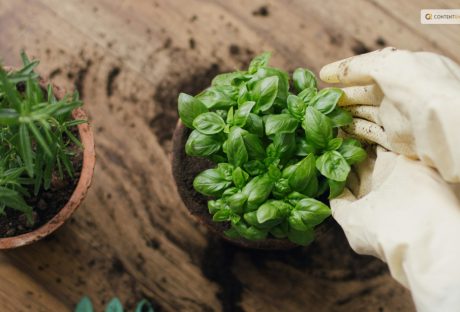
Basil is one of the most popular and versatile herbs you can grow in your garden or indoors. It has a fresh and aromatic flavor that can enhance any dish, from salads and soups to pizzas and pastas. Basil is also rich in vitamins, minerals, and antioxidants just like cilantro. It can benefit your health and well-being. But how do you harvest basil properly so that it keeps growing and producing more leaves?
If these are some of the things you want to know, I have you covered! In this article, I will answer all these questions and more and give you everything you need to know about harvesting basil! So, keep on reading this blog till the end to learn more…
How to Harvest Basil Leaves?
The first thing you need to know about harvesting basil is when to do it. The best time to harvest basil leaves is in the morning when the plant is still fresh and moist. Avoid harvesting basil in the afternoon or evening when the plant is dry and wilted. Also, avoid harvesting basil when it is raining or wet, as this can cause the leaves to rot or mold.
Steps to Harvest Basil Leaves
To harvest basil leaves, you will need a pair of scissors or a sharp knife and a basket or a bowl to collect the leaves. You can also use your fingers to pinch off the leaves, but be careful not to damage the stem or the plant. Here are the steps to follow:
Start from the top of the plant, and look for the stems with leaf clusters. These are called the terminal buds, and they are where the basil flowers will grow. You want to remove these buds, as they will make the plant stop producing new leaves and focus on flowering and seeding. This will reduce the flavor and quality of the basil leaves.
Cut or pinch off the stem just below the terminal bud, leaving about a quarter of an inch of stem above the next pair of leaves. This will encourage the plant to grow two new stems from the leaf nodes and produce more leaves. You can also cut or pinch off any other stems that are too long or leggy and leave about four to six pairs of leaves on each stem.
Repeat this process for all the stems that have terminal buds, and collect the leaves in your basket or bowl. You can also harvest some of the lower leaves but leave enough leaves on the plant to allow it to photosynthesize and grow. You should not harvest more than a third of the plant at a time, as this can stress the plant and reduce its growth and health.
After harvesting, rinse the leaves with water and pat them dry with a paper towel. You can use them fresh or store them for later use.
How to Harvest Basil So It Keeps Growing
One of the benefits of harvesting basil is that it stimulates the plant to grow more leaves and branches and prevents it from flowering and seeding.
However, you need to harvest basil regularly and correctly, so that it keeps growing and producing more leaves.
Here are some tips to follow. For instance, you must harvest basil:
At least once every two weeks, or more often if you see the terminal buds forming. This will keep the plant bushy and compact and prevent it from becoming woody and bitter.
From different parts of the plant, and not always from the same spot. This will ensure that the plant grows evenly and does not become lopsided or uneven.
Before it flowers. This is because the flowers will reduce the flavor and quality of the leaves. If you see any flowers forming, remove them as soon as possible. You can also pinch off the flowers and use them as edible garnishes or decorations, as they have a mild and sweet flavor.
Before the frost, as the cold weather will kill the plant. You can either harvest the whole plant and store it for later use, or bring it indoors and keep it in a sunny and warm spot. You can also propagate the plant by taking cuttings and rooting them in water or soil and grow new plants for the next season.
How to Harvest Basil Without Killing The Plant?
Harvesting basil is different from harvesting lettuce or other plants. The process is good for the plant and you, as you can enjoy the fresh and aromatic leaves in your dishes.
However, you need to be careful not to harvest too much or too often, as this can harm and kill the plant.
Here are some dos and don'ts of harvesting basil without killing it:
Do harvest basil from the top of the plant, not the bottom or the middle. This will allow the plant to grow stems and leaves from the lower nodes and maintain its shape and structure.
Don't harvest basil from the main stem or cut it too close to the ground. This will damage the plant and prevent it from growing new stems and leaves. Leave at least four to six pairs of leaves on each stem and about an inch of stem above the ground.
Do harvest basil gently and carefully, and not roughly or forcefully. This will avoid injuring the plant and exposing it to diseases or pests. Use a sharp and clean tool, such as scissors or a knife, and make clean and smooth cuts. You can also use your fingers to pinch off the leaves but be gentle and precise.
Don't harvest basil when it is stressed or unhealthy, such as when it is wilting, yellowing, or diseased. This will weaken the plant and make it more susceptible to further damage. Wait until the plant recovers and looks healthy and green before harvesting. You can also water and fertilize the plant to help it grow and thrive.
Do harvest basil when it is young and tender, not old and tough. This will ensure the leaves are fresh, flavorful, and not bitter or woody. Harvest basil when the leaves are about two to three inches long before they curl or turn brown.
How to Pick Basil Leaves?
Picking basil leaves is another way to harvest and use the leaves in your dishes. You can pick basil leaves with your fingers or with a pair of tweezers, depending on your preference and convenience. Here are some tips on how to pick basil leaves. For instance, you can pick it:
From the top of the plant, not the bottom or the middle. This will allow the plant to grow stems and leaves from the lower nodes and maintain its shape and structure.
From the stems that have terminal buds, not from those that have none. This will prevent the plant from flowering and seeding and producing more leaves. You can also pick some of the lower leaves but leave enough leaves on the plant to allow it to photosynthesize and grow.
Gently and carefully, and not roughly or forcefully. This will avoid injuring the plant and exposing it to diseases or pests. Use your fingers to pinch off the leaves or a pair of tweezers to pluck them off. Be gentle and precise, and do not pull or tug on the leaves or the stems.
When they are young and tender and not when they are old and tough, this will ensure the leaves are fresh, flavorful, and not bitter or woody. Pick basil when the leaves are about two to three inches long before they curl or turn brown.
How to Store Basil Leaves?
Storing basil leaves is a great way to preserve and enjoy them for later use. You can store basil leaves in different ways, depending on how long you want to keep them and how you want to use them. Here are some of the best ways to store basil leaves:
Refrigerate Them
You can refrigerate basil leaves for up to a week, by wrapping them in a damp paper towel and placing them in a resealable plastic bag or an airtight container. This will keep them moist and fresh, and prevent them from wilting or drying out. However, you should not wash them.
Freeze Them
You can freeze basil leaves for up to six months, by blanching them in boiling water for a few seconds, and then plunging them in ice water to stop the cooking process. This will preserve their color and flavor, and prevent them from browning or oxidizing. Then, pat them dry with a paper towel, and place them in a resealable plastic bag or an airtight container. You can also chop them and mix them with some olive oil, and freeze them in ice cube trays. This will make it easier to use them in soups, sauces, or dressings.
Dry Them
You can dry basil leaves for up to a year, by hanging them upside down in a warm and dry place, such as a closet or a pantry. This will dehydrate them and concentrate their flavor, and make them last longer. However, you should avoid drying them in direct sunlight, as this can bleach them and reduce their quality. You can also dry them in an oven or a microwave, but be careful not to burn them or overcook them. Once they are dry, you can store them in a glass jar or a spice container, and crush them or grind them before using them.
Make Pesto
You can make pesto with basil leaves, by blending them with some garlic, pine nuts, parmesan cheese, and olive oil. This will create a delicious and versatile sauce that you can use for pasta, sandwiches, salads, or dips. You can store pesto in the refrigerator for up to a week, or in the freezer for up to six months. You can also customize pesto by adding other herbs, nuts, cheeses, or spices, according to your taste and preference.
How to Cut Basil?
Cutting basil is a simple and easy way to harvest and use the leaves in your dishes. You can cut basil with scissors, a knife, or your fingers, depending on your preference and convenience.
Here are some tips on how to cut basil:
Wash and dry the basil leaves before cutting them to remove any dirt or insects. You can rinse them under running water or soak them in a water bowl with a few drops of vinegar. Then, pat them dry with a paper towel or spin them in a salad spinner.
Cut the basil leaves just before using them, to preserve their flavor and aroma. If you cut them too early, they will lose their freshness and wilt. You can also bruise or damage the leaves if you cut them too roughly or with a dull tool.
Cut the basil leaves according to the size and shape that you need for your recipe. You can either leave them whole or chop them finely or coarsely. You can also cut them into ribbons or strips, by stacking several leaves together, rolling them up, and slicing them thinly. This is called the chiffonade technique, and it creates a beautiful and elegant garnish.
Cut the basil leaves with a sharp and clean tool, such as scissors or a knife, and not with a blender or a food processor. This will avoid bruising or crushing the leaves and releasing their oils and juices. You can also use your fingers to tear or pinch off the leaves but be gentle and careful.
How to Use Basil Leaves?
Using basil leaves is a fun and easy way to add flavor and aroma to your dishes. You can use basil leaves in different ways, depending on your mood and occasion. Here are some of the best ways to use basil leaves:
Fresh
You can use fresh basil leaves to garnish and enhance your dishes, such as salads, soups, pizzas, and pastas. Also you can use fresh basil leaves to make salads, such as caprese salad with tomatoes, mozzarella cheese, and basil, or Greek salad with cucumbers, feta cheese, and basil. You can also use fresh basil leaves to make drinks, such as lemonade, tea, or cocktails, with basil, lemon, sugar, and water.
Cooked
You can use cooked basil leaves to flavor and season your dishes, such as sauces, stews, curries, and casseroles. Also you can use cooked basil leaves to make dishes, such as tomato sauce with basil, garlic, and onion, or chicken with basil, cream, and mushrooms. You can also use cooked basil leaves to make breads, such as focaccia with basil, olive oil, and salt, or muffins with basil, cheese, and eggs.
Preserved
You can use preserved basil leaves to store and enjoy them for later use, such as freezing, drying, or making pesto. Also you can use preserved basil leaves to make dishes, such as pesto pasta with basil, garlic, pine nuts, and parmesan cheese, or roasted vegetables with basil, olive oil, and salt. You can also use preserved basil leaves to make snacks, such as crackers with basil, cheese, and honey, or popcorn with basil, butter, and salt.
Wrapping It Up!
Basil is a wonderful herb that you can grow and harvest in your garden or indoors. It has a fresh and aromatic flavor that can enhance any dish, and a rich and nutritious profile that can benefit your health and well-being. By following the tips and tricks in this article, you can learn how to harvest basil properly, so that it keeps growing and producing more leaves, how to cut basil, pick basil leaves, and store them for later use, and how to use basil leaves in different and delicious ways.
Read Also:
Some Facts You Need to Know About Rainwater Harvesting
Asparagus 101: When, How, And How Often To Harvest?
Exploring Ideas For A Biophilic Home Design
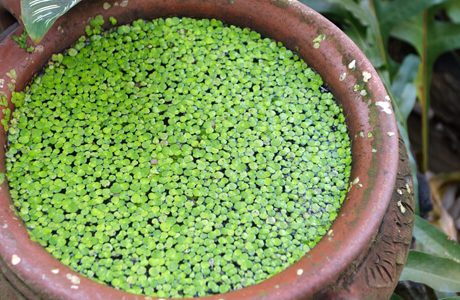
What is the fastest growing plant on earth? The answer to this question is Duckweed which is known as the fastest-growing plant in the world in 2021.
The Duckweed family consists of 37 species and can be found pretty all over the globe. Besides, this plant is also known as Wolffia, a plant that is easy to harvest and float on water. It grows very fast that you have never imagined of.
Wolffia is found everywhere in freshwater and has become a subject of fascination for scientists. This plant acts much like a weed, although it is eaten by humans, animals, and ducks.
What Is The Fastest Growing Plant On Earth?
As already discussed above, the fastest growing plant on earth is Duckweed, also known as Wolffia. This plant is a tiny type of duckweed that grows faster.
On the other hand, you are probably familiar with this plant (duckweed) that is found on ponds where several green beads seem to form a lid on water sources. The genetics underlying this strange little plant’s success has long been a mystery to scientists.
The Genome Research of February 2021 will help scientists to know how plants grow up so fast and what are the functions that allow them.
What Makes Wolffia (Duckweed) The Fastest Growing Plant In the World?
There are various reasons why Wolffia is known as the fastest-growing plant in the world. Many individuals are taking the benefit of this unusual crop as it is extremely high in protein and is a part of some Southeast Asian cuisines.
This plant reproduces very quickly. According to many types of research, Wolffia is regarded as the fastest growing plant in the globe. About forty percent of the plant’s genes are influenced by this time of day factor. Wolffia, clocks in with only 13 percent of its genes restricted by time.
Can You Speed Up Growing Rate Of Plants?
Smaller plants and trees grow faster than bigger versions of the same tree and plant because of the root ratio. These variants grow fast as they highlight a great balance of roots to top growth.
On the other hand, the plant and trees can place all their strength into top growth enables it to grow taller. And fast-growing plants only grow as fast as their roots support.
Besides, if you are growing plants, they must be planted right. In order to encourage deep root growth, you can also give continuous watering to the same.
The Final Thoughts
Duckweed is the fastest growing plant on earth and this is the correct answer to your question. The characteristics of the same are described above and if you have any queries about the same, you can specify them below in the comment section.
More Resources:
Garden Edging for Beginners
How to Maintain a Bright and Beautiful Garden During Winter
Smart Fun Gardening: How to Take Care of a Money Tree


 You can equip your cellar with just about any type of wooden wine furniture that will enhance the aesthetic appeal of your home and provide cozy culinary service. If you really prefer timber for your wine cellar furniture, make sure you pick a durable one that will not decay or be affected with mildew in the humid environment of your cellar. Or else what you can do is create a separate room next to your wine cellar for entertaining your guests in order to get rid of the humid environment.