Waterjet Vs. Laser Cutting: Which Is Worth The Hype?

Published on: 19 December 2018 Last Updated on: 12 September 2024
Waterjet Vs. Laser Cutting

Waterjet and laser cutters can slice through materials that no other cutting tool can. They are invaluable for prototyping products and precision manufacturing. But which one is worth the hype – waterjets or laser cutters? This article provides everything you need to know about waterjet vs laser cutting units. Learn how they work and which one is best for your industrial manufacturing facility.

Waterjet Vs Laser Cutting:

Unlike the vast majority of blades and saws, waterjets and laser cutters don’t have a blade. The lack of a blade makes engraving and detail work much more precise. And, waterjets and laser cutters are computer operated, as to achieve a very high level of precision.

Both machines can engrave minute lettering and symbology into a wide range of manufacturing materials. But each machine goes about it a very different way.

Both methods of cutting excel with 2D objects and engraving, but which is better: waterjet or laser cutting?

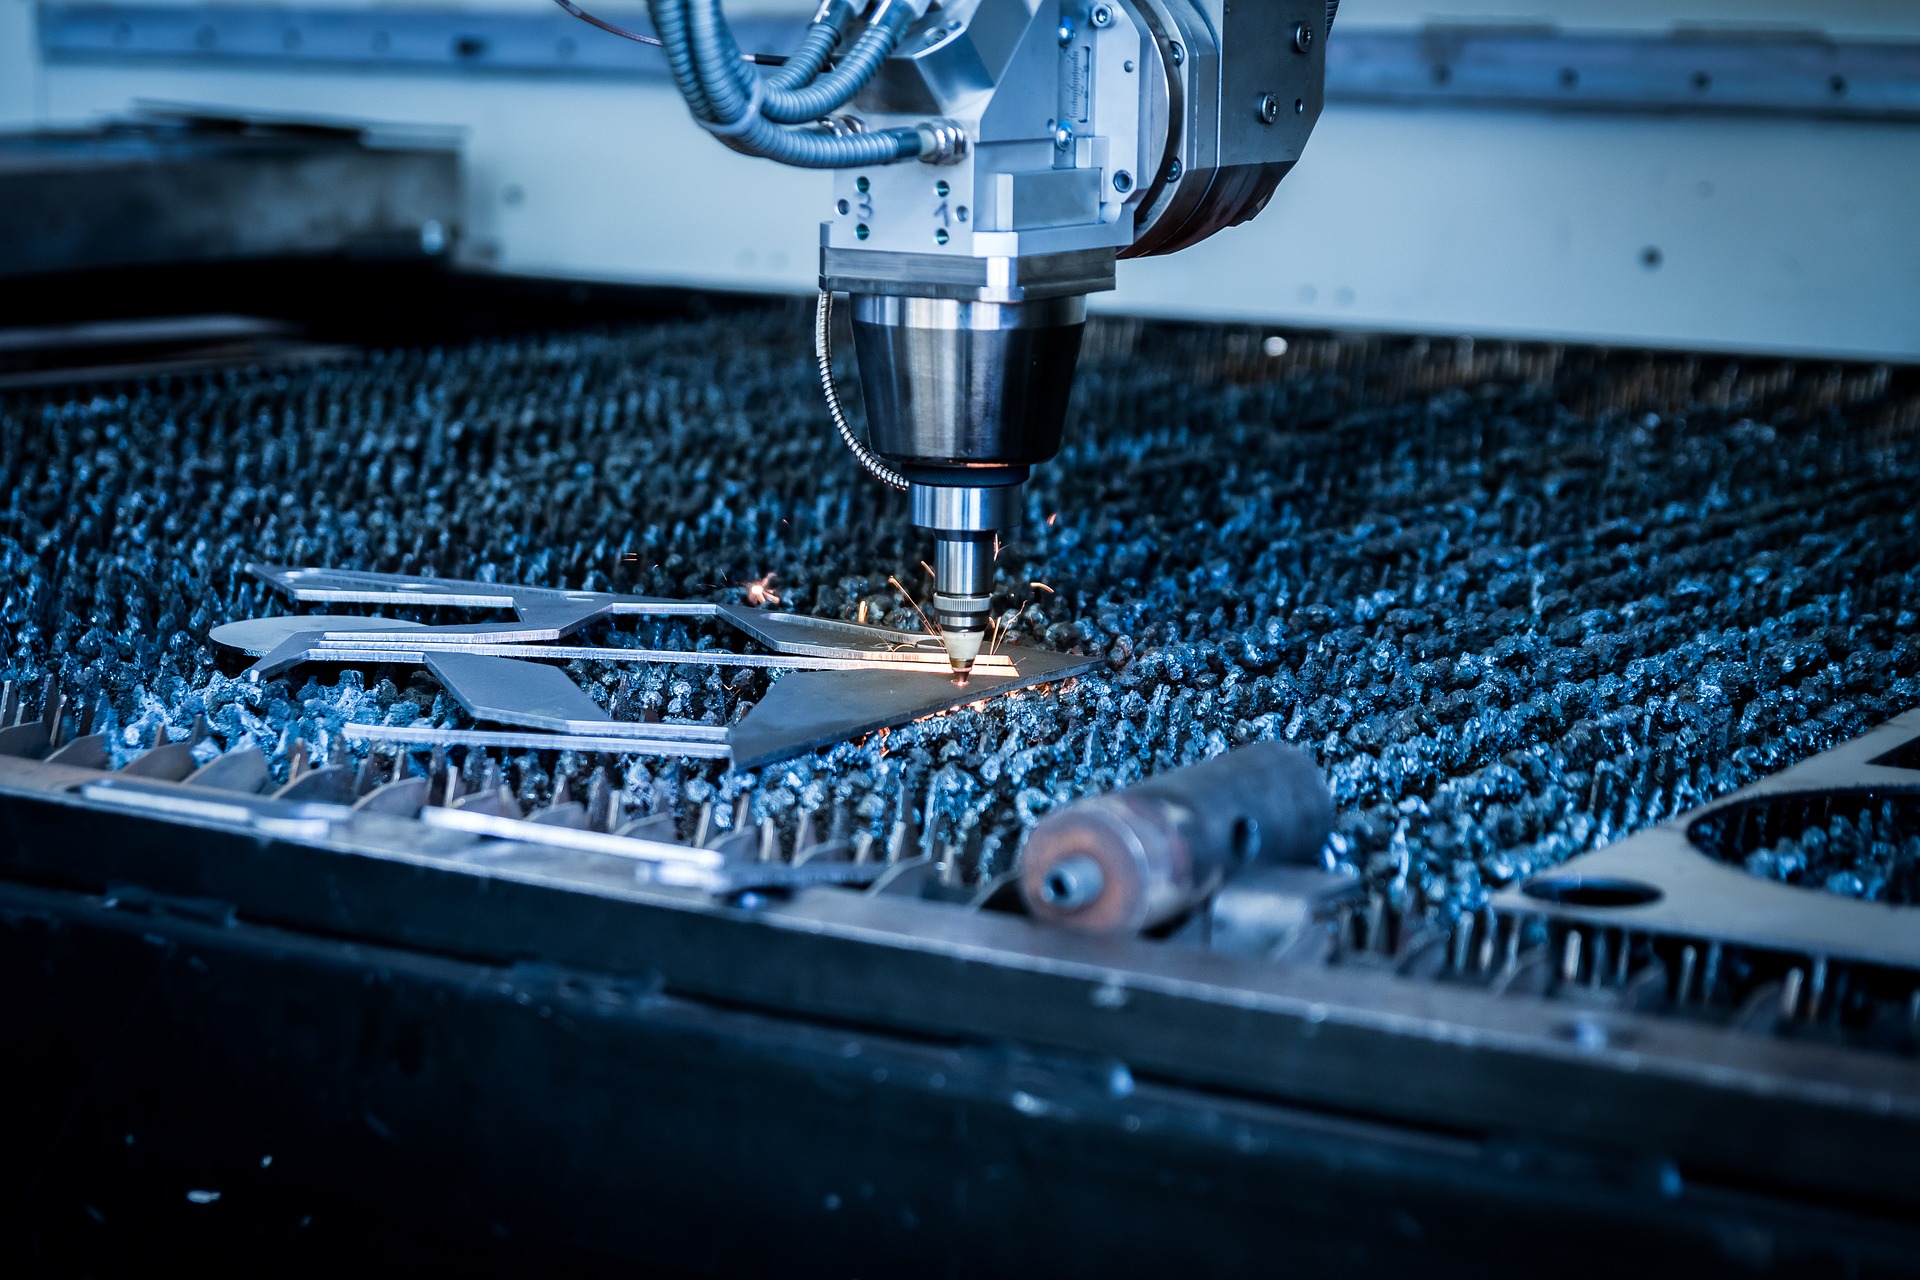
What Is Laser Cutting?

Laser cutting uses a high-focus laser to cut or engrave materials. Laser cutting is a method of subtractive manufacturing, which means it only takes away material.

This is in opposition to additive manufacturing, like 3D printing.

Special software guides the lasers using mirrors. A gas power source provides energy to the system, usually in the form of CO2. The CO2 fuels the laser which outputs between 1,500 and 2,600 watts.

Some systems implement an additional gas jet to expel the excess material.

Laser cutting is a very precise form of subtractive manufacturing. The intense heat of the laser cuts through material like a razor using a precision burn. Laser systems cut material from sheets or large panels.

Laser Cutter Materials:

Laser cutting systems make precision cuts in a wide range of materials. The only material that a laser cutter is not “cut-out” for is reflective metals. The reflective property of some metal reflects the laser off of the cutting surface, which can be dangerous.

Laser cutters are great for cutting glass, wood, plastic, and a wide range of metals.

Laser cutters encounter obstacles, however, when trying to cut compound materials. If the material contains multiple materials, then it has multiple melting points. If the material has multiple melting points, then a laser takes longer to cut through it, and cuts can become uneven.

Laser cutting systems work the best with flat sheets of material, with a thickness range between 0.1 inches to just under a half-inch.

And, most laser cutting systems proficiently perform the functions of cutting, drilling, engraving, welding, ablating, and structuring.

What Is Waterjet Cutting?

Waterjet cutting systems utilize a high-pressure waterjet to slice through materials. The water is shot through a very fine point and creates over 60,000 pounds of pressure per square inch.

For tougher materials, a mixture of water and an abrasive acts like a diamond saw blade.

Garnet is a common abrasive for use in waterjet cutters. Aluminum oxide is another common abrasive that you can use with a waterjet cutter.

The process of waterjet cutting is a high-speed version of natural erosion. With a big enough waterjet cutter, you can make another grand canyon in a fraction of the time. Read more about how the best water jets can cut through anything nature makes.

Waterjet cutters differ from laser cutters in that the power source does not reside with the cutting unit. Since a waterjet cutter outputs between 4 to 7 kilowatts, the water pump is located away from the worksite. This is also true because the water source is rarely nearby your bench.

Waterjet Cutting Materials:

Unlike a laser cutter, waterjet cutters can effectively cut almost any material. They have no problem cutting through compound materials with multiple material types. The pure pressure of the water jet is enough to cut cleanly through anything.

Waterjet cutter units are especially useful for cutting precisely through masonry. They’re also good for cutting and structuring stone, thick metals, ceramics, and glass.

Waterjets handle thicker material than laser cutters. They can handle material that is up to around 2 inches thick. But they don’t do as well with material thinner than 0.4 inches.

Level of Waste from Waterjet vs Laser Cutting:

Laser cutters create a minimal amount of off-fall and waste. Very little, if any, cleanup is required after cutting. The only waste that laser cutting produces is a small amount of dust that is easily vacuumed up.

Waterjet cutting, on the other hand, creates a lot of waste. You might think that waterjet cutting would be cleaner, but it is not. The abrasive material in the water adds a toxic element to the off-fall liquid.

For this reason, waterjet cutting requires special waste-water disposal, safety gear, and a bigger project budget.

What’s the Cost to Purchase and Operate a Waterjet vs Laser Cutter?

A plasma laser cutting machine will cost between $15,000 to over $250,000 at the initial purchase. Waterjet cutters are more expensive because they require more specialized materials. They range from $100,000 to around $400,000.

On average, either machine will cost around $350k. Expensive industrial machines can exceed $1,000,000.

On average, a laser cutter costs between $13 to $20 an hour to operate. Waterjet cutting systems run between $15 to $30 an hour to operate.

Final Thoughts:

At the end of the day, waterjet cutters cost up to five times more to operate than laser cutters. Waterjet cutters can cut thicker and more complex materials, but they are slower than laser cutters. So, when considering waterjet vs laser cutting, laser cutting will save you time and money.

If you like this article on which is better, share it with your friends on social media. And check out the blog for more resources on hardware and gadgets. Thanks for reading!

Read Also:

Content Rally wrapped around an online publication where you can publish your own intellectuals. It is a publishing platform designed to make great stories by content creators. This is your era, your place to be online. So come forward share your views, thoughts and ideas via Content Rally.

View all posts

Leave a Reply

Your email address will not be published. Required fields are marked *

Related

steam disk write error

How To Troubleshoot Steam Disk Write Error? [Fixed]

Steam is a well-known name in the video gaming industry. It is a social gaming website, which allows you to play, buy, and discuss games. If you are using steam for some time, then there is a lot to know about it. Have you ever faced the Steam disk write error? Are you looking for the solution to Steam disk write error windows 10? Are you unable to solve the issue? This article will help you with multiple solutions in order to remove the error. Go through the steps and enjoy an interruption-free gaming experience.        What Is The Steam Disk Write Error? While you are updating or downloading any game you bought from the Steam Platform, you may face the Steam disk write error. At the time you are attempting to download or install a new game, this message can appear on the screen. You also can face the same issue when you are trying to update a game that you have installed earlier. In case your game needs an update, at the time of launching the game, the screen will show this error. Reason For Steam Disk Write Error? Whenever Steam is not able to download and save the data of the game to the storage drive of your computer during a new installation or an update. One of the messages mentioned below will appear on the screen, Any error occurred at the time of updating the  game_title Any error occurred at the time of installing game_title The steam disk write error can happen, when There are no defects on the hard drive. The Steam folder or drive is write-protected. There are outdated or steam corrupt disk files in the Steam directory. Your firewall or antivirus is blocking Steam from saving and downloading data.  Fixing Steam Disk Write Error If you have encountered the steam error while downloading, error while installing, updating, or launching the Steam game and want to know the ways of fixing disk write error steam, here are the answers #1. Restart The Steam Open the Steam window Click the word “Steam” on the top-left corner The Dropdown menu will open For Windows, click on “Exit,” and for Mac, click on “Quit Steam.” Again open Steam. In case you have been logged out, log in another time Check for the Steam disk write error is gone or not #2. Restart Your PC Click on the start icon Power Icon Restart #3. Clear All Download Cache Open steam Go to “settings.” Click on “downloads.” Select the option “clear download cache.” Reopen and check if it is working or not #4. Repair All The Steam Disk Bad Sectors EaseUS Partition Master to check bad sector Install it Click on the disk which you want to check Click “surface test.” It will red mark the bad sectors. In case of any error, it is a good idea to replace the drive or clone it to another HDD apart from the steam disk write error SSD. You can take help from EaseUS Partition Master to replace the failing disk. After opening the EaseUS Partition Master, select the disk, which you want to clone. Click on “Clone” Select your destination or SSD/HDD whenever you want to clone it Click on “Next” Click on “Continue” to wipe out all data. If you have any valuable data, take a backup of it. Click on “Autofit the desk” or “Edit disk layout” or “Clone as the source.” Click on “Execute the operation.” Click on “Apply” to solve the steam disk write error #5. Run As Administrator Go to your Steam folder Right-click on “Steam.exe” Click on “Properties” Select the tab named “Compatibility.” Click in “Run this program as an administrator.” Click on “Apply” then “OK.” See whether the Steam disk write error is solved or not #6. Move The Game Folder Sometimes transferring the game to a healthy drive can solve the issue. But here, manual transferring will not work. You can use EaseUS Todo PCTrans for transferring the file.  Connect your computer with the destination drive Select the games that you want to transfer Now transfer them to the destination drive #7. Confirm Integrity For Steam Game Files  Reboot the system Launch Steam Click on the “Library” tab Right-click on the game that is causing the error Select “Properties” Click on the “Local Files” tab Click on the “Verify Integrity Of Game Files…..” button It will take some time to verify the game files Once the verification is done, try to install the updates and see if the Steam disk write error is showing or not.  #8. Remove The Write Protection From The Steam Drive For Steam Disk Write Error Press “Win + R.” Type cmd Command Prompt will open. Type “disk part” there Press “Enter” Type “list disk.” Press “Enter” Type “select disk 0.” Press “Enter” Type “attribute disk clear read-only.” Press “Enter” After the write protection process is done, type “Exit.”  Press “Enter” The disk part window will close.  #9. Some Other Fixes Of Steam Disk Write Error Apart from all the steps mentioned earlier or techniques, there are two more ways to eliminate the Steam disk write error. You can uninstall Steam and reinstall it. In order to uninstall  Go to “Control panel.” Open “Add or Remove programs.” Search for Steam and select it Click on the “Remove” After selecting the automatic option, click on “Next.” Click “Finish” Once the uninstallation is completed, you can install it again. For installing Steam, follow the below steps. Visit https://store.steampowered.com/about/ Click on “Install Steam” After the download is completed, click on “Open” or “Run.” Follow the on-screen instruction to install Steam. Open steam and log in. Final Talk Though you have tried and everything to resolve the issue, it is not working. You can seek help from Steam’s official support. Opt for the Steam support team. You also can visit the community forum of Steam for any further or additional help. Apart from the above-mentioned nine solutions of steam disk write error, if you know any other practical solution, do let us know.   More Resources: The Complete Guide To Choosing VPS Hosting Best Server Management Tips for Startups Best Bulk Sd Cards Of 2020 – Review And Buying Guide

READ MOREDetails
What You Are Paying For With A Virtual Data Room

What You Are Paying For With A Virtual Data Room

Running a business or performing due diligence on any level requires time and money, especially when it comes to maintaining the security of your confidential documents during the process. If you are planning to share data online to facilitate M&A transactions, assist in the litigation process, or simply store information for future use, it is important to ensure that the platform you are using provides you the utmost safety. With the rise of cloud-based document storage, users are finding platforms to share data more than ever, however, some are better suited to certain industries and their needs. While it might seem easy and cheap to opt for a generic document sharing service like Dropbox or Google Drive, the trouble you can face in the future with regards to their functionality and security can negatively affect the business you are conducting within your data room.     This article aims to outline what exactly you are paying for when you invest in a virtual data room and what the hype around them is really all about. It will also discuss a few of the key differences between a VDR and a generic document sharing service so that you are able to make the best decision for your business. Functionality: Security & Control : When choosing a virtual data room, the best method of deciphering the right one for you and your needs is by the features it provides and the correlating price. No one wants to spend a fortune, especially if trying to run a small start-up company, so understanding what certain providers can offer for the price they charge will benefit you in your process. The main factors a VDR provider strives to offer our security and control—intellectual property, financial information, and legal documents being a few examples of the types of data VDRs store. Complex permissions settings allow an administrator to control the action by certain users within the room while features such as watermarking and disable print and download control documents from being seen by the wrong third parties. When choosing a virtual data room, the value you get out of the experience should dictate the prices, not a bloated interface with useless features. This is especially important for businesses not as specialized as M&A or litigation—your needs should be handled as professionally as those industries, but without the cost of unnecessary features and a more notable company name. Simplicity is key and that is reflected by features such as drag and drop for easy uploading of documents and folder templates. As well as tracking and auditing to view how your documentation is being received by third party contributors in the VDR. Additionally, good customer support is also a primary reason why a lot of professionals turn to virtual data rooms to store their important documents. They are able to contact a real-life representative to help them if they have any questions or concerns about the data room and its features. Unlike its generic counterparts, a VDR is much more organized and detailed in its features so that navigation is easier with customer service to lend a helping hand if needed. Period Of Use : Like any type of service, what you pay is designated by the use you plan to get out of it. When you invest in a virtual data room the period of time you spend in it is based on either the number of pages or gigabytes you need for your project. You also have the option to buy the VDR for a single-use or opt for a subscription, depending on the provider. Every VDR provider is different and their rates vary, however, some also guarantee that there will be no hidden fees in the price you sign up for. A breakdown of a virtual data room’s price and its features are usually shown on the provider’s main site so that a client can make an informed decision based on the number of pages, projects, users, and gigabytes they may need during their transaction. Virtual data rooms offer a platform with intricate features to ensure your security and control; each provider reflecting their efficiency with their prices. Some VDRs are higher priced than others, specializing in industries that necessitate the use of a VDR, while others are designed for general corporate use for the sharing of confidential data. Choosing the right provider for you and your business needs should not be completely dependent on their price, but should incorporate an understanding of what that price will be offering you, in the long run, depending on the features you need and how long you plan to use the virtual data room.  Read Also : What To Look For In A Transcription Service Provider How Can Conveyancing Services Help You? Would Your E-commerce Website Pass The Cybersecurity Test? Here Are 3 Things You Could 

READ MOREDetails
Chromecast source not supported

5 Ways To Fix Chromecast Source Not Supported Error

Modern smart televisions are designed to connect with several external devices in order to enhance our entertainment experiences. And casting videos from your mobile devices to your Tv is one of the most popular options. You also can cast any content from your laptop or computer. But in case your television does not support this feature, you can use streaming devices for establishing the connection. Now, let’s begin to solve the issue “Chromecast source not supported”.  Google Chromecast is a device that fulfills a similar purpose. It is packed with many streaming applications. With the help of this device, you will be able to cast content from the Google Chrome browser as well. And in case you are using this device and facing an issue like Chromecast source not supported, here I will guide you with the techniques to eliminate them.  Fixing Chromecast Source Not Supported Error  Here are the ways that you can try to fix the Chromecast source not supported error in your device. There can be several reasons behind this issue, so here are all the solutions for different kinds of reasons that are causing this issue.  1. Enable Mirroring Service Suppose you are using The Chrome browser in your system and unable to cast to the Chromecast. Then you need to check whether the Mirror service option is enabled or not. The users mostly recommend this method as it is really effective in solving the source not supported Chromecast issue.  Here are the steps to enable Mirror Services to eliminate the Chromecast source not supported the issue. Open the search browser, Google Chrome. Into the browser, type chrome://flags. Hit the Enter button. Press CTRL + F on your keyboard for bringing up the Find tool. Type in Mirroring, that we are searching for. Hit the Enter again. Find Mirroring Service option. On the right side, click on the drop-down menu. Now select it as Enabled.  Close the Chrome Browser completely and again Open it so that the changes are saves.  Now you can check whether the issue is resolved or not. Try to cast something from your system to your television using Google chrome. And check whether the issue is still there or not.  2. Restart your Chromecast, Wi-fi Router, and Computer Restarting your Chromecast also can solve your Chromecast source not supported issue. But for added measure, it is also recommended to restart your Wi-fi router and your computer also. This will make sure that if there is an issue that is causing the error will get resolved at the same time.  Here are the steps to do that, Firstly, you need to power off your TV, with which your Chromecast is connected. Unplug your Chromecast from your television. Also, unplug the power cord of the Chromecast device. Now leave it unplugged for 1 minute at least. Now, you need to power off the router or modem, depending on whatever you are using. Wait for 1 or 2 minutes.  Power on your router or modem. Now is the time to restart your system. After your system restarts back, connect it again with the WiFi.  Give your Chromecast sometime to reset up everything. Now try to cast something and check.  3. Turn Off all VPN and Ad Blockers Ad blockers generally block pop-ups and prevent Javascript from running. This sometimes causes the Chromecast source not supported error. So, you can try turning off the add blockers and also any VPN if you are using them.  Here are the steps to disable those Google Chrome browser extensions. Open Google Chrome browser. Click on the three-dot icon. A drop-down menu will open.  Select More tools. Click on Extensions. The Extension page will open. Search for the add blocker that you are using. To turn off the extension, Toggle the blue switch.  Close your browser completely. Reopen it and try to cast.  4. Enable the option of Cast Media Route Provider Though you have enabled Mirroring service options, you also can try enabling the option of Cast Media Route Provider. This will also can solve the Chromecast source not supported error that you are currently facing.  The process is similar to the enabling process or Mirroring Service. Here are the steps.  Open the Google Chrome search browser. Into the browser, type chrome://flags. Hit the Enter button. Press CTRL + F on your keyboard for bringing up the Find tool. Type in Cast Media Route that we are searching for. Hit the Enter again. Find Cast Media Route Provider option. On the right side, click on the drop-down menu. Now select it as Enabled.  Close the Chrome Browser completely and again Open it so that the changes are saves.  5. Check The App You Are Using To Cast There is a reason behind the Chromecast source not supported issue, and that is the app that you are using. Maybe the particular app that you are using for casting is not working properly at that very moment.  So what will you do in this case?  You can check by restarting the spp. In case you are trying to cast from your desktop or laptop, you can simply close the app and start it again. But what if you are casting from your Android device? You can restart the app by using the “Application Manager.” before you start the process, there are some things that you should know.  In case the particular app is not storing your user settings online, everything might get reset after this process. You may also need to log in with your credential once the process is completed. So, just make sure you have all those details.  Open the folder, Apps. Tap the icon, Settings. Open the Application Manager. Scroll down and search for the application with which you are facing casting issues on your TV.  Tap the app. The app menu will open. Tap Force Stop. Go to the Storage Section. Tap on Clear Data. Go to the Cache section. Tap Clear Cache. Now back to your Home screen. Restart the app.  This will solve the issues if it is caused by the app instability.  Final Tips In case you are done with all the above-mentioned steps and the Chromecast source not supported, the error is still there. There are some other ways you can try installing the latest version of chrome. I believe the issue will get resolves. But in case the issue persists. Lastly, you can factory reset the Chromecast device. It will lose all the previous data, and you will also need to log in again with your credentials.  Read Also: How Many Jobs Are Available In Real Estate Investment Trusts? 2021 0123Putlockers And Servers – Watch Movies Online How to Download Game Of Thrones Putlocker Online for Free? Is Real Estate Investment Trusts A Good Career Path? REITs Pros And Cons How to Plant Grass Seed on Hard Dirt? – Latest Update 2021

READ MOREDetails