What Leather Is Used In Leather Chesterfield Sofa

Published on: 26 July 2023 Last Updated on: 27 July 2024
Chesterfield Sofa

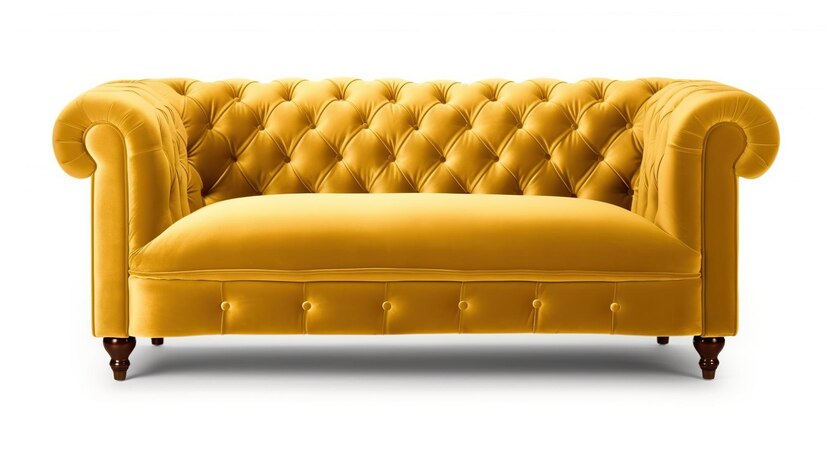
A Chesterfield sofa is all about looking good and being comfy. It’s known for its neat button pattern and high, rounded armrests. The best part about leather Chesterfield sofas is the use of top-quality leather. This makes the couch look great and last for a long time.

In this article, we will explore the types of leather, how the sofas are made, and how to care for them. Our goal is to give you a complete understanding of the leather used in Chesterfield sofas.

The Story of Chesterfield Sofas

The name “Chesterfield sofa” comes from the Earl of Chesterfield. He was looking for a sofa that was not just cozy, but also wouldn’t crumple his suit when he sat. So the Chesterfield sofa became the perfect solution.

Leather plays a crucial role in these sofas. It’s not just about the appearance, but it’s about lasting a long time too. The finest leathers used for a Chesterfield are Full-grain and Top-grain.

Full-grain is the best you can get. It keeps all the natural patterns of the animal skin. The sofas made with it are all unique. Top-grain is just a step below. It gives a more uniform look with its sanded and finished surface.

Types Of Leather Used In Chesterfield Sofas

Types Of Leather Used In Chesterfield Sofas

1. Full-Grain Leather Chesterfields

When you want the best, you go for full-grain leather. This type of leather is the finest you can find. The surface of the hide is left untouched except for removing the hair. This keeps all the original textures and marks.

Each Chesterfield made with this leather is one of a kind. Full-grain leather is super durable. This leather can handle moisture and, if cared for correctly, will develop a beautiful patina as it ages.

However, full-grain is the priciest of the leathers. But, it is well worth the cost. If you value heritage, long life, and individual beauty, it is the right choice for you.

2. Top-Grain Leather

Top-grain leather is another great option for a Chesterfield. It is almost as good as full-grain. But, it is slightly processed to remove any imperfections. This makes it look more uniform.

Top-grain leather sofas are good quality, durable, and a bit more affordable. They won’t get the same deep patina as full-grain sofas. But they are still tough and can handle everyday use.

This leather is easier to take care of because it resists stains. The smooth surface of top-grain leather gives a sleek and modern look. This is perfect if you like a more contemporary style.

3. Bonded Leather

If you’re on a budget, bonded leather is for you. It gives the look of a leather sofa without the high cost. Bonded leather is crafted from remnants of leather, which are combined together. It doesn’t match up to the durability or breathability of full or top-grain leather.

However, for furniture that’s not used daily, it can be a viable choice. Plus, it’s better suited to handle sunlight, making it a decent pick for rooms with a lot of sunshine.

The main selling point of bonded leather is its affordability. But remember, its lifespan may not be as long as that of superior-quality leather.

The Making of a Chesterfield Sofa

Making a Chesterfield sofa takes a lot of work. It needs skill, focus, and a good understanding of leather. Each step, from choosing the hide to cutting, tanning, and dyeing, affects the final look and quality.

The deep-buttoning of a Chesterfield is a special process. It needs careful work to make sure it is done correctly and will last. The buttons need to be tied down securely to keep the tufted look.

The leather also needs special treatment to protect it from stains and wear.

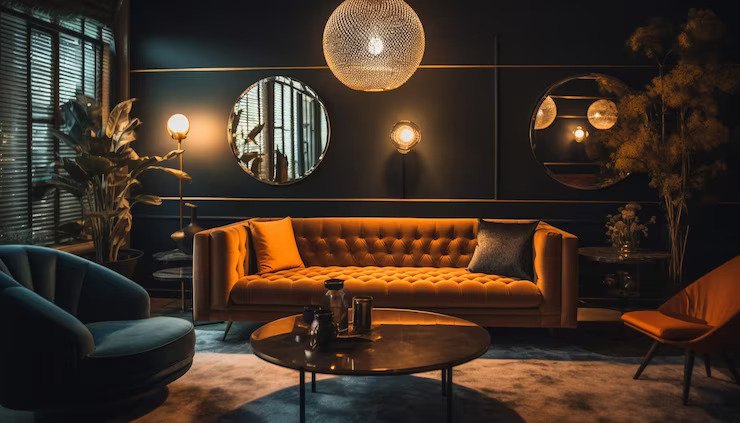
The Chesterfield Styles

The Chesterfield sofa has a signature style, easily recognized by its deep-buttoned upholstery, high rolled arms, and equal back height. But while the classic design remains popular, modern interpretations of the Chesterfield style have also found a place in contemporary homes.

The classic Chesterfield is often wrapped in full-grain or top-grain leather, rich in tones of browns and blacks, conveying a sense of old-world luxury. The design is a perfect fit for traditional or vintage-inspired interiors.

Modern Chesterfields, on the other hand, have been reimagined in lighter shades of leather or even brightly colored hues. This modern twist offers a fresh and vibrant take on the traditional design, suitable for more contemporary or eclectic spaces.

But whether classic or modern, the Chesterfield maintains its signature features. These design elements have stood the test of time, ensuring the sofa’s presence in homes for many years to come.

Conclusion

A Chesterfield sofa is a piece of history that adds luxury to any room. The type of leather used greatly affects how the sofa looks, how long it lasts, and how much it costs. From premium full-grain leather to the more affordable top-grain and bonded leather, each has unique qualities. No matter your choice, the artistry and skill in making these sofas are always there. It is a tradition of quality that has lasted for centuries.

By understanding the types of leather and how the sofas are made, you can choose the best Chesterfield for you. With knowledge about style, practical needs, and cost, you’ll be better equipped to choose the right sofa. Plus, your appreciation for your couch will only grow as you understand the craftsmanship and effort behind it.

Read Also:

Arnab is a professional blogger, having an enormous interest in writing blogs and other jones of calligraphies. In terms of his professional commitments, He carries out sharing sentient blogs.

View all posts

Leave a Reply

Your email address will not be published. Required fields are marked *

Related

Clean Blocked Drains

7 Ways to Clean Blocked Drains in Your Home

The drains in your home really do take a lot of abuse. Not only are things sometimes accidentally flushed down toilets and drains, but they also naturally collect all of the dust, hair, and whatever else is in the air. Over time, your pipes are bound to get clogged at some point.Clean Blocked Drains cxan make things work for you in all the aspects. Of course, a plumber can clear out a clog in a snap. But, here are seven things that you can try on your own first without using harsh chemicals which could harm your pipes. 7 Ways to Clean Blocked Drains in Your Home: 1. Find the clog: It might not be that deep. In a toilet, it's generally somewhere in the base. And, in sinks, it's often in the trap underneath it where hair and other debris will settle. There are a few different tools that you can use to attack the clog from the outside of the drain. Trap cleaner: You can find one at your local hardware store. It's usually made of plastic and is about the length of your arm. It has ridges along the sides and is designed to fit inside of your drain. You can use it to fish out anything that might be clogging the trap. Drain snake: It's the same idea as the trap cleaner, only it's longer and has a hose that rolls up, so it can get to clogs that may be deeper inside of the drains. Wire coat hanger: In a pinch? Just grab a wire coat hanger, unwind it, fashion it into a long hook, and use it to clear the trap. 2. Use a plunger: It's a basic home necessity for toilets. And, it can also be used for sinks. All you need is a solid suction and you may get the same results on a sink drain that you would with a toilet. In a sink, it might help to have a little standing water while you are plunging. 3. Dish Detergent: You can use it in toilets and sink drains. Pour it straight down the drain or into the toilet, about a quarter of a cup. The detergent will settle on the clog, and start to break it down. Let it sit for a few hours, run some hot water, and try plunging. The soap is sometimes strong enough to break up the clog. 4. Boiling Water: This would be more effective for a sink drain. Pouring boiling water directly down the drain could break up the clog. You could add boiling water, wait a few minutes, try plunging, and repeat the process a couple of times, if necessary. Just make sure the water isn't still boiling while you are plunging to protect yourself from any scalding. 5. Use a wet/dry vac: Wet/dry vacs are great for many purposes, including clearing clogs in your drain. If the clog isn't too deep, you can use it to either pull the clog out or push it down the drain. It's a good idea to try to pull it out first to remove the clog from your plumbing system. But, sometimes pushing it will also clear the clog and allow it to drain. 6. Clean the trap: If you are dealing with a clogged sink, you can usually access the trap underneath the drain. Most likely, that's where the clog will be. If you're handy with home repairs, here's a quick how-to. You'll need a plumber's wrench. Have a bucket underneath to catch the water. Unscrew the fittings on the top and bottom of the trap. Remove the trap and clean it out. An old toothbrush is perfect. Clean out the surrounding pipes. Put it back together. A plumbing company such as Red Dog knows all about unblocking drains so if you are not confident taking apart the pipes in the drain, it may be worth hiring a professional. 7. DIY Clog-removing Recipes: You may actually have a few things in your pantry that can be used to clear up clogged drains. Here a few different ideas that you can try before calling a plumber. Mix salt and baking soda: Combine equal parts of salt and baking soda, maybe a half-cup of each. Pour it directly into the clogged drain, and let it sit for a few minutes. The salt and baking soda will settle on the clog and start to eat away at parts of it. Then, pour boiling water down the drain. If there is standing water in the sink, you can also include plunging the drain in the process to get things moving around. Combine baking soda and vinegar: Mix together equal parts of white vinegar and baking soda, maybe a half-cup of each. Stand over the sink when you mix them. The reaction of the two substances will result in an almost immediate fizz. Pour everything down the drain. This one is best to let sit for a few hours or overnight. Afterward, try rinsing the drain with hot water. Sodium Hydroxide: More commonly known as caustic soda, you can find it at your local hardware store if you don't already have it on hand. You will mix 3 cups of soda with about a gallon of water. The mixture will get warmer and begin to fizz. Pour all of it directly into the drain. Wait for a half-hour or so, and pour boiling water down the drain. If it seems a little better, but still draining slowly, you can repeat the process. Unfortunately, some clogs are either too deep or too intense for any of these home remedies. If you've tried everything, and you just can't seem to get that clog cleared on your own, give Brisbane Drain Cleaning by Conrad Martens a call today. Our team of dedicated service professionals will quickly assess your individual circumstances and easily get your drains cleared. Let us show you have we've built our reputation of providing dependable service focused on quality of workmanship to the entire Brisbane area since 1982. Read Also: 8 Plumbing Myths Busted 3 Reasons Why Business Organizations Need To Get The Drains Cleaned Regularly

READ MOREDetails
8 Plumbing Myths Busted

8 Plumbing Myths Busted

Plumbing is an essential part of any home although it is something that most would pay attention to if something goes wrong. Ranging from leaks to busted garbage disposals, folks turn to temporary measures to address the problem and only call the professional plumbers once all else fails. Aware of the multiple problems plumbing fixtures can cause, some household employ maintenance beliefs that have proven not to be entirely effective. Folks have been left under the impression that several of them actually improve their piping and fixtures but conversely cause more harm than good. That said, below are some of the mythical stuff tied up to plumbing. Some may make sense although they do carry consequences that can be good or bad. 1. Placing bricks in the toilet to conserve water : Making sure that the toilet properly functions is a must to ensure that water is not wasted. This includes making sure that the stopper closes properly to avoid water from continuously flowing. The amount of water that goes through it is key. So would having less stored water be equivalent to savings? Using logic, it does make a bit of sense although it alters the proper water stored in the tank. Also, a brick dilapidates over time. At some point, it could affect parts of a toilet and end up wasting more water and money. 2. Limiting a dripping faucet prevents water bill from escalating : A drip may not matter much but it does translate to unwanted expenses. Some have toyed with the notion that wrapping a piece of cloth or sticking a small piece of wood to somehow clog and lessen water that goes down could save some cents. Small or not, such does not address the problem. The fact here is that unless a plumber actually stops the drip or leak, money is wasted. 3. Plumbing can be a simple DIY job : Again, this belief is a temporary solution. Some could change faucets or pipes although some of the little things are overlooked. One example is the placement of Teflon to make sure that water does not seep through. Leaks may not show at first but eventually will due to continuous usage and fixture depreciation. 4. Flushable Wipes pose no threat : There are some who claim that wipes are flushable. But the fact here is that they are still solid. Some assume that being branded as septic-safe translates to them being biodegradable. The truth is that despite those claims, they cause clogging just the same. Hence, the best way is to dispose of them the traditional way – that is through the waste can and not down the drain. 5. Flushing dead goldfish is safe : Folks who take care of pet fish often find themselves wondering how to dispose of them. The common way for most is to flush them down the toilet. However, this is provided that they are really dead. Flushing living fish down while they are alive could lead to dire consequences such as affecting the eco-system which could end up being contaminated by them. 6. Plungers may not always save the day : When clogs occur, the simple recourse is to use a plunger to free up the drain. It does resolve the problem at first but there is that chance that the blockage may get worse. Should recurring clogging happen, it would be best to seek the help of a professional plumber? Besides, it takes the stress and worries away once the actual reason for the clog is addressed right? 7. Egg shells or Ice cubes can sharpen garbage disposal blades : Most believe that throwing down ice cubes or eggshells can benefit from a garbage disposal. However, this does not include sharpening them. Rather, ice cubes and/or eggshells can help resolve the bad odor garbage disposal may give out. But as far as sharpening the blades, this does not follow. 8. Pouring grease down the drain is helpful with boiling water : There are certain forms of liquids that can be poured down the drain and some that should not. Grease or fats are one of the most common ones that are discouraged since they would end up clogging the pipes. Although most are aware, adding some boiling water has led most to believe that clogged drains would be avoided. But the truth is that grease or any fat-containing liquid will compromise any sink. Boiling water does not really help meaning grease and other fatty substances should be disposed of using the trash bin and not through sinks. There are plenty other plumbing myths going around such as a rumbling heater that could end up exploding or using lemon peels to freshen up stinky disposals. Like most of the enumerated ones above, they are either temporary measures or things that could lead to disaster, leaving most to possibly face higher repair costs than average. When any plumbing related problem occurs, it would be best to call the pros for best (and reasonable) results. Some claim that they are never around when you need them, probably a reason why most should have their plumbing checked regularly – regardless if there are signs of issues or not. Read Also : Mirror Decorating Ideas To Style Your Bathroom Best Ways To Maintain A Shower Cabin 5 Easy Ways To Detect A Water Leak In Your Home

READ MOREDetails
Tiny Homes

5 Things You Should Know About Heating and Cooling Tiny Homes

Tiny homes are small-scale houses meant for simple living with a smaller carbon footprint. Tiny houses have special considerations because of limited space, especially concerning heating, ventilation, and air conditioning (HVAC). Here are some critical points for heating and cooling of a tiny home. Different Ways Your Tiny Homes Can Help You In Heating & Cooling    Make use of the tiny homes that can help you to achieve your heating and cooling in the correct order. Try to make use of the best Tiny homes that can help you in that.   How Much Heating and Cooling Is Needed? Heating a home of any size requires knowledge of heating systems. British Thermal Units (BTU) measures the energy it takes to raise the temperature of a pound of water by 1 degree Fahrenheit. It is used for heating and cooling, so calculate the BTUs of the home, and move on to heating and cooling options. Online calculators provide the BTU for your space, allowing you to make the best and most energy-efficient choice. Off the Grid or On? Another consideration for a tiny-home living is energy. Is the home tied to local utilities, or is it off the grid with its source of energy coming through solar or wind power? It's important to look at the needs and the amount of energy available in the house before looking at heating and cooling units. Heating Options Half splints are a solid choice for homes tied to the grid. These units provide both heating and cooling options and mount outside the home with professional installation. Consider the climate as these units struggle when temperatures drop under minus 5 degrees Fahrenheit. You don't want to service your unit in the dead of winter. Radiant floor mats are another option that saves space, warming the floor throughout the home. Electrical floor heaters are an affordable solution, allowing you to move the unit wherever it is needed. Homes off the grid may also use basic heating like wood stoves and propane heaters. Cooling Options Cooling options also include mini splints. These convenient HVAC units blend seamlessly into the home interior but do require professional installation. Roof-mounted AC units, like the ones seen on RVs, are another option. So long as the roof is flat, this option even allows minimal ductwork throughout the home. Packaged terminal air conditioners are those seen in hotel rooms, usually under the windows. This option is both more expensive and takes up prime real estate in a small home. Window AC units are budget-friendly and don't require professional installation. Depending on the heat extremes of the area, floor and desk fans are relatively inexpensive and adaptable. Ceiling fans are another choice, depending on the layout of the home, especially the height of the ceiling. Logistics for Temperature Management Weather extremes dictate the needs and options for heating, ventilation, and air conditioning (HVAC) of the home. A home in the Pacific Northwest can get away with a few desk fans during the summer, while in the desert of the Southwest, a house needs more powerful cooling. Owners of small homes usually look for highly efficient units to cool and heat the home with the least amount of energy necessary. Tiny homes allow minimal living, paring everything down to the bare essentials. Small-home living does not mean discomfort, as heating and cooling units create the perfect living space. Once you know the BTUs of the home, the climate of the area, and your utility considerations, deciding on which unit meets your needs is relatively simple. Read Also: 5 Features That Any Heating Service Should Have! Interiors To Reduce The Heat Build-Up In Your Homes 7 Specifications You Should Look For When Buying A Home Generator Don’t Get Caught In A Heatwave: 5 Signs That Your AC Is About To Go Out

READ MOREDetails