Things to Consider While Choosing Data Recovery Software

Published on: 27 December 2018 Last Updated on: 31 October 2024
Data Recovery Software

Choosing the best data recovery software can be a complicated task to do due to the similar services and features offered. The best way is by finding the reference and then comparing the services and features. While comparing the software, you can relate them with the important keys below.

Try to Get Software which Able to Recover Lost Data Caused by Any Problems:

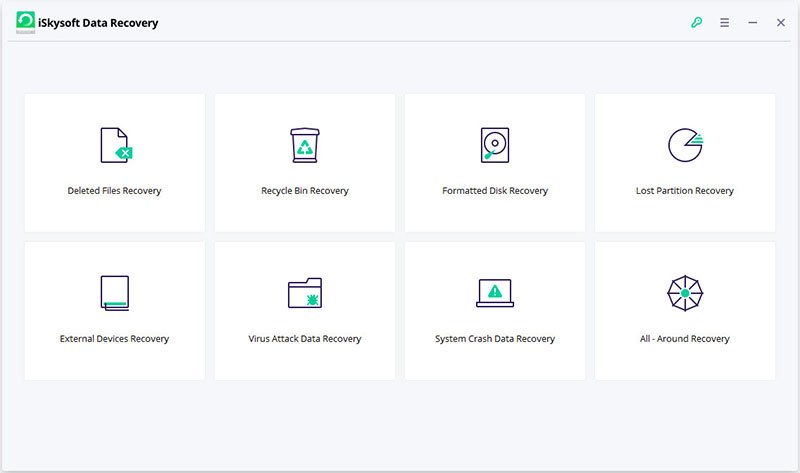
When you are comparing the software, try to find whether the software is able to recover lost data by any causes or not, especially the one that you need to get your data back safely. This is also because there are many possibilities of why the data is lost or deleted. The data can be deleted because you want to delete it, removed by the Recycle Bin system, formatted system, system crash, virus attack, and lost partition. If the software is able to solve your problems, you can take it on your list. iSkysoft data recovery software can be included on the list because this data recovery software is able to solve your lost data problems.

Try to Get Software which Able to Recover A Variety of File Formats:

Your data consist of a variety of formats and some formats are hard to recover sometimes if it is lost or deleted. The solution of this problem is by finding a data recovery software which can recover any file formats from PDF, Doc, Docx, JPG, MP4, and MPEG to EML, DLL, CWK, XCF, FLV, and many others. As the result, the software helps to get any deleted and lost data in the form of a document, photos, video, audio, email, and other files. One of the reasons why iSkysoft data recovery software is included on the reference is because the software is compatible with those file formats and it means it reaches your achievement to get lost data back safely.

Try to Get Software which Able to Recover Data from Any Storage Device:

This is also an important consideration while finding data recovery software because you must have some devices to save data. It will be hard if you have to find a different tool for a different device when you lost the data. What you need is an all in one data recovery software which able to recover data from computer and any storage device. It hopes by using the software you can take the lost data no matter what the storage devices are including music player, digital camera, camcorder, or anything you have now.

Try to Get Software which Able to Repair the Crash System:

Sometimes, you face a worse condition where you are not only losing data but also the PC or computer because of a system crash. The good news, there is data recovery software which designed not only recovering lost data but also repairing the system crash. Just find out such software to solve your problem right way. As the result, you are not only repairing the PC system but also getting your lost data back. iSkysoft data recovery software is developed with the ability to repair a computer system crash problem. The software helps to create Windows Preinstallation Environment bootable media so you get access to the PC and the data back.

Try to Get Software which Supports A Variety of Systems:

You must have some devices in different operating systems. Due to this condition, you also need to find data recovery software which can support a variety of systems. Let say, the software has to be compatible with some popular Windows Operating System such as Windows 10, Windows 8.1, Windows 8, Windows 7, Windows Vista, and Windows XP. Moreover, the software also has to be suitable for Mac OS including Mojave, High Sierra, Sierra, El Capitan, Yosemite, and Maverick. If you read the detail of iSkysoft data recovery software, you might think that this software is suitable to solve your problem because it supports the operating systems above.

Follow the list above while finding the best data recovery software so you will not get lost and use the wrong software. The most important, the software can really solve your problem by taking your lost data back safely and repair the PC system. iSkysoft data recovery software meets the classification above because the software is not only used to recover data from the computer and any storage device, but it also used to repair the system. Even, there is a specific tool namely iSkysoft toolbox which able to boost the performance of mobile phone devices.

Summary: This article explains the things to consider when you are looking for the best data recovery software.

Read Also:

Featured Imageiskysoft.com

Content Rally wrapped around an online publication where you can publish your own intellectuals. It is a publishing platform designed to make great stories by content creators. This is your era, your place to be online. So come forward share your views, thoughts and ideas via Content Rally.

View all posts

Leave a Reply

Your email address will not be published. Required fields are marked *

Related

audio renderer error

How To Fix Audio Renderer Error In Windows 10

Are you getting an “audio renderer error, please restart your computer” error message in your Windows 10 system? In case you still have not restarted your computer, then you can start by clearing your browser cache. And then restart your computer. If the audio renderer error on YouTube still persists, there are several other tactics or troubleshooting steps that you can try to eliminate this issue. Causes Of Audio Renderer Errors Here are different reasons why you might face audio renderer Errors – Driver Issues One of the reasons why you face audio renderer errors is because the driver is getting corrupted or outdated. When the drivers aren’t working properly, it can cause communication errors Between the hardware and the operating system. Most users report that updating the drivers or rolling them back often resolves the issue. Hardware Conflicts Hardware complex can also cause the audio devices to Trigger these errors. Got example would be when a computer has both the headphones and the speakers connected. This can cause a struggle within the computer to determine which device should deliver the output. In this case, it's best to disconnect one of the devices. Software Conflicts The software conflicts in the computer can also interfere with the audio playback. This happens when the web computer has installed different extensions or third-party audio and has enhancement tools. Sometimes, the system updates also in advertently affect the audio setting, causing conflict within the software and audio rendering processes. Updating Windows Operating System Sometimes, updating the Windows operating system can also disturb the existing audio on the favorite configuration, leading to audio issues. In many cases, it's best to check if the audio is working after major operating system updates. Corrupted Systems Corrupted system files can also lead to audio-rendered errors. It's best to run system file checks for or troubleshoot utilities to identify and solve these issues. Fixing Audio Renderer Error In Windows 10 Here are the ways to techniques that will help you fix the YouTube audio renderer error in Windows 10. If you are getting no sound on YouTube Windows 10, you should definitely try these steps and check whether the issue is solved or staying. 1. Replug Or Unplug The Sound Device In case you have any external wired audio device connected with your system, like a pair of earphones, headphones, or speakers, then unplug the device and start the youtube video. If the audio is playing, then connect the device again and check for the issue. Sometimes, when you connect too many external devices to your computer, this audio renderer error may occur. At that time, connect only the default audio device and disconnect the rest to solve the issue. If this error is still showing, try the next suggestion. 2. Close The Audio Mixing programs Audio mixing programs, like Mixcraft, often take exclusive control of your system’s audio drivers and prevent your browser from using them. In case you have a program like this, and it is running in the background before you start watching Youtube, completely exit the program. On the other hand, you also can prevent those programs from taking control of your audio devices. For example, let’s go through the steps for Mixcraft. Open File. Go to Preferences. Go to Sound Device. Search for Exclusive Mode. Now, uncheck the box or turn off the switch. 3. Disable And Enable Sound Devices While trying to fic audio renderer error in Windows 10, you can disable and then again enable sound devices to fix the issue. Here are the steps to do that.  Right-click on the Start Button. Now select the Device Manager. Expand the option Audio inputs and outputs. Now, right-click on your default audio device name. Suppose you are unable to figure out where to click, as there are a lot of options. Right-click on the volume icon. Choose Disable device. Select the Yes option to confirm. Again, right-click the Audio device. Now, Enable the device. 4. Run The Audio Troubleshooter Now you have done with the three fixing techniques, but the audio renderer error is still there. You can try to fix the issue by using the audio troubleshooter in your Windows 10 system. It will not only be able to detect the underlying problems but also help to fix the issue. Follow the below steps to do that. Open the Start menu. Now, type troubleshoot settings. Now select Open. Select the option named Additional Troubleshooters. Select Playing Audio. Now select Run the troubleshooter. Now follow the on-screen suggestions or instructions to solve the issue of the YouTube sound cutting out. 5. Rollback Audio Drivers Are you facing the audio renderer error just after updating any sound card or audio playback device-related driver? If yes, then try rolling them back. But in case there is no update, you can not try to roll back them. Audio Playback Device Right-click the Start button. Select Device Manager. Expand the option Audio inputs and outputs. Now, right-click on your default audio device name. Choose Properties. Switch to the tab named Driver. Now select Roll Back Driver. Audio Card Drivers Open the Device Manager. Expand the options for Sound, videos, and game controllers. Right-click on the Audio card driver. Now select Properties. Switch to the tab named Driver. Then Select Roll Back Driver. In case you are multiple audio drivers, repeat steps 2 to 4. 6. Update Audio Drivers What if you can not rollback your audio drivers to fix the audio renderer error issue? You can try updating them instead. Audio Playback Device Right-click the Start button. Select Device Manager. Expand the option Audio inputs and outputs. Right-click on the default output device. Choose the Update driver. Select the option named Search automatically for drivers. Now apply the last driver updates if you get the option. Audio Card Drivers Open Device Manager. Expand the option Sound, videos and game controllers. Right-click on the Sound card driver. Select the Update Driver. In case you see multiple devices, repeat the third and fourth steps.  7. Update Windows 10 An outdated system often becomes the reason for many technical glitches and abnormalities to crop up. Updating your Windows 10 may eliminate the audio renderer error. So, update it now. Open the Start menu. Now type there Windows Update. Hit Enter. Now select Check for updates. If any update is available, install it. Just below the Check for Updates option, there will be another option named Optional Updates. Select it in order to install any updates related to audio. Update Web Browser An outdated web browser can also be the main reason behind audio renderer errors. Though popular web browsers such as Firefox and Chrome are designed for automatic updates, there is no harm in double-checking. And if there is, any update is available. Install it. 8. Disable Hardware Acceleration Hardware acceleration is used by your browser in order to speed up things. But this feature also can cause audio renderer errors in Windows 10. So, you can disable hardware acceleration to avoid this issue. Google Chrome Open the Chrome menu. Select Settings. Expand Advanced. Choose System. Search for Use hardware acceleration when available. Turn the switch off. Mozilla Firefox Open the Firefox menu. Select Settings. Scroll the General tab down. Search for the Performance section. Search for Use hardware acceleration when available. Uncheck the box. Final Tips All the tactics that are mentioned above are more than enough to solve the audio renderer error in Windows 10. But if it persists, you also can update the bios and check whether the issue is solved or not. If you have any other technique to solve this issue, you can share that with our readers. Read Also: How Many Jobs Are Available In Real Estate Investment Trusts? 2021 How to Download Game Of Thrones Putlocker Online for Free? How to Plant Grass Seed on Hard Dirt? – Latest Update 2021  

READ MOREDetails
Commercial Boiler

How Servicing for Your Commercial Boiler Works

If you have a business, you could be making use of a commercial boiler. A commercial boiler would often be classified as such if the unit has a power rating of 70kW and above, and if your boiler unit produces this much power, then it is already categorized as a commercial boiler. You should also know that your commercial boiler needs to be regularly serviced by a professional. With regular boiler servicing, you can be sure that your property will not have any disruptions due to boiler issues, and you will not be left with more expenses in the end. But there is also a proper way to have your boiler serviced. First of all, it needs to be done by someone who is aptly qualified, such as an engineer who has a Gas Safety card. You should check that they have the right qualifications and can do commercial boiler checks and inspections. But when you have your commercial boiler serviced, here's how a proper inspection should be done. Step 1: a visual check: The technician should check that the pipework of your boiler, as well as your flue and the actual boiler, are correctly installed, and they should do a visual check of both the external and internal components as well. The technician should also check for the right ventilation as well as do a visual inspection of the flame and check for any signs of leaks or corrosion. Since you are operating a commercial boiler, they should also check that it follows regulations for non-domestic property. These regulations include gas safety rules as well as building regulations, by-laws for water, and European and British standards as well. Step 2: a check of components: The engineer or technician should then remove the casing of the boiler and inspect each internal element or component. Some parts which need to be inspected by the engineer include the gas flow and pressure, the combustion and flue, the heat exchanger, the burner, the main injector, the electrical connections, the spark probe, the seals and fans, the electrodes, the condensate pipe and trap, and the safety components or devices. After this, the engineer should clean the boiler’s insides to remove any blockage or debris. Step 3: the tests: The engineer should then perform tests to check that the boiler is functioning correctly according to Gas Safety regulations for installation and use. If any issues are found (e.g. gas leaks, faults, and parts which are damaged), the engineer should make a note of this in the report. Step 4: the report: Once they have thoroughly inspected the boiler and all its components, the engineer should give you a report of their findings and the process and checks they made, as confirmed by an experienced commercial gas engineer in north London. If there is an issue, it should also be in the report, particularly if it involves replacement or repair. If your boiler violates any regulations pertaining to Gas Safety or building regulations, the engineer should include this in the report as well. It is essential that you ask as many questions as you can and voice any of your concerns while the gas engineer is there. This is your chance to ask for guidance and advice as well – it is, after all, your business property, and by taking advantage of a full check and inspection, you are adequately protecting your assets too. Read Also: How To Become A Certified HVAC Technician In Canada 13 Ways To Maintain The Coolness Of Your Air Condition Unit

READ MOREDetails
Video Interview

6 Things You Must Do to Prepare for a Video Interview

Video interviews can be nerve-racking especially if you are meeting the interviewer for the first time. Video interviews are more cost-effective, easier, and faster than a long phone call or in-person meeting. No wonder most organizations are using them to make hiring decisions among other job-related functions. Here are some of the tips that will increase your chances of success during video interviews. 1. Double-Check Your Internet Connection, Video, and Audio: You should always test your audio and video to make sure that everything is working well before the interview. The fact that it worked two weeks ago is not a guarantee that it will work properly today. No one wants to risk the embarrassment or headache of technological issues while conversing with a potential employer. Also, confirm that you have a stable wireless connection. Therefore, select a location where spotty connections will not disrupt your video conversation. 2. Choose a Background That is Free from Distractions: You have to make sure that you entirely focus on the face and what you will be saying during the interview. Therefore, choose a business-like background that is free of any distractions. Avoid windows and walls that are full of decorations, posters, and pictures. Clutter off your desk and clear all the books. The most important thing is to eliminate those things that can draw away the attention of the interviewer from you. If you cannot get an excellent background at your home or office, it is wise to use a solid wall. The guiding principle is to hold your video interview in a sterile and clean environment. Communicate on a human level so that the interviewers will find it easy to talk to you. There is nothing glorious about this as what they are doing it to talk with you. 3. Lit the Room Well: You have to make sure that the interviewer will see you clearly by paying close attention to the lighting. The interviewers should look at your face clearly, and hence you need to test the video beforehand so that lights don’t cast any shadows on your face. The challenge of having a single overhead light shining down from the ceiling is that it can be unflattering and create shadows.  Try to have one light emanating from behind you and one on the left to create a glow around your body. 4. Eye and Angle Contact Are Critical: You have to pay close attention to the place you look during the interview. Several people are thrown off especially if you are used to video interviews. The experience may not feel natural from the onset, and you may want to talk to the camera and not the screen. The position of the camera should always be at an eye level and not below or above you. The angle of the camera is so critical because the camera should not look down at you and you don’t want to look up your nose. Therefore, make sure that the position of the camera is okay. 5. Dress for the Interview: you need to groom yourself depending on the kind of interview you are attending. Remember presentation is critical and you should not overlook this idea because you are talking on video. Dress as if you are attending a face-to-face interview. The wrong dressing will also reflect in your speech and attitude. The interviewer will look at all aspects of a good candidate and dressing is one of them. 6. Maintain an Open Body Language: Like in-person interviews, its critical to be cognizant of the body language so that you can leave a positive impression on the interviewer.  It’s a good practice to gesture while speaking but remember to contain the movement of your hands and also within the video frame. Remember gestures may not translate over video in the same way in-person interviews do. With these tips, you are prepared to handle any video interview. The most important thing is to prepare well, and you will increase your chances of success. Read Also: Traditional Job Interviews Will Be Dead By 2020 Ten Interview Tips That Might Surprise You: The Medical Edition

READ MOREDetails