Published on: 20 February 2021
Last Updated on: 26 December 2024
Steam is a well-known name in the video gaming industry. It is a social gaming website, which allows you to play, buy, and discuss games. If you are using steam for some time, then there is a lot to know about it. Have you ever faced the Steam disk write error? Are you looking for the solution to Steam disk write error windows 10? Are you unable to solve the issue? This article will help you with multiple solutions in order to remove the error. Go through the steps and enjoy an interruption-free gaming experience.
What Is The Steam Disk Write Error?
While you are updating or downloading any game you bought from the Steam Platform, you may face the Steam disk write error. At the time you are attempting to download or install a new game, this message can appear on the screen. You also can face the same issue when you are trying to update a game that you have installed earlier. In case your game needs an update, at the time of launching the game, the screen will show this error.
Reason For Steam Disk Write Error?
Whenever Steam is not able to download and save the data of the game to the storage drive of your computer during a new installation or an update. One of the messages mentioned below will appear on the screen,
Any error occurred at the time of updating the game_title
Any error occurred at the time of installing game_title
The steam disk write error can happen, when
There are no defects on the hard drive.
The Steam folder or drive is write-protected.
There are outdated or steam corrupt disk files in the Steam directory.
Your firewall or antivirus is blocking Steam from saving and downloading data.
Fixing Steam Disk Write Error
If you have encountered the steam error while downloading, error while installing, updating, or launching the Steam game and want to know the ways of fixing disk write error steam, here are the answers
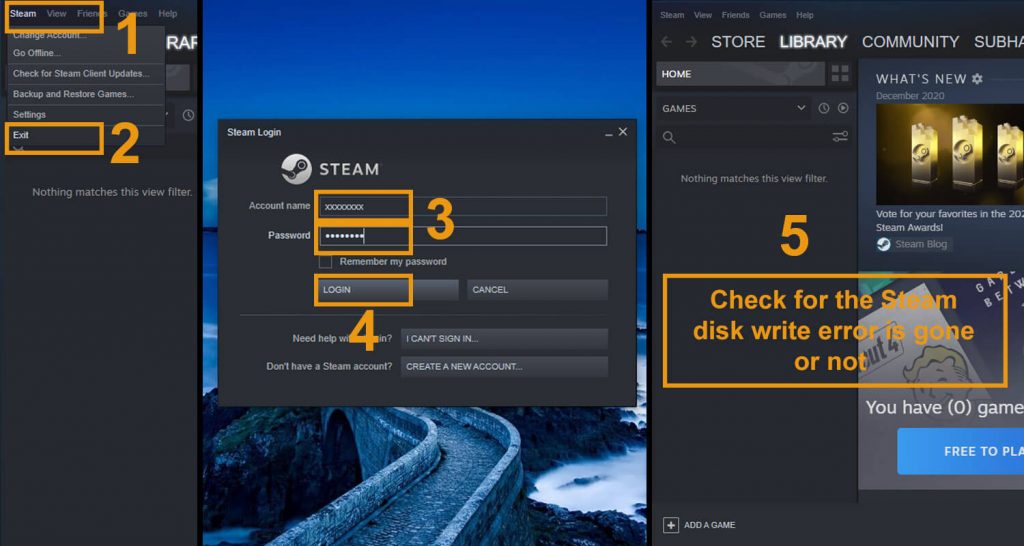
#1. Restart The Steam
Open the Steam window
Click the word “Steam” on the top-left corner
The Dropdown menu will open
For Windows, click on “Exit,” and for Mac, click on “Quit Steam.”
Again open Steam.
In case you have been logged out, log in another time
Check for the Steam disk write error is gone or not
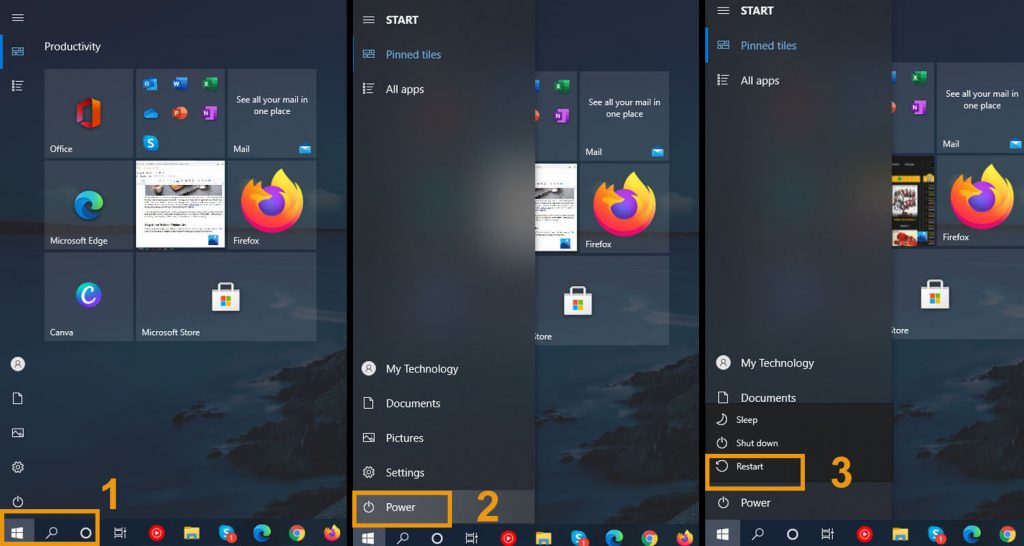
#2. Restart Your PC
Click on the start icon
Power Icon
Restart
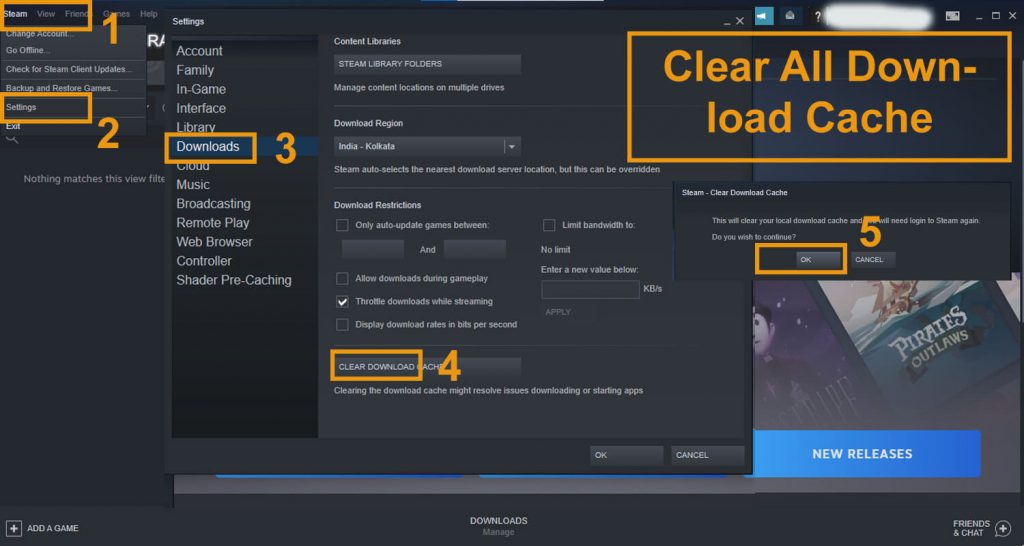
#3. Clear All Download Cache
Open steam
Go to “settings.”
Click on “downloads.”
Select the option “clear download cache.”
Reopen and check if it is working or not
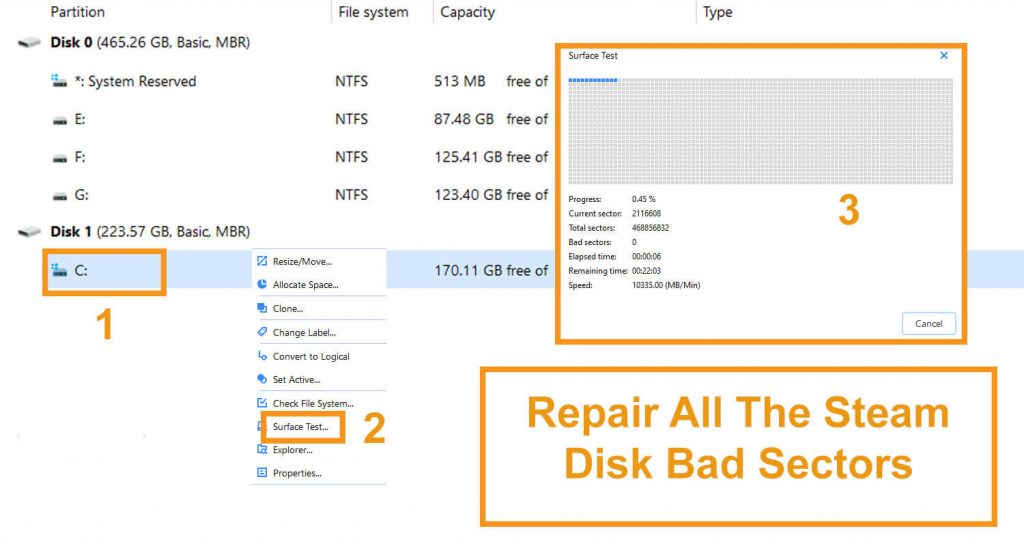
#4. Repair All The Steam Disk Bad Sectors
EaseUS Partition Master to check bad sector
Install it
Click on the disk which you want to check
Click “surface test.”
It will red mark the bad sectors.
In case of any error, it is a good idea to replace the drive or clone it to another HDD apart from the steam disk write error SSD. You can take help from EaseUS Partition Master to replace the failing disk.
After opening the EaseUS Partition Master, select the disk, which you want to clone.
Click on “Clone”
Select your destination or SSD/HDD whenever you want to clone it
Click on “Next”
Click on “Continue” to wipe out all data. If you have any valuable data, take a backup of it.
Click on “Autofit the desk” or “Edit disk layout” or “Clone as the source.”
Click on “Execute the operation.”
Click on “Apply” to solve the steam disk write error
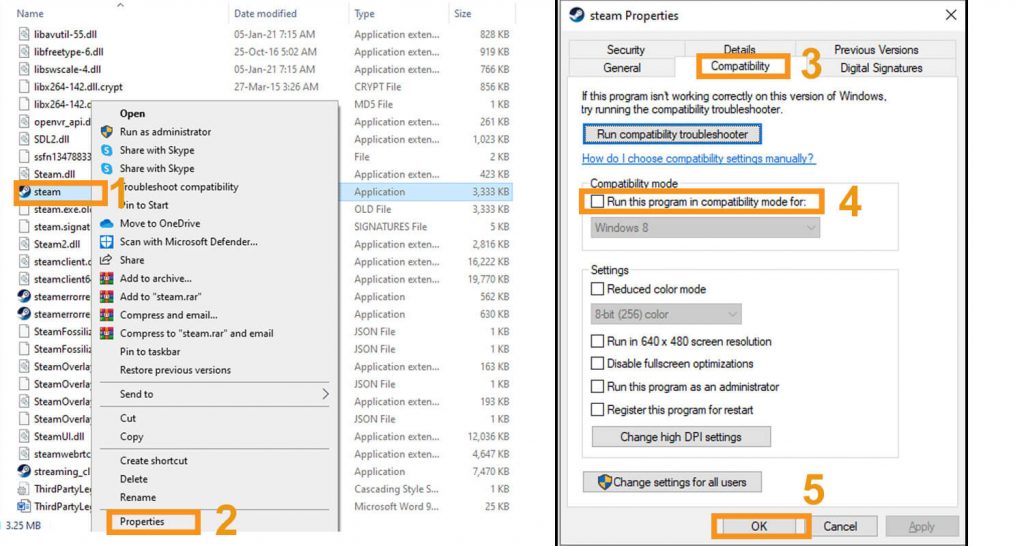
#5. Run As Administrator
Go to your Steam folder
Right-click on “Steam.exe”
Click on “Properties”
Select the tab named “Compatibility.”
Click in “Run this program as an administrator.”
Click on “Apply” then “OK.”
See whether the Steam disk write error is solved or not
#6. Move The Game Folder
Sometimes transferring the game to a healthy drive can solve the issue. But here, manual transferring will not work. You can use EaseUS Todo PCTrans for transferring the file.
Connect your computer with the destination drive
Select the games that you want to transfer
Now transfer them to the destination drive
#7. Confirm Integrity For Steam Game Files
Reboot the system
Launch Steam
Click on the “Library” tab
Right-click on the game that is causing the error
Select “Properties”
Click on the “Local Files” tab
Click on the “Verify Integrity Of Game Files…..” button
It will take some time to verify the game files
Once the verification is done, try to install the updates and see if the Steam disk write error is showing or not.
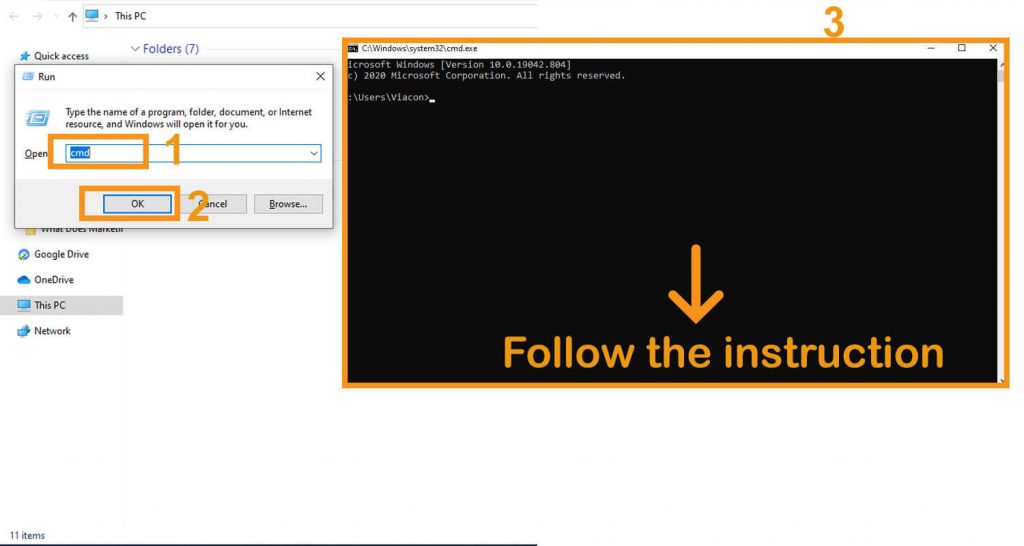
#8. Remove The Write Protection From The Steam Drive For Steam Disk Write Error
Press “Win + R.”
Type cmd
Command Prompt will open.
Type “disk part” there
Press “Enter”
Type “list disk.”
Press “Enter”
Type “select disk 0.”
Press “Enter”
Type “attribute disk clear read-only.”
Press “Enter”
After the write protection process is done, type “Exit.”
Press “Enter”
The disk part window will close.
#9. Some Other Fixes Of Steam Disk Write Error
Apart from all the steps mentioned earlier or techniques, there are two more ways to eliminate the Steam disk write error. You can uninstall Steam and reinstall it. In order to uninstall
Go to “Control panel.”
Open “Add or Remove programs.”
Search for Steam and select it
Click on the “Remove”
After selecting the automatic option, click on “Next.”
Click “Finish”
Once the uninstallation is completed, you can install it again. For installing Steam, follow the below steps.
After the download is completed, click on “Open” or “Run.”
Follow the on-screen instruction to install Steam.
Open steam and log in.
Final Talk
Though you have tried and everything to resolve the issue, it is not working. You can seek help from Steam’s official support. Opt for the Steam support team. You also can visit the community forum of Steam for any further or additional help. Apart from the above-mentioned nine solutions of steam disk write error, if you know any other practical solution, do let us know.
Mashum Mollah is the feature writer of Search Engine Magazine and an SEO Analyst at Real Wealth Business. Over the last 3 years, He has successfully developed and implemented online marketing, SEO, and conversion campaigns for 50+ businesses of all sizes. He is the co-founder of Social Media Magazine.
It appears to be all over the internet suddenly. ChatGPT aces are legal and medical exams. ChatGPT simplifies homework completion and learning. While completely rebuilding industries, ChatGPT is revolutionizing production processes.
Although ChatGPT is capable of writing songs, poems, and movie scripts, it learns its tricks from humans. Given what it can do, ChatGPT has undoubtedly been making waves over the past few weeks.
Even though this artificial intelligence (AI) tool is not new, its capabilities still represent a revolutionary leap in technology.
Furthermore, it's not a passing fad either; Microsoft, the world's largest tech company, invested $10 billion (R173 billion) in OpenAI, the startup that created ChatGPT and is integrating the technology into a number of its products, including Microsoft Teams and the search engine Bing. So, who owns Chat GPT?
Overview: Who Invented ChatGPT
Image Source: media.bizj.us
Though ChatGPT is currently gaining a lot of attention, we shouldn't overlook the unsung genius that created it. Meet the brains behind the machine, Ilya Sutskever.
He is a pioneer in the area of artificial intelligence and has significantly influenced the state of the field today. He also keeps pushing the limits of machine learning.
Sutskever is the Chief Scientist and Co-Founder of OpenAI. It is a research group committed to the safe and responsible advancement of artificial intelligence. The company has advanced the field of artificial intelligence and developed state-of-the-art technologies under his direction.
This article will examine his development from an early researcher to a prominent figure in the artificial intelligence community. Whether you are a researcher, an enthusiast, or just interested in learning more, this article will undoubtedly provide you with useful knowledge and insights.
Who Owns Chat GPT?
On November 30, 22, Sutskever assisted in the launch of ChatGPT, a popular messaging app that attracted one million users in just five days.
One of ChatGPT's primary functions is its ability to comprehend the context of a conversation and generate pertinent responses. The bot retains the thread of your conversation and uses the questions and answers from earlier exchanges to inform its next responses.
As opposed to other chatbots, which can generate pre-programmed responses, ChatGPT has the ability to offer responses instantly. It enables it to engage in more engaging and diverse dialogues.
Elon Musk, who was one of the founders of OpenAI, said, “ChatGPT is scary good. We are not far from dangerously strong AI.”
Ilya Sutskever's revolutionary research in artificial intelligence has altered the direction of the field, driven by his passion for the field. His contributions to machine learning and deep learning have advanced the field's state of the art and shaped its future course.
Who Owns Chat GPT: What Is Next?
Image Source: substack-post-media.s3.amazonaws.com
Sutskever has made the decision to follow his passion and concentrate on his research in spite of many generous financial opportunities; his commitment to his work is an inspiration to all researchers.
We have already started to see Sutskever's influence in our world. But it seems like this is only the beginning.
Early Life
The 37-year-old Russian computer scientist spent the majority of his childhood in Israel before his family moved to Canada when he was a teenager.
The five-year-old son of an engineer, Ilya, claims he was "utterly enchanted" when he saw a computer at an expo he and his father attended.
When he was a teenager, he dreamt of creating computers that could perform tasks that were exclusive to humans. “I felt very strongly that learning was this mysterious thing: humans clearly learn, computers clearly don’t.”
After earning three degrees from the University of Toronto, he co-founded AlexNet, an advanced artificial intelligence system that can recognize and classify images.
Ilya then joined Google and brought a significant update to Google Translate. Then, he was approached to join the OpenAI team.
What Can ChatGPT Do?
It can write lyrics for songs, stanzas for poems, dialogue for screenplays, articles for medical journals, and love letters for Valentine's Day, among other things.
You only need to give ChatGPT instructions to solve math problems and get complex question answers.
Although it's not the original tool of its kind, it's the most user-friendly for typical consumers. You don't need a degree in computer science to use the online artificial intelligence tool developed by OpenAI. It opened to internet users in December of last year via the website chat.openai.com.
It will respond to your inquiry in comprehensible terms. In contrast to a search engine that produces pages and pages of links, ChatGPT will respond in the form of a conversation.
Additionally, it provides simple explanations of concepts; if a concept is too complex, you can instruct it to do so. Although it can't guarantee accuracy, ChatGPT is cautious in its responses.
For instance, if you ask it to write a paragraph titled "Donald J. Trump, the greatest president in the history of the USA," it will say, "I apologize, but making subjective statements is not appropriate."
While many welcome the way technology reduces resentment and boosts output, there will soon be a large number of job losses as a result of it.
ChatGPT Aftermath
AI is replacing white-collar workers. Pengcheng Shi, associate dean of computing and information sciences at Rochester Institute of Technology, says, "I don't think anyone can stop that."
There are also moral dilemmas. When students in the US use ChatGPT to write essays, for instance, they are found to be cheating. The AI's developers have released software that allows teachers to recognize work produced by ChatGPT. But schools in New York have banned the tool.
Bronwyn Hemsley is the head of speech pathology at the University of Technology in Sydney, Australia. He thinks it can benefit people with physical limitations. “What about people with a disability who are disadvantaged in getting a job interview – disadvantaged with having a level playing field because of their writing, spelling or grammar? What if this could be the polishing they need done?”
Wrapping Up
There are already companies that are intelligent beyond human comprehension. For example, the combined power and capabilities of Google exceed those of any individual human. Therefore, there is no reason why a large network of computers would not also be much smarter than humans years or even decades later when supercomputers become smarter than computers; a network of these computers would be extremely intelligent in every sense of the word.
If you have thoughts to share or questions to ask about who owns Chat GPT, please leave a comment below. We would love to hear from you!
Learn More Also:
How Artificial Intelligence Is Helping Banking And Financial Institutions?
Can You Trust Online IQ Testing Platforms For Evaluating Your Intelligence Level?
What Is Business Intelligence And How Modern It Gadgets may Improve Them Effectively?
How to cancel Walmart plus subscription? If this is something that you have been searching for, then you have reached the right place.
What Is Walmart Plus?
Answering the question, “how to cancel Walmart plus?”
Want to know how to unsubscribe from Walmart Plus?
I will teach you the following ways to cancel your Walmart subscription.
How to cancel Walmart Plus online via a web browser
How to cancel Walmart Plus on app
How to cancel Walmart Plus account by phone
How To Cancel Walmart Plus Membership Online Via a Web Browser?
Image Source: techowns.com
Here’s how to cancel Walmart Plus account online using your web browser.
Go to the Walmart website and log in to your account.
Click your name in the top-right corner.
Select Walmart+ from the dropdown menu.
Click Manage membership.
Click Cancel Walmart+ at the bottom of the page.
An easy tip during your free trial period is to wait until the last day to cancel your Walmart membership. The site may offer you an additional 15 days before confirming your cancellation.
If you want to extend your membership, choose the Extend free trial option. If not, choose the Cancel free trial option.
Remember, Walmart will charge your credit or debit card for the membership cost if you don’t cancel your free trial before it ends.
How To Cancel Walmart Subscription On App?
Image Source: techcult.com
Here’s how to cancel a Walmart subscription on the mobile app.
Open the Walmart app on your mobile device and log in to your account.
Tap Pickup and Delivery on the home screen.
Click the menu icon (the three lines) at the top-left corner of your screen.
Choose Walmart+ under Pickups and Deliveries on the window that pops up.
Your account information will appear. Tap Cancel Walmart+ Trial or Account at the bottom of the page.
After confirming your cancellation, Walmart will notify you that you’re no longer a Walmart+ member. You can continue using your benefits until your current pay cycle ends.
Walmart won’t charge you after your Walmart+ account expires, but you can no longer access the benefits of the membership program or subscription service.
How To Cancel Walmart Plus Free Trial Period By Phone?
Image Source: doctorofcredit.com
You can cancel your Walmart Plus free trial or paid membership by calling Walmart Customer Care at (800) 924-9206, available daily from 8 AM to 10 PM CST.
How to Login To Walmart Plus?
Image Source: keepsolid.com
In case you want to log in to Walmart Plus, it is important that you follow these steps.
Visit the Walmart Plus website on your browser.
Click on Start your free 30-day trial.
Enter your email address and click on Continue.
Enter your name and password while signing up and click on Create Account to get some promotional discounts.
Does Wamart Have A Free Trail?
How To Cancel A Walmart Plus Free Trial?
Image Source: i.dansdeals.com
If you are in your trial phase in Walmart plus here are the steps that will help you achieve yours.
1. Navigate to the Walmart website.
2. From the top right corner, click on Hi, [your name] Account.
3. Click on Account from the drop-down menu.
4. From the left pane, click on Walmart+.
5. Select Manage membership.
6. Over the bottom you will have a Cancel Free Trial.
Can You Cancel Walmart Plus Subscription Anytime You Want?
A lot of us like to try out a few things but then want to cancel these subscriptions. The Walmart Plus subscription is no less different than that.
Your Plus subscription can be canceled at any time. Depending on your preference, you can cancel it right away or wait until the end of your pay cycle.
You will not receive a refund for the remaining days if you cancel during the middle of a billing cycle. Consequently, you must plan your cancellation accordingly.
Benefits of A Walmart Plus Subscription
Walmart Plus is close to the top of the list when it comes to perks for subscription services offered by retailers. Customers benefit greatly from it, especially if Walmart is your primary retailer.
Six months of Spotify Premium for free are one of the first benefits you receive. That amounts to a value of $59, which is more than half the annual cost of a Walmart Plus subscription. Video streaming is also included through the Essential plan of Paramount Plus. That is a great deal of diversion stacked on top of the typical advantages. Another advantage is free conveyance from your nearby Walmart store, gave your request is somewhere around $35. You must reserve a time in advance due to some restrictions. With the exception of oversized and Marketplace items, you can also get free shipping. This also includes delivery the same day or the next; ideal for customers who primarily use Walmart for grocery delivery.
Wrapping It Up!
In case you were searching for the answer to how to cancel Walmart Plus, I hope that this article has been of help to you. If there are any other queries related to the same, feel free to let me know. All that you need to do is scroll down till you reach the bottom of the page. Then leave your suggestions and doubts in the comment box below how to cancel walmart plus? - Step by step guide.
Read Also:
Walmart 101: What Is Walmart Neighborhood Market?
Operating Hours: What Time Does Walmart Customer Service Close And Open?
Walmart Pharmacy Hours: What Time Does Walmart Pharmacy Close And Open?
The best routers are always the best option to get secure network connectivity. In 2021 the wireless routers are coming in many varieties and brands. The wireless features are always the best-required features of the routers. As in the modern generations, every gadget needs internet connectivity, software, and applications are becoming the essential part of every gadget.
When you search for the best internet connection provider, the ISP’s names instantly come into your mind. For subscribing to the best ISP. You have to research for days on the internet near me. But after the subscription, if you do not have a good conditioning router. The internet connectivity is lacking the perfection level.
4 Best Wi-Fi Routers In 2021
These types of trouble for routers are common. There is only a single solution to recover the problem is to upgrade your home network. You have to configure a family value device in the network and provide it without the dead spot.
Let’s have a look at the top four best wireless routers for 2021.
1. Compatibale TP-Link Archer AX600
In 2021 not only the roust feature routers are making the difference. Along with the features and the looks, the router’s compatibility issues are always playing significant roles. You are going through many devices features and, at last, can not fix your mind over the product for the compatibility issues.
In the 2021 WIFI, six is the modern and the fastest iteration of Wi-Fi. So you should constantly shift into the Wi-Fi 6 routers. These router’s options are more compatible with smartphones and the iPhone SE. For higher configuration smartphones, you are going to need a more backward compatible connectivity. Your polder gadgets are getting faster when you are using this latest wireless router.
Are you searching for the routers options which give you the maximum transmission speed with the highest range and the lowest latency level? Then take a look at the TP-Link Archer AX6000. And we can guarantee this has the most significant good report from the consumer’s feedback.
2. Budget-Friendly D-Link DIR-867
The next which comes to our popularity list is the D-Link DIR-867.iF you are searching for new wireless well-performing routers. But you have a limited budget. This router option is the best suitable for your choice. The DIR-86 7 is still the best router out of all routers we reviewed. When you are going to compare the work efficiency level and the budget of the routers, you are also going to agree with us.
This router is an outstanding performer for both the qualifying parameters, the high-performance, and the real-world range checks. Moreover, you can enjoy the clock with the highest mean download rates in the 2.4GHz frequency spectrum, which is faster than the other routers.
Even this router owned the 5GHz channel, which is quite a unique feature for any budget-friendly router. And you can see these features here and enjoy faster connectivity without spending a big budget.
3. High Performing Google Wi-Fi
Google Wifi is one of the high performer routers on the list. When you are looking for the mesh router choices, these choices are coming to the top priority list of the users. This powerful, well-performing router is maintaining its standard for the past few years.
The easy configuration part and the speedy connectivity both make these routers competitive. These routers are performing on the basis of the second genre follow-up. The routers are faster and widely used for mesh networking connectivity. The ranges extending features are making the routers unique and attractive for smart speaker users. The attractive features of the routers are you can do the experiment with multiple colors.
It does not support Wi-Fi 6.some of the new cool features are not added to the packages. For example, the package does not include modern WPA3 protection and 4X4 MU-MIMO connections requirements.
4. The Gamers Choice Asus RT-AC86U
For the game enthusiast, faster and robust connectivity is always required. This router choice is pretty tempting for professional gamers. However, when you often find an excellent compatible gaming router for your use, the pocket pinch is very high. Within $200, the router’s choices are very limited. But this 5GHz band Wi-Fi 5 router, the RT-AC86U dual-band router, is the outstanding performer on both ends. You will get a higher connectivity level within the $150 budget.
This is one of the best latency check gaming routers in the market. The lower average ping for hundreds of speed tests makes the router unconditionally well-performing and prioritizes the gamer’s choices. This router is wifi six compatible. You will get many well-performing sophisticated network settings within your package.
Among the dual-band router choices, very few are available within this budget and the features. This is the reason this router is widely prevalent among gamers.
Bottom Line
When you are looking for the best wireless routers often have certain essential features. According to the features and the compatibility issues, the prices and the functionality of the routers will be different. The main target is to get the network connectivity without interruptions. These four are the best available choices for you within your budget.
Read Also:
Quick Ways to Instantly Speed up Your Home PC Network
Fax Over the Internet