


DIY vs Professional Heaters Installation in Fairfax VA
Published on: 26 February 2020
Last Updated on: 29 January 2026

There are several reasons why people choose to take the DIY route to install a new water heater; the number one being financial constraints. However, you may want to give it a second thought and consider hiring a professional heaters installation for the same.
Hot water is considered to be one of the basic necessities for any home. And having the water heater installed correctly is a crucial requirement to have peace of mind in the long-run. Installing it yourself may seem like an easy task at first; however, without proper knowledge, experience and/or training, the same can rather be dangerous.
In addition to this, if you are looking to install a gas water heater, even a minor mistake can cause serious damage to your property and may even cost you your own life. Taking other factors into consideration; hiring a professional heaters installation to install your water heater would be a better option any day. You can read more about the importance of hiring a licensed plumber here.


Popular

Technologies For Creating A Startup Idea
20 Feb 2023

How to Download Facebook Videos on Android?
07 Feb 2019

7 Rules of Effective Ecommerce Web Design
28 Jan 2021

Why Are Online Transactions Convenient?
07 Dec 2023

Recent
Related

Beautify Your Place With This Green Neon Painting Sign
A neon painting sign is attractive lighting that you can use for your home, business, or event. It has built-in tubes containing neon gas and electrodes. These signs help to add lights and colors to any space. Many people are already using LED green neon signs as they are better than another lighting. These signs come in various designs and shapes. You can also personalize a neon light sign as per your preference. Sometimes, finding the best design of a neon painting sign is tough. So, in this article, we will tell you about a neon sign painting of a leaf, so keep reading: What New About Neon Leaf Light? Neon leaf lights are the beautiful green neon painting sign that has a design of a ficus plant. This neon light is perfect for use at your home or plant nursery. It has an attractive design and it glows in green color. This green neon light sign will make your mood good during stressful times. LED backlights and PVC tubing are used for making neon leaf lights. The neon lights are lightweight and also use less energy. You can easily mount or hang this neon light on the wall of your maintenance room or bedroom. This super bright neon light comes with pre-drilled holes and acrylic backing. You can also control the lighting of this sign with remote control. It also has a 6ft long cord, 3ft long cable with a wall plug and switch. Leaf Painting neon light is available to purchase on Echo Neon. 5 Benefits Of This Green Neon Painting Sign You will get many advantages after using this super bright neon light at your home or plant nursery. Below you can check the reasons for using this green neon painting sign: 1. Best For Home Decor Neon leaf light is perfect for home decor. This light will add brightness and color to your space. It will also make your home look unique. So, this green neon light is best to use at home. 2. Use Less Energy Neon leaf light has LED lights that use less energy. It is not like the traditional signs that use more energy and also create noise. You will not face any problem with the leaf design neon painting sign. 3. Safe To Use This green neon painting sign is safe to use as it does not contain harmful gases like the traditional signs. This neon light has LED lights with PVC tubing, so the build quality of this type of neon light is best. 4. Affordable Neon leaf light is affordable than other types of neon painting signs. It requires less maintenance and you can easily clean it. There is no need to replace this neon light for a long time as it has a long lifespan. 5. Easy Installation Installing this neon painting sign is much simpler. It has acrylic backing and pre-drilled holes, so you will not face any problem in installing it. After installing this sign, it will look best in your home. Price Of Neon Leaf Light So, this neon painting sign painting is available on Echo Neon. They charge reasonable prices for their neon signs. You will not regret spending money on this beautiful neon light sign. So, the Leaf painting sign is available on Echo Neon at the price of $349.00. For remote control, you have to pay $10 more. Shipping Of Neon Leaf Light You can order neon leaf light from Echo Neon. They deliver their neon signs in the UK, Australia, US, Canada, etc. For the standard delivery, they take around 2-3 weeks. It includes the production process and shipping. Then, for fast shipping, they take two weeks from the order date. About Echo Neon Echo Neon is a famous online neon site where you can find different types of neon signs. They are selling read and custom-made neon signs to customers. Even, they have a team of professionals who sell handmade attractive neon signboards. They use PVC tubing and LED lights for producing their signs. Echo Neon signs have a long lifespan than the other types of signs. That's the reason their neon signs are safe and eco-friendly. Their signs have acrylic backing and pre-drilled holes. You can control the lighting of their LED signs with remote control. You can also customize a neon painting sign through them. Designing a neon sign with its customization tool is much simpler. You can choose any font, coloring, and shape. So you can also purchase premium quality neon signs from this online neon site. Read Also: A Rundown of the Basic Led Lighting Grow These Flowering Plants In Your Home Garden Give Amazing Look Using Balloon Centerpieces in Wedding
READ MOREDetails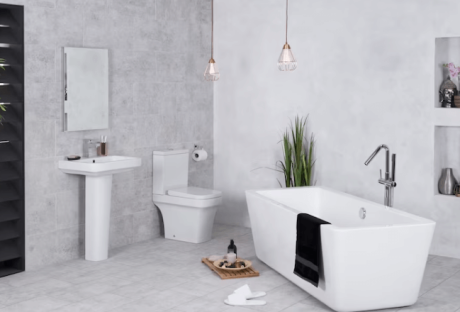
How To Keep A Bathroom Timelessly Elegant
When it comes to bathroom design, new trends emerge year after year. If these are always followed, however, this can become quite expensive in the long run. Those who don't want to invest a lot of money in redesigning their bathroom after just a short time are therefore much better off with a timeless style in the bathroom. But what interior design tips should actually be considered for this and what options are basically available? The following article shows. Timeless bathroom design - the basics With regard to a timeless bathroom design, some principles can be identified. These include the fact that the focus should be on basic colors. In addition, the functionality of the interior should be given the highest possible priority. Another valuable tip is to follow the well-known motto "less is more" when designing the bathroom. Despite a high level of functionality, however, aesthetics should not be neglected - after all, you should be able to feel good all around in the bathroom. Use basic colors In timeless bathrooms, people hardly ever go for shades like a bright turquoise or a gaudy red. Such splashes of color are only suitable for accessories and bathroom accessories, such as towels - after all, if necessary, these can be replaced in no time at all. Much more suitable are basic colors, such as black, gray, cream, sand, or white. Such muted colors will still be considered modern and contemporary in 20 years. In addition, brown tones also provide a high feel-good factor and a cozy ambiance, whether in the area of furniture or tiles. You can discover marble look tiles on this website. The tiles, by the way, play an extremely important role when it comes to the timeless design of the bathroom. Accordingly, basic colors should be used here as well. In addition, modern tiles have meanwhile been showing themselves as large-format for several years. Less is more A timeless bathroom is hardly characterized by the fact that the design always immediately catches the eye as soon as the room is entered. Current trends can be completely out again in just a few months. To prevent the design of the bathroom from soon being judged as a tasteful misstep, it is therefore much more advisable to prefer more inconspicuous and restrained designs. If the essentials are placed in the focus of the interior, the chances are good to be satisfied with the bathroom design for many years. Choose tried and tested classics There can be a very fine line between modern and antiquated - this is true not only in the world of fashion but also in bathroom design. When it comes to putting together new bathroom furnishings, it is therefore essential to proceed with caution. Many furnishings can be identified that have already proven themselves over many years. The chosen products should still give pleasure when entering the bathroom in ten years. Functionality in focus A timeless interior means, above all, that it will be enjoyed for a long time. However, if the functionality in the bathroom is neglected, this is quickly tarnished - a beautiful appearance is hardly enough in this room. Thus, awkward-to-use faucets, a too-small sink, or slippery floor tiles are taboo. A bathroom can only be truly timeless if its usability is guaranteed for many years. It also makes sense to address the issue of accessibility in the bathroom at an early stage. Additional: Bathroom Remodeling Tips and Ideas How to Keep Your Bathroom Clean All the Time Considerations When Choosing the Ceramic Bathroom Tile 5 Hotel Housekeeping Tricks You Need To Clean Your Bathroom
READ MOREDetails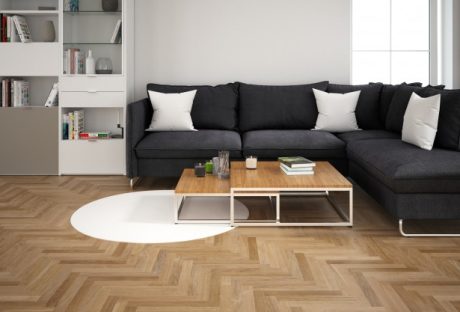
Ideas for Modern Flooring Designs for Home Improvement Plans
It is essential to make the right decisions when coming up with the design for a modern home. On the other hand, it is easy to transform old houses by the type of floor you decide to use. Most people will probably overlook it when planning for their house. The main reason is that homeowners do not know what they can choose for their homes. However, herringbone flooring can alter the floor's architectural design in your house to make them adaptable to your lifestyle. There are various types of materials that a person considers for flooring in buildings. The suitability of each option changes according to the room needs. For example, spaces where people visit a lot, like corridors and living rooms, can have wooden floors as they are resistant to wear. The bedrooms can differ from the rest of the house by using cozy materials for flooring. Ideas for Modern Flooring Designs The design of floors will mostly depend on the appearance that a homeowner wants. It will also depend on the budget for the home improvement plan. Here are some popular types of flooring systems; Wood Modern houses will utilize wooden floors for main rooms. It is an ancient technique that does not go out of style and remains a choice for many. Hardwood floors are durable and stylish. The raw material comes from indigenous trees like oak, maple, and walnut. Maintaining wooden floors is easy as you need to dust the spaces and use a recommended wood cleaner. Avoid exposing the floor to water as it can destroy the material if left wet. However, other artificial ones incorporate acrylic in making the floor resistant to water and moisture. Tiles Ceramic tiles are standard features in houses. It is a versatile material that is available in different colors to suit other preferences. There are different kinds of tiles, and it is crucial to ensure you purchase one to use on floors and not walls. The material is easy to clean and maintain. However, it makes the house cold compared to other forms of flooring systems. Laundry spaces and the bathroom are ideal rooms for tiling. While there are many brands that you can choose form, few will be able to give you the quality, style, durability, and affordability as Zia’s ceramic tile collection. They have options to suit everyone’s budgets. Depending upon the wall color and the décor of the room, you can mix and match the tiles. Concrete These types of floors have been existing for a long but are still adaptable to new house designs. They are ideal for contemporary houses as one can polish them to get an elegant appearance. Modern building techniques refine concrete to come up with patterns as decorations. Vinyl PVC is the raw material for the Vinyl flooring system. Walking on the floors is much more comfortable than the other forms above. It also aids in keeping the house warm, and it is resistant to the negative impact of moisture on flooring systems. Laminate It uses fiber and plywood to develop a veneer that technicians install together to form the flooring system. Laminate floors have a plastic coat that can resemble wood or concrete. Conclusion Apart from the above types of flooring techniques, there are other options available. They include the use of bamboo and cork in flooring. You can also carpet the space. Read Also: How to Protect Your Wood Flooring in a Busy Household What you must know about wood flooring? How Long Does Vinyl Flooring Last? 7 Advantages of Reflective Epoxy Flooring Use Floor Polishing for Keeping Your Flooring Looking New List of Most Durable Kitchen Flooring Hardwood Timber Flooring: Gives a Classic Look to Your Home
READ MOREDetails