Flooring Installation Process Transforming Your Space With Elegance

Flooring Installation Process

When it comes to renovating or building a new space, one of the most crucial aspects is the flooring installation process. The type of flooring you choose can significantly impact the overall aesthetics, functionality, and durability of your space. In this comprehensive guide, we will walk you through the intricate process of flooring installation toronto, providing valuable insights and tips to ensure a successful transformation.

Selecting The Right Flooring Material

Selecting The Right Flooring Material

The first step in the flooring installation process is choosing the right material. Whether you opt for hardwood, laminate, vinyl, tile, or carpet, each material has its unique features and benefits. Consider factors such as your budget, the room’s purpose, and your design preferences when making this decision.

Measuring And Preparing The Space

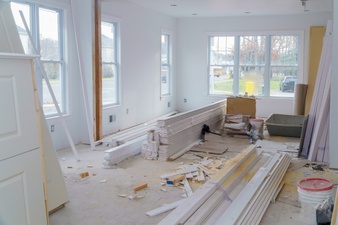
Before the installation begins, accurate measurements of the room are crucial. This step ensures that you purchase the right amount of flooring material. Additionally, you’ll need to prepare the space by removing any existing flooring, baseboards, and furniture. A clean, level surface is essential for a smooth installation.

Acclimating The Flooring

Many flooring materials, especially hardwood, need to acclimate to the room’s temperature and humidity levels before installation. This process prevents the flooring from warping or expanding after installation. Follow the manufacturer’s recommendations for acclimation time.

The Installation Process

Subfloor Preparation

A stable subfloor is the foundation of a successful flooring installation. Ensure that the subfloor is clean, dry, and free of any irregularities. Repair any damaged areas and add an underlayment if necessary.

Layout And Design

Planning the layout of your flooring is crucial for achieving a polished look. Decide whether you want a diagonal, herringbone, or straight pattern, depending on your design preferences. This step is especially important for tile and hardwood installations.

Cutting And Fitting

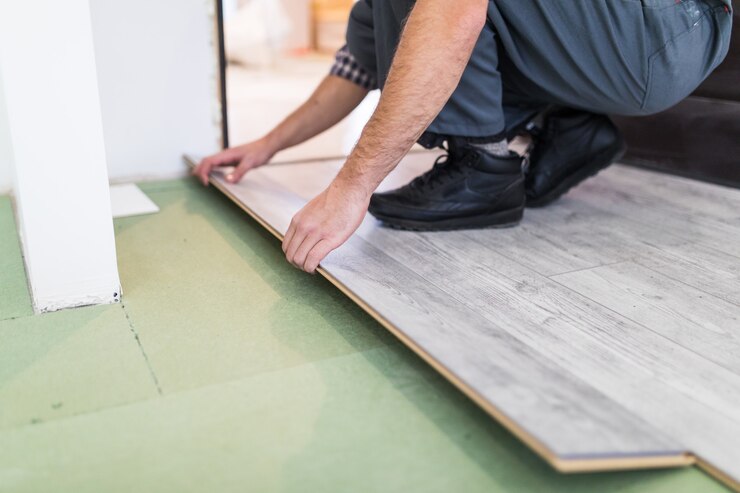
Precise cutting and fitting of the flooring material are essential for a seamless finish. Use the appropriate tools, such as a saw or cutter, to trim the material to fit the room’s dimensions accurately. Pay special attention to corners and edges.

Installation Method

The installation method varies depending on the type of flooring you’ve chosen. For example, hardwood may be nailed or glued down, while laminate often features a click-and-lock system. Follow the manufacturer’s guidelines and use the appropriate adhesives or fasteners.

Finishing Touches

After the main installation is complete, it’s time for the finishing touches. Install baseboards and transitions to create a polished look. Seal gaps and joints to prevent moisture and dirt from seeping underneath the flooring.

Maintenance And Care

Cleaning And Maintenance

Proper maintenance is crucial to ensure the longevity of your new flooring. Regularly sweep or vacuum to remove dirt and debris. Use manufacturer-recommended cleaning products to maintain the flooring’s finish.

Repairing Damage

Accidents happen, and flooring can get damaged over time. Whether it’s a scratch on hardwood or a chipped tile, knowing how to repair minor issues can extend the life of your flooring. Consult with professionals for major repairs.

The flooring installation process is a transformative journey that adds beauty and functionality to your space. By carefully selecting the right material, preparing the space, and following the installation steps, you can achieve stunning results that will stand the test of time.

Read Also:

Ankita Tripathy loves to write about food and the Hallyu Wave in particular. During her free time, she enjoys looking at the sky or reading books while sipping a cup of hot coffee. Her favourite niches are food, music, lifestyle, travel, and Korean Pop music and drama.

View all posts

Leave a Reply

Your email address will not be published. Required fields are marked *

Related

Bedroom

Here’s How to Turn Your Garage into a Bedroom on a Budget!

So you’ve decided to extend your living space, but at the same time, you’d like to avoid big costs and construction works. How about that old garage that’s been spontaneously turned into a storage for useless stuff you are never gonna use anyway. Make use of the bedroom for developing your home interiors in the right manner. You can renovate that space and turn it into a lovely little bedroom. We’ve talked to the guys at Rockstar Garage Doors about this idea and they were more than happy to give us their thoughts and opinions on how to turn your garage into a bedroom on a budget. Different Ways To Turn The Garage Into Bedroom   There are multiple factors that you have to take care of while you want to arrange for the garage in the bedroom. Work out the plans that can help you to achieve your goals in the best possible manner. Do not make your choices in the wrong manner. 1. The Floor Remodeling a garage into a bedroom costs significantly less than building a new room from the ground up, no argument about the math there. When you start refurbishing, the first thing you pay attention to is the floor. You’ll notice, at least in most cases, that it’s made of concrete, which already a nice foundation for whatever material you choose to put on top to make it nice and cozy. You can choose a carpet or a wooden floor. These two are inexpensive and both very pleasing to the eye. You’d instantly gain a warm and comfy feel to the whole room. You can also use vinyl tiles which are probably the cheapest option but would still get the work done. You can even be more artistic and just stain the existing concrete floor, and then put some rugs and carpets around to give it a bedroomy atmosphere. 2. What to do with the walls? Since walls are already there obviously, you’d probably need to build windows, because the garage probably didn’t have any. Either way, in order to have a proper bedroom, you need good insulation. Blown-in insulation is a good and affordable option, or if your wall is of older date, you can build an additional wall about 3-inches away from the old one, thus leaving enough room to add proper insulation. Drywall is also a great solution for your ceiling and walls, it’s a cheap yet effective solution, but in order for the whole system to function well, you’d also need windows and doors that provide energy efficiency and good insulation. 3.The interior You’d probably want to add air conditioning to your new bedroom. The easiest and cheapest way to do that is to use the ductwork you already have in your house, just expand it. You don’t have to aesthetically match your new bedroom with the rest of the house at all, it has its own charm if you decide to leave it in a more rustic state with minimalistic style and furniture. Don’t forget to add vent openings in order to decrease the energy spent on heating and ventilation. Most likely, you will also need to find good garage door installation companies to replace your old, worn-out garage door. You can easily turn this ‘’new space’’ into a guest room or even put it for rent on sites like Airbnb and such. It would be good to use more bright and vibrant paint job with a lot of natural light pouring in because bedrooms are all about warmth, coziness, and space. 4. Property value and additional notes It is estimated that you can return a great deal of your investment after a year or so if you manage to adapt the garage into a bedroom properly. When it comes to your available budget, you shouldn’t spend more than 5 percent of your current property value in order to have a good return. If you plan to use it as a guest room or rent it, it is important to have a bathroom. Costs would be increased of course if you decide to build a new one, but it’s much easier just to put a door if the garage and bathroom share the same wall. Final Take Away   Hence, these are some of the essential facts that you have to take care of while you want to develop your interiors in the correct way. You have to ideate your plans in the right order to achieve your goals in the best possible ways. Make your choices in the correct manner. Work out the plans that can have a long-term impact on your business to achieve your goals in a better way. Do not make your choices in grey while you want to improve your business in the correct manner. Try to achieve your plans after developing the correct strategy. Read Also:   3 Tips On How To Plan The Best Cheap And Fabulous DIY Bedroom Makeover Feature Image: google.com

READ MOREDetails
Disinfection

Disinfection and Cleaning Strategies for Reopening Commercial Buildings

Cleaning and Disinfection have never been more important than amid the COVID-19 pandemic. And, with quarantine restrictions beginning to loosen, many businesses that were shuttered during lockdown will start resuming operations. As this happens, the biggest challenge for commercial building owners is being able and ready to return buildings to use swiftly and safely. Reducing the risk of exposure by cleaning and disinfecting is an integral part of reopening commercial buildings as the safety of occupants remains a key priority. With this rising demand for clean environments, commercial buildings will have to come up with safe and effective cleaning strategies that will assure occupants of their safety even as the threat of the virus continues to linger in our minds. With so much uncertainty surrounding the spread of the coronavirus and how people can protect against it, it's not worth it to take any risks. You can find professional cleaning, sanitizing, and disinfecting services at www.excelpestservices.com. Cleaning and disinfecting commercial buildings for reopening will involve developing a plan, implementing the plan, as well as maintaining and revising the plan. Develop Your Disinfection Plan: There's no one-size-fits-all cleaning and disinfection plan as commercial buildings are structured differently and for different purposes. You will need to evaluate your building to determine the surfaces and materials that make up that area. This will guide you in choosing the appropriate cleaning and disinfection method suitable for each. Implement Your Plan: Once you have the right cleaning and disinfection plan for your building, it's time to put it into action. We have mapped out a few key strategies that will help you navigate this issue and ensure optimal cleaning and disinfection service. Without further ado, let's get started: Wear appropriate PPE (personal protective equipment): Whether you are contracting a cleaning service or using in-house janitorial staff, the cleaning crew must wear appropriate PPEs like gloves, masks, goggles, and so on. That's because they are at a higher risk of being exposed to COVID-19 (given that it can stay on surfaces for days) and the toxicity of cleaning/disinfecting products. Not wearing PPEs also means asymptomatic carriers could spread pathogens to clean areas. It's also important for the cleaning crew to receive training on the proper use of PPEs, cleaning equipment, and cleaning products to ensure efficiency. Apply normal routine cleaning on visibly dirty surfaces: It's important to clean surfaces and objects with soap and water before disinfecting. And, be sure to clean soft and porous materials according to the manufacturer's instructions. Determine what you need to disinfect: While some surfaces and materials are cleaned with just soap and water, others must be disinfected. Scientists have proven that coronavirus can also live on various surfaces for up to a couple of days. People can contract it by touching contaminated surfaces and then touching their eyes, mouth, or nose. Start by disinfecting high-touch surfaces as they are the main source of spreading pathogens. This includes doorknobs/handles, elevator buttons, restroom facilities, trash can lids, faucet handles, floor surfaces, light switches, tables/countertops/desks, handrails, and so on. Additionally, areas unique to your building may also require disinfecting. For instance, retail occupancy will require disinfecting shopping cart handles and payment touchpads while offices will need to disinfect computer monitors, keyboards, conference tables, etc. Soft and porous materials in high-traffic areas like carpets, upholstery, and curtains can be germ reservoirs and will need to be disinfected as well. Use EPA-Approved cleaning/disinfectant products: Not all cleaning products are suitable for removing pathogens, particularly traces of COVID-19, from building surfaces. It's important to look at EPA's suggested products as they are both effective and non-toxic. If EPA-approved disinfectants are not available, you can use a diluted solution of household bleach or 70% Isopropyl Alcohol (IPA). Use products effectively: It's important to follow the directions on the label with regards to the application method (concentration and dilution), contact time, as well as any other precautions to take when applying like good ventilation and appropriate PPE to wear. This will ensure the effective and safe use of cleaning and disinfecting products. Avoid mixing cleaning and disinfection products as this can result in very dangerous fumes that could cause serious injury or even death. Avoid over-disinfection: It is possible to over-disinfect surfaces while trying to ensure no pathogens are left behind. And although these products are great at removing pathogens, their overuse can have serious side effects in humans. Disinfectants can pose an immediate risk to some people, including those who are asthmatic or suffer from migraines, allergies, suppressed immune systems, or immune disorders. They may experience symptoms like headaches, nausea, and vomiting, irritability, difficulty breathing, mood swings, memory loss, seizures, etc. Outdoor areas require normal routine cleaning: Many outdoor surfaces will not be touched; as such, disinfecting them is a waste of supplies. However, some areas like bars and restaurants will require disinfecting. Pools and other water play areas must also be well-maintained, for example disinfecting with chlorine or bromine. What about an unoccupied building? Properties that have not been occupied for over 7 days will do with normal routine cleaning, meaning there's no need for disinfecting. That's because the coronavirus cannot survive on surfaces for longer than this time. But once you reopen, you will have to develop and implement a disinfection plan to keep everyone safe. Work in zones: It's important to separate areas in the building by how likely they are to contain pathogens. Then start with low-risk zones moving into high-risk areas to help avoid cross-contamination. Maintain and Revise the Plan: Once you reopen, it's important to maintain the above disinfection strategies to minimize the risk of contracting COVID-19 and other pathogens. This should be done in conjunction with other safe practices like social distancing, wearing masks, frequent hand washing, and more. Be sure to revise and update your cleaning and disinfection plan based on the current circumstances (level of COVID-19 exposure in your building) and updated guidance by the local and federal governments. Read also: 10 Tactics To Maintain Clear Windows 5 Hotel Housekeeping Tricks You Need To Clean Your Bathroom How Cleaning Helps Us Feel Better and Why We Don’t Do It

READ MOREDetails
Pests

Top 10 Most Common U.S. Household Pests: The Creepy Crawlers That Take the Cake

No one wants to deal with uninvited guests, especially not those of the multi-legged and exoskeletal variety. Unfortunately, sometimes these tiny creatures find their way inside no matter how hard we try to keep them out in the cold. Identifying a pest problem isn’t enough on its own--you must also take practical measures to eliminate any bugs in your home. Learning about the most common pests will help you take charge and show your creepy-crawly houseguests the door. 1. Ants Attracted by the sugars in food, ants often turn up in the kitchen. Depending on the type of ant and the size of the infestation, you might need professional help eliminating ants, though over-the-counter ant traps and regular cleaning help, too. 2. Termites Like bees, termites in a colony serve different functions. Wingless worker termites have whitish bodies and brown heads, while others have wings and darker bodies. Termite treatment needs to happen early and professionally. Don’t wait to call once you identify the telltale piles of sawdust and chewed wood, or even see the critters themselves. Termites can inflict enough damage to destroy a home’s foundation in just months. 3. Cockroaches While cockroaches generally don’t bite humans, they do spread bacteria and destroy foodstuffs. Specifically, roaches seek out sources of water within a home. Notoriously tricky to kill, cockroaches can die of dehydration within a week. In theory, dehumidifiers can help discourage roaches. However, by the time the first generation dies, they will have already laid egg cases with up to fifty eggs. 4. Spiders Spider bites can cause reactions and inflammation. Certain species are poisonous, others deadly if untreated, and their webs collect dust over time. Like cockroaches, female spiders lay multiple eggs in batches. Spiders are attracted by other small insects in the home, such as gnats and flies. 5. Millipedes Millipedes eat damp, decaying wood and tend to prefer dark crannies. These long-bodied bugs secrete a smelly compound when they feel threatened. Millipedes lay hundreds of eggs at a time. Once these pests find their way inside, they tend to multiply rapidly. 6. Fleas Generally carried indoors by household pets like cats and dogs, fleas are almost impossible to eliminate without a professional to identify the type of flea. These tiny bloodsuckers hide and lay eggs in clothes and carpets. Worst of all, fleas live off of blood. Itchy red bites are often the first sign that you have human fleas because these insects are often too small to see. 7. Bed bugs These small, brown, oval-shaped bugs also live off of blood and mostly bite people, generally at night. Apartment buildings are notorious for bed bug infestations. Once inside a mattress or other material, bed bugs leave noxious stains behind that are next to impossible to remove. 8. Moths Different types of winged moths are attracted to clothing or food. Once the moth eggs hatch, the larvae stain and eat holes in fabrics. While mothballs can help keep moths out of sealed storage areas and flypaper catches adult moths, the best way to rid a home of moths permanently is to hire pest control professionals. 9. Stink bugs Aptly named, these bugs give off a terrible smell as a warning when disturbed and tend to come inside as the weather cools. So, how do you make stink bugs stay outside where they belong? Individual stink bugs may be trapped live and released outside, and proper sealing on windows and doors goes a long way. 10. Rodents Even more than most insect infestations, rodents cause damage to all sorts of household goods, spread disease, and even take up residence inside walls. Wrap up Keep in mind that the most common pests vary by region and other factors, including the season and type of home. Renters, for instance, are much more likely to end up tackling earwigs and silverfish than homeowners. While insects may be the future of sustainable food, most people would prefer to keep them out of the house. Read Also: 4 Benefits of Pest Control Services What These People Did Wrong in Using Pesticides DIY Ways to Control Pests in Your Garden

READ MOREDetails