Outdoor Furniture: Design Trends & Tips for a Relaxing Oasis

Published on: 18 July 2023 Last Updated on: 14 October 2024
Design Trends And Tips For Creating A Relaxing Outdoor Oasis

Transforming your outdoor space into a relaxing oasis begins with the right furniture. Outdoor furniture has evolved beyond functionality, with design trends now focusing on creating a visually appealing and comfortable outdoor environment.

Embracing Natural Materials

One of the prominent trends in outdoor furniture design is the use of natural materials. Wholesale furniture suppliers are increasingly incorporating materials like rattan, teak, and bamboo into their product lines. These materials not only provide durability but also offer a natural and organic aesthetic. Incorporating natural materials into your outdoor space can create a sense of harmony with the surrounding environment.

To embrace this trend, opt for furniture pieces made from these materials, such as teak dining sets or rattan loungers. Pair them with earthy-toned cushions and throws to enhance the overall organic feel of your outdoor oasis. Using natural materials not only adds visual appeal but also promotes sustainability, making it a win-win choice.

Blurring Indoor-Outdoor Boundaries

Designs that seamlessly merge indoor and outdoor spaces continue to gain popularity. Wholesale furniture manufacturers are now producing versatile pieces that can be used both inside and outside the home. This trend allows for a smooth transition between the two spaces and expands the usability of your outdoor oasis.

Consider incorporating outdoor sofas or sectionals that mimic the style of indoor furniture. By using similar colors and patterns, you create a cohesive flow between your indoor and outdoor spaces. To make the most of this trend, install bi-fold or sliding doors that can be fully opened, providing a seamless connection between your indoor and outdoor areas.

Comfort Is Key

When it comes to outdoor furniture, comfort is paramount. Design trends now prioritize furniture that offers the same level of comfort as indoor seating. Wholesale furniture suppliers are crafting outdoor lounge chairs and sofas with plush cushions and ergonomic designs, ensuring a cozy and relaxing experience.

To create a relaxing outdoor oasis, invest in seating that prioritizes comfort. Look for deep-seated chairs and loungers with thick cushions that will cradle and support you. With added features like adjustable backs and ottomans, you can customize your seating to suit your relaxation preferences. By prioritizing comfort in your outdoor space, you create a sanctuary where you can unwind and rejuvenate.

Versatile And Modular Furniture

Flexibility and adaptability are key considerations in outdoor furniture design. Wholesale furniture suppliers are catering to this demand by offering modular furniture sets that allow for easy reconfiguration. These versatile pieces can be rearranged to suit different entertaining needs and space constraints.

To maximize the flexibility of your outdoor space, opt for modular furniture sets that consist of individual pieces that can be rearranged as needed. This allows you to create different seating arrangements for various occasions. Consider adding a modular dining set that can transform into a cozy lounge area by rearranging or removing certain pieces. With versatile and modular furniture, you can easily transform your outdoor oasis based on your specific needs.

Adding Style With Accessories And Lighting

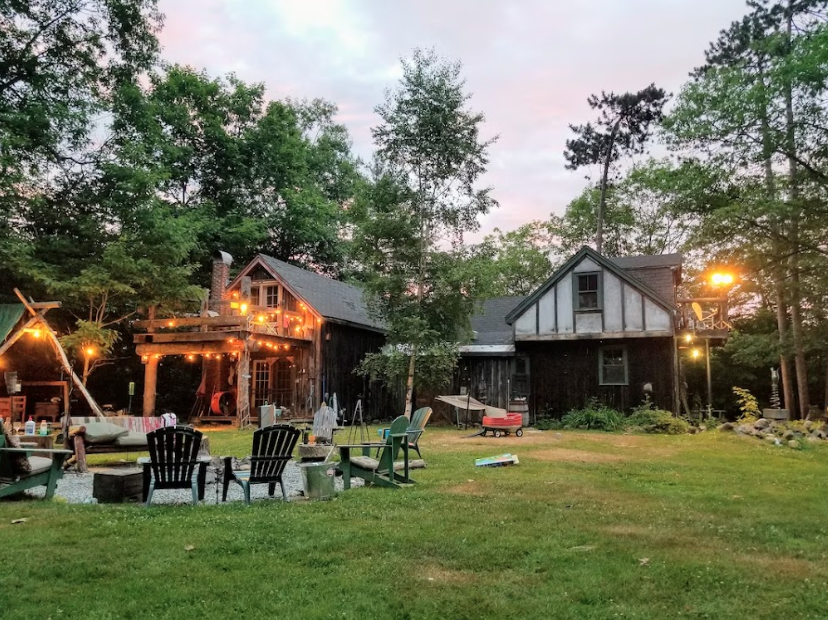
To complete the transformation of your outdoor oasis, pay attention to the finishing touches. Wholesale furniture suppliers often offer a range of outdoor accessories and lighting options to enhance the style and functionality of your space.

Consider adding outdoor rugs, throw pillows, and planters to elevate the visual appeal of your outdoor area. Opt for weather-resistant materials that can withstand the elements. Additionally, incorporate ambient lighting fixtures, such as string lights or lanterns, to create a warm and inviting atmosphere for evening gatherings.

Conclusion

Creating a relaxing outdoor oasis begins with the right furniture choices. By embracing natural materials, blurring indoor-outdoor boundaries, prioritizing comfort, selecting versatile furniture, and adding style with accessories and lighting, you can transform your outdoor space into a haven of relaxation and beauty. Whether you are a homeowner or a furniture wholesale business, these design trends and tips will help you create an outdoor oasis that your customers or family will love.

Read Also:

Abdul Aziz Mondol is a professional blogger who is having a colossal interest in writing blogs and other jones of calligraphies. In terms of his professional commitments, he loves to share content related to business, finance, technology, and the gaming niche.

View all posts

Leave a Reply

Your email address will not be published. Required fields are marked *

Related

how to clean evaporator coil without removing

How To Clean Evaporator Coil Without Removing?

If you want your air conditioner to perform well at all times, you will need to ensure that you maintain and clean the parts of the air conditioner on a regular basis. If you schedule your maintenance as per the requirement of the AC, then it is great. However, in some cases, people like to clean their AC themselves. If you are one of them, you might be interested to know how to clean evaporator coil without removing it when you have a dirty evaporator coil. In this article, we will basically talk about why you need to clean your AC's evaporator coil and how to clean evaporator coil without removing the coil from the AC. Before that, you will also know about what happens to the air conditioner when the evaporator gets dirty. What Happens When Your AC Coil Gets Dirty? Image Source: lirp.cdn-website.com If the evaporator coil of your AC is unclean, it puts your AC at risk. It compromises the safety and working efficiency of the AC in general. In the first, an unclean evaporator coil slows down the speed at which the air blows through the AC, as it blocks the flow of the air. If the evaporator coil contains other materials and particles like pollen and dust, it limits the efficiency of the flow of air. The following things happen when there is an unclean evaporator coil inside the air conditioner: 1. If the evaporator coil is dirty or clogged with particles, then it reduces the flow of air into your home. If there is a reduced flow of air inside your home, it will lead to a lowering of the efficiency of the cooling system of the AC. Your room takes a lot of time to cool than it normally takes, probably your evaporator coil needs cleaning. 2. There might be some cases where your room is not achieving a good level of cooling, despite running the AC for hours at a stretch. In such cases, the problem is probably more than a delay in the cooling performance of the AC. Basically, it is a negative effect on the AC's cooling capacity. 3. Another great issue that happens when the evaporator coil of your AC gets dirty is that the operating pressure increases. This increases the temperature level of the AC, as the unit is working at hotter levels. This is not good for the AC as it damages the components of the AC. 4. An unclean evaporator coil creates wear on the AC system. If one important part of the AC fails to work properly, the other parts follow suit. This is because there is more pressure on the other components of the AC. Hence, the other parts are more likely to get damaged due to the failure of one part. Therefore, you will end up with a damaged AC altogether, and repairing it will be quite expensive for you. 5. If your AC’s evaporator coil gets compromised and does not work properly, then it affects the performance of the other parts of the AC. Hence, your AC unit will have a shorter life. If you want your AC unit to perform well and serve your home for a long time, you will need to ensure that every part of your AC is clean, especially the evaporator coil. Why Do You Need Your Air Conditioner Coil Clean? Image Source: www.cleanairprotx.com You will not need to spend a lot on the repairs of the AC. Regular maintenance will keep out the issues from the AC that need repair. Before any problem turns into a bigger one, you can fix it with regular maintenance. Apart from that, if you keep your evaporator coil clean always, it will not accumulate dust and hence will perform better as a result. How To Clean AC Coils? – Things You Need? Image Source: phyxter.ai The first thing you will obviously need for your AC cleaning is an air conditioner coil cleaner. Apart from that, you will need a cotton cloth for cleaning the coil. For your own protection, wear protective goggles, and wear gloves on your hand for better protection. Furthermore, ensure that you are following the instructions properly while you are cleaning your AC’s evaporator coil. How To Clean Evaporator Coil Without Removing? Image Source: snyderac.com The evaporator coil basically captures all the heat present in your home to condition the air inside. Apart from the evaporator coil, there is a condenser coil in the AC, which removes the air from the AC to the outside of the house. This is the way in which the AC works in colling the house. Since an evaporator is an important part of your air conditioner, hence keeping it clean will enable you to keep your air conditioner always efficient. However, if your question is, “How to clean AC evaporator coils inside house?” then you need to read the next subsection of this article. Read More: Here’s What Makes Package Units Better than the Other ACs AC Coil Cleaners - How To Clean Evaporator Coil Without Removing? Image Source: img.fruugo.com The following are the ways in which you can clean the evaporator coil of your AC without removing it from the AC: Step 1: Turn down the power of the AC, and unplug the machine from the electric port. You will not need an electricity risk for yourself while cleaning. Step 2: Remove the access panel from the AC to see the evaporator coil clearly. Go over the manual of the AC, if required. The manual has instructions on where you can find the access panel. Step 3: Take the access panel off, and remove the screws from the AC. Keep the screws in a safe place. Step 4: To blow the unclean particles off, try using a compressed air canister. This will help you to easily loosen the dirt on the evaporator coil. Step 5: Put back the screws, as well as the access panel. Your evaporator coil is clean. Summing Up Hope the article helped you in knowing how to clean evaporator coil without removing it from the AC. Cleaning your AC is a part of the maintenance operation of the AC. If you maintain your AC on a regular basis, it will offer you a lot of benefits. There will be less hassle and issues on your AC as a result of regular maintenance and cleaning. If you clean the parts of your AC, your AC will look and perform as if it is fully new. Read Also: Best Paying Jobs In Electric Utilities Central How to Brew the Best Beer with an Electric Brew System 13 Ways to Maintain the Coolness of Your Air Condition Unit

READ MOREDetails
Water Filter Pitcher

The 5 Best Brita Alternatives For Water Filter Pitchers

A water filter pitcher is something everyone should have in their home. It’s one of the simplest ways to guarantee that the water you’re drinking is clean, safe, and deliciously chilled. Unfortunately, getting a great water filter pitcher isn’t as easy as you might think. Popular brands like Brita do a great job of filtering out substances like chlorine thanks to their activated carbon filters; however, they’re far from comprehensive. The fact is, mass-produced, store-bought water filtration systems are a far cry from true filtration options. They’re limited by their simple filter media and only work when it comes to high-turbidity contamination—lots of suspended solids. These filters do almost nothing to neutralize VOCs or microbiological threats. If you’re on the lookout for a water filter pitcher, you can do better than Brita. Here are a few of the best Brita alternatives for water filter pitchers and why they’re worth the investment. 1. Aquaspace® Carafe® Pitchers You might not even need to finish this list, because we’ve put the very best Brita alternative front and center, right at the top. There’s simply no beating the performance of Aquaspace® Carafe® Pitchers! Not only are there options for specific filtration such as fluoride, but there are also alkaline options for those who prefer the benefits of water with a slightly higher pH. The specifications of these filters are second-to-none when it comes to filtration capabilities. First, there’s an amazing 500-gallon capacity on Aquaspace® filters—as opposed to a meager 40 gallons on most Brita systems. On top of this, there’s filtration power to consider. The Aquaspace® filter goes above and beyond any activated carbon filter, to deliver comprehensive filtration that spans both organic and inorganic compounds. Need more proof that Aquaspace® comes out on top? Look at the pour-through funnel to the filter media, which ensures powerful filtration, instead of pass-through sieve filtration. If you’re going to spend the money on a water filter pitcher, there are few better options than Aquaspace®. 2. Pūr Classic 11-Cup Pitcher One of the competitors to Brita that you’re likely to find in stores is Pūr. This brand is mass produced, but its filter media is a step above others on the market. It doesn’t just rely on activated carbon media; its MAXION® filter technology also addresses pharmaceuticals and industrial pollutants to provide a more encompassing level of cleanliness to water. Like other store-bought filters, Pūr has some bells and whistles that make it worth looking at—including the LED filter indicator. While the filter lifespan is only a meager 40 gallons, an LED reminder will let you know when it’s time to swap in new media. Moreover, the filters themselves are relatively inexpensive. One of the best things about this water filter pitcher is its convenience. It has a relatively low cost of ownership and is easy to fill, pour and clean. It’s also BPA-free. If you’re shopping in-store, it’s hard to do better than Pūr. 3. Travel Berkey Gravity-Fed Water Filter If price isn’t an option, the Travel Berkey Water Filter is worth a look. We’re not kidding when we say it’s pricey, though—you’re looking at a $250 purchase price and $120 replacement filters. If you’re reading this aghast, take a moment to consider the benefits. First off, the Travel Berkey Water Filter and its filtration media will cleanse up to 6,000 gallons before you need to replace the filters. This is enough to justify the cost of the filters themselves. As for the cost of the unit, it’s probably the most well-made on this list and features stainless steel that’ll last you a lifetime. The system itself is also a gravity-fed setup, which means you can expect superb filtration and extremely clean drinking water. Outfitted with the right filters, it’ll eliminate just about any contaminants in your water, including arsenic. The downfall of this system? Well, it’s not exactly a pitcher and you can’t keep it in the fridge. It’s meant as a countertop option that holds 1.5 gallons, which makes it equally as convenient. 4. ZeroWater 6-Cup Pitcher If you live in an area with heavy lead content in the water supply, this pitcher is an upgrade over Brita filters. While it only boasts a 6-cup capacity, the filtration power of the ZeroWater filter pitcher is well-worth the extremely affordable $20 price tag. Thanks to its five-stage filtration capabilities, this pitcher does what only activated carbon filters can’t. Aside from the usual hard water culprits, this system also filters out compounds like fluoride, nitrates and other inorganics. This, in conjunction with its ability to filter out most unwanted organic compounds like arsenic and mercury. It’s one of the best filtration systems for the cost. The unfortunate aspect of the ZeroWater filter pitcher is its 20-gallon filter lifespan. If you’re relying on it frequently, you could end up spending a fortune in filter replacement costs. This is an option best left for those who also have some point-of-use filtration system. 5. Clearly Filtered 10-Cup Pitcher While its claim of being “the most powerful water pitcher on the market,” might be a little dubious, the Clearly Filtered pitcher is certainly a leader in its class. Sure, you’re going to spend more than the off-the-shelf filters on this list, but you’ll also get better performance. First, you’ll love the 100-gallon filter capacity on this model. This, in combination with its powerful filtration capabilities, makes it a great everyday option. Its 10-cup capacity means you’ll need to replace the filter roughly every 10 times you refill it. When it comes to filtration quality, expect this system to remove more than 230 unwanted organics and inorganics, including fluoride, lead, plastics, hormones, and more. It’s a truly encompassing filtration option. The only real downfall of this pitcher is that it’s a bit bulky and can be difficult to fit into a small fridge. Replacement filters aren’t cheap, either ($50), but they do offer good value thanks to their longevity. Pay Attention to Pitcher Performance When selecting a water filter pitcher, the best way to understand what you’re getting for your money is to look at the specifications of the product. What type of filter media does it use? How quickly does it filter? What’s the filter lifespan? These factors all matter when it comes to the clarity and safety of your water. At the end of the day, a water filter pitcher is all about convenience—and health. When you pull that pitcher out of the fridge and pour yourself a refreshing glass of crisp, cool water, you should be able to enjoy every sip. It starts by having confidence in the filter pitcher you’ve chosen. Looking for the best water filter pitcher available on the market? Look to Aquaspace for all your filtration needs! Read Also: How Many Jobs Are Available In Real Estate Investment Trusts? 2021 0123Putlockers And Servers – Watch Movies Online

READ MOREDetails
how to harvest asparagus-

Asparagus 101: When, How, And How Often To Harvest?

If you are a gardener like me, you must have thought about harvesting greens that you eat at restaurants at your house. One of these days, I was with my friends from my university, and we were discussing the importance of eating veggies for staying healthy. And they could not figure out the best ways to effectively do so. Reading my previous blog about cilantro, Laila asked me, “how to grow and harvest asparagus?” Well, surely asparagus is one of the most delicious and nutritious vegetables you can grow in your garden. But what a lot of people do not know is that it's also one of the easiest once you know how to harvest asparagus properly. In this article, I will cover everything you need to know about harvesting asparagus, from when to start, how to cut, and how often to do it. Additionally, I will also share some tips on how to store and freeze asparagus, as well as the benefits of eating this green wonder. So, keep on reading till the end to learn more...  How Does Asparagus Grow? Before I dive into the seemingly difficult process of how to harvest asparagus, let me help you grow it.  Asparagus is a perennial plant that grows from a crown of roots that can live for up to 20 years. The crown produces spears, which are the edible part of the plant, every spring. The spears grow rapidly, sometimes up to an inch per day, and can reach a height of 6 to 10 inches. The spears are harvested before they open into fern-like leaves, which are edible and tough. Asparagus grows best in well-drained, sandy soil with a pH of 6.5 to 7.5. It prefers full sun and moderate temperatures and needs regular watering and fertilizing. Asparagus can be grown from seeds or crowns, but crowns are easier and faster to establish. Crowns are planted in trenches about 12 to 18 inches apart and covered with 2 to 3 inches of soil. As the spears emerge, more soil is added until the trench is filled Benefits of Asparagus  https://giphy.com/gifs/food-asparagus-taylor-lee-nicholson-pejh5q5BBXxi2m4PgF Asparagus is not only tasty, but also healthy. It's low in calories and high in fiber, vitamins, minerals, and antioxidants just like spinach. It can help lower blood pressure, regulate blood sugar, support digestion, and prevent urinary tract infections. Asparagus also contains a compound called asparagine, which is a natural diuretic that helps flush out excess fluids and salts from the body. Asparagus is also a good source of folate, which is essential for pregnant women and fetal development When to Harvest Asparagus? The first year after planting, you should not harvest any asparagus spears, as they need to grow and strengthen the root system. The second year, you can harvest a few spears for a short period, about two to three weeks. The third year and beyond, you can harvest asparagus for a longer period, up to eight weeks, depending on the climate and the health of the plants. The best time to harvest asparagus is in the early morning when the spears are crisp and tender. You should harvest asparagus when the spears are about 6 to 10 inches tall, and before the tips start to open up. If you wait too long, the spears will become woody and bitter. How to Plant and Care for Asparagus? Asparagus is a long-term investment that can reward you with years of delicious harvests. However, it requires some planning and preparation before planting.   Here are some steps to follow to plant and care for asparagus:  Choose the Day  Choose a sunny and well-drained spot in your garden, preferably with sandy or loamy soil. Avoid areas where water tends to pool or where weeds are hard to control. Asparagus also needs plenty of space, so make sure you have at least 4 to 5 feet between rows and 12 to 18 inches between plants. Prepare the Soil  Prepare the soil by adding organic matter, such as compost or manure, and adjusting the pH to 6.5 to 7.5. You can use a soil test kit to check the pH and nutrient levels of your soil. You may also need to add some fertilizer, such as 10-10-10 or 10-20-10, to boost the phosphorus and potassium content. Dig it Deep Dig a trench about 8 to 12 inches deep and 12 to 18 inches wide. You can make the trench longer or shorter depending on how many asparagus crowns you have. Asparagus crowns are the dormant roots of the plant that you can buy from nurseries or online. They usually have one-year-old or two-year-old crowns, which are more reliable and productive than seeds. Fertilize Spread some fertilizer along the bottom of the trench, about 2 pounds per 100 square feet. Then, cover the fertilizer with 2 to 3 inches of soil, forming a ridge in the center of the trench. Placing the Plant Place the asparagus crowns on top of the ridge, about 12 to 18 inches apart, with the buds facing up. The crowns should be slightly below the soil surface, about 1 to 2 inches deep. Do not bury them too deep, as this will delay the emergence of the spears. Focus on the Crown Cover the crowns with another 2 to 3 inches of soil, and water well. As the spears grow, gradually fill in the trench with more soil, until it is level with the ground. This will help protect the crowns from frost and weeds. Add Mulch  Mulch the bed with straw, leaves, or wood chips, to conserve moisture and prevent weeds. You can also add some organic fertilizer, such as fish emulsion or seaweed extract, every few weeks during the growing season, to encourage healthy growth. Keep in Mind Do not harvest any asparagus spears in the first year, as they need to establish a strong root system. In the second year, you can harvest a few spears for a short period, about two to three weeks. In the third year and beyond, you can harvest asparagus for a longer period, up to eight weeks, depending on the climate and the health of the plants. How to Harvest Asparagus? Now, coming to the most important part that you wanted to know about. Let us talk about the ways to harvest asparagus! To harvest asparagus, you need a sharp knife or a pair of scissors. You should cut the spears at the base, about an inch below the soil surface. Be careful not to damage the crown or the emerging spears. You should also avoid cutting too many spears from one plant, as this will weaken the plant and reduce the yield. A good rule of thumb is to leave at least one-third of the spears on each plant. You should harvest asparagus every day or every other day, depending on how fast the spears grow. You should stop harvesting asparagus when the spears become thinner than a pencil, as this indicates that the plant is running out of energy. You should then let the spears grow into ferns, which will replenish the crown and prepare it for the next season. How to Store and Freeze Asparagus? Unlike lettuce, which you can store for more than a week, asparagus is best eaten fresh, as it loses its flavor and texture quickly. If you can't eat it right away, you should store it in the refrigerator for up to a week. To keep it fresh, you should trim the ends of the spears and stand them upright in a glass of water or wrap them in a damp paper towel and put them in a plastic bag. If you want to preserve asparagus for longer, you can freeze it. To freeze asparagus, you should first wash and trim the spears, and then blanch them in boiling water for two to three minutes, depending on the thickness.  Blanching is a process of briefly cooking and cooling the vegetables to stop the enzyme activity that causes them to spoil.  After blanching, you should drain and cool the spears, and then pack them in freezer bags or containers, leaving some space for expansion. You can freeze asparagus for up to a year, and use it in soups, casseroles, or stir-fries. How to Prevent and Treat Asparagus Pests and Diseases?  Asparagus is generally a hardy and resilient plant, but it can still suffer from some pests and diseases that can affect its growth and quality. Here are some of the most common problems that affect asparagus plants, and how to prevent or treat them: Asparagus beetles These are small, black or red beetles that feed on the spears and the ferns, causing them to wilt and turn brown. They can also lay eggs on the spears, which hatch into larvae that chew on the stems and leaves. To prevent asparagus beetles, you should keep the area around the plants clean and weed-free, and remove any old or damaged spears. To treat asparagus beetles, you can hand-pick them and their eggs, or spray them with insecticidal soap or neem oil. Fusarium wilt This is a fungal disease that infects the roots and the crowns of the plants, causing them to rot and die. It can also cause the spears to become yellow, twisted, and stunted. Fusarium wilt is more likely to occur in poorly drained, acidic, or infested soil.   To prevent fusarium wilt, you should plant disease-resistant varieties, rotate crops, and avoid overwatering or injuring the plants. To treat fusarium wilt, you should remove and destroy any infected plants, and apply fungicides to the soil. Rust This is another fungal disease that affects the ferns, causing them to develop orange or brown spots and pustules. Rust can reduce the vigor and yield of the plants, and make them more susceptible to other diseases. Rust is more likely to occur in humid, wet, or shady conditions.   To prevent rust, you should plant resistant varieties, space the plants well, and prune any excess or infected ferns. To treat rust, you should apply fungicides to the ferns, and avoid watering them from above. Crown rot This is a bacterial disease that causes the crowns and the bases of the spears to become soft, mushy, and foul-smelling. Crown rot can spread quickly and kill the plants. Crown rot is more likely to occur in wet, compacted, or poorly drained soil. To prevent crown rot, you should plant healthy crowns, improve the drainage and aeration of the soil, and avoid overwatering or injuring the plants. To treat crown rot, you should remove and destroy any infected plants, and disinfect the tools and the soil. Bonus: How to Cook and Enjoy Asparagus?  There are many ways to cook and enjoy asparagus, from steaming, boiling, roasting, grilling, to sautéing. The key is not to overcook it, as it will become mushy and lose its flavor. You should cook asparagus until it is bright green and crisp-tender, which usually takes about 5 to 10 minutes, depending on the method and the thickness of the spears. You can season asparagus with salt, pepper, butter, lemon juice, garlic, herbs, cheese, or any other condiments you like. You can also pair asparagus with eggs, bacon, ham, chicken, fish, pasta, rice, or salad. Asparagus is a versatile and delicious vegetable that can complement any meal. Wrapping It Up! Asparagus is a wonderful vegetable that you can grow and harvest in your own garden. It's easy to care for, once you know how to harvest asparagus properly. You should harvest asparagus when the spears are about 6 to 10 inches tall and before the tips start to open up. You should cut the spears at the base and leave some on the plant to grow into ferns. It would be best to store asparagus in the refrigerator for later use. And yes, you should also enjoy the many benefits and flavors of asparagus, by cooking it in various ways and pairing it with different dishes. Asparagus is a springtime delight that you don't want to miss. Learn More About: Planting & Harvesting Mint 7 Health Benefits of Black Seed Oil Spirulina: The Complete Plant Based Protein Source | Health Benefits

READ MOREDetails