Published on: 15 February 2021
Last Updated on: 26 December 2024
Diamond jewelry pieces are timeless. They will always be in style. They can give any kind of outfit a complete look, whether it is a nice pair of jeans and a trendy top or a beautiful evening gown. Diamond pieces can evoke antique romance.
The recent fashion in diamond jewelry offers customers a wide range of options to choose from. Here are some of the latest trends in diamond jewelry that you should know. These trends can guide you in the right direction and help you accessorize like a fashion expert.
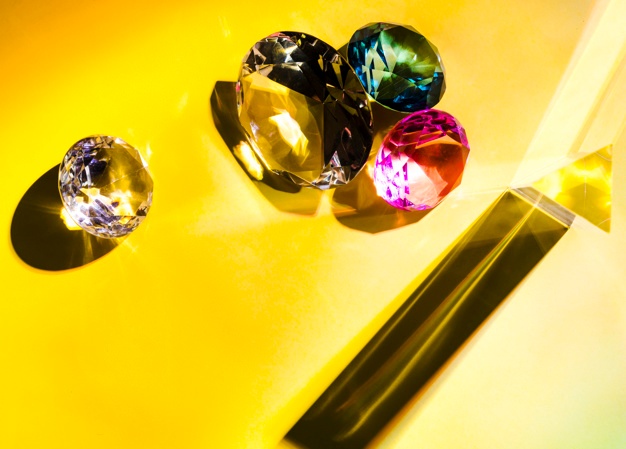
1. Colorful diamond jewelry:
In 2021, expect to see an explosion of color in the jewelry world. There is no doubt that colored diamonds are beautiful and fun. Colorful engagement rings are an ideal option for people who are looking for something unconventional yet flamboyant. Other than colored diamonds, there is also a huge rise in other colored gemstones, including sapphire or emerald and diamond studs or diamond chandelier earrings. These timeless pieces will definitely add a touch of class and glamour to any look. Some of the colors currently trending are pink, sunny yellow, hue chocolate, and champagne diamonds. You can always consult your jewelry expert on the latest diamond trends so you know which piece fits you best.
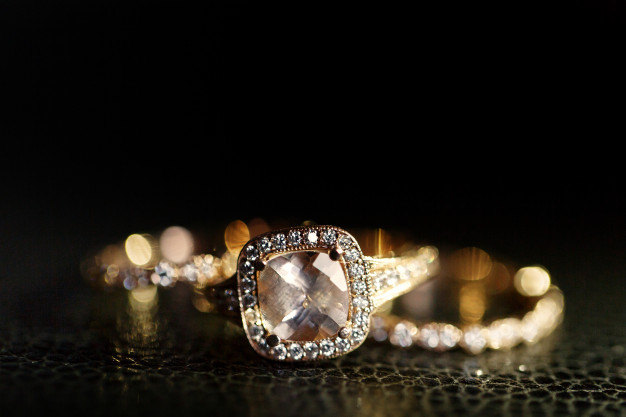
2. Vintage-inspired rings:
Whether you are intrigued by the look of a vintage ring or you are hoping to update a ring from your past, the heirloom-styled ring is currently trending. A lot of women are choosing new rings that replicate the look of a ring from the 90s. However, other women are incorporating a bit of a contemporary twist on their antique rings by simply adding a lab-grown diamond piece to a ring passed down in their families.
3. Stackable rings:
A huge trend in diamond jewelry currently is the right stack. Whether you want to add to your ring finger or you just want to start a stack on your right hand, the best option would be the stackable rings. Since the ring stacking trend started, many women are now thinking about how they can fit their black diamond engagement ring into a stack.
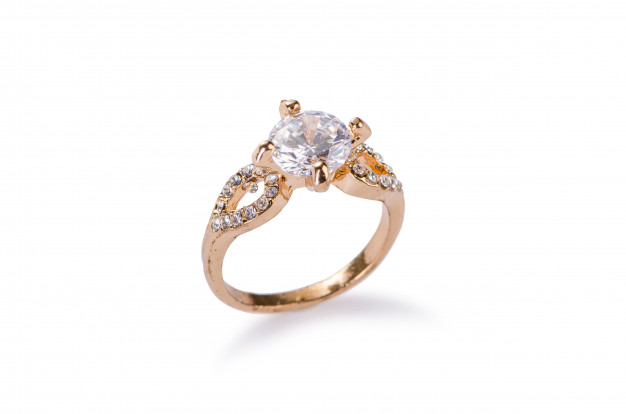
4. Lab-grown diamonds:
There are plenty of reasons why a lot of women are now opting for lab-grown diamonds, including the environment, cost, and their morals. The mining of diamonds is usually not environment-friendly. It destroys the planet and uses a large amount of water and energy. It also emits unnecessary amounts of carbon. But the lab-grown diamonds can significantly reduce the supply chain. In addition to that, these types of diamonds look as gorgeous as mined diamonds. But chemically, they aren’t the same. The benefits of lab-grown diamonds are endless. So if you want to save the planet, lab-grown diamonds are your perfect choice.
5. Chainlink diamond jewelry:
Chains become quite popular in 2020. Not just limited to necklaces, the chain link design has also been redesigned in bracelets and rings. From thin diamond chains in several layers to big and bold singular diamond chain link bracelets, chain link is believed to be the coolest diamond jewelry trend that will take 2021 by storm.
Read Also:
Content Rally wrapped around an online publication where you can publish your own intellectuals. It is a publishing platform designed to make great stories by content creators. This is your era, your place to be online. So come forward share your views, thoughts and ideas via Content Rally.
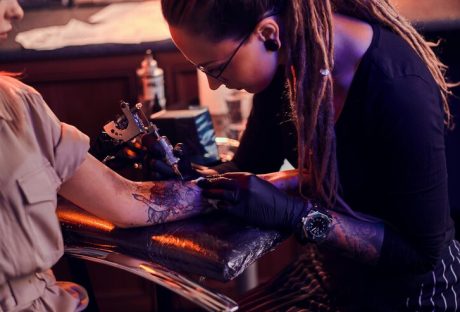
Tattoos have come a long way from being associated with rebellion and counterculture. In today's world, they are celebrated as forms of self-expression, art, and storytelling. If you're considering getting inked, the first step is finding the perfect tattoo shop. In this comprehensive guide, we'll explore everything you need to know about tattoo shops near me, from choosing the right one to taking care of your new masterpiece.
Tattoos are no longer just ink on skin; they're expressions of identity and artistry. Finding the right tattoo shop is crucial to ensuring a positive and safe tattooing experience. This guide will walk you through the process, from understanding different tattoo styles to selecting the ideal tattoo parlor.
Understanding Tattoo Styles
Understanding different tattoo styles is essential, but it's equally important to know that if your style preferences change over time, tattoo removal is effective, providing a way to evolve your body art along with your personal tastes. Before you step into a tattoo shop, it’s essential to know what style you want. There are various styles to choose from, including:
Traditional Tattoos
Traditional tattoos are characterized by bold outlines and a limited color palette. They often feature classic designs like anchors, roses, and hearts.
Realism Tattoos
Realism tattoos aim to replicate the appearance of a photograph or real-life object. These tattoos require an artist with exceptional attention to detail.
Watercolor Tattoos
Watercolor tattoos use vibrant colors and techniques that resemble watercolor paintings. They are known for their artistic and unique appearance.
Researching Tattoo Shops
Finding the right tattoo shop begins with thorough research. Here are some steps to consider:
Word Of Mouth Recommendations
Ask friends and acquaintances with tattoos about their experiences. Personal recommendations can provide valuable insights.
Online Reviews
Check online platforms like Yelp or Google for reviews of local tattoo shops. Pay attention to both positive and negative feedback.
Visiting Tattoo Shops
Don't hesitate to visit tattoo shops in person. Observe their cleanliness, the behavior of the staff, and the overall atmosphere.
The Importance Of Cleanliness
Cleanliness is non-negotiable when it comes to tattoo shops. Ensure that the shop you choose follows strict sterilization and hygiene practices.
Sterilization And Hygiene Practices
Tattoo equipment should be sterilized between uses, and artists must use disposable needles and gloves.
Licensing And Certification
Verify that the shop and artists are licensed and certified by relevant health authorities.
Tattoo Artist's Portfolio
The portfolio of a tattoo artist speaks volumes about their skills and style. Take time to review their previous work.
Examining Their Previous Work
Look for consistency in their art, attention to detail, and the ability to execute various styles.
Matching Style And Vision
Choose an artist whose style aligns with the vision you have for your tattoo.
Communication Is Key
Effective communication with your chosen artist is essential to get the tattoo you desire.
Discussing Your Ideas
Clearly convey your ideas, preferences, and any specific elements you want in your tattoo.
Clarifying Pricing
Discuss pricing upfront to avoid any surprises later in the process.
The Tattooing Process
Once you've chosen a tattoo shop and artist, you'll go through the tattooing process.
Preparing For Your Tattoo Session
Follow any pre-session instructions provided by the artist to ensure a smooth experience.
The Tattooing Experience
During the session, relax and trust your artist. They will guide you through the process.
Aftercare And Healing
Taking care of your tattoo after the session is crucial for its longevity and appearance.
Proper Tattoo Aftercare
Follow the aftercare instructions provided by your artist, including cleaning and moisturizing the tattoo.
Avoiding Tattoo Infections
Be vigilant for signs of infection and consult a healthcare professional if needed.
Choosing The Right Tattoo Shop
Consider location, personal comfort, and the overall atmosphere when selecting the perfect tattoo shop.
Location And Convenience
Choose a shop that is easily accessible and suits your schedule.
Personal Comfort And Atmosphere
You should feel comfortable in the shop, as you'll be spending a significant amount of time there.
Selecting the right tattoo shop is a crucial step in your tattoo journey. With the right research and communication, you can ensure a safe and satisfying experience.
Read Also:
How Many Jobs Are Available In Real Estate Investment Trusts?
How to Download Game Of Thrones Putlocker Online for Free?
0123Putlockers And Servers – Watch Movies Online
Jewelry is a fun and unique way to add some flair to your everyday outfit.
It can make any outfit look great and it also makes you feel confident. It’s also a nice way to get compliments from other people, especially if you find something unique and original that isn’t like anything else they’ve seen before! Wearing the right jewelry is a great way to express your personality and show people what you’re all about.
Jewelry can be worn with almost anything, so it doesn’t have to be limited to just formal outfits. However, there are so many different types of jewelry out there that it's easy to get overwhelmed when trying to find the perfect piece.
7 Must-Have Jewelry Pieces For Your Everyday Look
In this blog, we'll cover seven must-have types of jewelry that every woman should own.
1. Statement Necklace
A statement necklace is a great way to add some interest to your outfit, whether you're looking for something super fancy or just want to make something simple look more interesting. You can never go wrong with a statement necklace.
Necklaces are also an easy way to dress up an outfit especially if you don't have the time or energy for full-on makeup, but still, want your look to be polished and put together. They can be worn with jeans or sweatpants, which makes them great if you like wearing jewelry but don't always feel like putting them on every day.
2. Gemstone Ring
A gemstone ring is one of those must-have pieces of jewelry that you can wear with almost any outfit. It's simple, yet elegant and will add some sparkle to your everyday look. You can wear this piece with jeans and a shirt or blouse, but also with dresses and skirts. You'll find many varieties like polki diamond ring, the options are endless.
You can also go for an antique silver band which is made from sterling silver as it is very lightweight and comfortable to wear, even though it looks like a piece of jewelry that would be heavy on your finger.
3. Long Chain Necklace
A long chain necklace is a must-have for any jewelry collection. It can be worn with almost anything, and the length of the necklace can be adjusted to fit your style.
You can wear it long, or you can double it up and wear it shorter. This allows you to layer different necklaces together and create an entirely new look. A long chain necklace is perfect for everyday wear because it goes well with any outfit, you can even pair one with jeans or dresses if you want something more casual.
4. Watch or Bracelet
You could wear a watch, or you could wear a bracelet. But why not do both? A watch is an accessory that's been around for centuries and will never go out of style. It can be worn with any outfit, whether it's casual or formal. You can also buy ankle bracelets or a simple red string bracelet online that you can show off while at the beach or anywhere you go.
Bracelets are also timeless, you can wear them with other bracelets or watches! Whether you're looking to complement your outfit or just want to add something extra, it's always a good idea to have both on hand. These are perfect for the collection if you are looking for where to buy jewelry boxes.
5. Fashionable Earrings
Earrings are the perfect accessory to add personality to your look. You can wear them with any outfit, from casual to formal, and they'll make it look chic. Earrings can be made of many different materials including gold, silver, and diamonds.
They come in many shapes like hoops or drop styles. Hoops are round pieces of jewelry that go around your earlobe and create a bold outfit look. Drop earrings are a classic style that can be worn with anything. They come in many different sizes and shapes, like hearts or flowers. You can also find drop earrings made of precious metals like silver or gold, which will make your outfit look even more expensive.
6. Diamond Studs
If you're not sure where to start with your jewelry collection, diamond studs are a great place to begin. They're classic and versatile and can be worn with any outfit from casual to formal. Diamond studs are also an excellent way to add some sparkle without going overboard on bling.
You'll look elegant without feeling overloaded and that's exactly what we all want. When choosing diamond stud earrings, it's important to remember that they're a long-term investment. You'll want to make sure you're getting the ones of the best quality for your money.
7. Stackable Bracelets
You've probably seen this trend in the jewelry world, where people wear multiple bracelets on their wrists at once. It's a great way to add some color and dimension to an outfit. A bracelet can be worn with other bracelets or even other jewelry pieces such as necklaces or earrings.
It's important for any piece of jewelry, especially one worn on your wrist to be versatile enough so that it goes with any outfit combination in your closet. The more you can wear a piece of jewelry, the more value you will get out of it. It's important to choose a bracelet that goes with your style as well as be able to wear it with different types of clothing.
End Note
Jewelry is so fun to wear and it can make your outfits look amazing. Jewelry can be a great way to add color to your outfit and show off your personality. It comes in many different forms, and it can be worn for so many different occasions.
Jewelry can be an easy way to spice up an outfit, but it can also be a good way to add some subtle touches. If you want to wear something simple and elegant, try wearing a pair of simple stud earrings or hoops. We hope you enjoyed our list of must-have jewelry. Remember that the most important thing is to have fun with your look and feel confident in what you wear!
Read Also:
What Is Princess Cut Diamond & Buying Guide
Precisely How to Select the Ideal Jewelry Store for You
Here’s Why Women’s Silicone Rings Are Becoming More Popular
“You can have anything you want in life if you dress for it,” said the famous American costume designer, Edith Head. The professionals responsible for influencing people’s dressing choices are the coveted fashion designers we all love to draw inspiration from. However, the fashion industry has come a long way – no longer is it dominated by fashion designers. If you’re also looking to enter this industry, you can opt for different fashion design courses based on your unique sensibilities, as discussed below.
Fashion designing
In short, the art of designing beautiful clothes and relevant fashion accessories comes under fashion designing. Looking at the work of famous fashion designers, students of these courses are given a thorough understanding of designing clothes that meet the cultural needs of their time and are at the same time, in line with the latest trends.
Under fashion design short course from reputed institutes like the Pearl Academy, students learn a whole lot about the different technical aspects of fashion designing such as freehand and digital sketching, color palettes, mixing and matching styles, knowledge of different textiles and how each drapes on the human body, history and evolution of fashion, trends within the industry, secrets of top fashion designers, and more. Using a fashion design course, students can make a successful career as a fashion designer or other products' designer, such as footwear, headwear, jewelry, and other accessories.
Visual merchandising
Where fashion designing courses teach students the art of designing original and influential designs, visual merchandising courses offer deep insights on making these designs attractive in the eyes of the brand's target audience via various brand promotional strategies. These courses provide students knowledge on implementing different creative marketing strategies, strategic store displays, window signs, and even interior product placement, source and manage inventory on a budget, and more.
From brand managers to retail buyers and even visual merchandising bloggers, the career prospects for those having pursued this course are far and wide. These professionals are hired by marketing agencies, fashion stores, theatre companies, jewelry stores, and more.
Textile designing
Textile designing is a highly technical field wherein students are taught the art of creating designs for all kinds of fabrics – printed, woven, knitted, or surface ornamented fabrics, along with dying and embroidery. Students of this course will learn how to design fabrics based on their type and use. These designs can be for a certain body or space, and while textile designers are free to allow their imaginations to run wild, they still need to stay within the technical boundaries set by trends, culture, and of course, demand. Textile designing courses offer students a good eye for color, texture, and fabric patterns as well as different techniques of processing textiles.
Textile designers are often in high demand among garment and textile export houses, branded fashion showrooms, boutiques, retail outlets, textile manufacturing units, among others.
Fashion photography
Belonging to the umbrella of fashion communication, fashion photography is an exclusive genre of photography that deals with the display of clothing items and other accessories such as jewellery, headwear, even nail art, makeup, and hairstyles. Easy as it may appear, this field is all about showing the clothes and fashion accessories in such a manner that the particular brand’s products appear to be enticing to its target audience. Fashion photography students learn more than creative photography; they learn how to balance creativity with the brand’s business goals for promotional purposes.
Fashion photography is a highly lucrative career option involving different sub-niches such as catalog photography, editorial photography, high-end and street fashion photography, and more.
The world of fashion is advancing at an unparalleled rate. And where once only fashion designers reigned supreme in the industry, the fashion design industry has opened its doors wide for other successful fields worth exploring.
Read Also:
35+ Best Nail Designs 2026
Top 5 Eyewear to Style your look at New Year


 In 2021, expect to see an explosion of color in the jewelry world. There is no doubt that colored diamonds are beautiful and fun. Colorful engagement rings are an ideal option for people who are looking for something unconventional yet flamboyant. Other than colored diamonds, there is also a huge rise in other colored gemstones, including sapphire or emerald and diamond studs or diamond chandelier earrings. These timeless pieces will definitely add a touch of class and glamour to any look. Some of the colors currently trending are pink, sunny yellow, hue chocolate, and champagne diamonds. You can always consult your jewelry expert on the latest diamond trends so you know which piece fits you best.
 Whether you are intrigued by the look of a vintage ring or you are hoping to update a ring from your past, the heirloom-styled ring is currently trending. A lot of women are choosing new rings that replicate the look of a ring from the 90s. However, other women are incorporating a bit of a contemporary twist on their antique rings by simply adding a lab-grown diamond piece to a ring passed down in their families.
 Chains become quite popular in 2020. Not just limited to necklaces, the chain link design has also been redesigned in bracelets and rings. From thin diamond chains in several layers to big and bold singular diamond chain link bracelets, chain link is believed to be the coolest diamond jewelry trend that will take 2021 by storm.
Read Also:
Chains become quite popular in 2020. Not just limited to necklaces, the chain link design has also been redesigned in bracelets and rings. From thin diamond chains in several layers to big and bold singular diamond chain link bracelets, chain link is believed to be the coolest diamond jewelry trend that will take 2021 by storm.
Read Also: