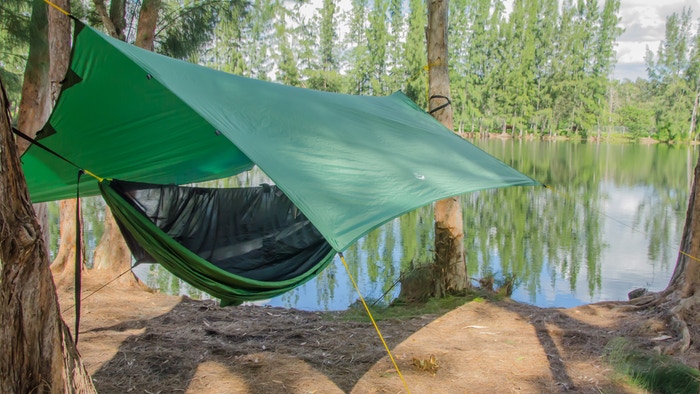
Why You Should Include A Tent In Your Hammock Backpacking

Published on: 15 November 2018 Last Updated on: 19 July 2019
Hammock

Choosing to either sleep in a hammock or a tent is an important factor to consider when prepping for camping. This range of choices has generated heated debates among outdoor enthusiasts. Traditional campers prefer to stick with tents, and the others usually opt for hammocks.

Sleeping in a hammock is definitely a different experience than sleeping in a tent. This is mainly because while a tent is sited on the ground, a hammock is suspended in air between two trees. Moreover, there are pros and cons of sleeping either in a hammock or a tent.

This leads to us to an important subject that’s fast becoming popular among campers – hammock camping.

What is hammock camping?

There are different ways of camping. Hammock camping is a type of camping wherein a camper sleeps in a hammock rather than in a regular tent.

Sleeping in a hammock or a tent comes with respective advantages and disadvantages. No doubt, the biggest advantage of sleeping in a hammock is comfortable and better sleep it provides. However, sleeping in hammock still presents some drawbacks such as exposure to the elements.

Sleeping in a tent is more common among campers, and the reason for this isn’t far-fetched. The advantages that a tent offers, such as more space and protection, make it a great choice among campers.

Top reasons why you should include a tent in your hammock backpack:

The following are some of the reasons why you should always include a tent in your hammock backpack.

  • For protection: This is one of the many upsides of sleeping in a tent. Unlike sleeping in a hammock where you are exposed, sleeping in a tent gets you covered and protected from the weather. So, if you plan on hammock camping, ensure that you include a tent in anticipation for the worst.
  • For better sleep experience: While sleeping in a hammock seems more comfortable than in a tent, you might find it difficult to turn or sleep on your side when using a hammock. As a result, most campers choose to go the traditional way of using a tent, even during hammock camping.
  • No need for trees: While it may be unlikely to not find trees in camping sites, you need to be prepared for such an inopportune situation. Including a tent in your hammock backpack is a proactive way of preparing for the unlikely.
  • Options: Including a tent in your backpack offers you options to alternate between sleeping in a hammock and a tent. During the day, you might prefer resting in the hammock, while at night (when it is usually cold), you can benefit from the shelter of a tent.
  • Little or no need for paraphernalia: If you must use a hammock in the cold, then you need to also include extra materials such as a bug net. However, with a tent, there is little or no need for such provisions, besides your sleeping bag.

Conclusion:

Although hammock camping is becoming increasingly popular among campers, tent camping is still very predominant. The limitations of sleeping in hammocks are the reasons why tents will continue to remain popular.

Read Also:

Content Rally wrapped around an online publication where you can publish your own intellectuals. It is a publishing platform designed to make great stories by content creators. This is your era, your place to be online. So come forward share your views, thoughts and ideas via Content Rally.

View all posts

Leave a Reply

Your email address will not be published. Required fields are marked *

Related

Wedding Dress

7 Perfect Accessories to Match Your Wedding Dress

So you have found the perfect dress -- congratulations! Now it’s time to decide on your accessories. All brides know that a wedding gown isn’t complete without the right finishing touches. Your accessories can even make your gown look more gorgeous than ever. Whether your gown is simple and sleek or an extra embellished one, here’s a list of accessories that will further define your wedding style. 7 Perfect Accessories to Match Your Wedding Dress: 1. Veil: Not all brides prefer to wear a veil on their wedding day, but to those who choose to, know that there are many different types of veils for every bride. Of course, you have to make sure that your veil suits your gown, be it a classic or an edgy one. Try on some varieties with your dress so you can decide which one is best. Although it’s always a good idea to have a motif, you might find that the opposite style actually works with your gown. 2. Necklace: Some brides feel that a necklace will define the look they want to project on their wedding day. Often times, a matching earring and necklace set is chosen because it’s a safe choice. Your decision should be based on the type of neckline your dress has when choosing a necklace. For example, if your dress is already busy with details on the neckline, it’s perfectly OK to go without a necklace. On the other hand, a simple gown with a strapless neckline is befitting for necklaces. 3. Garter: Garters are a traditional part of the wedding, especially for the bride. Who doesn’t look forward to a garter toss, after all? But did you know where the garter tradition originated? Back then a belief of many people is that you have to own a piece of the wedding gown to bring good luck, so guests would often end up attacking the bride in an attempt to get a piece of her gown. This led to wedding garters, so brides don’t have to end up with a torn wedding dress and simply remove a piece of article to be given to one lucky guest. You can still opt out on the garter, but it’s still fun to have one even if your wedding isn’t exactly the traditional kind. 4. Hairpins: If a tiara or a crown isn’t an option for you, you can still add some accessories to your hair by incorporating hairpins. These accessories will bring out a girly vibe and works best in keeping your hair in place too. Hairpins are ideal for brides who prefer a subtle way to accessorize the hair without too many embellishments. 5. Crown: If you want to go all out on the princess vibe, a crown will do the trick. And you don’t have to go for a bejewelled crown if you think it’s too much. You can always choose to wear flower crowns, which are becoming hugely popular these days. History has depicted women wearing crowns as a representation of beauty, fertility, and love. You can bring all these things to your wedding with a crown or tiara that matches your motif. 6. Earrings: The beauty of earrings is that they're old enough to complete an outfit. You can choose to go without any other accessories but a pair of gorgeous earrings, and you’d still feel that your outfit is complete. Again, you should make sure that your earrings match with your gown and they don’t have to be super expensive too. This season, tassels are in, so you may want to take a look at those. 7. Anklet: Although not all brides are cool with the idea of wearing an anklet, this piece of accessory works best for beach weddings or boho type gowns. This especially works if you opt out on the shoes -- the anklet will be a major attraction. Guidelines for Accessorizing Your Wedding Gown: Don’t go overboard: This is the first rule in choosing your accessories for the wedding: don’t overdo it. It is tempting to load up on jewelry, but you have to remember that all eyes should be on you, the bride, and not on the bride’s trinkets. Always remember that less is more, so choose pieces that will complete your whole look and not overpower it. Don’t be overwhelmed: Picking out accessories for the wedding can be challenging and overwhelming, but no matter how you’re feeling, remember to focus. Choose an accessory that you love and not just for the reason of wearing it because the event calls for it. Wear something that you have no trouble investing in. If you’re still unsure, diamond studs or a pair of pearls will never go wrong. Or let a friend help you out. A second opinion might be the only thing you need. Match your accessories with the dress: This rule doesn’t have to be said out loud. All brides know that the accessories should always go with the dress. But there are some specific guidelines you have to keep in mind. For example, your jewelry set should have the same metal base, whether it’s gold, rose, or silver. If your dress already has beadwork, allow it to set the tone for the accessories you should wear. If you're wearing a bright white dress, compliment it with hints of platinum. For a dress with an ivory shade, gold always works best. Be yourself: This might be the most important rule of all. In weddings, there are some instances where you have to compromise, but at the end of the day, you know it’s your wedding and it’s essential that you have fun and be able to show your true self. So when choosing accessories, always pick out ones that you like the most. If you’re not comfortable wearing dangling or bulky earrings, it’s okay to go for studs. If you don’t want to wear a necklace, an embellished neckline will do it for you. Always be confident and keep the day genuine. And of course, wear Wedding Dresses Melbourne with your best smile, which is the best accessory of all. Read Also: How To Avoid Buying A Cheap Looking Prom Dress Sarees – The Identity Of Indian Women Top 3 Factors While Selecting Mismatched Dresses For Your Bridesmaids Choose The Latest Collection Of Women Clothing For A Stylish Look Make Your Pre-Wedding Amazing: 8 Bridal-Shower Planning Ideas 7 Tips To Serve The Most Memorable Food On Your Wedding Hottest Plus Size Shapewear Ideas for Your Big Day

READ MOREDetails
how to make cannabis gummies

From Bud To Bite: Crafting Your Own Cannabis Gummy Edibles  

Hello there, fellow cannabis enthusiasts! Today, I'm excited to take you on a flavorful journey into the world of homemade cannabis gummies. If you've ever wanted to try your hand at crafting these delectable treats, you're in the right place. Want to know how to make cannabis gummies? I have you covered! In this blog, I will walk you through the process step by step, from selecting the right strain to infusing your gummies with the perfect dose of cannabis goodness. So, roll up your sleeves (pun intended), and let's get cooking! Before We Dive In: A Word On Cannabis Strains   Choosing the right cannabis strain for your gummies is crucial. Each strain offers a unique flavor profile and effect, so consider what kind of experience you're aiming for. Personally, I like to use a hybrid strain for a balanced blend of relaxation and creativity. Indica strains can be too sedating for some, while sativa strains might make you a bit too chatty. A hybrid is often the sweet spot. How To Make Cannabis Gummies: A Step-By-Step Guide That You Need!   Before we start with the steps, there is one thing I would like to make clear. While making cannabis gummies at home offers numerous benefits, it's essential to approach the process responsibly, especially if you are new to cannabis edibles. Start with lower doses, be patient, and remember to comply with local laws and regulations regarding the preparation and consumption of cannabis-infused products. Now that it is done, let’s get started! Step 1: Gather Your Ingredients And Tools   Before you start whipping up your cannabis-infused gummies, make sure you have everything you need. Here's a list of what you'll require: Cannabis tincture or cannabis-infused oil: This is the star of the show, providing THC or CBD goodness. Flavored gelatin packets: Choose your favorite flavors for a delightful twist. Unflavored gelatin: This will give your gummies the right texture. Sugar: For sweetness, of course! Water: To mix everything together. Silicone molds: These will help shape your gummies. A saucepan and a whisk: To heat and mix your ingredients. A dropper or syringe: For precise dosing. Step 2: Calculate Your Dosage   Getting the dosage right is crucial. We want those gummies to provide a blissful experience, not send us to the moon! Start by determining how much THC or CBD is in your tincture or oil and calculate the dosage per gummy. For beginners, I recommend starting with a lower dose (around 5-10mg) and gradually increasing it as needed. Step 3: Prepare Your Molds   Before you dive into the cooking process, prepare your silicone molds. Lightly coat them with cooking spray to prevent sticking later on. This step will ensure your gummies pop out effortlessly once they're set. Step 4: Mix Your Ingredients   Now, let's get cooking! In your saucepan, combine the flavored gelatin packets, unflavored gelatin, sugar, and water. Stir everything together until it forms a smooth mixture. It should be free of lumps and evenly blended. Step 5: Infuse With Cannabis   This is where the magic happens! Add your cannabis tincture or infused oil to the mixture. The dosage you calculated earlier will guide you here. Use a whisk to ensure the cannabis is evenly distributed throughout the mixture. Keep the heat low to avoid overheating the cannabis, which could affect its potency. Step 6: Heat And Stir   Place your saucepan over low heat and continue to stir. You want to gently heat the mixture without boiling it. Keep stirring until all the ingredients are fully combined, and the mixture becomes smooth and shiny. This should take about 7-10 minutes. Step 7: Fill Your Molds   Once your mixture is ready, use your dropper or syringe to fill the silicone molds. Take your time and be as precise as possible. This will ensure that each gummy has the correct dosage, and they'll all look fantastic! Step 8: Let Them Set   Patience is key at this stage. Allow your cannabis gummies to set at room temperature for at least 30 minutes. You can speed up the process by placing them in the refrigerator, but be careful not to freeze them. Step 9: Pop And Enjoy!   The moment you've been waiting for has arrived! Carefully pop your gummies out of the molds and behold your homemade cannabis-infused creations. Store them in an airtight container in a cool, dark place to maintain their freshness. The Beauty Of Homemade Cannabis Gummies   There's something truly special about crafting your own cannabis gummies. You have full control over the ingredients, flavors, and dosages, ensuring a personalized experience every time. Plus, it's a fun and rewarding process that allows you to experiment with different strains and flavors until you find your perfect match. Now that you've learned the art of making cannabis gummies, the possibilities are endless. Whether you're treating yourself or sharing with friends, these homemade delights are a delightful way to enjoy the benefits of cannabis in a delicious and discreet form. So, go ahead, put on your apron, and let your culinary creativity shine in the world of cannabis-infused treats! Benefits Of Making Cannabis Gummies At Home!   Making cannabis gummies at home offers several benefits, which contribute to their popularity among cannabis enthusiasts. Here are some key advantages: 1. Control Over Ingredients:    When you make cannabis gummies at home, you have full control over the quality of ingredients. You can choose organic, non-GMO, and natural products, ensuring that your gummies are free from undesirable additives or artificial flavors. 2. Customizable Dosage:    One of the most significant advantages is the ability to customize the dosage. You can precisely measure the amount of cannabis you want in each gummy, allowing for consistent and accurate dosing. This is particularly important for medical cannabis users who require specific doses for their conditions. 3. Choice Of Strain:    Homemade gummies let you select the cannabis strain that suits your preferences and desired effects. Whether you want a relaxing Indica or an energizing sativa, you can tailor your gummies to your specific needs. 4. Variety Of Flavors:    You can experiment with an array of flavors, creating gummies that cater to your taste preferences. Whether you prefer fruity, sour, or herbal flavors, you have the freedom to get creative and craft gummies that delight your palate. 5. Cost-Effective:    Making your own cannabis gummies can be more cost-effective than purchasing pre-made edibles. You can buy cannabis flowers or extracts in bulk, which often offers better value for money, and create a substantial quantity of gummies. 6. Quality Control:    Home preparation allows for better quality control. You can ensure the cleanliness of your equipment and environment, reducing the risk of contamination. This is particularly crucial for individuals with allergies or dietary restrictions. 7. Privacy And Discretion:    Crafting your cannabis gummies at home offers privacy and discretion. You can enjoy the therapeutic benefits of cannabis without drawing attention to yourself or your cannabis consumption. 8. Fun And Educational:    The process of making cannabis gummies can be enjoyable and educational. It provides an opportunity to learn about the science of cannabis infusion and cooking techniques. It can be a fun activity to share with friends or loved ones. 9. Experimentation:    Homemade gummies encourage experimentation. You can try different recipes, ratios, and infusion methods until you find the perfect formula that suits your preferences and needs. 10. Longer Shelf Life:    Keep With proper storage, homemade cannabis gummies can have a longer shelf life compared to store-bought edibles. You can keep them fresh for an extended period, allowing you to enjoy them at your own pace. Wrapping It Up!   In case you were searching about how to make cannabis gummies at home, I hope that this blog has been of help to you. If there are any other queries related to the same, feel free to let me know. All that you need to do is scroll down till you reach the bottom of the page, Then leave your comments and queries in the box below. And I will be there to answer them all for you! Learn More About: Why Cannabis Is Good For Health? How To Make Your Own Cannabis Topicals? Things To Consider While Buying CBD Gummies Online Cannabis Can Help In The Fight Against Drug Addiction

READ MOREDetails
First Knife

Mistakes To Avoid While Making Your First Knife

Making your first knife is a daunting task. There are so many steps involved, and so much can go wrong if you don't know what you're doing. This article will cover some of the most common mistakes beginners make when making their first knives. If you take on this project, it's important to avoid them. 4 Top Mistakes To Avoid While Making First Knife 1. Using the wrong kind of steel Using the wrong kind of steel is one of the most common mistakes people make when they first start making knives. Before you begin, research which type of steel is best for your needs and budget. When choosing your steel, avoid using recycled steel or steel that has not been properly hardened. Also, make sure your knife is made of the right kind of steel for the type of knife you are making. For example, if you're making a hunting knife, don't use high carbon stainless steel because it will break under pressure. A survey of knife makers found that 72% of knife makers prefer high carbon steel as their favorite steel of choice. Finally, be sure to use steel that has been properly ground. Using inexpensive steel may seem like it will save you money, but it won't hold up as well in the long run. 2. Overheating your blade blank If you overheat the steel, it can warp and become less than straight. Overheating will also make your blade more brittle and prone to breaking, so you'll need to start from scratch with a new piece of steel if this happens. If you don't heat up your blade long enough, however, you'll have problems getting it sharp because there won't be enough carbon in the metal to be hardened properly. You may also not get enough hardness or strength in your knife if there isn't enough time spent at high temperatures. 3. Using bad quality grinding tools A good quality grinding tool will allow you to make a smooth, even grind. Its teeth are sharp enough to cut through the material being ground easily. You should also be able to do your grinding in a shorter amount of time with a good quality grinder, saving yourself precious time. If you're unsure if your grinder is up to snuff, check for any burrs along its teeth and see if there's any visible damage on them (like chips or cracks). If there are any issues with your grinder's teeth, it will likely result in an uneven finished product when it comes time to grind down the blade of your knife. 4. Neglecting to quench your blade In the world of bladesmithing, quenching is an integral part of the process. Quenching (or tempering) is a step that comes after forging or grinding your blade, where you plunge it into some kind of liquid to cool down and harden it. If you don't properly quench your knife, it can warp or crack—not what you want when making something that's meant to be used for everything from opening boxes to cutting meat. Conclusion If you are going to make a knife, it's important to understand what it takes. You can't cut corners on this project, or you will end up with a poor-quality product that is not worth anything. We've given you some tips about avoiding common mistakes when making your first knife, but these things should also be kept in mind when making any other kind of tool out of steel. Additionals: 4 Tips for choosing a good kitchen tap6 Tips To Improve Your Cooking Overnight

READ MOREDetails