How to set up your baby’s room

Published on: 26 June 2018 Last Updated on: 06 December 2022
baby’s room

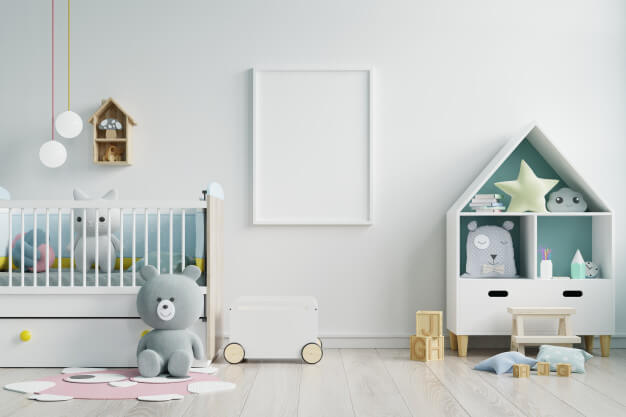
Are you expecting to welcome a new member into your family? If so, then you should definitely prepare before they are here. One of the best ways to begin is by setting up your baby’s room. Giving it a good theme, setting a decent wallpaper, getting all the furniture plays a very important role when it comes to setting up nurseries. Not only that, you have to keep many other things in mind while getting it all done. We can help you with all of this with today’s post!

Read ahead to find out more!

Select the right theme for yourself

Select the right theme for yourself

Before you set up your baby’s room, make sure to set up a theme. There are several ideas available on Pinterest and various other free apps that will open your mind, improve your creativity and actually help you decide what sort of theme you should go for your little one. However, make sure it isn’t too bright or shiny. You can keep the look of the room subtle and it will still look great!

Know what essentials you require:

Know what essentials you require

Some of the most important things you require while setting up your baby’s room are cribs, changing tables, cupboards, soft carpets, a nursing chair, baby bath toys, baby blankets, toy boxes, and a nice drawer for clothing.

Once you have got these things in place, you can get on with the rest such as design and styling.

Great wallpaper:

The first thing you need to do is begin with a good nursery wallpaper. A baby’s nursery could easily look a lot better if you get hold of a fun pattern and paper that fills up the entire room or maybe a single wall. Building on the pattern with great colors or art could improve the whole look of your baby’s room as well.

Get rid of all the clutter:

If there is a lot of stuff that you want to keep in the nursery, make sure to use closed storage. This helps to keep all the clutter far away. Shelves that come without doors look good but they can get messy if you pile them with a whole bunch of stuff. In this case, you can use a few baskets or boxes that will help your staff stay more organized.

Invest in the best baby change baskets:

Invest in the best baby change baskets

A baby change basket is necessary if you are setting up a nursery for your little one. A great treasure basket can be kept in the middle of the circle so that your baby can reach inside it easily. Allow all of them to explore each item. There are several accessories available online to help style the treasure basket. Also, the best baby change baskets are available in several stores online. You can take a look at all, compare the prices and then make the final decision.

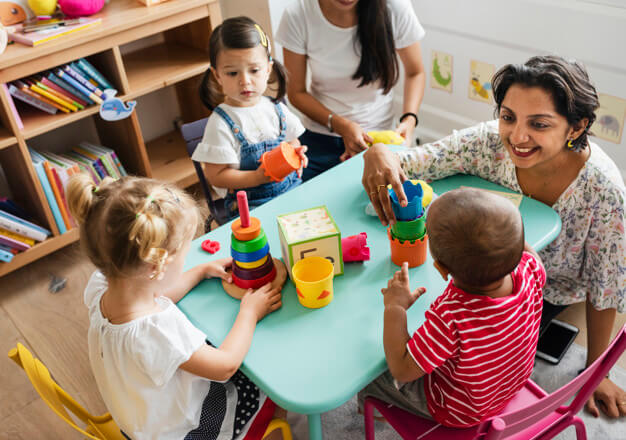
Educational toys in your baby’s nursery:

Having educational toys in your baby’s nursery is essential. You could hang a mobile on the crib so that your baby can play with it whenever he/she is bored. You can add some nursery rhymes and audio collections that will keep them happy. Those who invest in things like this tend to find more success in their relationship with kids more than others.

Use geometric patterns:

Using geometric patterns on the walls with some strong colors could be an amazing way to add some fun and spark to your baby’s room. This could be on the rug, the walls and so much more. Babies who are developing eyes will be more attracted to a contrast of high color. If you really want to highlight the appearance of your baby’s room, this could be a helpful tip!

Decorating your baby’s nursery:

Decorating your baby’s nursery

Decorating your baby’s nursery doesn’t have to be boring. If you like finding the perfect set of curtains and bed sheets that match with the wall paint, this could actually be perfect for you. If decorating is not really your thing, don’t give yourself the pressure to create the best baby nursery. You can ask your friend to help you out or simply stick to the basics and your home will look somehow.

Test all the designs:

Finally, make sure to test all the designs with the help of a sample board. It will bring your wall, flooring, window, bedding, and samples together. It will help you play around with the options as well. Several baby nurseries are set up after a few trials and errors so be open to fun and some experimenting until you have achieved what you fully desire.

With that, we bring our post to an end. If you have liked reading our post, do let us know in the comment section below. Also, if there are questions you have in mind, drop them down. We would love to answer all your questions in detail!


Read Also:


Content Rally wrapped around an online publication where you can publish your own intellectuals. It is a publishing platform designed to make great stories by content creators. This is your era, your place to be online. So come forward share your views, thoughts and ideas via Content Rally.

View all posts

Leave a Reply

Your email address will not be published. Required fields are marked *

Related

Air Condition

13 Ways to Maintain the Coolness of Your Air Condition Unit

Maintenance of home devices is one way to keep them for a long period of time and make them energy-efficient devices to decrease electrical bills. There are various ways to maintain the air condition unit and this, we are going to discuss today. Things you should do to maintain properly the AC condition unit: The evaporator The foil insulation in front of air duct junction should be removed first. If it is worn, replace it immediately. Then, the access plate should be cleaned as well. It is located behind the insulation and anchored with a few screws. Remove the screws and plates Professional contractors who offer AC repair will recommend you to use a utility brush when cleaning the underside of the evaporator. Now, if the back area is unreachable, you just slide the evaporator a little bit. Clean the tray now from the growth of fungus by pouring a tablespoon of chlorine bleach inside the tray. You can determine if there's a clog on your tray, there's water in it. Use the heavy wire in removing the clog. Now, attach again the plate and tape the insulation back to the original place. Switch on the AC unit and check for any air leakage. If there's any, tape them with duct tape. Maintain the Condenser According to the professional technicians of HVAC companies, the condenser is always collecting dirt, dust and other debris from the outside environment. The fan inside the unit helps to circulate the air over the coil. Any dirt, dust, debris like grass or vines should be removed from the condenser. This debris can affect the airflow. Use a coil cleaner when cleaning the condenser. There is an instruction on the manual on how are you going to clean it. Flush some water on coil cleaner and let it dry. Clean the fins using a brush. Remove the outer grill so you can reach the fins. Some of the professional contractors said that using the water hose to clean the fins may cause the dirt to clump then turning into mud. A fin comb can be used to get into the spaces of fins to clean it. Inspecting the concrete pad is essential too. Make sure that the concrete pad is settled properly. Use condenser cover for your unit to prevent ice damage or leaf blockage during winter months. A heavy plastic sheet with the sturdy cord can also secure your unit. The maintenance of thermostat unit Remove the grill and the control panel. Then, you must remove the thermostat carefully. Test the thermostat using the VOM set into RX1 scale. You should attach the probes to the terminals then switch on the temperature controls to the coolest setting. Licensed HVAC technicians said that if the result is zero, it is functional then. But if the result is above zero, replace it right away. Filter The air conditioning filter must be changed once a month according to professional air condition technicians. But if the weather is extreme, change the filter twice a month. Now, you don't need to worry about your AC unit, these steps and tips shared by Wincrest will totally help you to do-it-yourself the AC cleaning and maintenance. Read More:  Basic Idea On Power Tools For Home Improvement Additional Ways To Keep Your Home Warm Installing A Kitchen Tile Splashback – The Basics Using Feng Shui In Your Bathroom Design

READ MOREDetails
how to harvest spinach

How to Harvest Spinach the Right Way: A Step-by-Step Guide 

Being a gardener, I know Spinach is one of the most popular and versatile leafy greens you can grow in your garden. It's rich in vitamins, minerals, antioxidants, and fiber and can be used in salads, soups, smoothies, and more. But how do you harvest spinach the right way so that you can enjoy it fresh and crisp and make it last longer? In this article, I will show you how to harvest spinach, so it keeps growing. I will also explain how to harvest spinach seeds, how to store and freeze spinach, and the health benefits of spinach. Additionally, I will also share some tips and tricks on how to grow spinach successfully and how to use it in delicious recipes. Whether you're a beginner or an expert gardener, this guide will help you make the most of your spinach harvest. So, keep on reading till the end to learn more, and thank me later!  Driven by Benefits: Why are People Growing Spinach? Spinach is not only tasty but also healthy. It's low in calories and high in fiber, vitamins, minerals, antioxidants, and phytochemicals. It can help improve various aspects of health, such as: Eye Health Spinach is rich in lutein and zeaxanthin. These are carotenoids that protect the eyes from age-related macular degeneration, cataracts, and glaucoma. Spinach also contains vitamin A, which is essential for vision and eye health. Blood Pressure Spinach is high in potassium, magnesium, and nitrates, which are compounds that help lower blood pressure and relax the blood vessels. Spinach also contains folate. This helps prevent homocysteine, an amino acid that can damage the blood vessels and increase the risk of cardiovascular diseases. Bone Health Spinach is a good source of calcium, magnesium, and vitamin K, which are important for bone health and density. Spinach also contains vitamin C, which helps the body absorb calcium and produce collagen, a protein that strengthens the bones and connective tissues. Immune System Spinach is loaded with vitamin C, which is a powerful antioxidant that boosts the immune system and fights off infections and inflammation. Spinach also contains vitamin E, which enhances the immune response and protects the cells from oxidative stress. Digestion Spinach is high in fiber, which helps regulate digestion and prevent constipation, diarrhea, and bloating. Fiber also feeds the beneficial bacteria in the gut. This improves the digestion and absorption of nutrients. It also supports the immune system. Skin And Hair Spinach is rich in vitamins A, C, E, and iron, which are essential for healthy skin and hair. Vitamin A helps maintain the moisture and elasticity of the skin and prevents acne and wrinkles. Vitamin C helps produce collagen, which keeps the skin firm and smooth. On the other hand, vitamin E helps protect the skin from sun damage and aging. Iron helps deliver oxygen to the skin and hair cells and prevents anemia, which can cause hair loss and pale skin. How To Harvest Spinach So It Keeps Growing One of the best things about spinach is that it's a cut-and-come-again crop. This means you can harvest it multiple times throughout the season if you do it correctly. Here are the steps to follow to harvest spinach so it keeps growing: Choose the right time to harvest The best time to harvest spinach is when the leaves are young and tender. This is usually about 40 to 50 days after planting. You can also harvest baby spinach leaves earlier, about 25 to 30 days after planting. You should harvest spinach before it starts to bolt. This is when it produces flowers and seeds and becomes bitter and tough. Spinach usually bolts when the days get longer and warmer. So, you should harvest it more frequently in the spring and summer. Use a sharp knife or scissors to cut the leaves You can either cut the whole plant at the base, leaving about an inch of stem, or cut individual leaves from the outer part of the plant, leaving the inner leaves to grow. You should cut the leaves about an inch above the soil, to avoid damaging the crown and the roots. Moreover, you should also avoid cutting too many leaves from one plant, as this will weaken the plant and reduce the yield. A good rule of thumb is to leave at least half of the leaves on each plant. Wash and dry the leaves  You should wash the spinach leaves as soon as possible after harvesting, to remove any dirt, bugs, or pesticides. You can use a colander or a salad spinner to rinse the leaves under cold water. After this, pat them dry with a paper towel or a cloth. Additionally, you should remove any damaged or yellow leaves, and trim any tough stems. Enjoy or store the leaves You can eat the spinach leaves fresh, or store them in the refrigerator or freezer for later use. We'll explain how to store and freeze spinach in the next sections. How to Harvest Spinach Seeds? If you want to save some spinach seeds for the next season or share them with your friends and family, you must let some spinach plants bolt and produce flowers and seeds. Here are the steps to follow to harvest spinach seeds: Select the best plants to save seeds from It would be best if you chose healthy, vigorous, and productive plants with the desired characteristics. Some of these are the flavor, size, color, and disease resistance. Apart from these, you should also avoid saving seeds from hybrid varieties, as they will not produce true-to-type plants. You should look for open-pollinated or heirloom varieties, which will produce plants that are similar to the parent plants. Isolate the plants to prevent cross-pollination Spinach is a wind-pollinated crop, which means that it can cross-pollinate with other spinach plants or related plants, such as beets, chard, or quinoa, within a distance of up to a mile. This can result in seeds that have different traits than the parent plants. To prevent cross-pollination, you should isolate the plants you want to save seeds from, by either planting them far away from other spinach plants or related plants, or covering them with a mesh bag or a cage. Let the plants flower and set seeds You should let the plants bolt and produce flowers, which are small and yellow, and then wait for the seeds to form and mature. The seeds are round and black, and they are enclosed in a spiny husk. The seeds are ready to harvest when they are dry and hard, and the husks are brown and brittle, usually about four to six weeks after flowering. Harvest and clean the seeds  You should cut the seed stalks and place them in a paper bag or a bucket, and then shake or rub them to release the seeds from the husks. Furthermore, you should then winnow the seeds, which separates the seeds from the chaff or the husks and other debris. You can do this by blowing or fanning the seeds or using a screen or a sieve. You should end up with clean and shiny seeds. Store the seeds It would be best if you stored the spinach seeds in a cool, dry, and dark place, such as a jar, a tin, or a plastic bag. You should also label the seeds with the variety name and the date of harvest. Besides, you can store the spinach seeds for up to five years, but they will germinate better if you use them within two to three years. How to Store and Freeze Spinach? Spinach is best eaten fresh, as it loses its flavor and texture quickly. However, if you have a large harvest, or you want to preserve spinach for later use, you can store or freeze it. Here are the best ways to store and freeze spinach: Store spinach in the refrigerator  You can store fresh spinach in the refrigerator for up to a week if you keep it in a perforated plastic bag or a container with a lid. However, you should avoid washing the spinach before storing it, as this will make it wilt faster. You should wash the spinach just before using it. Freeze spinach raw You can freeze raw spinach without blanching it, which is a process of briefly cooking and cooling the vegetables to stop the enzyme activity that causes them to spoil. However, freezing raw spinach will result in a mushy and watery texture and a loss of flavor and nutrients. To freeze raw spinach, you should wash and dry the leaves, and then pack them in freezer bags or containers, leaving some space for expansion. You can freeze raw spinach for up to six months, and use it in smoothies, soups, or casseroles. Freeze spinach blanched You can freeze blanched spinach, which will retain its color, texture, flavor, and nutrients better than raw spinach. To freeze blanched spinach, you should wash and trim the leaves, and then blanch them in boiling water for one to two minutes, depending on the size of the leaves. You should then drain and cool the leaves, and squeeze out the excess water. You can then pack the leaves in freezer bags or containers, leaving some space for expansion. Furthermore, you can freeze blanched spinach for up to a year, and use it in salads, sandwiches, or quiches. Things to Keep in Mind: How to Grow Spinach Successfully? Spinach is a cool-season crop that grows best in the spring and fall, when the temperatures are between 40°F and 75°F. It can tolerate light frost but not heat or drought. Spinach also prefers moist, fertile, and well-drained soil with a pH of 6.0 to 7.0. Here are some tips and tricks on how to grow spinach successfully: Choose the right variety There are many types of spinach, but the most common varieties are savoy, semi-savoy, and flat-leafed. Savoy spinach has dark green, crinkly leaves that are great for salads and wraps. Semi-savoy spinach has slightly curled leaves that are more resistant to diseases and bolting. Flat-leafed spinach has smooth, broad leaves that are easy to clean and process. You can also choose spinach varieties based on their maturity time, bolt resistance, flavor, and color. Bloomsdale, Tyee, Space, Melody, and Red Kitten are popular spinach varieties. Sow the seeds  You can sow spinach seeds directly in the garden, or start them indoors and transplant them later. The best time to sow spinach seeds is in early spring, as soon as the soil can be worked, or in late summer or early fall, for a winter harvest. You can also sow spinach seeds every two to three weeks, for a continuous harvest. Besides this, you should sow the seeds about half an inch deep, and one to two inches apart, in rows that are 12 to 18 inches apart. You should water the seeds well, and keep the soil moist until they germinate, which usually takes seven to 14 days. Thin the seedlings When the spinach seedlings have two to four true leaves, you should thin them to avoid overcrowding and competition. You should leave about four to six inches of space between each plant, and eat or transplant the thinned seedlings. You should also weed the area around the spinach plants regularly, to prevent pests and diseases. Harvest the leaves Depending on the variety, you can start harvesting spinach leaves when they are big enough to eat, usually about 25 to 50 days after sowing. You can either harvest the whole plant or pick individual leaves from the outer part of the plant, leaving the inner leaves to grow. Additionally, you should harvest spinach in the morning, when the leaves are crisp and fresh, and before the sun gets too hot. You should also harvest spinach before it starts to bolt, which is when it produces flowers and seeds, and becomes bitter and tough. How to Use Spinach in Different Cuisines and Recipes? Spinach is a versatile vegetable that can be used in many different cuisines and recipes. Whether you want to make a salad, a soup, a pasta, a pie, or a smoothie, spinach can add flavor, color, and nutrition to your dish. Here are some examples of how to use spinach in different cuisines and recipes: Mediterranean cuisine Spinach is a staple ingredient in many Mediterranean dishes, such as spanakopita, a Greek pie made with spinach and feta cheese wrapped in phyllo dough, or spinach and chickpea stew, a Moroccan dish flavored with cumin, paprika, and lemon juice. You can also make a simple spinach salad with tomatoes, olives, and feta cheese, dressed with olive oil and vinegar. Asian cuisine Spinach is widely used in Asian cuisine, especially in Chinese, Japanese, and Indian dishes. You can make a Chinese spinach and tofu stir-fry with garlic, ginger, soy sauce, and sesame oil, or a Japanese spinach and sesame salad with rice vinegar, sugar, and soy sauce. You can also make an Indian spinach and potato curry with onion, garlic, ginger, turmeric, and garam masala, or a spinach and paneer cheese dish with cream, tomato, and fenugreek. Italian cuisine Spinach is a common ingredient in Italian cuisine, especially in pasta, pizza, and lasagna. You can make a spinach and ricotta ravioli with butter and sage sauce, or a spinach and mushroom pizza with mozzarella and parmesan cheese. You can also make a spinach and cheese lasagna with béchamel sauce, or a spinach and artichoke dip with cream cheese and sour cream. American cuisine  Spinach is also popular in American cuisine, especially salads, sandwiches, and casseroles. You can make a spinach and strawberry salad with almonds and poppy seed dressing or a spinach and bacon sandwich with mayonnaise and mustard. You can also make a spinach and cheese casserole with eggs, milk, and breadcrumbs, or a spinach and artichoke quiche with pie crust and cheddar cheese. Wrapping It Up! Spinach is a wonderful vegetable that you can harvest, store, and use in various ways. It's easy to grow, harvest, and store spinach, as long as you follow some simple steps and tips. It's also healthy, delicious, and versatile, as you can use it in many different cuisines and recipes. Spinach is a green treasure that you don't want to miss. If you want to know about how to harvest spinach, I hope that this blog has been of help to you. If there are any other queries related to the same, please feel free to let me know. All that you need to do is scroll down till you reach the bottom of the page. Then, leave your comments and suggestions in the box below. And I will be ether to answer them all for you. Read Also: How to Harvest Lettuce: A Step-by-Step Guide for Fresh and Crispy Salads Everything You Need To Know About Harvesting Basil! Asparagus 101: When, How, And How Often To Harvest?

READ MOREDetails
propane-powered

Five Efficient Uses of Propane in your Home

Doesn’t it feel blissful to return to the cozy confines of your home and relax in your pool after a tiring day at the workplace? On winter evenings, nothing can be more delightful than spending a lazy evening sitting in front of a warm fire in your fireplace and sharing a drink with your partner. After all, home is where warmth abounds. Literally speaking, in order to maintain the warmth and coziness of your home, you have to depend on an efficient energy source. Propane, as an energy source, is not only reliable, cost-effective and environmental-friendly, it is efficient as well. In this article, we tell you about five efficient uses of propane in your home to keep you warm and comfortable. Home heating With a propane-powered home heating system, you can have the best of energy efficiency and heating comfort. Whether you opt for a space heating system, a central heating system, or a combination of both, the quality of conditioning provided by propane is better than that provided by an electrical resource or fuel oil. Propane furnaces have the ability to warm up air up to 25 degrees more than an electric pump heater. As they are easily transportable, propane-powered patio heaters can also be used to heat up your outdoor living space. Water heating Water heaters are the second highest energy users in maximum homes. Using propane, you can keep your dishwasher, shower, washing machine, etc. hot at the same time. Be it a traditional water heater or a tankless one, propane is compatible with both. A propane tankless water heater functions at up to 98% efficiency and can bring down energy expenses by about 60%. This type of water heater also lasts longer and saves space due to its compact design. Powering up cooking appliances From outdoor grills and portable cookstoves to indoor cooking ranges and stovetops, propane can fuel up all your appliances in a convenient manner. A propane-powered cooking appliance offers better temperature control and heat distribution as compared to electric appliances. Performance apart, propane-fueled cooking appliances produce no soot or ashes and are safe to use. Fuelling pool and spa heaters Propane heaters can provide you with a comfortable temperature for your pool and spa all year round. Using propane pool and spa heaters, you can condition the water temperature to your liking in a faster and more efficient manner than an electric heater. This way, you will be able to save money even while enjoying the comfort of your pool and spa throughout the year. Operating fireplaces and log inserts A fireplace fuelled with propane can enable you to turn on or off the fire with the flip of a switch. Propane-powered fireplaces with log inserts are not just efficient and cost-effective they are also easy to maintain and clean-up. You can use propane with any gas fireplace and enjoy a roaring fire. You can contact propane services in Jefferson for detailed information about propane delivery and tank installation process.

READ MOREDetails