How To Use A Shipping Container As A Home Office

Published on: 16 January 2019 Last Updated on: 22 February 2020
Tiger Containers

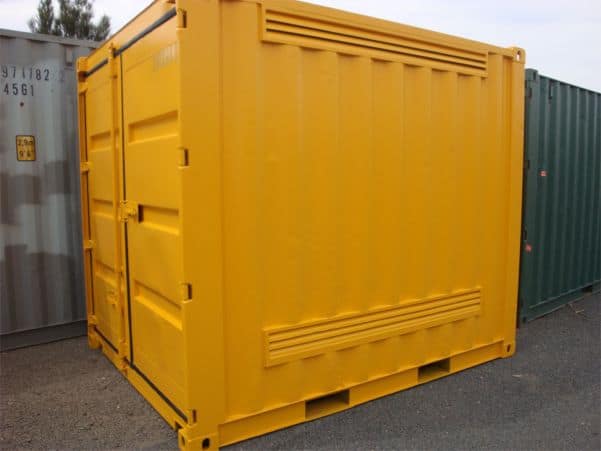
Shipping container offices have given many a quick, long-term, and Eco-friendly approach to making an office space. Today, a lot of people are looking to used containers for their small office needs because they are very affordable, convenient, and already an established setting that can be easily constructed from within. Its popularity comes from their simplistic making of ordering, being delivered to the location, and building right on site. Plus, it doesn’t take long to construct the interior of a container. These steel shipping containers are made to be standard, durable in all settings, and easy to move around.

Buyers have to prepare for everything and you want to set it up by the time the shipping container arrives. This involves preparing the doors and windows, insulation, utilities, and flooring. Get a ballpark amount of how much it would cost per square foot;  the floor plan and where every little thing should be drawn up, plus plumbing and electrical areas. Making a shipping container into an office requires you to be detailed in your small room because you are making it simple. There are major considerations in this small space; think of the phrase, “Less is more.” You don’t have a lot of room, so don’t get fancy with the furniture and computers.

For any office to be workable, you need proper heating, ventilation, and air conditioning. Installing that is a major difference from what the shipping container has because it is built to be airtight in moving goods around. Now, you need to install a perfect unit that can control the temperature inside. For a large container, air ducts can be installed if the container is split up.Air ducts let the air go from one end to the other. Rooftop turbine vents and ceiling exhaust fans can also be installed. These are inexpensive and don’t require a lot of power to keep on running.

Then, there is the presentation of your office from the outside where it should not come off as run down and cheap just because you are in a container. The paint job all over prevents the rust from showing. The container needs to be washed to rid of any markings and the more visible rust smoothed out before painting. It has to be as if the container was built as new. The aesthetics are important because it is en vogue for an appealing, younger sector of people who are trying their own business.

You have to use your shipper container office like any other room. Home office building can provide the most money and time being saved. There is a lot to think of in creating your new home office. This is still a new trend and there will be skeptics, but the total cost of the entire project is quite easily comparable to a traditional construction in that the shipping container is the way to go.

 Shipping Container

Source: Tiger Containers

Content Rally wrapped around an online publication where you can publish your own intellectuals. It is a publishing platform designed to make great stories by content creators. This is your era, your place to be online. So come forward share your views, thoughts and ideas via Content Rally.

View all posts

Leave a Reply

Your email address will not be published. Required fields are marked *

Related

image001

The Ultimate Moving Checklist – Things you Need to do When Moving

If you are moving to a new place, you have to wind up a long list of things. To do all the jobs peacefully and make your move flawless it is better you create a moving checklist. Making a checklist, sticking it in a place of your frequent visits to give you timely reminders, and doing the tasks defined in the list one by one will not make you feel burdened. But what should be there is the checklist? If it is your first time everything must be haphazard for you. You might be completely clueless about where to begin. Well, there is nothing to panic about. The blog below is a complete guide for you. If you follow the things in the blog you will move with ease. Effective Checklist for Smooth Relocation: The checklist can be referred to as a schedule for different things to be done while moving. You can also write when to begin a particular time and in what duration it should be complete. The first thing to be done for moving is to divide the things at your home into four parts. The first list of what you will carry with you, the second list must contain what you want to donate, the third list must be things to be sold and last but not least things to be recycled. Get rid of the list second, third and fourth. Your home must now contain the things you want to carry along. The second thing to do is to hire movers. To hire moving companies you must know the best company in your locality You can know about it either by carrying out a ground survey or online. Make sure to contact previous customers in case of the ground survey and read the reviews in case of online inspection. Compare the cost between your preferred choices along with a comparison of the services offered by them. Now check the availability of the moving company on your desired date and time. Finalize the moving company by completing the documentation. Now, comes the packing part. Decide if you want to do it yourself or hire packers. Start with the packing process at least a month before your move or you can decide it based on the size of your home. If you are going for a long-distance move you must pack the things much before in comparison to a local move. Begin with packing starting from a single room. Once you complete with a place, then shift to another. Label each box that is packed and keep it in a single place. All the packed things must be locked in one place. Make sure you pack the most used place in the last. The kitchen would be last in the series. Change your address at all the important places like shopping websites, with friends and acquaintances on your important documents, and wherever you feel it's necessary. Put all your important documents and bills intact in a file. The file should be kept along with you in your car and not the loading truck. You might require any document anytime, so make sure you do not miss out on anything. Load the trucks, clean your home, lock, and move. It is advised that you must reach your new place prior to your luggage so that you can arrange the things instantly. Conclusion: Moving can be as easy as you feel while reading the blog if all the things are carried out in a specific order. With all the above tips you will never be in a situation of panic, not even for a single moment. Read also:  The Five Most Important Things to Know Before Moving

READ MOREDetails
Radon Test

What Is A Typical Radon Test Fee? Understanding Costs And Factors

When considering the safety of your home, radon testing is a crucial step. Radon is an odorless, colorless, radioactive gas that can pose serious health risks if present at high levels. To determine if your home is at risk, professional radon testing is advised. The cost for this service can vary based on several factors, including the size of your home and the complexity of the testing required. The fee for a radon test typically ranges from $146 to $716 for a professional inspection. This range factors in the methods used for testing, the size of the area being tested, and whether additional diagnostic tools are required. Understanding these costs is essential, especially considering the potential health implications of radon exposure. Keep in mind that while DIY test kits are a less expensive initial option, ranging from $10 to $50, they often include laboratory analysis fees.  However, it is recommended to use professional test services as they include requirements about the placement of tests, analysis, and recording and including proper test conditions for a final risk assessment For those seeking the most accurate assessment of radon levels in their home, hiring a professional is generally the most reliable option.  Understanding Radon Testing Radon testing plays a crucial role in maintaining a healthy indoor environment, as radon exposure is a known health risk. This section will detail the significance of radon testing and outline the typical process involved. The Importance of Radon Testing Testing for radon is essential because this odorless, colorless gas is the second leading cause of lung cancer after smoking. Radon naturally emanates from the decay of uranium in the soil, and without testing, there's no other way to determine if your home's levels are safe. Regular radon testing ensures that any dangerous concentration is identified and mitigated promptly, protecting you and your family from the associated health hazards. How Radon Testing Works To conduct radon testing, various devices are available, ranging from passive kits to sophisticated radon monitoring solutions. Passive devices, like charcoal canisters, collect radon samples over a specific period. In contrast, active devices like the Model 1028 XP: Professional Continuous Radon Monitor continuously measure levels, providing more dynamic data. These active monitors are preferred for their ability to deliver real-time measurements and create detailed reports, informing you about fluctuations in radon levels and allowing for a comprehensive understanding of your indoor air quality over an extended period. Factors Influencing Radon Test Fees When you're looking to test your home for radon, various factors will determine the cost. Understanding these can help you budget more effectively for a radon test. Test Duration The length of time a radon test takes can affect the price. Short-term tests may last from 2 to 90 days, while long-term tests exceed 90 days; the latter typically being more expensive due to the comprehensive data they provide. Type of Test You have options between DIY radon testing kits and professional radon testing services. While an at-home kit can cost between $10 and $75, professional service includes the necessary expertise and equipment, incurring higher fees. Test Location The price of a radon test can vary depending on your geographic location. For instance, tests conducted in regions with known radon prevalence may involve additional precautionary steps, potentially increasing the cost. Professional Expertise Opting for a certified radon inspector adds value as they bring specialized knowledge and accuracy. The complexity of your home's structure can also necessitate more time-consuming and thus, costlier, inspection methods. Average Cost of Radon Testing When exploring radon testing for your home, you'll find that prices can vary widely based on location and the type of test you select. Understanding these costs is essential for planning your budget effectively. By Region The cost of radon testing can differ depending on the region due to factors like demand, the prevalence of radon, and labor costs. In some areas, testing can be as affordable as $100, while in others it might reach up to $1,200. For example, homeowners can expect to pay an average of $420 for a radon inspection. By Test Type Radon testing varies not only by price but also by the methodology and duration of the test. Short-term tests may range from $10 to $30 for home test kits, whereas professional long-term testing or the use of a continuous radon monitor could cost significantly more. Tools like a continuous radon monitor might incur higher upfront costs but provide more detailed information over time. Additional Costs and Considerations When budgeting for radon testing, it's important to factor in not just the base cost but also potential additional expenses. These can vary depending on several factors, including whether you require a more thorough inspection or if follow-up testing is necessary. Mitigation System Inspection If your property already has a radon mitigation system in place, you'll need to include the cost of an inspection to ensure it's functioning correctly. This typically involves checking the system's components like the fan and the vent and can add to your overall expenses. Follow-Up Testing After the initial radon test, follow-up testing may be recommended, especially if levels are close to or above the EPA's action limit. You may need short-term follow-up tests for a quick verification, or long-term tests for a more accurate assessment, impacting your total testing costs. Home Size and Test Complexity The size of your home and the complexity of the test required can also affect the cost. Larger homes or those with multiple foundations may need several test kits or longer testing periods, potentially increasing expenses. Remember, these costs are on top of the typical radon inspection fee which can range from $146 to $716, with an average of around $420. Your specific costs will vary based on these additional factors and the options you choose. Choosing a Radon Testing Provider When faced with the task of selecting a professional to conduct your radon test, focusing on their expertise and the variety of services offered will ensure you receive a reliable and thorough assessment of radon levels in your home. Certifications and Qualifications Certifications: Make sure the provider you choose is certified to perform radon testing in your state. The National Radon Proficiency Program (NRPP) and the National Radon Safety Board (NRSB) are two leading certification bodies. A certified tester will have a sound understanding of radon testing protocols and state-specific requirements. Qualifications: Beyond certifications, assess the provider’s experience and training. Years in the field and specialized knowledge can greatly influence the accuracy of your radon test results. Experienced professionals will also be adept at using the most current and effective testing methodologies. Service Comparisons Range of Services: Compare different providers based on the scope of services they offer. Some may only conduct tests, while others provide comprehensive services including radon mitigation. It's crucial to understand whether follow-up services are available, should your test results show high radon levels. Test Types: Ensure they offer both short-term and long-term testing options to suit your specific needs. Equipment Used: High-quality, calibrated equipment yields more accurate results. Verify the type of devices used in testing. Pricing: Prices can vary, with professional radon inspection costs ranging between $146 to $716, with a common average being around $420. While cost is a factor, it shouldn't be the sole criterion. Lower prices may not always guarantee the same level of service as providers charging industry-standard fees. Interpreting Test Results Before you proceed with any steps following a radon test, it's crucial to accurately interpret the results. The test reveals the radon concentration levels in your home, allowing you to make informed decisions on necessary measures. Understanding Safe Levels Radon levels are commonly measured in picocuries per liter (pCi/L) in the United States. The Environmental Protection Agency (EPA) states that there is no completely safe level of radon exposure. However, levels less than 2 pCi/L are considered acceptable, while readings between 2 and 4 pCi/L suggest a moderate risk that warrants your attention. It's important to know that some organizations, like the World Health Organization (WHO), suggest more stringent action if levels surpass 2.7 pCi/L. Low radon levels: (<2 pCi/L) Moderate radon levels: (2-4 pCi/L) High radon levels: (>4 pCi/L) Conclusion Professional radon testing can vary in cost, generally ranging from $146 to $716 with a national average of around $420. Factors that can influence your radon inspection fee include the size of your home and the type of test conducted. For those preferring a more economical approach, DIY radon test kits are priced between $10 and $50 and include lab analysis. It's important to ensure accurate results, which might lead you to opt for a professional inspection over a DIY approach. Read Also: How Pests Control Maintains The Aesthetic Appeal Of Your Home Guide To Making Your Home Guest-Ready On Time Exploring Ideas For A Biophilic Home Design

READ MOREDetails
Properties

What Does it Take to Have an Eye for Top-Notch Properties?

The potential of a property cannot only be seen through its façade. Looking beyond what the naked eye can see is essential if you are looking for the best properties to acquire to invest your money. Going through the conventional ways of searching for a top-notch property may seem inappropriate nowadays, especially now that development is occurring fast and properties can increase or decrease their valuation at any time. The ability to target properties that are growing in value is a skill to develop for people who want to invest in properties. Creativity: A creative mind is useful in transforming properties that are unappealing on the first look. The location and the structure itself can be the starting point to develop these properties into high-end ones or to make them feasible for the specific purpose you have in mind. No property can be devalued as long as it has the qualities and features that every property-seeker is looking for when buying. All you need is to concrete your intent and objective in buying so that you can have a picture of how you are going to transform your target property. Updating: If you want to detect a potential top-notch property, it is essential to get yourself updated on the current trends in the real estate sector. Some aspects to know and consider are the properties up for sale, the current pricing and valuation, the profile of buyers, the flow of investment, and the innovations in real estate to make them a profitable location for business. So whether it is land in the corner of the town centre, or a property for sale in Bournemouth, all information should be gathered to keep you informed which may be useful when you decide to look for a property to buy. Networks: Establishing networks among real estate providers can also lead you to first-class types of property. This strategy may be done by connecting property-seekers to real estate agents or brokers to guide them with their preferred properties. Share with them your interest in top-notch properties. In this way, you can exchange contacts with other people engaging in real estate that will, later on, be beneficial for your high-end property hunt through their referrals. Credibility: A property purchaser that is trustworthy and delivers payment on time is a credible one. By possessing this kind of attitude when buying properties, it can lead you to the best property available for buying. Also, paying attention to advise and referrals can help in building up your seriousness to acquire properties, making real estate agents or property owners trust you with any transaction you engage in with them. That character is crucial since it is your credibility that is at stake. Your good record can bring you to the specific property you want to buy. Having such qualities is essential if you are into the real estate world where you are not only putting your money at stake but also your capacity to trust the people you are dealing with. Read Also: 5 Health Benefits Of A Clutter-Free Home Benefits Of Working With A Realtor When Selling A Property

READ MOREDetails