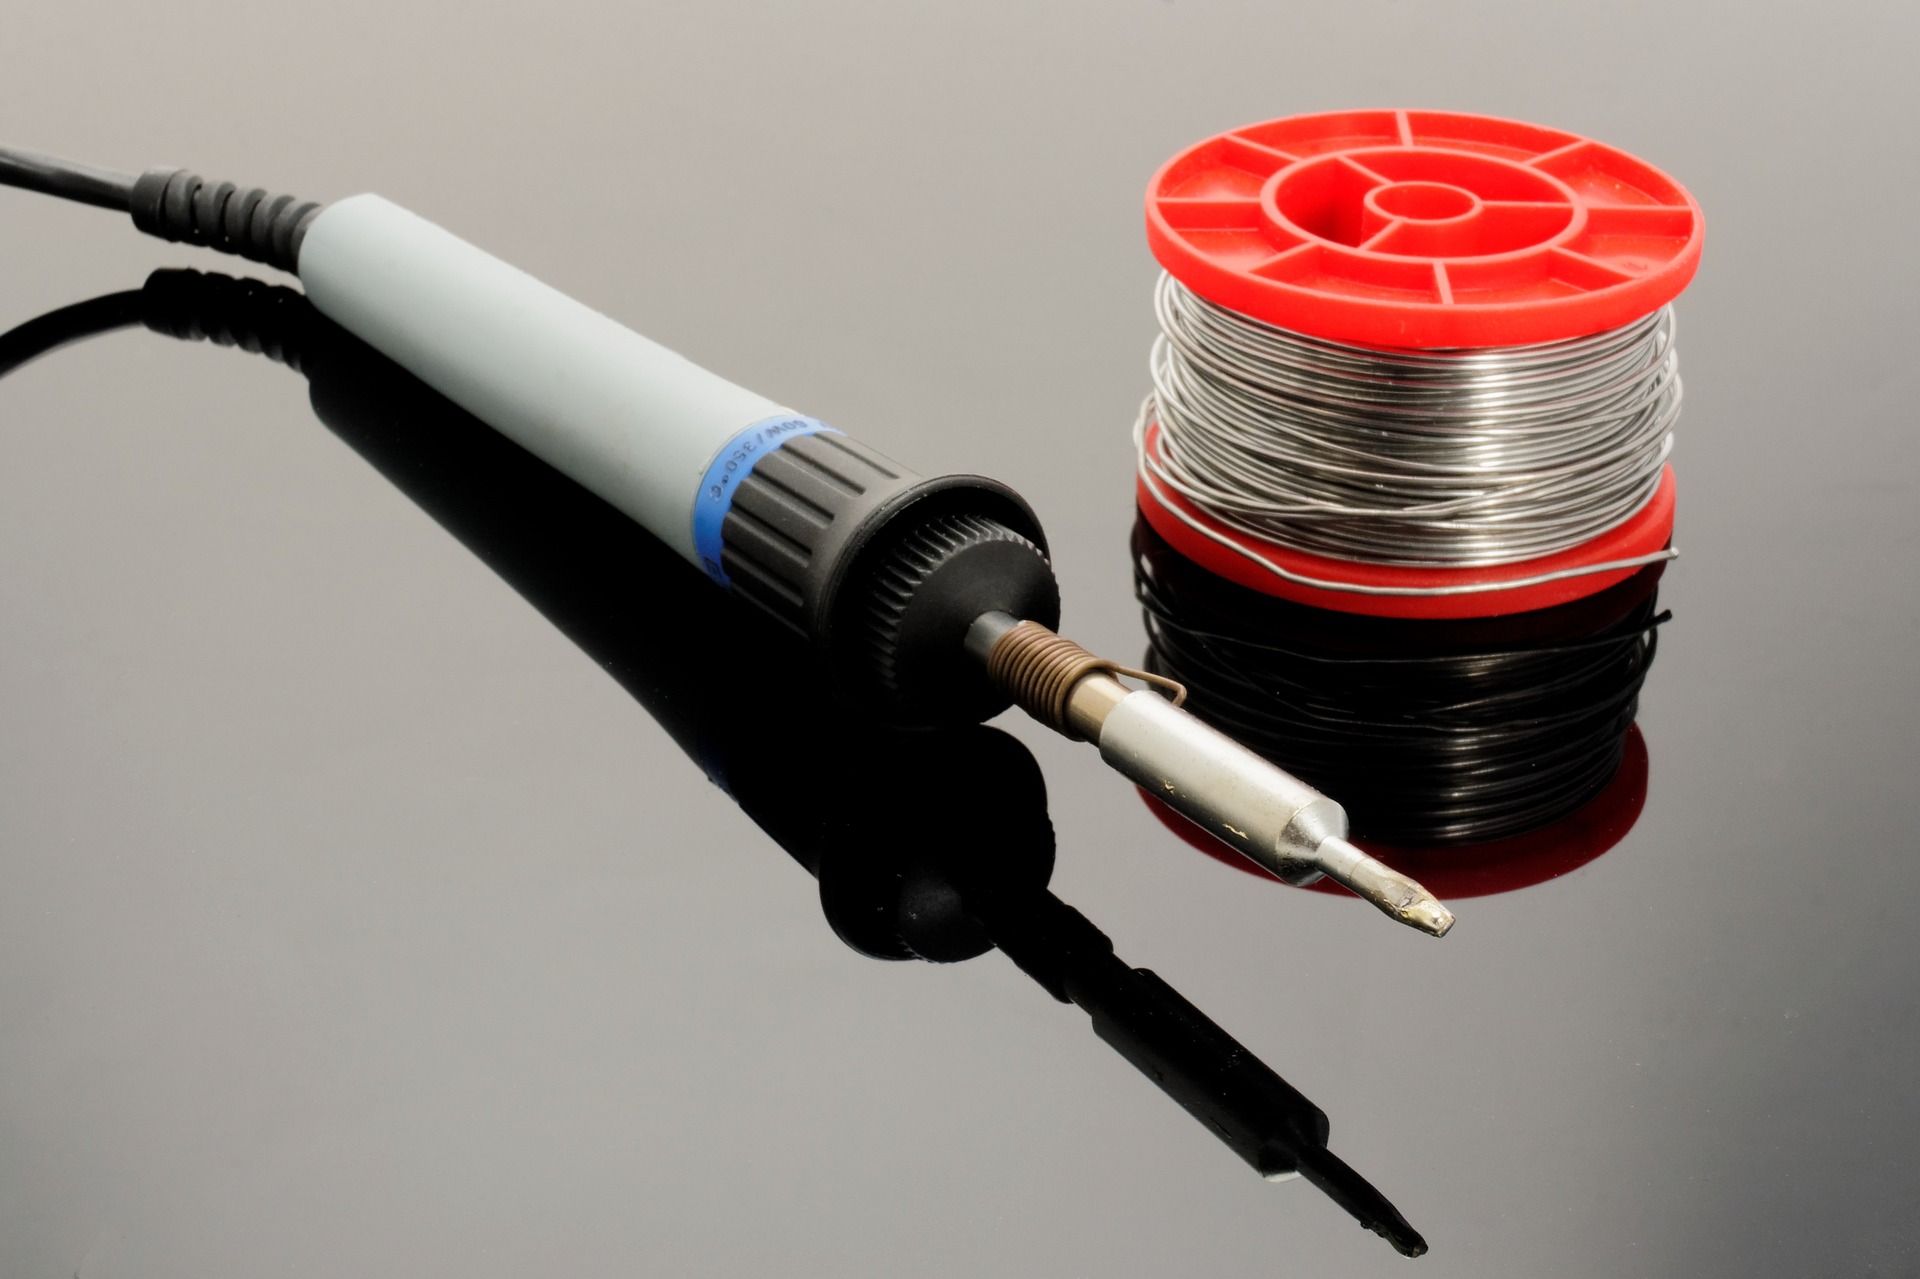
How to Use a Soldering Iron

Published on: 03 September 2018 Last Updated on: 29 January 2022
Soldering Iron

Of all techniques and methods used to join surfaces, metal sheets, Iron, and other objects together, soldering is highly preferred because it does not cause any type of damage to the items being joined together. This is because the solder used to stick them together has a lower melting point than most metals and it offers durable yet reversible bonds between the items. In addition to that, although there are a few key differences between the two types of soldering gear used, they share a similar trait and they’re both easily operable, which we will discover more in this article

What Is Soldering?

There are several types of soldering using different filler metals called solder, but, they all use the same concept which is heating a filler metal between two items so that it melts and fills the seam between the two items.

Soldering is done using either individually bought soldering gear, which allows you to choose the type of tool that is most suitable for the project you are planning to work on, or a soldering station which usually is a standard combination of a soldering iron and a power supply.

Soldering Iron 

In order to learn how to use a soldering iron, one must first know its basic parts and the science behind its mode of operation.

It is simply a tool that connects to a power supply, it consists of a handle that doesn’t conduct heat and a tip that heats up very quickly to high temperatures so it can melt the solder, it also cools down fast.

To Be More Specific, The Main Parts Of Soldering Iron Are:

  • Soldering tip: All soldering irons contain iron tips which are the only part that heats up; it doesn’t ooze out the solder as most people think, it simply heats the metals being joined so that when the solder is applied, it melts, but more often than not, the solder would stick on the tip. Luckily, most tips are interchangeable so, you can replace your tip in case of damage or in case you need a specialized tip to suit your uses; bear in mind that tips vary in size and shape, thus, they vary in their uses as well.
  • Wand: The wand is the handheld part of the iron that the tip is attached to. It can be made from a large number of materials that poorly conduct heat or isolate it completely so as to prevent heat from the tip from transferring to the part where the wand makes contact with the skin. Inside the wand, there are wires and metal contacts that conduct and convert the electricity from the power outlet to heat. The contradicting functions of a wand are the reason why most people prefer to buy high-quality wands from renowned brands.

Of course, there are other extras and accessories like brass sponges, cradles, and tip tinner which can be purchased individually or found in soldering stations which is actually one of the advantages of soldering stations; but, the two main parts will always remain the tip and the wand.

Step 1: Safety

First of all, before using a soldering iron, you must be familiar with standard safety precautions since the iron tends to get really hot; not to mention the fact that solder is literally molten metal. So, it would be smart of you to wear protective gear such as; safety goggles and protective gloves, because your fingers are most likely to come into contact with the tip during the first few times. You also should keep in mind to tie your hair and avoid wearing loose-fitting clothes. Moreover, it is preferable to work in a well-ventilated area since some types of solder contain lead which produces toxic fumes, it is also important to thoroughly clean your hands after handling lead-based material.

Step 2: Preparing The Tip

The tip should be regularly cleaned of any old solder because when old solder solidifies, it turns into a heat isolator due to oxidization resulting in a totally inefficient and highly wasteful soldering process. Not only that but also, slow heating means that you will have to hold the iron to the items being joined for a longer time; it would be highly inconvenient for you and very damaging for sensitive objects like PCBs.

So, when the iron is fully heated, softly drag the tip against a sponge to remove old solder. You want to aim for a shiny tip. After cleaning the tip, you should “tin” the tip; to make it last longer and conduct heat better through newfound layers of solder. Same as above, on a fully heated iron, apply a little piece of solder and lightly coat the tip with tinner; then, immediately start soldering while cleaning and tinning the tip between every couple of joints for maximum conductivity and efficiency.

Step 3: Actual soldering

With your dominant hand holding the iron and the other holding a piece of solder, touch the area where the object comes into contact with the solder and hold it there for about a second then slide the solder underneath the tip while pushing the solder rod further according to how much solder you need.

Then, make sure to pull back the solder first while holding the tip in position until all the solder melts; it usually takes about five seconds or less. Solder cools down fast so, you will not need to blow on the joint since it will only lead to a weak joint which can be identified by its oxidized, unclear, and grainy appearance. What you want to get is a smooth connection, not a lump.

Finishing touches :

After you’ve had enough soldering for the day, clean and in the tip again before you put it into storage, it helps increase its lifespan.

As you may have noticed, soldering is not that hard of a task, it only requires soldering gear, steady hands, and concentration. So, go ahead, start soldering, and don’t be afraid to get creative.

Read Also:

Content Rally wrapped around an online publication where you can publish your own intellectuals. It is a publishing platform designed to make great stories by content creators. This is your era, your place to be online. So come forward share your views, thoughts and ideas via Content Rally.

View all posts

Leave a Reply

Your email address will not be published. Required fields are marked *

Related

Button cell battery chart

Button Cell Battery Chart- know about it more

Did your flashlight battery run out? If yes, then it will be good if you buy a new battery for your flashlight according to the recommendation from the manufacturers. If you follow the instructions or manuals given by the manufacturer inside then you can save your device from damages and wrong type of batteries. While you are replacing the batteries make sure to check the details such as battery type, capacity, chemistry, dimensions, max pulse current, self-discharge rate, etc. It may sound complicated however it is necessary for good performance of the gadget. Here we have small tips related to battery and its safety- You must never recharge the battery with the wrong charger as well as do not charge primary batteries or it may explode and cause fires. Do not swallow the battery; keep your kids away from it. These NiMH and lithium batteries do not contain toxic metals but they are dangerous and when swallowed electrolytes will close the circuit in the body as well as cause chemical reaction which caused the ultimate death of a person. Battery types: Coin/ button cell battery: These are grouped under no- rechargeable batteries. It is common in key chains, watches, remote controls, and hearing aids. There are various chemistry types of this battery like silver oxide, alkaline, and mercury oxide. In addition, most of the manufacturer interchangeably makes use of similar labels for silver oxide and alkaline batteries. If you look at the button cell battery chart then you can find out the difference and also know about the button battery sizes. Alkaline: Alkaline coin/button cell batteries are cheap and reliable batteries. 1.5 volts is the nominal voltage of this battery but when you use this battery its voltage drops with time. The real capacity of this battery is dependent on the device cut off voltage. If it is to be used in electronic equipment where there is the requirement of the constant high voltage then the so-called capacity of this battery is low. In such gadgets the need for replacement of the battery is quick. However, if the alkaline battery is to be used in gadgets that can tolerate low battery voltage, then its so-called capacity will be larger and you need not replace batteries in them so soon. Typical labels for alkaline batteries are LR##, AG##, LR###, etc. The normal capacity of alkaline LR44 is about 110-130 mAh and it is lower than equivalent silver oxide battery. Common Shelf life for it is 5 years. Silver Oxide: These button/coin cell batteries are a well-known type of batteries. They are not very expensive and have a shelf life of about 10 or more years. They have constant voltage while an operation that is identical to the nominal voltage of the alkaline batteries. Typical labels of this battery type are SR##, SG##, SR###, etc. Typical capacity of these types of batteries ex- Silver oxide SR44 is 150-200 mAh and it is more than equivalent alkaline LR44 while less than zinc-air. Zinc Air: These are used widely in hearing aid devices. They are having slightly lesser nominal voltage (1.4 to 1.45 V) however this voltage is quite similar or higher than the alkaline batteries voltage while using. In addition to this, these batteries got the largest capacity and chemistry. Typical capacity- 600-700 mAh and it is the much larger capacity when compared to silver oxide. These batteries are not common because of different reasons, however, one of the common reasons is that they work by using air, and when electrolyte dries out, it is dead and needed to be replaced. Depending on manufacturer and model, after the protective tab of these batteries is removed, leave it for some minute in the air then use it for weeks. It has a shelf life of 4-5 years. Mercury oxide: These types of batteries are no longer in the use because of their impact on the environment. They require slightly lower voltage (~1.35V) they have good capacity. The typical capacity of battery MR44 is 180-200 mAh and it is quite similar to silver oxide SR44. If a small portion of these batteries is swallowed then it can induce vomiting. Cylindrical batteries: These are commonly used in devices such as remote control devices, key chains, bikes, electric tools, etc. Cylindrical batteries are divided into 2 groups such as- Non-rechargeable or primary batteries rechargeable or secondary batteries It is to be noted that the primary batteries must never be charges. Also, keep in mind that does not recharge batteries with NOT designed charger. The nominal voltage of the non-rechargeable cell is 1.5V regardless of whether they are alkaline or carbon-zinc batteries. These are interchangeable nit alkaline batteries that have huge capacity and they are used more than the zinc-carbon batteries. For Primary lithium batteries, nominal voltage is 3V; they have a larger capacity and are light weighted. In addition to this, they tend to be highly expensive than the zinc-carbon as well as alkaline batteries and are utilized in high power gadgets such as cameras, flashlights, etc. Secondary cells’ nominal voltage is dependent on its chemistry. These batteries are smaller and packed with enough energy but if mistreated then it may burst or explode. Hence, make sure you refer a button cell battery chart before replacing or using any batteries in your device. nickel Cadmium battery it is also referred to as NiCd batteries and they have the nominal voltage of 1.2 V. it can generate large current however it has limited capacity as well as number of charging/ discharging cycles. Nickel metal hydride- it is also referred to as NiMH batteries and it offers good capacity, low rate of self-discharge, good shelf life, etc along with reasonable rates. Lithium secondary batteries- they have a voltage ranging from 3.3-3.7V and are labeled as 3.7 or 3.6V batteries. They have a large capacity, improved safety, and a higher drain. For more information about batteries, you can refer button cell battery chart. We hope you have gained enough knowledge about batteries and their usage. Hurry up and go replace your batteries. Read Also: Car Battery Maintenance 101 Add Accuracy To Your Testing With The Help Of Multimeter The Latest Way Of Transportation: Electric Motor Scooters

READ MOREDetails
PVS 14 Monocular

What You Need to Know about Night Vision Optics?

In the past time, humans hunt the animal for food and fur. But now it is also counted in sports activities in some countries. It is part of their culture. Furthermore, in some regions, people do the hunting of animals during campaigns. Also, in developed countries, several governments allow hunting zones for hunting lovers. With advancements in technology, hunting instruments are developed, and people start hunting at night. About night vision optics for hunting, vision optics make hunting easy at night by the use of monocular. Here, we will discuss a monocular named PVS 14 Monocular. Firstly, this was the choice of armed forces for night operations, but now it is also available for the public only for hunting at night. This is available on the internet and manufactured by many companies.  To know about pvs 14 Monocular, let us proceed through its details. What is PVS 14 Monocular? it is a night vision monocular designed for the most demanding night applications like hunting and night army actions for strikes. It is light in weight, rugged, and versatile device. This allows users to see at night through one eye while viewing their surroundings or targets. Another positive aspect of this monocular, its adaptability to use on the helmet and the weapon. Details About night vision optics for hunting It is initially designed for the united states military that why its quality is high in optics. Further, its application is the same for the hunters to see the animals in the night of woods without making any noise. Its shape and size are listed below. Dimensions of the products: its size is 4.5 X 2.2 X 2 inches Weight: It weighs up to one pound. Headgear specification: multipurpose unit, Handhold Monocular, Hands-free goggle optional helmet mount. IR System: Total darkness IR System Magnification: Yes, up to 2X magnify Color option: Yes, Multi Colors Field of view: 40 degree Diopter Adjustment: -6 to +2 diopters Objective Lens: 26 mm, f/1.2 Focus Range: 9.8” to infinity Power Source: 2 AA size batteries are required Night observing distance: seen clearly up to 100 meters at night Eyepieces Size: eye pupil diameter 14mm Waterproof: Yes, it is waterproof Display screen: LCD screen Further, its package includes one protective film, one mount, one blinder, a storage bag, and a user manual. What did hunters think of PVS 14 monocular? On exploring the internet for the mentioned monocular, we found mixed thoughts of hunters. A few hunters are satisfied with this product, but it has more negative reviews on the internet. The opposing view has their opinions like the rectangular screen is not appropriately mounted when mounted on the helmet, and one of them is saying that its focus is not good when it magnifies to 2X. Furthermore, many other negative reviews are available on the internet, and buyers who buy this in the past not suggested this. Read Also: Hunting Tips For Beginners

READ MOREDetails
Vampire Appliances

Vampire Appliances And Electronic Costs

Can you imagine spending a day without your electronic devices? It is possible, but it’s not convenient. Electronics help us to get our job done faster, and more effective; they entertain and keep us healthy. The only scary thing is paying off the electricity bills. During the winter season, energy bills are set to skyrocket. The worse thing is that most people keep paying for devices they don’t use during the day. Ladies and gentlemen, it’s time to learn more about the c and stop paying for nothing. Vampire Appliances And Electronic Costs: Vampire appliances are devices you leave plugged in. According to the latest statistics, every house owner in the United States pays around $200 monthly for electronics they don’t use. Yes, your favorite coffee machine, microwave, electric toothbrush, and desktop secretly ‘steal your money.’ If you want to get rid of these vampires in your house and lower your monthly electricity bill, check out these practical tips: First of all, consider replacing your current bulbs. You might want to invest in fluorescent lighting to lower your bills. It’s important to mention that they are also eco-friendly. Secondly, start using power strips. It will allow you to switch off your electronics faster and save a few bucks. Use power strips for devices such as a printer, modem, DVD player, and TV. Before you leave your flat, make sure to unplug all the electronics. Leaving your phone charger can feed the vampire and increase your bill. Also, you might want to adjust your power setting so that your desktop will go into the sleep mode every time you leave the house. These simple tips will help you save hundreds of dollars within a year. To learn more about it, check out recommendations in the infographic provided by Texas energy:   Read Also: What’s A Good USB Cable? Smart House Technology For Saving Energy Top 5 Electronics Gadgets To Buy From Amazon US The Best Personal Protection Devices To Keep You Safe 5 Key Factors To Consider Before Buying The Best Smart TV In India

READ MOREDetails