In modern times, when people are flocking towards cities, the demand for homes has increased like anything. Builders have perfectly met this demand, but with some tricks. The sizes of the homes have gone smaller. Just look at the room sizes of rooms in the cities like Mumbai; these are really very small.
Small room size doesn’t mean that it has to really look small. Every problem comes with a solution, and the expert interior designers and creative people have found the solution to this problem as well. There are so many tips and tricks to create an illusion of larger room sizes.
5 Perfect Ways to Create Size Illusion in Room with Home Accessories
You just need some specific home furnishing accessories suitable as per Indian homes, right paint colors, and furniture to make your small bedroom look large.
1. Mirrors are the ultimate solution to create an illusion
By adding some mirrors to the bare wall in the bedroom, you can make it look bigger. If you want to create depth or height, you can buy an angled mirror. When talking about mirrors in the bedroom, most people find the solution in the mirrored closet doors. But this is not the right trick for every bedroom. If you want to create an illusion of a wider space, you should place the mirror near the window.
When buying lighting fixtures or lamps for the bedroom you should not rely only on the single source that hangs in the middle of the ceiling. Instead, you can use a combination of different smaller lamps to draw attention to the room. The best way for this is to place the lamps on the bedside table.
3. Carefully decide the height and color of the curtains
Curtains make in important home decoration and furnishing item. The best way to use curtains that are a few inches above the floor. Drapes that run all the way to the floor disturb the flow of the room and make it look more congested. For the best effect, you can also tie them with designer curtain tiebacks.
Further, the color of the curtains also makes an impact on the size of the room. You should buy light-colored curtains. If nothing matches your style, it is better to avoid using curtains.
4. Simple Carpets
Today’s homeowners love to buy patterned carpets due to their beautiful designs and themes. But for small rooms, you should avoid rugs or carpets with heavy patterns. If you don’t want completely plain carpets for your living room or bedroom, you can look for the ones with vertical stripes. These help you create an illusion of a longer room.
Though carpets make the room look beautiful, there is no compulsion of using them. Sometimes these can make the room look more cluttered. Instead, you can try for solid continuous flooring to make the room look bigger.
5. Try something bold to divert the attention
Most people suggest bright colors for small spaces, but sometimes the opposite can work wonders. Experiment with some accessories in bold and loud colors to divert the attention from the space to other things. You can either use some different colored furniture or just small cushions in bold and big prints. These are just a few tips to make your small bedroom look larger. Above all the tips, you need to keep your room clutter-free and organized.
Conclusion
No matter how much you spend on online shopping of home accessories, these are useless until your room is clean. So use the tips, opt for the right color coordination, experiment with different home accessories and you are ready to surprise the guests by creating an illusion of a bigger room.
Lucia Patterson is the woman behind TheLegalGuides, a blog solely focused on legal guides, tips, and advice. Lucia loves essay writing and blogs at EssayWritingGuides from her college days.
There is so much to look upon when you have to choose the perfect kitchen flooring for your kitchen. It is not an easy task because you have to look at so many factors.
Deciding on a kitchen flooring you have to consider numerous factors like the look, will it merge with the rest of your interior or not, the climatic effects on it and the most important factor “durability”. The durability factor is the one which has to be reconsidered because you don’t change your kitchen flooring every week. It’s an investment which lasts for an average of 5-7 years or even more. Sometimes it’s just twice or thrice in a lifetime for a middle-class person.
Also Read:
Use Floor Polishing for Keeping Your Flooring Looking New
Hardwood Timber Flooring: Gives a Classic Look to Your Home
These days when people do not have time to go even for grocery shopping and instead buy it from the online grocery store then how would people get time to go for a consultant who would suggest the best flooring for your home. It is expensive as well that everyone cannot afford it.
So here we have come up with some of the best kitchen flooring options which you can go for, you just have to choose the best for your home as per the features which we will be discussing here:
Hardwood Flooring:
Hardwood timber flooring is flooring which never goes out of fashion and is highly durable. It needs low maintenance You can have an open floor plan with this type of flooring.
Vinyl Flooring:
Vinyl flooring is good when you are tight on a budget and want easy maintenance. It is an excellent choice if you love cooking and have a huge family for whom you have to cook a lot. If you want to buy grocery and other kitchen appliances in a budget, you can visit Askmegrocery store where you can take benefits of coupons too and can really shop in a budget.
Cork Flooring:
Cork Flooring is good when you want to go for an eco-friendly option. It is softer than wood or tile. It is slip-resistant.
Stone or Tile:
Stone or tile is an option for people who want to do it for one time. You have the option to change it but if maintained properly, it can last for a very long period. It comes in various textures and colors. You can easily decide the appearance based on this type of flooring.
Wooden flooring:
Wooden flooring is quite classy and gives you a good feel under the feet. These days it’s used in the way that it is also resistant to water stains.
Laminated Flooring:
Laminate flooring is an alternative option of wooden flooring in a cheap budget. They provide the same look as of wooden flooring and that too in a less budget.
So, after going through this list I think it will be much easier now for you to choose the best and the most durable flooring for your kitchen. Go for the most compatible flooring considering the factors texture, color, look, durability.
Read More:
Pressure Washing- Why It Is Necessarily Important For Your Home?
How To Make Your Home Look Like A Splendid Hotel?
Best 5 Designer Secrets To Make The Most Of Small Spaces
Experts Recommend: Top Interior Design Trends For 2017
Over the years, the perception of gardening has changed from the traditional method of tilling a patch in the backyard for fruits and vegetables to more sophisticated types of gardening. Front yard gardening is steadily taking root in the suburbs as homeowners strive to decorate their front yards with more than hydrangeas in the flower bed.
Needless to say, front yard gardening adds aesthetic value to the property and not just for you but your neighbors as well. In open-plan neighborhoods, exposed front yards call for constant admiration or scrutiny from neighbors who may get upset if they do not approve of what is in your yard.
If you are confused about which plants will be able to uplift the aesthetics of the garden you can always count on experts in the industry. Home and property owners can get a mix of plants selected by Tree Service Roseville that are not only pleasant to look at, but also require low maintenance. This will help you keep your garden in top shape and be appreciated by everyone that visits the same.
5 Essential Tips to Designing a Beautiful Front Yard Garden
An unsightly front yard is likely to hurt your neighbor's property as well. For instance, if he is trying to sell his home, open house visits with potential buyers will not go well if there are overgrown bushes right next door. Some neighborhood associations go as far as stipulating guidelines on what is allowed in the front yard. If you are contemplating starting a garden in your front yard, read on for useful tips.
1. Determine Size of the Garden
How much land you allocate for your front garden is dependent on the size of your front yard; you cannot extend your garden to the neighbor's property. Consider other activities that go on your front yard, for instance, parking vehicles, a playpen for young children, and so on.
Read also: 3 Amazing Flower Street Garden – How To Design
Planting beds can be horizontal, along with the width of the house, or vertical from the house to the sidewalk to the fence. Leave enough space for a walkway so that people can access the home with ease without the risk of stepping on plants or getting their shoes muddy from dirt.
2. Select Mix of Plants
Once you know how much land is available, identify a plant. Since front yard gardens are meant to enhance the look of your home, avoid monotony in one crop. Try a mix of different plants that will look great when they grow and plants that do not compete for nutrients.
You also need suitable methods of nourishing your plants to give them the best chance of survival. Applying fertilizer and compost will greatly boost the nutrient content of the soil. Whatever plants you settle for, they should not block the view of the street-facing windows as this will block natural sunlight from gracing your living room or kitchen.
Bushy plants with overgrown foliage look unsightly and are likely to mar the look of your front yard. Drop by your local garden store and find the best pole saw for trimming excess foliage to maintain the desired look and avoid harboring pests.
3. Establish Order
While growing a variety of plants in your front yard is encouraged, do not get carried away. Planting too many species affects the appearance of the landscape making looks like different patches of land with no cohesion. This type of mess is best moved to the backyard away from the prying eye of onlookers.
Read also: How to make a perfect summer retreat from your backyard
Gardening experts recommend five to ten species of perennials, three to five shrubs and if you like, add two varieties of trees. Before making a decision, investigate what types of plants thrive in the climatic conditions of your area.
4. Regular Maintenance
Having a front yard garden demands your full attention. You cannot afford to ignore drooping leaves, weak stems, or an insect infestation. Establish a maintenance routine that works well with your other responsibilities such as work or taking care of the family.
Regardless of your schedule, there are important activities that must be done on a regular basis and sometimes daily. For instance, watering, trimming bushes, weeding, etc. You can choose to do this in the evening after work or if you are too busy, enlist the services of a gardener during the day.
5. Year-Round Gardening
When starting a front garden, you want your plants to grow throughout as opposed to only a few months of the year. While not all plants can do well in the dead of winter or the sweltering heat of summer, you can count on evergreen trees and shrubs.
Planting trees in your garden provide a natural fence around your property and trees provide natural shade for smaller plants. A reasonable amount of shade helps to control evaporation in the hotter months of the year
A front yard garden may be the solution you have been looking for since you purchased your home. Gardening is an ideal alternative to mowing the lawn and running sprinklers all day. You do not have to do it all by yourself; involve the rest of the family for some added fun.
One of the most used herbs in the world, cilantro, is also referred to as Chinese parsley or Coriandrum sativum. Fresh and zesty, cilantro gives your recipes a flavor boost. Mexican, Middle Eastern, Indian, Mediterranean, Chinese, African, and even Scandinavian cuisines use it extensively. Even cilantro microgreens are grown from it!
Since cilantro itself doesn't keep well and loses aroma and flavor once dried, most people prefer to use it fresh. To have cilantro on hand, you should also have a few plants in the garden.
You can harvest the plant for its flavorful cilantro seeds, also known as coriander, even if you don't use the leaves in your recipes. The leaves of the cilantro plants come throughout the spring and summer. Allow them to go to seed at that time since they grow easily in the garden!
You must know how to harvest cilantro properly if you want to have a steady supply. Keep reading to find out all you need to know about harvesting cilantro.
Harvesting Cilantro: Overview
Most people either love or hate the flavor of cilantro leaves. However, you should still think about cultivating a few coriander plants in your garden and saving the seeds for a range of culinary uses.
Most people in the US grow this delicious herb for its leaves. But the tasty coriander seeds are also worth harvesting. They have a distinct flavor from cilantro leaves. This fragrant herb of the cool season, cilantro, quickly goes to seed in the long, sweltering summer months.
As the plant reaches higher in the sky, its rounded, lobed leaves become feathery. Pretty clusters of tiny white blossoms quickly emerge. Many pollinators are drawn to these nectar- and pollen-rich blossoms, particularly syrphid flies and honeybees. Little round coriander seeds with a kelly green color emerge as the blossoms start to fade.
What To Expect from Cilantro?
The distinctive flavor of coriander is citrusy and slightly nutty. It goes incredibly well with rice, beans, lentils, and roasted or grilled veggies. You can pick the seeds while they are still young and vibrant green. Or you can wait until they start to turn brown.
Since green coriander seed is only found in gardens, it is better to harvest them when they are still green because of their stronger, more distinct flavor. You will not find them in the farmers’ market or the grocery store.
If the seeds are kept in a glass container with a lid, then they can be refrigerated for several weeks and frozen effectively as well. Wait until most of the seed turns brown if you want to harvest the mature brown seed for winter grinding or planting next year.
Next, trim off a few inches of stalk and the seed heads, then hang them upside down in a brown paper bag. The seeds will drop out of the heads and land in the bag's bottom once they are completely dry. The dry seed should be kept in a dry, cool place in a glass jar with a lid.
For optimal flavor, grind it just before using. The flavor difference between freshly ground coriander seed and the pre-ground variety typically found in stores will astound you. Try adding green coriander seeds to dressings and marinades. Frequently adding an equal amount of ground coriander to recipes that call for cumin makes the flavors of the two go particularly well together.
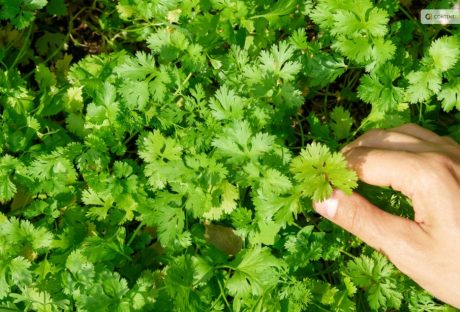
How to Harvest Cilantro?
The most exciting aspect of growing plants is undoubtedly harvesting. Pick individual cilantro leaves if you plan to use a small amount. It is best to leave at least 1-2 inches of stem above the soil's surface when harvesting larger quantities of cilantro.
It is preferable to leave a few lower leaves on the plant to support the herbs until they grow back. To cut the stems cleanly, use harvesting snips, long reach harvesting snips, or sharp, sterilized garden shears. To guarantee that your herbs regrow, it is best to remove only a small portion of the plant at a time.
Furthermore, when the cilantro plant blooms and sets seed, the herb may start to taste bitter. So, when wondering how to harvest cilantro, it is preferable to harvest before the plant bolts because the leaves will be less appetizing at that point.
When is The Best Time to Harvest Cilantro?
When the morning dew has cleared and the sun hasn't set, it's the ideal time of day to harvest a variety of fruits, vegetables, and herbs, including cilantro. This way you can lessen the stress on your cilantro plant and give the fresh stock cuts enough time to dry before dusk, which lowers the risk of illness.
Before it bolts, harvest cilantro when it is 6 to 8 inches tall. The flavor of cilantro leaves significantly decreases after they have bolted. The lifespan of the cilantro plants can be increased by careful and routine harvesting. It is crucial, though, to wait for your plant to become established before beginning to harvest.
The plant develops numerous long, thin stems as it grows. They are ready to be harvested when the stems are long, and the leaves have a lacy appearance. The cilantro herbs are about ten to twelve inches tall at this point. Gather your cilantro in the spring and into the first part of the summer.
Your plants may bolt to seed if summertime full sun conditions prove to be too hot for them. The best time to harvest cilantro is early morning. You can either choose to harvest it once a week or source just individual leaves whenever you need them.
Most of the time, it takes about 2-3 weeks for regrowth, so you must harvest accordingly. You must remember that regular cut-and-come-again harvesting is the most ideal while the plant keeps producing foliage.
How To Store Fresh Cilantro?
Part of knowing how to harvest cilantro is also knowing how to store them. It's best to know how much you should take from the garden before you harvest. You will need to learn how to store cilantro if you do not intend to use the leaves right away to extend its shelf life. There are several approaches to try.
Storing Cilantro in Water
To keep the cilantro leaves dry, wait to wash them after harvesting. For storage purposes, store the stem ends in a glass or jar with 1 to 1.5 inches of water and refrigerate for a few days. At a minimum, change the water once a day. Use a plastic bag to cover the top loosely to preserve the humidity surrounding the herbs.
Storing Cilantro in The Freezer
Freezing cilantro is another low-maintenance way to store it. Shake off any extra moisture and rinse the leaves to get rid of any garden soil. Tear the leaves into small pieces and stuff them into ice cube trays, covering the herb with just enough water to barely cover.
You can pre-measure if you'd like to ensure that you know precisely how much is in each cube for recipes in the future. After the cubes are completely frozen, place them in a freezer bag. Add as needed to marinade, smoothies, soups, and sauces. You can freeze cilantro for up to six or eight months.
Read More: Everything You Need To Know About Harvesting Basil
How To Dry Cilantro?
There are two methods for drying cilantro. You can use the oven to dry cilantro. Since hot air can greatly affect the flavor of the finished and dried herb, you might want to avoid using heat if you want to enjoy flavorful dried cilantro.
Air drying or hanging drying is a better way to dry cilantro. Gather the stems of the herbs into a small bunch and secure them with a string. Place the bunch in a dark, well-ventilated area and hang it upside down. Alternatively, you can wrap the bunch in a brown paper bag to keep the cilantro from getting dusty.
After the bunch has been hanging for about a week, begin to check its level of dryness every day or two. It's ready to be crushed or powdered and stored for later use when it crumbles when touched.
Cure the cilantro ahead of time to reduce the possibility of mold growth. Put the dried cilantro in a glass mason jar to cure. Open the jar and give it a good shake every day to let fresh air into it and mix the contents. This will assist in achieving moisture content parity. If you'd like, you can also include a moisture-absorbing packet.
How To Harvest Cilantro Seeds?
You can harvest the coriander seeds even if you don't like cilantro leaves. The plant can grow to 20 inches when it flowers. This requires temperatures above 75 degrees. Pods will form once they have flowered, and the flowers will fade.
Before being harvested, these should be green to brown in color. These pods release the mature seed when it's ready. Tie the stems with the seed pods still attached into a bunch. Next, hang them upside down in a paper bag in a cool, dry place to harvest the seeds.
With time, the seeds will sprout and drop into the bag. Store your seeds in a dry, cool place in an airtight jar. Unground dried seeds can be kept for three to four years in storage. Before using dried seeds in your recipes, grind them for the best flavor.
How To Harvest Cilantro So It Keeps Growing?
If you sow cilantro seeds every two weeks from spring until late summer, you can be sure to always have fresh leaves available. We advise chopping them up and firmly packing them into an ice cube tray filled with water. Then, just place the tray in the freezer. These can then be added directly to hot pans when preparing soups or sauces. Or they can be dropped into hot or cold water for cooking or drinking.
What To Do If Cilantro Bolts?
It's time to collect and preserve your own coriander seeds once your plant produces seeds. Picture each of those tiny white blossoms turning into a flavorful spice for your cooking or seeds for the following year! In addition to being aesthetically pleasing and tasty, cilantro flowers are also excellent pollinators.
There is a short window of time when the growing seasons of cilantro and tomatoes coincide. This proves they go well together. It usually happens that my tomato and pepper plants are just starting to take off when my cilantro plants bolt, sending forth gorgeous white flowers.
To maximize the amount of fruit your plants produce for you, beneficial insects that are feeding on your cilantro flowers will collide with your fruiting plants, vibrate their leaves, and assist in pollination. Ladybugs, butterflies, and bees all love cilantro flowers. It truly is a win-win!
Choose Slow Bolt Seeds
Seek out seed packets labeled "long-standing" or "slow bolt cilantro," as these varieties have been cultivated to endure longer in the garden. You can find your go-to slow bolt seeds that are 100% certified organic from Seeds of Change.
Finding a local seed producer is another smart move. Buying local seeds means you'll be growing a climate-adapted variety of cilantro, which increases the likelihood that you'll keep it longer.
Harvest Cilantro Regularly
Regularly chop your cilantro leaves. This preserves the health of the plant and guarantees that the leaves of this herb are fresh when you use them. Your cilantro will continue to produce new leaves from the center of the plant if you regularly harvest it by chopping off the older outer leaves.
Additionally, your chances of cutting off those immature flower stalks increase with the amount of cilantro you harvest. This will aid in postponing any bolting.
Since cilantro is incredibly obstinate, you can delay as long as you can. Cut that thick center stalk as soon as possible. After that, the plant will start to send outside shoots, giving you a little extra cilantro before it eventually bolts completely. For sun protection, surround your cilantro with tall plants.
Plant Taller Plants Around Cilantro for Sun Protection
Encircle your cilantro with large warm-season plants (like tomato or pepper plants) so that the taller plants can shade your herbs slightly and help keep the soil cooler as the temperatures rise. After all, four to six hours of sun is sufficient for cilantro to grow. To increase the lifespan of your cilantro in the garden, interplant it with larger plants.
Wrapping Up
You will need to have patience if you want to collect the seeds for your cilantro. Before seeds can be harvested, cilantro needs to blossom. Before harvesting, the resulting seed heads need to be allowed to dry on the plant for a while.
Harvesting the seeds is then as simple as shaking them into a paper bag or chopping off the entire seedhead and placing it inside the bag. If you have thoughts to share or questions to ask about how to harvest cilantro, please leave a comment below. We would love to hear from you!
Read Also:
Asparagus 101: When, How, And How Often To Harvest?
Some Facts You Need to Know About Rainwater Harvesting
How to Harvest Lettuce: A Step-by-Step Guide for Fresh and Crispy Salads