A Comprehensive Guide To Construction Equipment Procurement

Published on: 21 February 2024 Last Updated on: 07 February 2026
Guide to Construction Equipment Procurement

Efficient construction equipment procurement is crucial for any construction project's success. Whether you are a construction company owner or a project manager, the process can be complex and overwhelming. Follow this step-by-step guide to streamline the procurement process and ensure you get the best equipment from the construction equipment auction.

1. Assess Your Equipment Needs

Attend Equipment Auctions

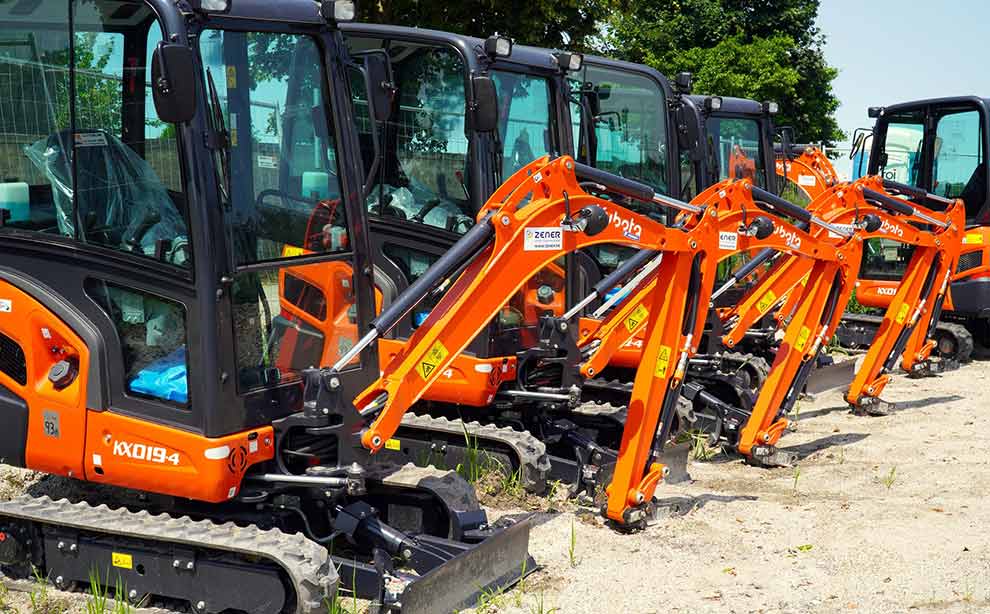
The first step in the procurement of construction equipment is to conduct a comprehensive assessment of your project's specific requirements. It is essential to consider various factors, including the type of construction project, its size, and its overall scope. Delve into the intricacies of your project to determine the precise equipment necessary to accomplish the tasks at hand. This may include excavators, bulldozers, cranes, and other specialized machinery and tools. By meticulously examining these aspects, you ensure you acquire the right equipment precisely tailored to meet your project's unique demands, ultimately contributing to its successful execution and timely completion.

2. Determine Your Budget

Determine Your Budget

Once you understand your equipment needs, it's essential to establish a budget. Begin by thoroughly assessing your financial resources and project requirements. Consider how much you can allocate for equipment procurement without compromising the project's economic health. It's crucial to balance upfront costs and long-term maintenance expenses to ensure that your investment remains sustainable throughout the project's lifecycle. Additionally, factor in any potential contingencies or unexpected expenses to create a comprehensive budget that can adapt to changing circumstances and support the success of your endeavor.

3. Research Equipment Suppliers

Identify reputable equipment suppliers who offer the machinery you require. You can search online marketplaces, visit local dealerships, or seek recommendations from industry peers. Evaluate each supplier based on their reputation, product quality, and pricing.

4. Attend Equipment Auctions

Equipment auctions can be an excellent way to procure construction machinery at competitive prices. Visit online auction platforms that specialize in construction equipment. Scrutinize the listings and participate in timed auctions to secure the best deals. Additionally, consider setting a budget beforehand to ensure you make informed and cost-effective choices when bidding on the necessary equipment. This strategic approach to equipment auctions can help your construction business acquire the required machinery while optimizing your financial resources for other essential aspects of your operations.

5. Inspect Equipment Listings

Before placing bids, thoroughly inspect the equipment listings on the auction platform. Pay close attention to item descriptions, specifications, and photographs. Ensure that the equipment's condition matches your project's requirements.

6. Register And Verify

Register and Verify

To participate in online equipment auctions, you must register on the platform. Provide accurate information and complete the verification process. This step ensures that only legitimate buyers are allowed to bid.

7. Set A Bidding Strategy

Before the auction begins, establish a clear bidding strategy. Establish the highest bid amount you are prepared to place on each item. Stay caught up in the excitement of the auction and overbidding, as it may exceed your budget.

8. Place Bids Strategically

During the auction, follow your predetermined bidding strategy. Be patient and bid strategically to secure the equipment at a reasonable price. Keep an eye on competing bids and adjust your plan accordingly.

9. Monitor Auction Progress

Stay actively engaged with the auction process. Continuously monitor the progress and consider placing last-minute bids to secure the equipment if necessary. Adhere to your budget and prevent exceeding your allocated spending limit.

10. Winning And Payment

Winning and Payment

Once you have successfully won an auction, follow the platform's payment instructions. Make the payment promptly to secure the equipment. Keep all transaction records and receipts for future reference.

11. Arrange For Transportation

After the payment is complete, it's time to arrange to transport the equipment to your construction site. Coordinate with the seller or auction platform to ensure a smooth delivery process.

12. Conduct Final Inspections

Conduct Final Inspections

Conduct a final inspection to verify the equipment's condition upon arrival. Verify that it aligns with the details outlined in the auction listing. Any discrepancies should be addressed immediately with the seller or platform.

13. Maintenance And Support

Ensuring routine maintenance is a crucial factor in extending the longevity of your construction equipment. Establish a schedule and consider maintenance contracts with the supplier or a third-party service provider. It's critical to have a reliable support system to address any issues that may arise during the equipment's operation.

Common Procurement Problems

Procurement is an essential process that dictates several aspects of the construction process. It can streamline the whole process, as well as make it more lengthy. As a result, you need to have a clear idea about what to expect. 

In this section, we will talk about some of the challenges that you might face while procuring newer materials. This section will aim to educate and provide you with solutions that will enable you to counter it if needed. Let us dive right in without further ado. 

Ambiguous Specification

Ambiguous specifications are very common, and as a contractor, you need to know how to deal with it. The very first step that you need to do is to request a proper RFI in order to gain as much clarity as possible about the market and the bulk of the order. Make sure that the RFI you request is up to the mark and is first-party in nature. Subsequently, the RFI is compliant with the design. Like for example, you will be procuring materials for a plumbing project, make sure the materials that you get are in compliant with the requirement. Do not exceed too much. 

Submittal Delays

Another very important issue that most contractors will run into is a poorly planned submittal delay. A lack of clear communication channels between the client and the mediator can be one of the reasons behind submittal delays. Therefore, keep an open channel of conversation and coordinate at all points. Do not be afraid to call up your client or vice versa if you feel like things are slacking off. Even though submittal delays are easy to fix, if left unchecked, they can wreak havoc on the procurement process. This, in turn, will jeopardize the whole project. 

Budgetary Issues

The construction material market is a dubious space to work in. You can never truly understand the price trajectory. Therefore, it is very important that you have a clear idea about where the price is headed. A sudden spike in the procurement budget can delay the procurement process. As a result, keep buffer funds in place. These funds will enable you to keep the procurement process flowing. 

Supply Chain Disruptions

No project can be sustained without a proper supply chain. Hence, you need to have fair clarity about the proper supply chain. Make sure that you understand and account for every step of the supply chain. For example, several projects require specific components that need to be ordered months in advance. Therefore, identify the wait time and the costs in order to have a proper idea about the supply chain and keep it from disrupting. 

Payment Delays

Most specialty contractors procure materials on credit. The duration of these credits usually varies from 30 to 90 days. As a result, contractors need to pay up during that period of time. Failing to do so can result in supply chain disruptions. Therefore, understand this cycle and adjust your finances accordingly. Try not to stretch too thin. Always keep funds in order to maintain homeostasis. 

Conclusion

Efficient procurement of construction equipment, whether through the construction equipment auction or direct supplier engagement, is critical to any successful construction project. Following this step-by-step guide, you can streamline the process, secure the right equipment at a favorable price, and stay within your budget. Thorough research and careful planning are crucial to making the best decisions for your construction needs, whether for an online construction equipment auction or supplier collaboration.

Additional Reading:

Ankita Tripathy loves to write about food and the Hallyu Wave in particular. During her free time, she enjoys looking at the sky or reading books while sipping a cup of hot coffee. Her favourite niches are food, music, lifestyle, travel, and Korean Pop music and drama.

View all posts

Leave a Reply

Your email address will not be published. Required fields are marked *

Related

Radon Test

What Is A Typical Radon Test Fee? Understanding Costs And Factors

When considering the safety of your home, radon testing is a crucial step. Radon is an odorless, colorless, radioactive gas that can pose serious health risks if present at high levels. To determine if your home is at risk, professional radon testing is advised. The cost for this service can vary based on several factors, including the size of your home and the complexity of the testing required. The fee for a radon test typically ranges from $146 to $716 for a professional inspection. This range factors in the methods used for testing, the size of the area being tested, and whether additional diagnostic tools are required. Understanding these costs is essential, especially considering the potential health implications of radon exposure. Keep in mind that while DIY test kits are a less expensive initial option, ranging from $10 to $50, they often include laboratory analysis fees.  However, it is recommended to use professional test services as they include requirements about the placement of tests, analysis, and recording and including proper test conditions for a final risk assessment For those seeking the most accurate assessment of radon levels in their home, hiring a professional is generally the most reliable option.  Understanding Radon Testing Radon testing plays a crucial role in maintaining a healthy indoor environment, as radon exposure is a known health risk. This section will detail the significance of radon testing and outline the typical process involved. The Importance of Radon Testing Testing for radon is essential because this odorless, colorless gas is the second leading cause of lung cancer after smoking. Radon naturally emanates from the decay of uranium in the soil, and without testing, there's no other way to determine if your home's levels are safe. Regular radon testing ensures that any dangerous concentration is identified and mitigated promptly, protecting you and your family from the associated health hazards. How Radon Testing Works To conduct radon testing, various devices are available, ranging from passive kits to sophisticated radon monitoring solutions. Passive devices, like charcoal canisters, collect radon samples over a specific period. In contrast, active devices like the Model 1028 XP: Professional Continuous Radon Monitor continuously measure levels, providing more dynamic data. These active monitors are preferred for their ability to deliver real-time measurements and create detailed reports, informing you about fluctuations in radon levels and allowing for a comprehensive understanding of your indoor air quality over an extended period. Factors Influencing Radon Test Fees When you're looking to test your home for radon, various factors will determine the cost. Understanding these can help you budget more effectively for a radon test. Test Duration The length of time a radon test takes can affect the price. Short-term tests may last from 2 to 90 days, while long-term tests exceed 90 days; the latter typically being more expensive due to the comprehensive data they provide. Type of Test You have options between DIY radon testing kits and professional radon testing services. While an at-home kit can cost between $10 and $75, professional service includes the necessary expertise and equipment, incurring higher fees. Test Location The price of a radon test can vary depending on your geographic location. For instance, tests conducted in regions with known radon prevalence may involve additional precautionary steps, potentially increasing the cost. Professional Expertise Opting for a certified radon inspector adds value as they bring specialized knowledge and accuracy. The complexity of your home's structure can also necessitate more time-consuming and thus, costlier, inspection methods. Average Cost of Radon Testing When exploring radon testing for your home, you'll find that prices can vary widely based on location and the type of test you select. Understanding these costs is essential for planning your budget effectively. By Region The cost of radon testing can differ depending on the region due to factors like demand, the prevalence of radon, and labor costs. In some areas, testing can be as affordable as $100, while in others it might reach up to $1,200. For example, homeowners can expect to pay an average of $420 for a radon inspection. By Test Type Radon testing varies not only by price but also by the methodology and duration of the test. Short-term tests may range from $10 to $30 for home test kits, whereas professional long-term testing or the use of a continuous radon monitor could cost significantly more. Tools like a continuous radon monitor might incur higher upfront costs but provide more detailed information over time. Additional Costs and Considerations When budgeting for radon testing, it's important to factor in not just the base cost but also potential additional expenses. These can vary depending on several factors, including whether you require a more thorough inspection or if follow-up testing is necessary. Mitigation System Inspection If your property already has a radon mitigation system in place, you'll need to include the cost of an inspection to ensure it's functioning correctly. This typically involves checking the system's components like the fan and the vent and can add to your overall expenses. Follow-Up Testing After the initial radon test, follow-up testing may be recommended, especially if levels are close to or above the EPA's action limit. You may need short-term follow-up tests for a quick verification, or long-term tests for a more accurate assessment, impacting your total testing costs. Home Size and Test Complexity The size of your home and the complexity of the test required can also affect the cost. Larger homes or those with multiple foundations may need several test kits or longer testing periods, potentially increasing expenses. Remember, these costs are on top of the typical radon inspection fee which can range from $146 to $716, with an average of around $420. Your specific costs will vary based on these additional factors and the options you choose. Choosing a Radon Testing Provider When faced with the task of selecting a professional to conduct your radon test, focusing on their expertise and the variety of services offered will ensure you receive a reliable and thorough assessment of radon levels in your home. Certifications and Qualifications Certifications: Make sure the provider you choose is certified to perform radon testing in your state. The National Radon Proficiency Program (NRPP) and the National Radon Safety Board (NRSB) are two leading certification bodies. A certified tester will have a sound understanding of radon testing protocols and state-specific requirements. Qualifications: Beyond certifications, assess the provider’s experience and training. Years in the field and specialized knowledge can greatly influence the accuracy of your radon test results. Experienced professionals will also be adept at using the most current and effective testing methodologies. Service Comparisons Range of Services: Compare different providers based on the scope of services they offer. Some may only conduct tests, while others provide comprehensive services including radon mitigation. It's crucial to understand whether follow-up services are available, should your test results show high radon levels. Test Types: Ensure they offer both short-term and long-term testing options to suit your specific needs. Equipment Used: High-quality, calibrated equipment yields more accurate results. Verify the type of devices used in testing. Pricing: Prices can vary, with professional radon inspection costs ranging between $146 to $716, with a common average being around $420. While cost is a factor, it shouldn't be the sole criterion. Lower prices may not always guarantee the same level of service as providers charging industry-standard fees. Interpreting Test Results Before you proceed with any steps following a radon test, it's crucial to accurately interpret the results. The test reveals the radon concentration levels in your home, allowing you to make informed decisions on necessary measures. Understanding Safe Levels Radon levels are commonly measured in picocuries per liter (pCi/L) in the United States. The Environmental Protection Agency (EPA) states that there is no completely safe level of radon exposure. However, levels less than 2 pCi/L are considered acceptable, while readings between 2 and 4 pCi/L suggest a moderate risk that warrants your attention. It's important to know that some organizations, like the World Health Organization (WHO), suggest more stringent action if levels surpass 2.7 pCi/L. Low radon levels: (<2 pCi/L) Moderate radon levels: (2-4 pCi/L) High radon levels: (>4 pCi/L) Conclusion Professional radon testing can vary in cost, generally ranging from $146 to $716 with a national average of around $420. Factors that can influence your radon inspection fee include the size of your home and the type of test conducted. For those preferring a more economical approach, DIY radon test kits are priced between $10 and $50 and include lab analysis. It's important to ensure accurate results, which might lead you to opt for a professional inspection over a DIY approach. Read Also: How Pests Control Maintains The Aesthetic Appeal Of Your Home Guide To Making Your Home Guest-Ready On Time Exploring Ideas For A Biophilic Home Design

READ MOREDetails
How To Find Valuable Property In Colorado

How To Find Valuable Property In Colorado

Looking for a new property to call your own? In the market for real estate, either for your own home or for investing and other purposes? Colorado is a great state to call home, but finding valuable property there can take some time. Visit integratedmountain.com to get in touch with professionals. With the real estate market as hot as it has been over the past few years, finding the property you seek may even seem impossible. Valuable Colorado property can vary depending on what you may be looking for at any given time. Whether you want to live in the heart of your favorite Colorado city or you would like to have an acreage with a beautiful view of the mountains, finding the perfect property will usually require a little research. Fortunately, there are a few steps you can take to find the valuable property you need in Colorado, and these measures do not have to be too complicated. Let's look at how to find valuable property in Colorado for your needs. Know The Location The first aspect to consider is the location of the property you would like to purchase. Do you really want to spend time looking throughout the whole of Colorado, or are you hoping to find a property in a specific part of the state? You can help limit your search by determining the area or town that suits your desires most rather than exploring such a broad range. You can even choose a few different locations but try to limit it rather than looking through the whole state. Know Your Price Point Once you have a good idea of your ideal locale, you need to know your price point or what you can afford. The average cost of a home in Colorado in September of 2022 was $677,793. It is very easy to start looking at properties that are too expensive. You will then fall in love with a property that is too high for your budget, leading to remorse – and nothing else will compare in the future. Before you look at any properties out there in Colorado, take the time to talk to the bank and get pre-approved for what you can afford. Getting the pre-approval allows you to know exactly what you can afford. It prevents you from going too expensive on any property you find. Look Through The MLS With a price point and a location ready to go, it is time to begin your search. You can do this alone or with the help of a qualified real estate professional. The MLS is an excellent place to start because it lists out all of the available properties, including their price, any information about them, and often pictures. You can even get contact information about the property owner or their agent to help you get a tour of the property before you make your decision. Explore Online Most buyers will begin their search online. The MLS has a comprehensive listing, but you must be a professional real estate agent to get the most out of it. You can look online for some homes or properties perfect for your needs. Options like Zillow, Trulia, Redfin, and more will list homes in any area you prefer so you can get a feel for what is out there. You can even pick specific parameters for the homes that appear. As you look online, take your time at the primary homes listed by realtors. While many excellent properties appear courtesy of real estate agents, many worthwhile options are listed for sale by the owner too. Some properties listed for auction or sale directly through an individual can be perfect, even though this type of listing is less common. It is worth your time to look at them and see whether they meet some of your needs along the way. Ask Your Network Next, tap into your network and see what they can offer; some of your friends or family have heard of a property about to come up for sale. They may even be about ready to list their own property and would love a chance to sell it without waiting on the market too long. It never hurts to ask, and letting others know you are searching can be an excellent way to find the perfect property. Work With A Realtor Finding a suitable property on your own takes time. And you have to figure out the legal paperwork all on your own when you choose to do it this way. That is why many buyers work with a realtor to help them find the perfect property. The realtor will often know more about available properties than you do, can answer questions, and will point out some of the problems with the home you may need to worry about. Realtors have their own network of others they can pull on to help you learn about the perfect property in Colorado. They will show homes to you, handle the inspections, and take on any work necessary for selling the house. They can alert you about a potential property before the listing even appears on the MLS. If there is a hiccup in the process, they will step in and ensure that everything works out the way it should and that the closing happens as smoothly as possible. The best part about working with a realtor is that their services are accessible to you as the buyer. The seller is responsible for paying for the buyers and sellers' agent, making this a free resource you can take advantage of if you want to find the perfect property for your needs. The Bottom Line You can explore many excellent properties when looking to find somewhere to call home in Colorado. Still, you must be ready to do your due diligence and search. Knowing where you would like to live and your price point before beginning the search will make a big difference and help you find the perfect property for your needs. A knowledgeable realtor can be a lifesaver during this, too, giving you some fantastic results when finding that property. Read Also: Mold Growth At Home: What You Should Know And What You Can Do Things First-Time Homebuyers Need To Know About Hiring Realtors 10 Best Ways To Find Cheap Homes To Flip

READ MOREDetails
Revit Modeling

4 Advantages Of Revit Modeling In Designing

Revit modeling is a process that uses Building Information Modeling (BIM) software to create and manage information about a building project. This advanced technology is rapidly becoming an industry standard for designing and constructing buildings. Revit modeling is used in various industries to develop accurate, high-quality, and detailed building designs. This process provides significant advantages over traditional design methods.  Improved Collaboration Collaboration is a critical component of any building project. Effective collaboration between designers, engineers, and architects ensures the project is completed on time, within budget, and meets client expectations.  Real-time Collaboration Revit modeling allows real-time collaboration between team members working on the same project. With the software's cloud-based capabilities, designers, engineers, and architects can simultaneously work on the same model, making real-time changes.  Enhanced Communication Revit modeling enhances communication between team members, reducing the likelihood of errors and misunderstandings. The software provides a shared platform for team members to share design ideas, make revisions, and collaborate on the project. This ensures that everyone is on the same page throughout the design process. Streamlined Design Process Leverage the expertise of revit modelling services to streamline your design processes by providing a central location for all project-related information. This will equip your team with accessibility to the same information, eliminating the likelihood of errors and ensuring everyone works from the exact design specifications.  Time-Saving Time is of the essence in any building project, and Revit modeling offers several advantages that save time in the design process.  Automated Processes Revit modeling automates many design processes, including generating 2D and 3D models, creating floor plans, and producing material takeoffs. By automating these tasks, designers and engineers can save significant time compared to traditional design methods. This automation also reduces the likelihood of errors and ensures the design meets the required standards. Rapid Revisions Revit modeling offers a streamlined approach to making revisions. The software allows for quick and easy modifications to the design, with changes automatically reflected throughout the model. This feature reduces the time needed for revisions and ensures that all team members work with the most up-to-date design version. Consistent Documentation Revit modeling ensures consistent documentation throughout the design process. The software automatically generates and updates project documentation, including construction documentation, specifications, and schedules. This feature reduces the likelihood of errors and ensures all team members work with the same documentation. Cost-Effective Revit modeling offers several cost-effective advantages that help to reduce project costs while improving overall project outcomes.  Reduced Design Errors Revit modeling reduces the likelihood of design errors compared to traditional design methods. The software automatically checks for design errors, such as clashes and interferences, reducing the need for manual checking. This helps to reduce project costs by preventing costly errors.  Efficient Material Management Revit modeling offers efficient material management capabilities that help to reduce project costs. The software helps designers prevent the over-ordering of materials, reducing project costs. Enhanced Project Accuracy Revit modeling offers enhanced project accuracy compared to traditional design methods. The software allows for accurate design modeling and simulations, ensuring the project meets the required standards. Project stakeholders can ensure accuracy and efficiency in the design process by utilizing Revit modeling solutions.   Visualization and Analysis Revit modeling offers several advantages in visualization and analysis that help to improve the design process and overall project outcomes. Simulations and Analysis Revit modeling offers simulations and analysis capabilities that help to improve project outcomes. The software allows designers to simulate various design scenarios, such as lighting, ventilation, and energy consumption. This feature helps to optimize the design and identify potential issues before construction, reducing the likelihood of costly errors and rework. Efficient Design Modifications Revit modeling offers efficient design modification capabilities that help designers and stakeholders make informed design decisions. The software allows for rapid and accurate design modifications, enabling stakeholders to evaluate different design options and make informed decisions about the project.  3D Modeling and Visualization Revit modeling offers 3D modeling and visualization capabilities that help designers and stakeholders visualize the project realistically. With 3D modeling services, stakeholders can visualize the project and identify potential issues before construction, reducing the likelihood of costly errors and rework. Conclusion Revit modeling is a valuable tool for building projects and can help to ensure project success. Using Revit modeling in the design process, project stakeholders can optimize the design, reduce costs, and ensure that the project meets the required standards. It offers 3D modeling and visualization capabilities, simulations and analysis, and efficient design modifications, improving the design process and overall project outcomes.  Read Also: Latest Trends of Graphic Design in London Divorce In Modern Society What are the Benefits of Eco-friendly reusable carry bags?

READ MOREDetails