Published on: 29 October 2018
Last Updated on: 24 February 2020
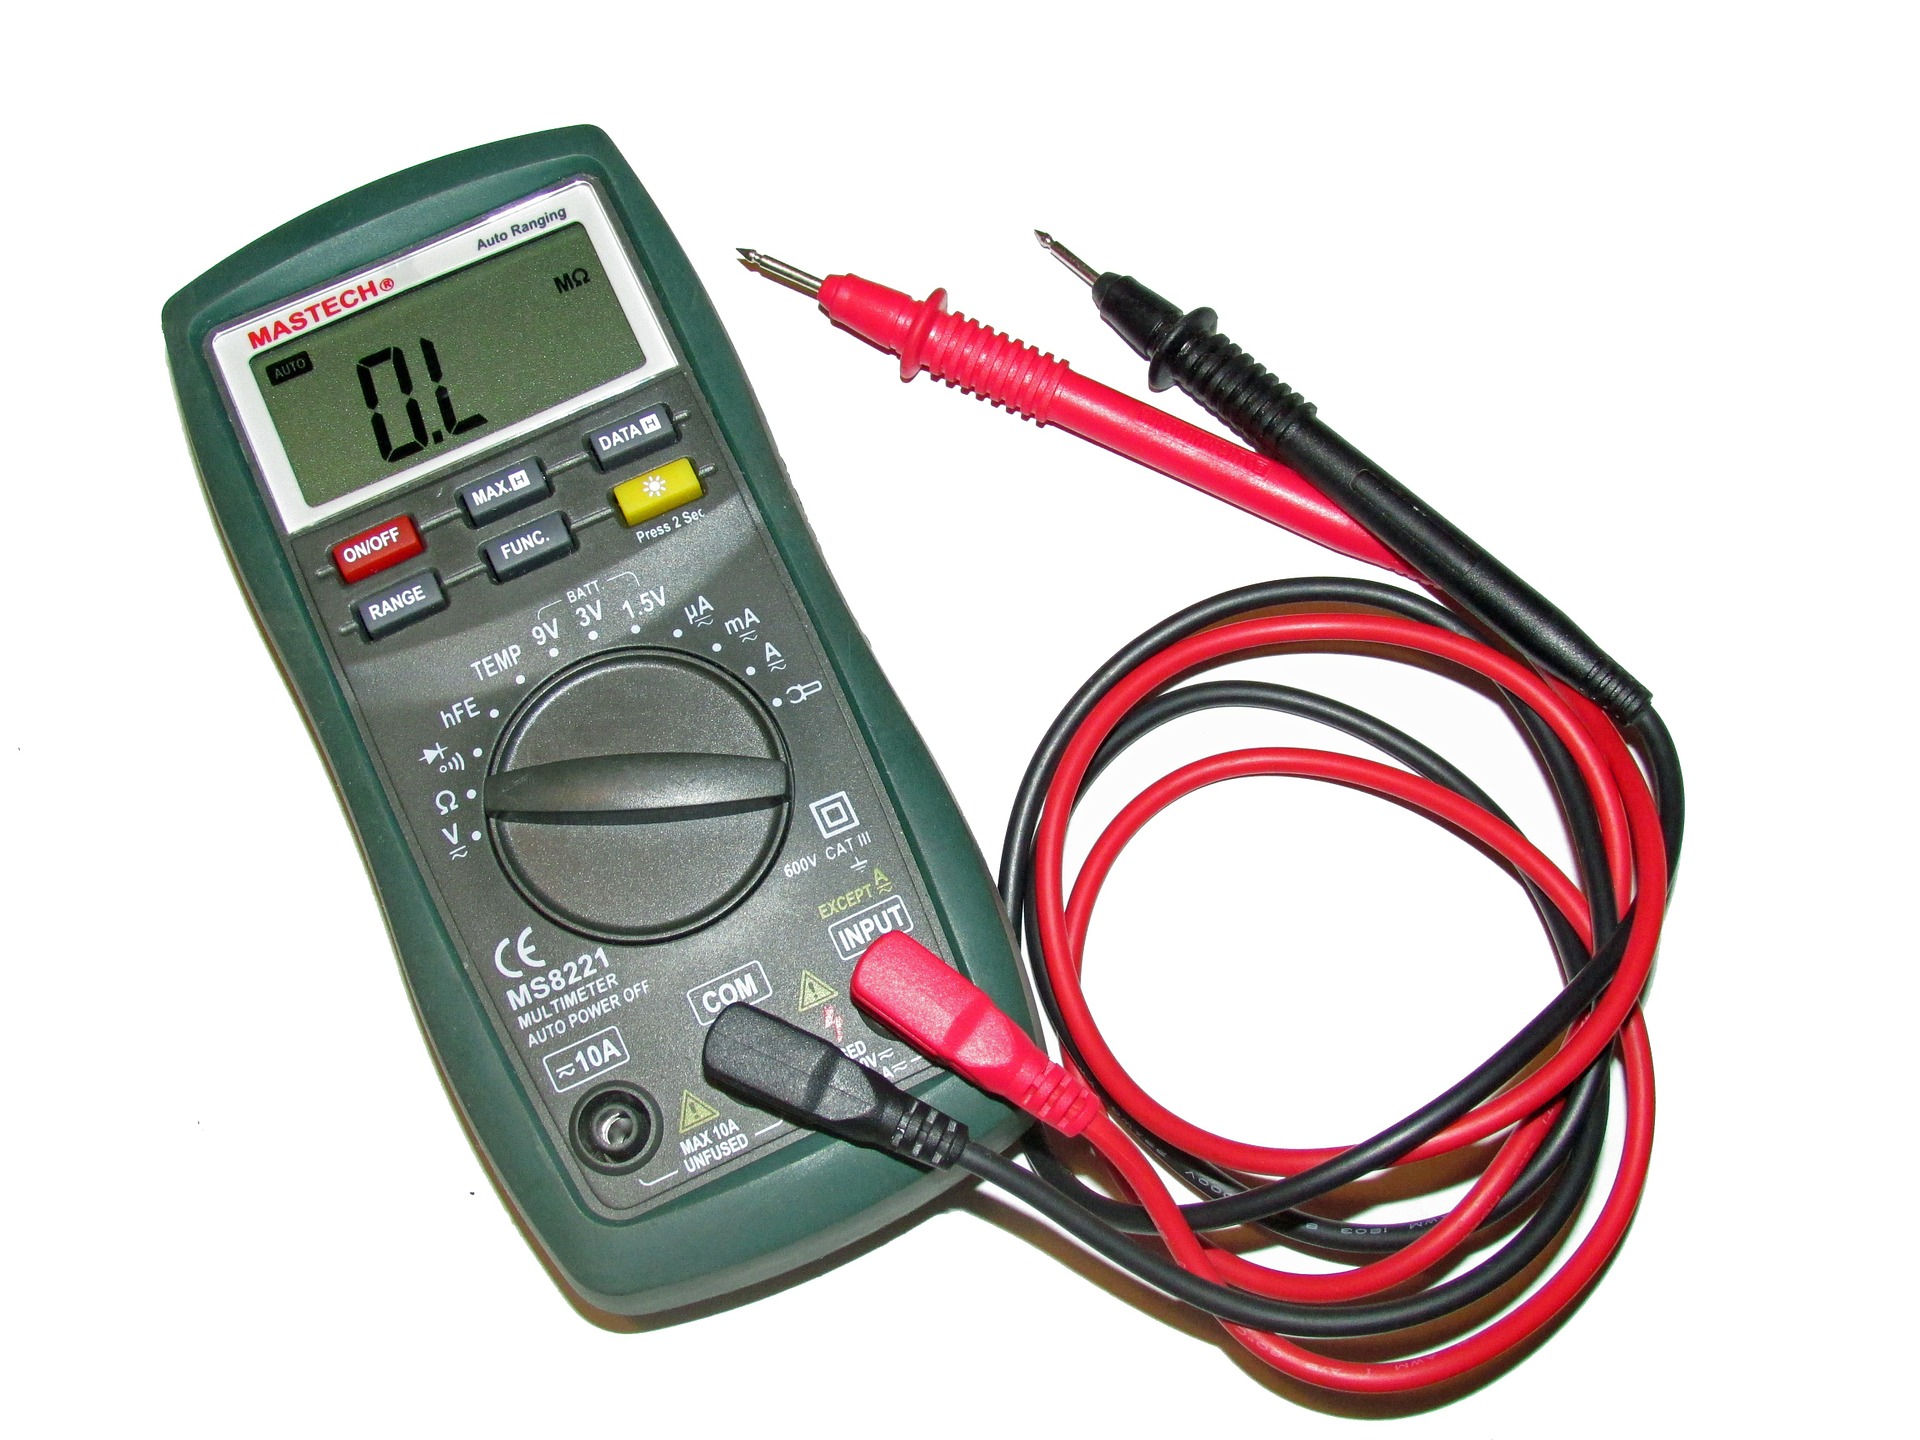
A multimeter is also known as a multi-tester. This small device helps you to find the accurate measurement of voltage, current, resistance, and power. With the help of an analog multimeter, you can troubleshoot the electrical problems with accuracy with the help of pointer on a scale. You can also use this multimeter in technical industries as well as in domestic appliances. You can use this multimeter for testing heavy motors, machines, wiring systems, and power supply and in home appliances like television, refrigerator, washing machine, air conditioner etc. Hence, it is a very useful device for both domestic and professional use.
How do needle based multimeters work?
The main work of needle based multimeter is to pass the current through a coil which is suspendedbetween two permanent magnets. After choosing the voltage scale, when the voltage is applied, a resistor of known value is placed in series with a measurement lead. This multimeter is a very sensitive piece of electrical testing device. It is common not only in home appliance installations but isalso very useful in servicing and repairs. Sometimes, when there is fluctuation in power supply this needle based multimeter gives you an accurate reading, which is not possible in the digital meter.
Advantages of using the needle based multimeter:
As you know that multimeters are of two types, analog and digital, the former one is very low in cost and available at every hardware store. You can get an accurate measurement by an analog meter, and you don’t even need a battery to operate it unless you have to measure the resistance. But in digital meters, you need a battery to operate it. While an analog meter needs DC power to measure resistance, it forces the current to flow in the capacitor and when it is stabilized, you will get the reading of the faulty wiring.
How to check the voltage by an analog meter?
If you want to check the voltage with the help of a needle based multimeter, you have to just follow a few tips. Thenumberto which the needle moves from 0 is known as “deflection “and full scale deflection is that goes till the end of the scale, anything beyond the scale is not measurable. In other words, this process is also known as full scale deflection. Users mostly drop the deflection part because it is rarely relevant anymore.
Current measurement by an analog meter:
Both AC and DC current can be checked with the help of needle-based multimeter by connecting the series in the meter in the circuit. For AC current measurement, an analog meter consists of diode rectifier that converts AC to corresponding DC current. Before measuring the current, one should consider the following:
Insert the red and the black leads in their respective slot depending on very high or very low current measurements.
Set range selector switch to DC current, and also select the expected range. Multimeter users can also ensure maximum range for measurements. They can also reduce the range if needed.
Content Rally wrapped around an online publication where you can publish your own intellectuals. It is a publishing platform designed to make great stories by content creators. This is your era, your place to be online. So come forward share your views, thoughts and ideas via Content Rally.
As the world continues to shift towards a more digital landscape, the significance of quality web applications has become progressively apparent.
Given the vast array of tools and technologies at the disposal of web developers, determining an appropriate starting point can prove challenging. Debugging is the method of identifying and fixing bugs or errors in software.
It is a vital aspect of web automation testing as it contributes significantly to the dependability and precision of the automated test results. Playwright is an open-source cross-browser testing framework released by Microsoft in 2020.
As stated by Systems Sciences Institute, the expenditure of addressing an error or bug discovered after product release was 4 to 5 times higher than pinpointing it during the configuration phase. The detected value during the maintenance phase can be exceeded by up to 100 times. Playwright developers operate at the API level and offer comprehensive tooling through the integrated Playwright Inspector.
Playwright Inspector is a powerful tool that authorizes developers to efficiently test and debug their web applications. Also, it facilitates creating automation scripts by furnishing auto code generation capabilities. Playwright Inspector allows you to inspect the Document Object Model (DOM) structure of a webpage, interact with web elements, and inspect CSS styles utilizing the Playwright API. It authorizes stepping through tests, picking locators, editing live locators, and seeing actionability logs.
This blog will dive into the basics of Playwright Inspector and explore its many features. So if you're ready to take your web development skills to the next level, buckle up and dive into the world of Playwright Inspector.
Before that, let's have a brief understanding of Playwright.
What is Playwright?
Developed by Microsoft, Playwright is an end-to-end open-source web testing and browser automation framework. Playwright offers outstanding cross-browser compatibility and convenient features. This makes it a perfect choice for automation and quality assurance purposes. The playwright is a flexible, robust, and efficient framework. It supports multiple languages like JavaScript, Java, Python, C#, and TypeScript.
Playwright utilizes a single automation API. This makes it steadfast and quick and produces consistent outcomes while running cross-browser testing. It provides a powerful set of testing features. These features can be utilized to simulate end-user interactions with the web application. Also, the framework authorizes testing complex scenarios such as file uploads, login flows, and other interactions. These test scenarios can be tough to test with other testing frameworks.
The software platform furnishes developers with a comprehensive selection of standard and personalized locators. This facilitates the straightforward and effective identification of elements on web pages. These locators can pinpoint elements based on a variety of attributes, including text content, position on the page, and other distinguishing features. With Playwright locators, developers can confidently identify elements on the DOM, ensuring the creation of substantial and steadfast test suites.
What is a Playwright Inspector?
Playwright Inspector is a Graphical User Interface based tool that helps testers and developers record scripts and debug Playwright tests. The tool helps generate boilerplate code. This can be a suitable starting point for building codes. Also, it assists developers and the Quality Assurance teams save time when writing the test script from scratch. Software developers can utilize the time saved to comprehensively understand the codebase and make informed modifications, as required, to enhance the efficacy of the testing suites.
The Playwright Inspector simplifies the process of debugging web applications. It is a browser-based development tool that facilitates developers to inspect, debug, and troubleshoot web applications. The tool authorizes developers to record user interactions, capture screenshots, and inspect HTML elements, CSS styles, and JavaScript code. Playwright Inspector furnishes a console for developers and testers to run arbitrary JavaScript code in the context of the inspected page.
To scale Playwright Inspector, an AI-powered test orchestration and test execution platform like LambdaTest offers an online farm of 3000+ browser and OS combinations to execute the Playwright test. You can effortlessly test your application as its scalable cloud infrastructure enables parallel test execution where you can run test cases altogether. It can also integrate with your existing testing infrastructure.
It effortlessly plugs into your Playwright tool, eliminating the need for complex configurations. LambdaTest's Playwright Inspector
empowers you to debug and analyze Playwright scripts effortlessly. Inspect element properties, verify page behavior, and optimize automated tests using this user-friendly tool.
Installation and Setup Instructions
Installation and setup instructions are crucial for any software tool, and Playwright Inspector is no exception. As a beginner, it's essential to follow these instructions carefully to ensure that you can start using the tool without any issues. To install Playwright Inspector, first, you need to make sure that you have Node.js installed on your computer or laptop. Once you have Node.js, you can install Playwright Inspector through npm by running the command "npm i -g playwright-inspector" in your terminal.
Upon successful installation, the tool can be initiated by executing the command "playwright-inspector" in your terminal. You can also use Playwright Inspector with other browsers like Firefox and Safari by installing the corresponding browser extensions. Following these instructions will give you a smooth and hassle-free experience of using Playwright Inspector, authorizing you to debug and troubleshoot your web applications with ease.
How to Inspect Elements in Playwright Inspector
If you are new to Playwright Inspector, you may be wondering how to inspect elements within your web page. Fortunately, Playwright Inspector comes equipped with a number of useful tools and features to assist you in efficiently identifying and inspecting elements on your web page. To start, simply launch Playwright Inspector and navigate to the web page you want to inspect.
Once you are on the page, right-click on any element within the page and select "Inspect element" from the context menu. This will bring up the Playwright Inspector pane, where you can view the HTML and CSS code for the selected element. You can also view any associated styles and properties. From there, you can use the various tools and features within Playwright Inspector to further inspect and manipulate the element, making it easier than ever to identify and troubleshoot any issues within your web page.
Benefits of Playwright Inspector
The Playwright Inspector tool presents lots of benefits. Let us consider a few pivotal benefits of the Playwright Inspector:
1. Easy Debugging:
Playwright Inspector facilitates the process of debugging Playwright scripts by furnishing a visual interface. This authorizes developers to inspect the page, make alterations to its state, and swiftly identify the cause of issues.
2. Record and Replay:
The tool presents a record and replay feature that authorizes testers and QA teams to record end-user activities on the page and replay them for debugging purposes. The record and replay feature can help pinpoint issues that may occur only during specific user interactions.
3. Robust Logging:
Playwright Inspector presents robust logging abilities that authorize testers and QA teams to outline the execution flow of the test script. This helps swiftly determine issues and fix them, thereby enhancing confidence in the code and application itself.
4. Intuitive Interface:
The Playwright Inspector boasts an intuitive and user-friendly interface that is simple to navigate and operate, even for testers and QA teams who are new to the Playwright platform.
5. Cross-Browser Support:
The Playwright Inspector facilitates the testing and debugging of applications across various platforms as it supports multiple Chromium-based browsers such as Chrome, Edge, and Firefox. This enables developers to ensure their applications perform optimally on different browsers.
6. Breakpoints:
The Playwright Inspector tool is designed to enhance the testing process for software testers and QA teams. With this tool, users can set breakpoints in their test scripts, enabling them to pause test execution at specific points and thoroughly investigate the page's state. This increased level of control and visibility allows for improved efficiency and effectiveness in the testing process.
Best Practices for Using Playwright Inspector
The Playwright Inspector tool furnishes developers with an intuitive solution for testing web applications at scale. With the help of Inspector, developers and testers can debug their web automation scripts, view page elements and attributes, and pinpoint issues that may be causing the tests to fail. To make the most out of this tool, it is paramount to follow the best practices for using it.
Here are eight best practices for using Playwright Inspector:
● Familiarize yourself with the Inspector UI.
● Utilize the search feature to swiftly pinpoint page elements.
● Utilize the highlight feature to visually locate elements on the page.
● Utilize the console to test JavaScript code and interact with the page.
● Utilize the network tab to inspect network requests and responses.
● Utilize the performance tab to pinpoint performance issues.
● Utilize the snapshot feature to capture a snapshot of the current page state for later analysis.
● Utilize the playback feature to replay test scripts and identify errors.
By following these best practices, you can utilize Playwright Inspector to its full potential and optimize your web automation testing process.
Conclusion
Playwright Inspector is a powerful tool that can help developers troubleshoot issues and enhance the quality of their web applications. With its user-friendly interface and wide range of features, Playwright Inspector is a prominent addition to any developer's toolkit. By following the steps outlined in this beginner's guide, you can start utilizing Playwright Inspector today and take advantage of its many benefits. Whether you are a seasoned developer or just starting out, Playwright Inspector is a must-have tool for anyone looking to enhance their web development skills.
Read Also:
Mobile Testing With Appium On Lambdatest
10 Reliable Free Currency APIs For Your Business
Using Tracking Code, Google Analytics Can Report On Data From Which Systems?
Selecting the best software vendors for your business can be a huge job. Your team is unique, and you need tools that fit your specific situation. The quality of the software solution you get depends on the quality and reliability of the vendor who stands behind it. So how do you get what you need?
Who Are the Best Software Vendors Out There?
Understand the types of software and vendors:
Some vendors try to do it all, but most concentrate on a particular category, whether that’s enterprise software, automation tools, productivity platforms, specific niches for marketers or educators, or advertising software. It’s always a good idea to go with a vendor who specializes in what you’re looking for.
As with all software, you as the end user are really just buying a license. The software remains the vendor’s property. All software licenses come with limitations, so in most cases, you are prohibited from modifying the software code or distributing it without permission.
Decide what you really need:
Before you choose a vendor, you need to seriously consider which solutions best fit your business. This means doing an audit of your specific needs: compile accurate requirements for everything you need in your software and make sure you identify which are the most crucial elements.
Don’t forget that the software doesn’t just need to do things — it also needs to help you do things. It needs to be a platform that assists your team in meeting your goals. If there are any elements that are not as important to you, identify these too, so you can adjust to stay within budget.
Read real reviews:
As you look for a software provider, your first step should check out a good review site like TrustRadius where you can find unbiased reviews by actual software users. Good sites verify that reviews are written by users and not by vendors themselves, and this can be a great way to find out which vendors are most reliable and trusted.
Reviews are always a tricky thing, and it can be hard to decide which reviews to pay attention to. You can get a feel for the reviewer by checking out other reviews they’ve left and watched out for unrealistic or overblown language.
Check out certificates and credentials:
Once you identify a few vendors you might like to work with, it’s time to check out their background. You want to find out how long they’ve been in business, who their tech partners are, and whether they’re growing.
What partner certifications can the vendor offer? How busy are they? If a vendor is any good, they’ll have a strong flow of steady business, but they still need to have time to devote to your project.
Talk in person:
As you narrow down your options, the next step is to get a feel for the real people who might be working on your project. You want to see how well you can communicate with them, whether they really listen to what you’re saying, and what they suggest.
At this stage, you should also ask about the level of customization you can get and the scalability of any software the vendor provides. As your company adapts and grows, will the software grow with you, or will you have to buy new software in a couple of years?
Nail down the specifics:
Once you’re sure you want to work with a vendor, there are still a few more things to negotiate before you sign the final agreement. Make sure you carefully check the contract so you know about any extra fees. If the contract allows the vendor to increase monthly prices, make sure there are provisions that make this reasonable for you.
You also need to make it clear what happens when and if you and your vendor stop working together. Will they be able to hold on to your data? What type of guarantees will you have and what system is in place to negotiate disagreements?
Don’t be afraid to ask questions and make sure you’re getting the vendor that really works for your company.
Read Also:
Securing Mobile App Development With Blockchain Technology
5 Informal Team Building Activities To Break The Ice Among Co-Workers
These days, it's rare for people coming out of school and entering the workforce to know what a fax machine even looks like.
The technology is considered outdated by most, and legacy fax machines are rare. Despite the digitization of information technology, though, there are still some industries that require the extra security provided by faxes.
The good news for those working in or communicating with companies that work in the healthcare, finance, and legal industries is that there are simple solutions for sending faxes that don't require investing in outdated technology. Arguably the most effective of them is faxing by email.
Why Send Faxes By Email?
There are many benefits to faxing with your email account. This method for sending faxes requires no legacy equipment or specialized software solutions, and it's easy to implement.
Faxing by email combines the security of faxing with the convenience of sending emails, offering the best of both worlds.
Read on to find a step-by-step guide to the process.
Step One: Choose an Email-to-Fax Service
Anyone who plans to send or receive faxes that contain sensitive or protected information should take extra care when choosing an email-to-fax service.
Some of them provide greater levels of data protection than others, so ease of use isn't the only concern. Look for an email-to-fax solution that's as secure as it is simple.
Step Two: Compose the Message
For shorter faxes, users can compose messages in emails. For longer documents, uploading an attachment to the email is a better solution.
A good email-to-fax service will accept a range of document types, including DOCX, PDF, JPEG, and others, but it's still best to check to make sure the file type is supported before sending the message.
Step Three: Address the Message Correctly
The message should be addressed to the recipient's fax number, complete with the "1" designated to US and Canadian fax lines. What follows the @ symbol will vary based on the service provider. Expect the word "send" to appear in the address along with the domain name.
Step Four: Send the Message
Once the message has been composed or attached and addressed correctly, all that's left is to hit send. The email-to-fax service will take care of all the rest by converting the document into secure fax and delivering it to the number indicated in the email address.
You May Also Check: Fax Over the Internet
How To Review Messages?
One of the great things about using an email-to-fax service is that it's easy to review fax history. Authorized users can access all of their sent faxes from a secured web portal.
In comparison to making physical or electronic copies of documents and then storing them on-site, this is a much easier and more secure solution.
How To Receive Messages?
Signing up with an email-to-fax service provider also gives users the ability to receive faxes by email. Each user will be assigned a virtual fax number, which can be given to the sender.
Any time documents are faxed to the number, the fax-to-email service will convert them into digital documents and deliver them to the user's email address and store copies on the web portal.
Work With the Best Whether users want to set up one digital fax line for personal use or they need to scale up to accommodate entire corporate teams, an email-to-fax service is the best solution. It's convenient, safe, and affordable, and it doesn't require maintaining legacy equipment.
Read Also:
How To Scan From Printer To Computer?How To Find The Best Check Printing SoftwareWhy You Need A Secure Wifi Connection In Shared Space