


Category: Lifestyle
ContentRally is a leading source of reliable news and trending topics on Lifestyle. Get hard-to-find insights and advice on Lifestyle from industry-specific leaders.

What Is This Magic Product Salons Are Using? What is Builder Gel?
What is builder gel? It could be your whole personality right now. I mean, that’s the prime function of beauty, though. Most importantly, it can change your nails big time. I just felt everyone should get to know more about it. So, here I am with the details! Firstly, it is a magic product, no doubt. Most licensed nail teachers and professional salon experts say this viscose polish strengthens your nails. The nails can grow without breaking. In technical terms, we call this- building your apex. Some refer to builder gel extensions as adding structure or creating structured overlays. What is an apex? You now know what builder gel is. But what is an apex? In the terminology of nail care, the apex is the highest point of nail extensions. It is added to your nail to give it strength and balance it simultaneously. To understand an apex better, you can think of it as the arch or dream curve of the nail. It is the thickest segment of your nail and the most challenging part of your nail palette. Once you get the apex right, you can pull off any of the nail designs 2024. How Do You Apply Builder Gel? Don't confuse it with the application of nail polish. Firstly, we apply nail polish in vertical strokes. However, builder gel is much more viscose. Hence, we use horizontal strokes while applying it. As a result, the policy expands across the whole nail. There are three types of builder gel. These are hard, medium, and soft gels. If you’re using the hard gel, then use a separate brush for the same. Let's clarify another confusion here. Some builder gels need you to apply a base coat first and then apply the gel on the top. However, builder gels manufactured by brands like Halo need nothing. Once applied correctly, the hard gel helps you keep your manicure safe for a long span. However, some experts say using a rubber-based base coat is always better. It helps you to achieve the correct adhesion and take good care of your nails. Why does builder gel lift? There are many reasons why the builder gel coating can lift from the nail top. Firstly, you must know that it is not as flexible as the natural nail. Therefore, the gel coat may lift at any time. The same may happen when you don’t apply a base coat to make the natural nail more adhesive. Generally, we call the lifting of gel- “pocket lifting.” The center of the enhanced nail lifts away from your natural nail. Well, we understand that the builder gel coat may ward off any time. But we apply it to give our nails strength, shape, and safety. So, we must know why the nail coating comes off. Otherwise, our builder gel treatments would be in vain. Here are some of the main reasons I’ve noticed over the years: Inaccurate nail preparation You can’t achieve proper adhesion if you don’t remove your ail cuticle debris; moreover, not buffing the surface properly leads to the same outcome. Therefore, I suggest using a hydrator properly and avoiding such outcomes especially if you’re into French manicure acrylic nail ideas. Imperfect application I’ve always suggested visiting experienced nail experts. They know the proper application techniques. Frail treatments like builder gel applications may go wrong if you don’t know the accurate application technique. However, the exact flaws that amateurs make are not properly curing the portions between the layers. The process takes time and patience. Poor products Are you using cheap or non-compatible gel primer? Even poor topcoats can also cause poor adhesion. Hence, the builder gel coat can be lifted easily. Quality of natural nails Often, your nails are naturally damaged. Some of the people have fragile natural nail layers. In that case, the nail additions can easily ward off. So, you must apply a good hard gel and a base coat of the right consistency. The same is also important for ombre nail designs 2024. Poor Curing Quality Did you use weak UV to cure the gel? It may be one reason your builder gel came off before time. When you don’t apply the UV for long, it makes the polymerization process weaker. As a result, it leads to easy lifting. Benefits of Using Builder Gel There are many benefits to using builder gels. By now, you know what builder gel is and its uses. Now, it is time to find out what are the most expected benefits of the builder gel application: a. strengthening natural nails if your nails are skinny and weak b. The nails can grow long, giving your fingers a premium finish c. The thickness of your nails also improves when you apply a builder gel finish d. Lastly, the builder gel nails become more durable. It can resist weathering, especially during severe winters. Builder gels make your nails chip-resistant and much longer lasting. However, you have to make the application right. Remember the tricks I mentioned, and you can enjoy builder gel nails for a long time. Application Process The application process is easy. It suits even beginners well. I suggest just following the steps below and having a safe and durable coat of builder gel. Start with preparing your nails for application. Do that by cleaning your nails and removing any existing polish or debris. After that, you have to do your nail buffing clinically. Start with buffing the surface gently. After that, ensure you’ve achieved the right rough texture to help the gel sediment on your nails. Thirdly, you have to apply builder gel. This is the most critical stop that we were all looking for. First, use only a thin layer of gel on each nail. Remember, the gel is much thicker than regular nail paint or nail polish. So, don’t use the builder gel in very high concentrations. At the same time, know about the proper application strokes. When you apply builder gel, the strokes go horizontally. However, the nail polish strokes are vertical. Lastly, use a sculpting form to extend it evenly across the edges, too. Done the primary step? Now, think about increasing the life of your builder gel nails. You must cure your nails with a UV/LED lamp. It will harden the builder gel layer. To finish off, cover the tips of your nails with a short nail polish layer. Always remember you must use a clean brush to remove the remains of the polishes applied beforehand. There might be small traces of polish inside the cuticles. Or on the sidewalls. So, use the brush well. Clean up and then layer the builder gel. Maintenance and Removal Maintaining a builder gel is not challenging. Shrug off the terrors experts may be giving you. You can now easily keep your builder gel nails with some simple tricks: 1. don’t use any harsh chemicals on the nails. 2. Most importantly, don’t soak your nails in water for a prolonged time. It is enough to ward off adhesion. At least avoid doing that for the first 3 days after application. 3. Don’t forget cuticle oil. You must regularly apply cuticle oil to keep the nails hydrated for a long time. In the meantime, the same also keeps your nails healthy. At the same time, cuticle oil can help avoid hangnails or dry and choppy nails. Most importantly, it helps you to avoid cracked cuticles, too. The removal of the builder gel coat is equally easy. Just soak the nails in an acetone remover. However, you can also remove the layer manually with a nail file and a cuticle pusher. This is, in fact, a gentler method. Hence it helps you to keep the health of your natural nails intact.
READ MOREDetails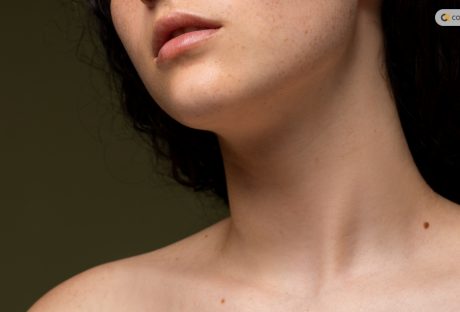
What Is A Beauty Mark And Why Does It Matter?
Beauty marks are common in many women. However, if you wonder what a beauty mark is, you are not alone. Generally, they are widespread and are a natural skin trait. In some cases, people will call it a mole. However, there is a slight difference. Hence, to know what is a beauty mark, read on to the end of the article. In this article, you will learn what is a beauty mark and what it means for the female body. Apart from that, this article will also explain a variety of facts about beauty marks (spots). Moreover, you will also find out the significance of having beauty marks on your face and body. Finally, the article will discuss cultural perspectives on beauty marks. What Is A Beauty Mark? The phrase “beauty mark” is a cultural term that is basically a dark spot on the face or the body. In fact, many people find it attractive. Generally, people use it as a euphemism for a dark facial mark. Hence, it tends to be a term that people use broadly for any type of facial mole or freckle. According to L’Oreal, “In truth, beauty mark is a term that was coined to describe a dark spot on your face that is considered attractive or beautiful. Most of the time, a beauty mark is a mole, freckle or spot on your skin that has been there since you were born (a birthmark).” In fact, you will find that more people are likely to have beauty marks on their faces without them knowing. Moreover, if there are a lot of beauty marks on your body, you must be concerned about it. Understanding Beauty Marks Generally, beauty marks are beauty spots on your body that are small, dark spots on the skin and are visually attractive. Basically, many people think them to be pleasant or attractive. Apart from that, many think that it improves the appearance of the person. In addition to that, it can actually be a lovely feature for the face or the torso. On the other hand, there are moles (also called nevi). These are skin growths that happen when you accumulate pigmented cells in your body. These cells are called melanocytes. Apart from that, it is interesting to note that moles are frequent in the female body and is usually an innocuous feature of the skin. Who Has Beauty Spots? A beauty spot is possible in people of all skin tones. Generally, these are dark spots on your face that make you look attractive (that’s what most people think). In fact, beauty spots include birthmarks, moles, and freckles on the skin (especially the face and torso). However, people with a lighter skin tone can have around 20 beauty spots. On the other hand, people with a darker skin tone have fewer beauty spots. The reason for beauty spots is generally sun exposure. However, most beauty spots are harmless and non-cancerous in nature. Apart from that, some beauty spots are atypical and dysplastic. This means they have a higher risk of developing melanoma. Moles or nevi are generally of these types: 1. Common Nevi: Actually, these are small moles that can be pink, brown, or tan in color. Also, they have a distinct shape. 2. Congenital Nevi: Generally, these include those moles that are present at birth. Also, there is a slight risk of developing skin cancer due to congenital nevi. 3. Dysplastic Nevi: Actually, these are very rare. In fact, these moles are larger than a pencil eraser. Also, they have an irregular shape. Furthermore, they have an uneven color. On the other hand, they also come with dark brown centers and lighter and uneven edges. Interesting Facts About Beauty Spots The following are some of the most interesting facts you need to know about beauty marks: 1. Many people do not recognize the fact that most beauty marks are moles. However, all beauty marks are not moles. For instance, if the mark is on your face, it is a beauty mark. On the other hand, if the mark is anywhere else in the body, it is a mole. 2. Only 1% of babies are born with beauty marks on their skin. Basically, beauty marks can appear in childhood, teenage years or even during adulthood. 3. In his play Cymbeline, Shakespeare gave the character Imogen beauty marks. This shows that he appreciated the beauty marks on the face. 4. In the 18th century, smallpox was common among women. Hence, they used to cover their smallpox scars with mouse fur. As a result, this turned those scars into beauty marks. 5. Marilyn Monroe was known for her beauty marks. However, its authenticity is still debatable. Moreover, it reshaped the meaning behind beauty marks on women’s faces. In fact, some sources say that she concealed her beauty marks in her early roles. Can Beauty Spots Make You Sick? Generally, most beauty marks are harmless in nature. Also, they appear early on in life and are benign. Moreover, they are not contagious. Hence, they do not hurt, itch, or bleed. However, a mole can be cancerous in nature (but rarely). For instance, it can turn into skin cancer. Hence, the following are some of the cases where you need to be concerned: 1. The mole appears to change in some way. 2. The mole shows up after the age of 20. 3. It becomes larger than 4-6 cm and keeps growing. 4. The mole itches and oozes continuously. Wrapping Up What is a beauty mark? Now you know the answer. Actually, these are small and dark spots on the face and in the torso. Apart from that, they can also come in other parts of the body. However, if those marks appear on the face, they are called beauty marks. However, if they appear on other parts of the body, they are called moles. Is it dangerous? It is only dangerous when it comes to 20 years of age and grows in size. What is your experience with beauty marks? Please share your ideas and opinions in the comments section below. Read Also: 7 Tips for People with Hypersensitive Skin The Profound Impact Of Well-Groomed Nails On Confidence Achieving Aesthetic Excellence: How Skin Clinics Deliver Beautiful Dermal Results
READ MOREDetails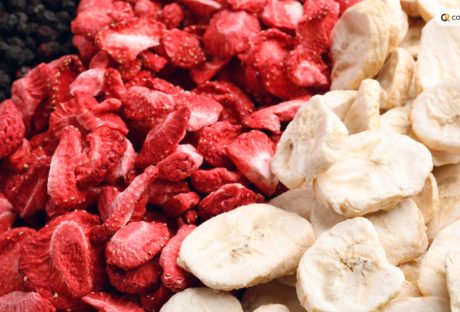
How To Freeze Dry Food At Home Fast? – Steps To Follow
How to freeze dry food? - To freeze-dry your food, you need first to freeze your food and then dry it under pressure to remove water content. This process is called lyophilization. In fact, it is one of the best methods to use if you want to dry your food. Actually, it is a common practice in both the pharmaceutical and food industries. In this article, you will learn how to freeze dry food at home with simple methods. However, before that, you will also understand the freeze-drying process and the types of food you can freeze-dry. Moreover, you will also learn the benefits of freeze-drying and essential tips to freeze-dry your food successfully. Hence, to learn more, read on to the end of the article. Understanding Freeze Drying Freeze drying is a process where you remove water from a food material by freezing it. Then, you turn the ice into vapor by putting the item under pressure. Hence, you can see that this process is a dehydration technique where you sublimate the water in a product. It means that the water content in your product changes from a solid state to a gaseous state (sublimation). Here, the water does not turn into liquid. Generally, this method is helpful when you want to preserve any perishable materials. Here, the goal is to extend the shelf life of the material. In this case, you freeze the material and reduce the pressure. Then, you add heat to allow the frozen water in the food (material) to change directly to vapor. How Does Freeze Drying Work? Freeze drying consists of three stages: freezing, sublimation, and desorption. Here is an explanation of the three stages: 1. Freezing This process involves freezing the food at a very low temperature. Generally, you have to freeze to -30 to -50°F. 2. Sublimation (Primary Drying) In this stage, you have to pass mild heat over the frozen material while the material is under vacuum. Hence, the ice crystals vaporize into water vapor. After that, you remove the water vapor with the help of a vacuum pump. 3. Desorption This is the second stage of drying. Here, you have to remove all the remaining moisture from the surface of the food. Benefits Of Freeze Drying Food The following are the major advantages of freeze-drying that will benefit you a lot: Generally, the foods that you freeze-dry retain up to 97% of their nutritional value. For instance, the food retains vitamins, minerals, and antioxidants. Those foods have a long shelf life. Moreover, you do not need to store it in cold chains. Once you freeze-dry your food, you will end up removing 98% of its water content. Hence, you will reduce its weight by 90%. Thereby, it will be easy for you to carry that food on camping and backpacking trips. Freeze-dried food is easy to prepare. This is because you just have to add water to rehydrate them. Moreover, the shape and size of the food remains intact. Also, freeze-drying helps in preventing the growth of pathogenic organisms. You can preserve a wide range of foods with freeze-drying. This includes meat, fish, fruits, vegetables, eggs, ice cream, and more. When you freeze-dry food, it does not get brown or caramelize. However, this is quite common when you dry food traditionally. How To Freeze Dry Food At Home? Here are the steps you must follow to freeze dry food at home: Wash your food items that you want to freeze-dry. Also, remove dirt and residues from the food. This way, you can ensure food safety. Cut your food into small pieces. This way, you can make the freeze-drying process faster. Place your food on a flat tray. Moreover, make sure to spread the food evenly. Basically, if you spread your food properly, you can freeze the food evenly. Place your food in your freezer, and set the temperature correctly. Then, place the food in your freezer for two weeks. Actually, you need this time to remove the moisture in the food. After the completion of two weeks, remove the trays from the freezer. After that, quickly place the food items in airtight bags. Make sure to take out one tray at a time to ensure that the food does not rehydrate. Make sure to place the food bags in the freezer, and also in a cool, dark spot. Check the food after a couple of days. This way, you ensure whether all the food is dried-up or not. Tips For Successful Freeze Drying The following are some essential tips by following which you can successfully freeze dry your food: 1. Preparing the Food Harvest the food produced when it is ripe. Then, wash the food, remove the damaged parts, and prepare it as desired. This is because if you cut your food into small pieces, it will dry faster. 2. Arrange the Food Place your food on a tray and arrange it into pieces. Also, make sure to place those pieces in such a way that they do not touch each other. 3. Use A Freeze Dryer With the help of a freeze dryer, you can automatically lower the temperature. Moreover, a freeze dryer also helps you to create a vacuum. 4. Store The Food Once you freeze-dry your food, store it in an airtight container. Also, you can store it in a bag which you can vacuum-seal it. 5. Cook Raw Foods: One of the drawbacks of freeze-drying is that it does not kill harmful bacteria. Hence, you must cook freeze-dried foods thoroughly before consumption. Related: The Importance Of Proper Cutting When Preparing Meals Common Uses For Freeze-Dried Ingredients The following are some of the common uses of freeze-dried foods: Works as essential food supplies at times of emergencies. They have a long shelf-life and you can use it to maintain food quality. You can use freeze-dried food in stews, soups, baked goods, etc. You can eat freeze-dried food as a healthy snack any time. If you freeze-dry your seasonings, you can retain the flavor and freshness for years. Wrapping Up You now know how to freeze dry food. Generally, in manufacturing, food companies and manufacturers prefer freeze-dried food over regular food. This is because they are easy to prepare and are portable and lightweight. Also, such food removes the moisture from the food to make it compact. Do you have more suggestions for freeze-drying to offer? Please share your ideas and opinions in the comments section below.
READ MOREDetails
Hummingbird Food Recipe: How To Make Hummingbird Nectar?
It always feels good to see a hummingbird in your garden. To see more of them in your garden, you can keep hummingbird nectar/food in a jar in your garden. In fact, with a simple hummingbird food recipe, you can make their lives easier. All you need is a few simple ingredients. In this article, you will learn how to make hummingbird food with simple ingredients. Apart from that, this article also discusses hummingbird nutrition and the steps you can take to set up your bird feeder. Finally, you will learn how to attract more hummingbirds to your garden. Hence, to learn more, read on to the end of the article. Understanding Hummingbird Nutrition There are a variety of food options a hummingbird needs to meet its nutrition. Although they are one of the smallest birds in the world, they burn a lot of their calories by fluttering their tiny wings. Generally, a hummingbird flutters its wings 90 beats per second to maintain its momentum. Hence, you can see that hummingbirds need to eat a lot. In fact, to satisfy their daily calorie requirements, these birds even consume half of their body weight. Basically, they feed on bugs and nectar every 10-15 minutes. Also, they visit 1000-2000 flowers per day. The following are the things that hummingbirds feed on: 1. Nectar: This is the primary food source of hummingbirds. Basically, it consists of 20% sugar and 80% water. Generally, hummingbirds get their nectar from cardinal flowers, bee balm, salvia, and petunias. 2. Insects: For their protein needs, hummingbirds feed on insects. This is also a source of fat and salt for hummingbirds. In fact, nectar does not provide those nutrients. Basically, hummingbirds hunt insects by finding them from flowers, leaves, or tree bark. Sometimes, they also attack insects midair or pluck them from sticky saps. 3. Spiders: Generally, hummingbirds also feed on spiders for protein. However, they are generally small spiders. 4. Tree Sap: When the amount of nectar is low, hummingbirds drink tree sap from tree bark. Generally, woodpeckers drill wells on tree barks to get tree saps. Hummingbird Food Recipe Basically, by offering hummingbird nectar, you can help them with their post-workout meal. Hence, follow the below hummingbird food recipe to make nectar: Ingredients The following are the ingredients you need to make hummingbird nectar: Filtered Water: 4 Cups Regular White Sugar: 1 Cup (If possible, use organic sugar for the recipe) Procedure Here are the steps you must follow to make hummingbird nectar: 1. Get four cups of water in a saucepan and bring it to a boil. 2. Once the water reaches the boiling point, take the water off the heat. Add sugar to the boiling water. 3. Stir the mixture until the sugar completely dissolves in the water. 4. The nectar is ready. Now, you must let the nectar cool completely. 5. Get a hummingbird feeder and place the mixture inside the feeder. Make sure to hang the hummingbird feeder outside (in your garden) to attract hummingbirds. Essential Factors To Consider The following are some of the major factors you must consider before you start making nectar with the hummingbird food recipe: Make sure to change the nectar every four days with a new nectar. This will ensure that the nectar is fresh. Also, remember not to use food coloring in the nectar. Let it be as natural as you can. Regularly check the bird feeder every time you change the nectar inside it. Look whether there is a gray mold inside the feeder base or not. Also, check whether any ant has crawled inside the feeder to consume sugar water. If you check any dirt or ants inside the hummingbird feeder, throw the bird food away. Basically, it is not good for the birds to drink dirty nectar. In fact, there is a high chance that the birds will not feed on the nectar anyway. To clean the feeder, rinse it with warm water. Then, put some bleach into the water inside. This will allow you to clean the feeder with a brush easily. Once you clean the feeder, rinse it thoroughly with fresh water. Moreover, allow the water to dry. After that, please fill up the feeder with food and place it outside. Enhancing The Hummingbird Experience Enhancing the hummingbird experience, you can attract more hummingbirds to your garden/balcony/porch. The following are some of the steps you must follow if you want to enhance the hummingbird experience: 1. Change The Food Regularly Make sure to change the food every 3-4 days. This is because nectar spoils quite fast, especially when the weather is hot. In fact, if the weather is above 30 degrees Celsius, make sure to change the nectar regularly. Also, make sure to keep the feeder in the shade. This will prevent the sugar from fermenting. 2. Use The Right Amount Of Ingredient You can make hummingbird nectar with just water and sugar. However, you must ensure the water-to-sugar ratio is 4:1. Then, boil the water and add the sugar. After that, mix them until the mixture is perfect. After that, you must let the mixture cool before you add it to the feeder. 3. Avoid Honey Generally, honey can ferment fast and becomes a great place for mold to grow quickly. Moreover, they can be sticky and get on the feathers of hummingbirds. Hence, it is better to avoid honey. 4. Add Another Feeder Although hummingbirds are small and cute, they can be incredibly aggressive and territorial when confronting other hummingbirds. Hence, to avoid conflict among hummingbirds, it is better to add a second feeder if you want to ensure every hummingbird gets the opportunity to have the nectar. 5. Clean The Feeders Make sure to clean the feeders every week. Moreover, if you have hot weather around, clean the feeders twice every week. While you clean, ensure the vinegar-to-water ratio is 1:4. Also, rinse the feeders well before you refill. Furthermore, while rinsing, do not use dish soap. This is because they can leave harmful residue on the feeders. Setting Up Your Hummingbird Feeder The following are the steps you must take to set up your hummingbird feeder: Make the nectar by checking the hummingbird food recipe in the previous section. Hang the feeder in your garden at the start of spring. Generally, hummingbirds migrate through your area in the spring. Also, leave the feeder up after the hummingbirds migrate in the fall. Hang the feeder in a place where it is visible for hummingbirds to see. Also, make sure to place the feeder in an area where you can have a good look. Clean the nectar every 3-4 days and clean the feeder thoroughly each time you change the nectar. This way, you can prevent dust and mold from getting into the feeder. Sugar water is safe and helpful for hummingbirds. Basically, it is quite similar to the natural nectar that hummingbirds find in flowers. If you want to make your own feeder, use an old spice container, bottle, mason jar, or wine bottle. Attracting More Hummingbirds Here are some of the major ways you can attract hummingbirds to your garden: 1. Offer Hummingbird Food/Nectar: If you make sugar water and keep it in a feeder in your garden, you can attract many hummingbirds in your area. To make this item, you can see the hummingbird food recipe above. 2. Keep Water: Generally, hummingbirds also like to bathe. Hence, you can keep some water in a pot/jar to allow hummingbirds to access water for bathing and drinking. 3. Perch Area: You can leave small branches and sticks on your trees and plants. This will allow hummingbirds to perch on. 4. Plant Flowers: There is no alternative to pure nectar that flowers have. Hence, this attracts hummingbirds a lot. For instance, you can use hummingbird sage, honeysuckle, bee balm, and more. Also, you can add other types of flowers to your garden. 5. Keep Other Animals Out: If you have a pet cat/dog in your home, keep them inside. This is because they can bother hummingbirds or even end up killing them. 6. Avoid Pesticides: Pesticides are repellants for hummingbirds as well as insects. Hence, make sure not to use them or use them minimally. Make Your Hummingbird Food Now Now, you can make hummingbird nectar with the help of the hummingbird food recipe in the article. However, make sure to change the food every 3-4 days. Also, ensure to clean the jar every time you change the food. This way, you can ensure clean food for hummingbirds. Do you have more suggestions on how to make hummingbird food? Please share your ideas and opinions in the comments section below. Additional Resources: Is Indian Food Healthy? – Major Nutritional Benefits of Indian Cuisine 15 Healthy Mexican Food Items With Immense Health Benefits The Importance Of Proper Cutting When Preparing Meals
READ MOREDetails
What Fast Food Is Open On Christmas? – Stores And Restaurants To Visit
Christmas is just a couple of weeks away, and it gets busy at this time of the year. Moreover, with all the festive celebrations, you will definitely want some fast food. But, what fast food is open on Christmas? The answer is many fast-food restaurants, and food stalls are open on 25 December to fulfill your cravings. In this article, you will learn about what fast food chain is open on Christmas. Apart from that, this article will also give you details about the types of fast-food chains open on Christmas. Moreover, you will also get tips on finding open fast-food locations. Hence, to learn more, read on to the end of the article. The Popularity Of Fast Food On Christmas Recently, more fast-food chains have been choosing to operate on Christmas Day. This is great news for people who do not celebrate by going out or who just want to take a break on Christmas. This is also helpful for people who are just looking for a convenient option for lunch and dinner. Generally, in the United States, unlike many other countries across the world, fast-food chains are quite popular. This is because of the following reasons: It is easy to get quick and easy fast food. Also, you will find it cheaper than preparing a meal at home. If you live in a city, the fast-paced city life and professional commitments make fast food an easy-to-get option. Generally, fast food is more affordable than healthy meals, organic food, and fresh food alternatives. Convenience is the biggest reason for the popularity of fast-food chains. Moreover, since Americans value time and money a lot, it makes fast food easy on the pocket as well as on time-savings. In fact, you can order cheeseburgers, sodas, and supersize items, each within a dollar. Basically, when it comes to Christmas, people want to take a break from making food and spend more time with their families. Hence, fast food has become the go-to alternative. On the other hand, many fast food chains use marketing campaigns to promote their food during holidays. Apart from that, fast food items also contain some ingredients that make people feel good, like saturated fats, sugar, trans fats, high calories, etc. Types Of Fast-Food Chains Open On Christmas The following are the major types of fast-food chains that are open on Christmas: Snacks Generally, these fast-food chains include a snack bar, beverage establishments, and simple meals like sandwiches, burgers, and hotdogs. Here, the serving person will serve you at the counter or on the table. Burger Shops This is a popular option in some places. In those shops, you will find upscale burgers and a variety of cheeseburgers. Moreover, you will find different types of concept burgers that emphasize variety and freshness. Generally, these are takeaway counters. Food Court These places are full of different small takeaway counters. Here, each customer pays independently and eats in a common room. In these places, each owner of the food island contributes to the dining room rental. Healthy Fast Food Healthy fast food options are also common in some places. For example, you will get nutritious wraps, vegetarian food, and a variety of vegan options. Basically, if you want a balanced diet, this is a great option. Also, it helps you a lot, even when you are on the move. Hence, if you are health-conscious, this can be a great alternative. Niche Fast Food Many new themed and niche fast food restaurants are opening up. Here, you can personalize your fast food. Here, the restaurant fuses fast food with many other food options to create something new. What Fast Food Chain Is Open On Christmas? The following are some of the fast food chains that are open on Christmas: 1. McDonalds The Golden Arches are the most popular fast-food options during Christmas. Yes, McDonald’s is open on Christmas and throughout the festive season. No matter which state you are from, you will find many locations open on Christmas Day and even on Christmas Eve. However, the hours may change depending on the location you are from. 2. Starbucks Sipping a Cafe Mocha on the evening of Christmas with a book in hand. This is heaven for people who like to celebrate Christmas alone. However, even if you have your family and friends with you on Christmas day, Starbucks is always a go-to option. Generally, you will find most Starbucks locations open on Christmas. However, individual store hours may differ depending on the place you stay. Basically, it depends on the cultural and climatic conditions of the place. Hence, before you visit the nearest Starbucks, make sure to call. 3. Burger King A juicy burger on a Christmas day is like heaven to many. Head to the nearest Burger King to get your burger. However, you might find some locations closed on Christmas Day. Hence, it is better to call beforehand. This is because the holiday hours are different in every location. 4. Dunkin’ Donuts If you have a sweet tooth, Dunkin’ Donuts is there to satisfy your needs. In fact, most of the Dunkin’ Donuts locations stay open on Christmas Day. Hence, if you are looking for a quick breakfast or an afternoon treat, order something from Dunkin’ Donuts. However, make sure to confirm the timings of your local store by calling them beforehand. Tips For Finding Open Fast-Food Locations The following are the steps you must follow if you want to find an open fast-food location near you: Open your smartphone. Tap on the Google Maps app to open it. Make sure your GPS is on. Tap the name of the shop and add “near me” after that. You will find all the locations of that shop near you. Check the opening and closing times of the shop. Also, note down the phone number of the shop. Call that shop and ask whether they are open within the time frame within which you will visit. If the storekeeper confirms that they are open, head on to that fast-food shop quickly. This way, you can visit a fast-food store near you and try out your favorite meal. Alternatives To Fast Food On Christmas A good home-cooked meal is always the better option if you want to compare it with fast food. Whether you are alone or with your family, spending some time cooking something you like is a great way to spend your Christmas in an amazing manner. Depending on how much time you have, you can also try out a new recipe. All you need to do is open YouTube and check out a cooking recipe. If possible, you can even involve your family members in the preparation. Basically, if there are many hands, the workload will be less. Moreover, this will strengthen the family bonding. Summing Up What fast food chain is open on Christmas? You can see that the popular fast food chains that are open on Christmas are McDonald’s, Burger King, Starbucks, and Dunkin’ Donuts. Apart from that, if you have any other local fast-food shop open, you can visit there. Do you have more suggestions on how to find a fast-food shop nearby? Please share your ideas and opinions in the comments section below. Read Also: Is Walmart Open On Christmas? Get To Know What Is Open And What Is Not Best Bulking Foods That You Need For Fast Muscle Gains All you need to know about kashkaval cheese Unveiling home décor ideas for Christmas
READ MOREDetails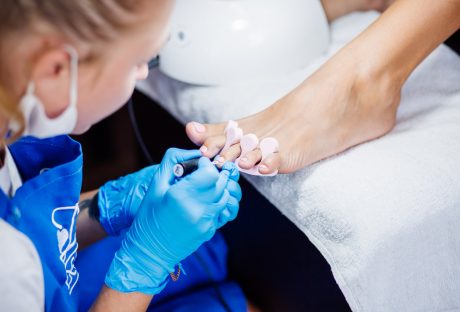
What is Pedicure? Process, benefits, Cost, and Guide
Among all cosmetic treatments, pedicure is one cool thing. All of you know what is pedicure. So, I won’t go into the basic nitty gritty. However, we have to focus on all four segments of it equally. Certainly, nail and cuticle care are the most important. The term pedicure is coined from the Latin “pedis,” meaning “of the foot,” and cura. Generally, when you speak of pedicure, it implies cosmetic pedicure. However, pedicures can be used for therapy and medical purposes, too. In this article, we will discuss the perks of pedicure and the outcomes you expect of it. We will also suggest some tips for DIY pedicures at home. But first, let’s start with what is pedicure. It is one of the beauty enhancers and, of course, maintaining better nail and foot hygiene. After all, the function of beauty is marinating better outer health. How often do you get a pedicure? A pedicure is a process of skin exfoliation. However, you may think of it as a skin treatment, too. It is a complete package of nail care, skin care, cuticle care, and dead skin removal. Now, the question is, how often do you need this set of treatments? The ideal gap is a month. In between these 30 days, the skin can regrow and regenerate. However, you must not overdo it. Firstly, the skin may feel irritated if pedicures become frequent. But pedicure isn’t one straightforward process. You may frequently repeat switching your Polish grade. But don’t barge into the exfoliation process every time. Types of Pedicures I already mentioned- a pedicure is not a simple process. So, it’s crucial to discuss the types of pedicures and their importance for your skin health and hygiene. Basic Pedicure It is the most common form of pedicure. It includes cuticle refining, shaping, and polishing. This package costs $35 and takes around 30 minutes. Spa Pedicure Next in line is a spa pedicure. It is a smooth process. People generally visit salons to get it done. First, it involves a deep cleansing and massage of the feet. The average cost of your spa pedicure could be $50 to $60. But experts say getting it done from a good spa for better effect is better. Paraffin Pedicure If you want a hydrating nail and cuticle treatment, go for the paraffin pedicure. Most of you may know what is pedicure. But do you know about paraffin and gel pedicures? Most nail designs 2024 updates include gel treatment. Firstly, a paraffin pedicure is a process where salon specialists use paraffin wax to reduce cracks and barriers. After that, they moisturize the feet. If you have cracked or frizzy skin, you must get a paraffin treatment once or twice a year. Gel Pedicure Here, nail treatment is the prime focus. Most importantly, experts curate your nails with UV or LED light after applying builder gel. But what is builder gel? It is a natural viscose gel base that increases nail strength, thickness, and length. It adds a gloss glass look to the nails. However, the look would last two weeks at best. Stone Pedicure One of the seldom-used types of pedicures is the stone pedicure. It is no prosthetic treatment. However, the spa specialists only use stones to massage the feet. The prime benefit of the same is better blood circulation in your feet. Hence, the skin remains naturally well. Benefits of Pedicures Pedicure sessions have specific benefits for sure. Some of these are apparent, and others are long-term gains. Here are the prime benefits you expect out of a pedicure: Your Skin Health Pedicures help to improve skin health. Hence your skin will immediately look fresher and youthful. It is the most significant outcome of the exfoliation process. Better blood circulation If you want better massage and foot care during pedicures, go for a classic and a stone treatment. What is pedicure? It is the mere exfoliation of the skin so that it respires better. Meanwhile, blood circulation through and around the cutaneous players also improves. It keeps the skin fresh and youthful as well. Exfoliation A pedicure is the best way to remove dead cells from the two upper layers of the skin. Hence, it prevents skin infection since all toxins are given away. Stress relief The pedicure process releases endorphins. Hence, you feel calm and breezy. Meanwhile, your feet feel relaxed as the blood circulation improves. Other Benefits There are other benefits of pedicure, too. Most importantly, it can resolve foot odor issues. At the same time, it can release muscle tension and cure back pain to some extent. What to Expect During a Pedicure Let's see what makes up a classic pedicure session. What is a pedicure? It is the treatment of your skin. There are 6 to 7 basic steps of this treatment. It starts with soaking your feet in warm, lather-rich water. Consequently, your nails and the skin of your feet will become mushy. After that, it is time for exfoliation. The process involves using a foot tile to remove the upper dead skins. Thirdly, pedicure involves nail care, too. Most importantly, the trimming, filing, buffing, etc. Moreover, there is cuticle work to be done. The last three steps are: Moisturizing Massaging, and Polishing The process lasts between 30 to 90 minutes. However, there are two types of pedicure treatment. These are basic and luxurious. Other than small detailing like nail shaping, gel polishing, and cuticle work, the rest is the same for luxury treatment. How much does a pedicure cost? In the US, the cost of pedicure might vary. It may range from $20 to $75. However, the average price of a basic pedicure from a standard salon would be $45. It is also apparent that the salon brand and location would be reasons for variation in the prices of the same pedicure services. DIY Pedicure at Home A DIY pedicure is easy. However, you need to prepare the ingredients from scratch using natural elements when you do it first. After that, you can reuse the same products and save time and resources. To do the same, you need a natural scrub first. A pumice stone can be one. It can substitute cosmetic foot scrubs. But the treatment should start the same way it does in any salon. Firstly, soak your feet in a bucket or tumbler. Combining lukewarm water, Epsom salts, and a few drops of essential oils. Remember, what is pedicure? It treats the external skin and blood vessels on the inner lining. So, a home pedicure can be as effective as a salon treatment. Just use the proper steps and a set of the right organic ingredients. Done with soaking? Apply Pumice stone for natural foot scrubbing. Once done, just trim your toenails and push back the cuticles. Finally, apply a base coat to the nails. Any nail color would do. At the end, apply the topcoat. While applying it, you should check out the best ombre nail designs 2024 ideas. Flaunt your best nails before Christmas! Massage the feet with moisturizer, lotion, or oil to finish the process. Choosing the Right Salon Finding the right salon for a pedicure can give you a heck of a time. So, keep this basics in mind when selecting one: 1. Ask friends and family members for recommendations. Meanwhile, check the ratings, reviews, and recommendations for that salon on local community groups. 2. Read customer reviews and expert opinions of the listed salons. 3. Most importantly, know your budget. The services that cost $30 at your local salon might cost you $150 at Bastian Gonzalez. So, choose wisely. 4. Book an experienced nail technician. Novices may often do it wrong, causing nail infections and plumps. 5. Hygiene is the first thing you should check when you visit any nail salon. Meanwhile, check the cleanliness as well. Common Myths About Pedicures Go, get your pedicure done in a sweep. Many people don’t know what is pedicure. They often create or spread false rumors about the process. I’ve heard people say paraffin pedicure is for people with dry feet and heavy skin barriers. However, it is a process that benefits anybody. Secondly, knowing that a stone pedicure is for relaxation only gives me a good laugh. However, the truth is that it can relax your whole body. It can also relieve you from muscle and bone-related diseases. Don’t Go for a Professional Pedicure! I won’t say that ever. However, it is one of the most outstanding rumors about pedicure. Just ignore such small talk! Meanwhile, enjoy your pedicure session. Also, let me know your experience at your local salon. We will survey who has the best salons in their area. Share the article and ask people to comment on the same too.
READ MOREDetails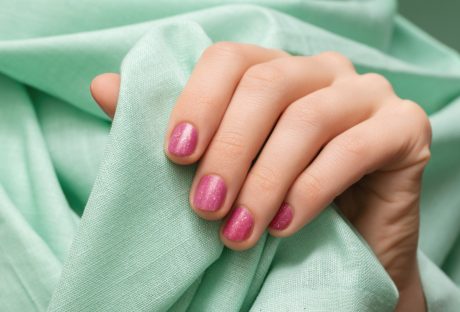
35+ Ombre Nail Designs 2026
The popularity of ombre nails is rising, and they will continue to grow in 2025 as well because of their various designs and gradient effects. The ombre nail designs 2026 trend was mostly a blend of bold and classic. It was a mix of creativity and elegance. You will have numerous options for different occasions and depending on your preferred style. You can choose some daring, bold colors or go with some soft nude transitions, but the nail designs also show off your personality. So, here are some of the best ombre nail designs 2026 ever saw, and something that you can take with you to 2025 as well. Best Ombre Nail Ideas 2026 Well, nail art has been on the trend for a while now. Before, we discussed about best nail designs and some French manicure acrylic nail ideas. So, why leave out ombre nails? Let's check some of the best ombre nail ideas that 2026 saw grow into the trend. 1. French Fade https://www.instagram.com/p/DBLWOPTykjd/?utm_source=ig_web_copy_link&igsh=MzRlODBiNWFlZA== This is one of the classic forms of the French manicure. The tip is classic white and gradually descends down to a darker shade of petal pink or rose pink near the cuticle. Also, you can accessorize it with some color coordinates scrunchies. 2. Nude Ombre https://www.instagram.com/p/CIdr2cWju87/?utm_source=ig_web_copy_link&igsh=MzRlODBiNWFlZA== If you always choose to look elegant over anything, then this is something perfect for you. This includes different gradients of nudes. The deeper nude shade is at the tip, and at the tip, it almost turns white. It creates a chic and elegant look. 3. Pink & Orange Gradient https://www.instagram.com/reel/C66eI-nr2AB/?utm_source=ig_web_copy_link&igsh=MzRlODBiNWFlZA== If you are looking at the best ombre nail ideas 2026, you cannot miss out on this one. Just imagine! Sitting on a tropical island, sipping a pina colada, and you hold the glass with those pink and orange gradient nails that actually match the entire vibe. Doesn't it seem nice? 4. Beach Chrome Nails https://www.instagram.com/p/CvvYBWxLnp_/?utm_source=ig_web_copy_link&igsh=MzRlODBiNWFlZA== Planning for the beach this time? Then why not prepare yourself? Match the outfits and outlooks, and not just match the nails to create the entire vibe. Also, if you have tanned skin, or plan to get a beautiful beach tan, these beach chrome nails would go perfectly with these. 5. Two-tone Square Nails https://www.instagram.com/p/CvvCWldOt_b/?utm_source=ig_web_copy_link&igsh=MzRlODBiNWFlZA== You can try ombre nail designs in all shapes, but something is alluring about square nails. These cute square nails look just like strawberry syrup. These are not very difficult to create, and if you have mid-length nails, these are perfect for you. 6. Pastel Ombre Nails https://www.instagram.com/p/CqKyqa_PGCw/?utm_source=ig_web_copy_link&igsh=MzRlODBiNWFlZA== If you have long, beautiful nails, then you can try this and create an amazing look, perfect for the summer. There is a very soft transition of white, orange, and pink. 7. Chrome Ombre Nails https://www.instagram.com/p/CXPtPm1pDUx/?utm_source=ig_web_copy_link&igsh=MzRlODBiNWFlZA== If you have coffin nails, you can then combine the French tips with the ombre effect, shiny finish, and some chrome. They are elegant and you can try these irrespective of all seasons and occasions. 8. Evil Eye Stiletto https://www.instagram.com/p/DAsaWSuMLkM/?utm_source=ig_web_copy_link If you have stiletto nails, then this is something you can definitely try. You get an amazing, sexy look with a bit of an edge if you add the evil eye to your nail art. The ombre effects highlight the blue evil eye symbol. 9. White & Pink Ombre Nails https://www.instagram.com/p/C-DgyRjyLGZ/?utm_source=ig_web_copy_link&igsh=MzRlODBiNWFlZA== A reverse French manicure is something we have seen in the ombre nail designs 2026, and this one is perfect for those bright sunny days when you like to enjoy the weather in a light mood with some popsicles. 10. Tropical Beach Sunsets https://www.instagram.com/reel/C8hgyUFsEBJ/?utm_source=ig_web_copy_link&igsh=MzRlODBiNWFlZA== Well, we have discussed beach nails but hear me out. This is different. Why not add some palm trees to the designs? When you are doing your nail art, why not add some of the actual tropical flavor? 11. Blue Ombre https://www.instagram.com/p/C9OXL-XvN10/?utm_source=ig_web_copy_link&igsh=MzRlODBiNWFlZA== These blue nails are making it big, offering a refreshing tone on the gradient nails. You can try various things with this color and feel those calming hues of the ocean or the different shades of the night sky. 12. Glitter Ombre https://www.instagram.com/p/DCUa-q3pGQS/?utm_source=ig_web_copy_link&igsh=MzRlODBiNWFlZA== These nails are the ones that would truly shine. The eye-catching design has a solid base, and then it transitions towards the tip, giving a glittery finish. You get a party-ready look, or you can try it for any other occasion. 13. Rose-Gold Ombre https://www.instagram.com/p/C05iCyqsLzK/?utm_source=ig_web_copy_link&igsh=MzRlODBiNWFlZA== This color is a popular choice for fashion and jewelry. And the world of nail art has also embraced color. This is a perfect combination of elegance and warmth. Moreover, because of the luxurious look it gives, you can definitely try these out. 14. Winter Frost Ombre https://www.instagram.com/p/DB3_pNuuHZA/?utm_source=ig_web_copy_link&igsh=MzRlODBiNWFlZA== If you want a makeover for the winter, you can try the winter frost ombre, which gives you a sophisticated and cool look. This design mainly features whites, silvers, and ice-blue shades giving a frosty effect for the winter season. 15. Black & White Ombre https://www.instagram.com/p/CnwoeRZBsLc/?utm_source=ig_web_copy_link&igsh=MzRlODBiNWFlZA== If you like drama and enjoy a good dramatic look, then these black & white ombre nails will make a statement for you. This striking contrast is both sophisticated and edgy. 16. Pastel Green Chrome https://www.instagram.com/p/DCDO1T4vKcd/?utm_source=ig_web_copy_link&igsh=MzRlODBiNWFlZA== If you are going to some summer vibes, these are the perfect nails for you. These pastel green ombre nails are some of the go-to among ombre nail designs. You can also try some chrome or matte coats to take it up a notch. 17. Tropical Sunset Nails https://www.instagram.com/reel/C8hgyUFsEBJ/?utm_source=ig_web_copy_link&igsh=MzRlODBiNWFlZA== These pink and orange chrome nails are something you will get obsessed with. They represent the beautiful sunset you get to witness by the tropical beach. 18. Tequila Sunrise Chrome https://www.instagram.com/p/CgR5WMAutFm/?utm_source=ig_web_copy_link&igsh=MzRlODBiNWFlZA== This nail design looks exactly like the tequila sunrise cocktail that you saw by the beach sitting on a chair. The upper coat is chrome and this is what adds to the glamour of the color. 19. Strawberry Glazed Nails https://www.instagram.com/p/Csu-6t3uhAh/?utm_source=ig_web_copy_link&igsh=MzRlODBiNWFlZA== Do you remember Hailey Bieber’s glazed donut nails? They went viral all over the social media. You can also try these, as they give out the perfect summer vibe. 20. Bright Summer Ombre https://www.instagram.com/p/C3-bebSO2Ck/?utm_source=ig_web_copy_link&igsh=MzRlODBiNWFlZA== Well, if you want some perfect summer nails, then you can try these as well. This matte pink and red design is perfect for the season. 21. Dusky Blue https://www.instagram.com/p/DB3_pNuuHZA/?utm_source=ig_web_copy_link&igsh=MzRlODBiNWFlZA== Getting an amazing ombre set does not mean that you are just limited to the pearly white nails. You can try out different shades as well. You can try out some dusky blue shades as well that fade around the base of the nail and mimic how the sky looks at dawn. 22. Pink Chrome https://www.instagram.com/p/DArovAqSUdz/?utm_source=ig_web_copy_link&igsh=MzRlODBiNWFlZA== Almond-shaped nails are currently a trend. So, if you are looking for ombre nail designs 2026, then this is something you should not miss out on. These pink chromes are perfect for a fall or summer vibe. 23. White & Orange Ombre https://www.instagram.com/reel/C3TBNxtPyeg/?utm_source=ig_web_copy_link&igsh=MzRlODBiNWFlZA== These are a lot like the reverse French manicures, and the two-tone nails look amazing. The orange ombre effect this design produces, but around the cuticle, adds to the chic look. 24. Rose Petal Ombre https://www.instagram.com/reel/DBYzSEKSi95/?utm_source=ig_web_copy_link&igsh=MzRlODBiNWFlZA== These light pink nails resemble rose petals, and the color is enhanced around the edge. If you are a person with mid-length nails, then you can definitely try this one. 25. Coral Reef Nail This is, again, a two-color gradient that takes inspiration from the coral reefs. With the colorful edge and tips, you get that quirky vibe. 26. Pastel Rainbow Ombre https://www.instagram.com/p/B87gGvun5K2/?utm_source=ig_web_copy_link&igsh=MzRlODBiNWFlZA== Want a little whimsical touch to the nails? Well, try the pastel rainbow ones that have a charm of their own. The design has various pastel shades in a dreamy, soft gradient. 27. Geometric Patterns https://www.instagram.com/p/C_DdPHLxF91/?utm_source=ig_web_copy_link&igsh=MzRlODBiNWFlZA== 2026 saw the combination of an ombre with some geometric art. This gives a sophisticated, modern look, adding an extra dimension to the ombre design. 28. Floral Accents https://www.instagram.com/p/DBKtsb9v6cg/?utm_source=ig_web_copy_link&igsh=MzRlODBiNWFlZA== If you want to add something romantic to your nails, then you can add some flowers to the ombre nails. They give a gradient effect to the flower designs and give an elegant look. 29. Matte Ombre https://www.instagram.com/p/DC2Kb2MoD38/?utm_source=ig_web_copy_link Matte finishes have been in the trend for a while, and the craze hasn't gone down just yet. They add a hint of sophistication to the gradient look. This blends the soft ombre effect with a modern matte finish. 30. Velvet Ombre https://www.instagram.com/p/CJy2YRPhqup/?utm_source=ig_web_copy_link&igsh=MzRlODBiNWFlZA== Velvet nails are growing in trend and are giving out an absolutely luxurious effect. They use special magnetic polish to get that shimmer and texture which changes when light falls on the nails. 31. Neon Ombre https://www.instagram.com/p/CQTvGLTB78p/?utm_source=ig_web_copy_link&igsh=MzRlODBiNWFlZA== If you want to make a statement, then these nails are perfect for you. They are bold with fluorescent colors, and it is something you can never ignore. 32. Gothic Ombre https://www.instagram.com/p/C5JErcXALBN/?utm_source=ig_web_copy_link&igsh=MzRlODBiNWFlZA== Gothic ombre comes with a mysterious, dark vibe. This is perfect for those who love to try something out of the box. This usually includes colors like black, midnight blue, deep red and dark purple. 33. Ocean Waves Ombre https://www.instagram.com/p/CvP4oFJqi6U/?utm_source=ig_web_copy_link&igsh=MzRlODBiNWFlZA== Bring the sea to your fingertips. The ombre nails with some ocean waves are just perfect for you if you are a beach lover. The design has various shades of green and blue to give you that perfect sea vibe. 34. Galaxy Ombre https://www.instagram.com/p/CV55OEuPjL5/?utm_source=ig_web_copy_link&igsh=MzRlODBiNWFlZA== These are actually some of the best ombre nail designs 2026 has ever seen. This creates a deep space on the nails with the help of black, deep blues, and purples with some sparkling elements. 35. Simple snowflake https://www.instagram.com/p/C0cClvhO_j5/?utm_source=ig_web_copy_link&igsh=MzRlODBiNWFlZA== During the winter season, give your nails that hint of that winter with a bit of snowflake on the nude nails to get that perfect princess vibe. 36. Winter White https://www.instagram.com/p/CrluZrlPpPH/?utm_source=ig_web_copy_link&igsh=MzRlODBiNWFlZA== This is one of the biggest examples of glossy, classic, and gradient French ombre manicure. The frosty white tips are perfect if you are getting prepared for the holiday season. This adds perfectly to the holiday vibe and gives you that classic look as well. Go all out Do not hold yourself back and pick one from these ombre nail designs 2026. These have something or the other for everyone, and you can pick one depending on the occasion or if you have an upcoming event. You can also choose something that resonates with your personality. Read Also: How Long Do Gel Nails Last? Polish Your Creativity: A Colorful Journey into Self-Care With Nail Polish
READ MOREDetails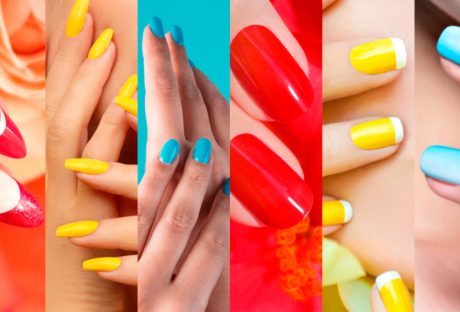
30+ French Manicure Acrylic Nail Ideas
Want to have that timeless classic look while giving your nails a makeover? Why not go for a French manicure? Yes, you can definitely get those along with a bit of your own touch to it. It doesn't have to be the same old French manicure. They are classic and can be customized beautifully to add something new to the original classic ones. They can be one of the most versatile designs you can ever have. It might look simply, but it can be done in various ways to match the kind you like. You can opt for the classic French one or try something colorful. There are various options to choose from. Here are some of the best French manicure acrylic nail ideas to provide you with different options. 30+ French Manicure Acrylic Nail Ideas If you are looking for some inspiration to deck your nails, here are some of the best French manicure acrylic nail ideas for you to try. Embrace this timeless nail design and elevate the nail game. 1. Classic White French Nails https://www.instagram.com/p/C58rrEuPxDv/?utm_source=ig_web_copy_link&igsh=MzRlODBiNWFlZA== If you are aiming for a timeless, classy look, then the classic white French tips can help you with that. It is a perfect fit for any kind of event. Moreover, this is an amazing choice for both long and short nails. 2. Brown French Tips https://www.instagram.com/p/C_t8ZAdvtz4/?utm_source=ig_web_copy_link&igsh=MzRlODBiNWFlZA== You can get brown French nails to get that minimal, classy look while showing off your personality. The earthy tones of brown go with different outfits and also go well for any kind of occasion. Even though brown is mostly associated with fall, you can wear these nails all year long. 3. Black French Tips https://www.instagram.com/p/CyO3I58SoR3/?utm_source=ig_web_copy_link&igsh=MzRlODBiNWFlZA== This kind of French tip gives a minimalist look and adds a sense of style to it. This is an amazing alternative to the classic ones and allows you to make a statement with a hint of edge. Moreover, if you want an extra minimal look, choose skinny French. 4. Glazed French Tips https://www.instagram.com/p/ChOJzFfpeZA/?utm_source=ig_web_copy_link&igsh=MzRlODBiNWFlZA== Glazed French nails are one of the upcoming trends these days, and they add a modern twist to the classic ones. They give a glossy finish, and these nails have an amazing way of elevating the entire look. If you are about to attend an event, this is something that you can definitely try. 5. Pastel French Nails https://www.instagram.com/p/CRaZ4FdjxK6/?utm_source=ig_web_copy_link&igsh=MzRlODBiNWFlZA== If you want to add a hint of color to your nails, then this is something you can try. You can get a minimalist look with pastel tips. You can go for any soft colors like green, lavender, or light pink, and this will elevate your look instantly. 7. Gold French Nails https://www.instagram.com/p/C4GKT6dMTnO/?utm_source=ig_web_copy_link&igsh=MzRlODBiNWFlZA== This French manicure with a touch of gold is going to elevate the look and give you a sophisticated look. The hint of gold adds a touch of a modern twist to the classic aesthetic. This is suitable for any kind of occasion, or if you are trying things out, you can definitely try these. 8. Silver French Nail Tips https://www.instagram.com/p/C1Y4oYQRhEj/?utm_source=ig_web_copy_link&igsh=MzRlODBiNWFlZA== French silver nail tips are on the trend, and they give you an edge to the minimal, classy style. You can also do something different with some intricate patterns or just go with the classic ones. 9. Pink Tips With Animal Print https://www.instagram.com/p/C8s8CPjOFn0/?utm_source=ig_web_copy_link&igsh=MzRlODBiNWFlZA== If you like playing with bright colors but do not want to give up on the classic style, then this is something you can try. Paint the French tips in a hot pink color with some animal print. If you want to elevate it even more, you can also add some crystals over it. 10. Black & Red Tips https://www.instagram.com/p/C6V2_rpoZFc/?utm_source=ig_web_copy_link&igsh=MzRlODBiNWFlZA== If you are trying to paint your nails for the winter, this is a perfect combination. Black and red is a perfect combination anytime, and if you are looking for something that would look glamorous with a classic vibe, then this is your pick. You can add some stars and studs to add to the festive season. 11. Red French Nails With Cherries https://www.instagram.com/p/C9z0sZkx1en/?utm_source=ig_web_copy_link&igsh=MzRlODBiNWFlZA== These are the perfect nails for fall, winter, as well as Valentine’s Day. They definitely make a statement and no doubt glamorous. So, you can definitely opt for this French manicure acrylic nail idea. Moreover, adding some cherries over the natural colors adds a sense of quirkiness. 12. Red & White French Nails https://www.instagram.com/p/CaZdp0FBOVt/?utm_source=ig_web_copy_link&igsh=MzRlODBiNWFlZA== If you want to look cool enjoy the classic French tips along with ombre trends. The red and white nails add to the classiness. 13. Orange French Nails https://www.instagram.com/p/Ct_7obDL4iG/?utm_source=ig_web_copy_link&igsh=MzRlODBiNWFlZA== There are numerous shades that you can pick from, but these orange-tip nails are an amazing option for Halloween or for the fall season. You can also choose the neon version if you want to go bold this season. 14. Oyster French Nails https://www.instagram.com/p/C-zOWKoMw_n/?utm_source=ig_web_copy_link&igsh=MzRlODBiNWFlZA== These are the extensions from Mermaid Nails and have developed by the late 2023s, and early 2024s. It has been all over social media since then, and people cannot get over these nails. 15. Black & White Nails https://www.instagram.com/p/DBDN6mySXkA/?utm_source=ig_web_copy_link&igsh=MzRlODBiNWFlZA== This is a good idea if you want to retain the timeless look while adding something different to your nails. With this combination, you can try different ideas, like intricate nail art or some geometric patterns. If you already have something in mind, then you can show your nail artist that as well. 16. Reverse French Nail Tips https://www.instagram.com/p/C1ZZNV_tV6N/?utm_source=ig_web_copy_link&igsh=MzRlODBiNWFlZA== This is something fresh yet has that classic touch. In this design, the French tip is placed near the cuticles instead of the edge. You get an instant cool and unique vibe with this design. You can go with the traditional white color or choose anything that pleases you. 17. Tips With a Twist https://www.instagram.com/p/C2N8IcvP8yH/?utm_source=ig_web_copy_link&igsh=MzRlODBiNWFlZA== What do you add a little bit of yourself to your perfect manicured tips? Well, you can add a twist to the classic French manicure to show off your quirky personality. You can experiment with intricate designs or asymmetric patterns. 18. Neon Yellow French Tips https://www.instagram.com/p/CvQuBCYpLOx/?utm_source=ig_web_copy_link&igsh=MzRlODBiNWFlZA== French manicure acrylic nail ideas are everywhere these days. But not everyone chooses to go with the neon yellow ones. Not everyone goes bolder than the traditional ones. So, if you are not afraid to try something bold and new, this is a perfect pick for you. 19. Gold 3D Nail Tips https://www.instagram.com/p/C5U8b8HMOIZ/?utm_source=ig_web_copy_link&igsh=MzRlODBiNWFlZA== Gold 3D nails are particularly good for weddings, fall, Christmas, or winter. People often choose to go with the gold tips, but with the 3D designs, it gets even better. It looks even better if you accessorize it with some bracelets and rings. 20. Glitter Ombre Nail Tips https://www.instagram.com/p/C-x1PfUun-7/?utm_source=ig_web_copy_link&igsh=MzRlODBiNWFlZA== If you are setting a look for an event, then these nails are going to be perfect for you. They add every bit of glam to your look, and once you try the ombre glitter French manicured nails, you will definitely be obsessed with these nails. 21. Tortoiseshell French Nails https://www.instagram.com/p/CUm9Ed-AUkZ/?utm_source=ig_web_copy_link&igsh=MzRlODBiNWFlZA== Tortoiseshell designs on nails are absolutely in-trend chic and add playfulness to the designs. This looks cool and also adds a fun vibe to a French manicure. 22. Velvet-dripping French Nails https://www.instagram.com/reel/CwlDIYPv7h2/?utm_source=ig_web_copy_link&igsh=MzRlODBiNWFlZA== Chrome nails have been all over the internet since 2023. They have been in trend since then and are coming up with different innovations every now and then. These velvet-dripping nails are something that has become very popular this year and grab attention immediately. 23. Double French https://www.instagram.com/p/CzBdxX9vHdy/?utm_source=ig_web_copy_link&igsh=MzRlODBiNWFlZA== This is also another twist on the classic French take. Some people love to have a double tip, and this can be tried in various colors as well. You can try these in white while adding some color is not at all a bad idea. 24. Butterfly Neon French Tips https://www.instagram.com/reel/DDG9k6OvZ70/?utm_source=ig_web_copy_link&igsh=MzRlODBiNWFlZA== Butterfly French tips are really colorful and fun. You can play with different color combinations, and this is perfect if you are looking for summer and spring outlooks. If you want you can add shimmers, glitter, nail art, gems, and gold leaves. 25. Halloween Special French Tips https://www.instagram.com/p/CVf0AoQljnt/?utm_source=ig_web_copy_link&igsh=MzRlODBiNWFlZA== It is almost the holiday season when Halloween is here. It is one of the best times, and it is time to try something fun and playful for the special occasion. You can try something subtle or spooky. Choose something that suits your personality. 26. Matt Black Tips https://www.instagram.com/p/Csl9XjROMuQ/?utm_source=ig_web_copy_link&igsh=MzRlODBiNWFlZA== If you are trying to go for a gothic or grungy look, these matt black tips are definitely for you. When you check out Khloe Kardashian or Kelly Osbourne, you will see them carrying these nails. 27. Nude French Nails https://www.instagram.com/p/DDJDwtnKsD2/?utm_source=ig_web_copy_link&igsh=MzRlODBiNWFlZA== This is one of the classiest French manicure acrylic nail ideas that you can try. If you like to keep your nails nude, and avoid getting colors on your nails, then these are the ones that you can try. 28. Embellished French Tips https://www.instagram.com/p/CqU0BAvtgRq/?utm_source=ig_web_copy_link&igsh=MzRlODBiNWFlZA== If you like everything dazzling and want to add that to your nails as well, this is your pick. These have the chance to enhance your entire look, and this is something that will add to your personality as well. 29. Logo mania People often prefer certain brands, and you can incorporate that into your look in every way possible. You can choose any brand like Gucci, Chanel, Dior, or anything you prefer, and ask the artist to incorporate that in your nails as well. 30. Zodiac Stars French Tips https://www.instagram.com/reel/Cw0-Drzv6sN/?utm_source=ig_web_copy_link&igsh=MzRlODBiNWFlZA== People have a love for different subjects. If you are into the stars and planets and have a heart for astrology, then you can paint some dreamy starscapes on your nails as well. 31. Cloud French Manicure https://www.instagram.com/p/CtfPnV7MZ03/?utm_source=ig_web_copy_link&igsh=MzRlODBiNWFlZA== Why stay limited to stars and planets? You can try anything you wish. If you are a dreamer, then this is for you. The blue cloud serves as the French tip. However, if you are more into blue skies or sunsets, you can switch out different shades of aqua, or to match that sunset vibe, try something out of orange or pink. Pick Your Nail Also, if you like trying out different French manicure acrylic nail ideas, you must begin by taking good care of your nails. And when you are dressing up for an event or a particular season, your nails don't feel left out. Deck those nails and try something that suits your personality. French manicure is always a classic idea to try on your nails, but why always try something traditional? You can try and add a little personality to you. Read Also: How Long Do Gel Nails Last? Polish Your Creativity: A Colorful Journey into Self-Care With Nail Polish
READ MOREDetails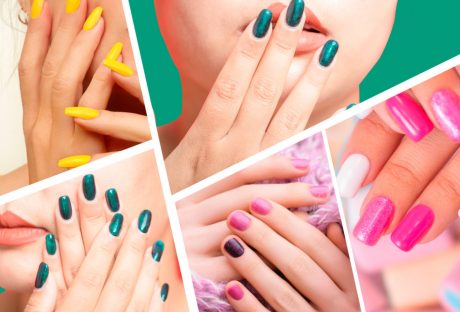
35+ Best Nail Designs 2026
There is no particular time to get your nails done. You can give those pretty perfect nails a makeover anytime you want, be it any season. It is one of those things which would boost your confidence instantly. It is simple. A fresh coat of nail polish can boost your style and confidence. All you have to think is how you want your nails to look. However, to get that polished look, you have to take good care of your cuticles and skin as well. You can get some gel, ombre nails, pastel nails, or try some French manicure acrylic nail paint this time. So, it's time to steal the spotlight with some gorgeous nail paints. 36 best nail designs, 2026 Thinking of what to do next with your nails? Well, we have got you covered, and here are some of the best nail designs 2026 has ever seen. They are still in trend, and you can try any of these out anytime. However, it might be difficult to choose as all of these are amazing. Also, lets check some of the upcoming nail designs which are going to be trending in 2025 as well. 1. Blue Aura & Metallic Nail Design The first one features Blure Aura with a little hint of Metallic Chrome. This particular takes inspiration from the ocean and tries to give a refreshing, cool vibe perfect for summer. The metallic chrome adds some edge to it. 2. Plain Silver Chrome Nails https://www.instagram.com/p/C5oKYFcMn0e/?utm_source=ig_web_copy_link&igsh=MzRlODBiNWFlZA%3D%3D This one is pretty simple but adds a little bit of sass to the entire look. This is perfect for someone who does not like anything bedazzling. The modern sleek finish makes it an amazing choice if you want to make a statement. 3. Dark chocolate https://www.instagram.com/p/CjNy0YArzud/?utm_source=ig_web_copy_link&igsh=MzRlODBiNWFlZA== Well, why not start 2025 with a moody and dark vibe? This New Year’s Eve, try some dark chocolate brown nails and take the spotlight. Dark shares are high in fashion and give out a chic look. 4. Cool cat eye https://www.instagram.com/p/DDT3r1TtZZV/?utm_source=ig_web_copy_link&igsh=MzRlODBiNWFlZA== This is going to be the trend in 2025. Cat eye with some metallic polishes is going to be on trend, and there is no denying it. These are fully customized and give out a chic look. They look complicated and intricate, but with the right products you will be able to DIY at home. 5. Modern aura pink nails https://www.instagram.com/p/C35gk2oOx4j/?utm_source=ig_web_copy_link&igsh=MzRlODBiNWFlZA== Want a little touch of glam in your regular mundane life? Paint your nails in this soft pink shade and create a playful and sophisticated look. The little bit of sparkling adds a touch of glam. This will pop your daily look as well as if you are prepping for any event. 6. French spring tips https://www.instagram.com/p/C4Dz6CaxhTs/?utm_source=ig_web_copy_link&igsh=MzRlODBiNWFlZA== The French tips are fresh, and if you add some flowers, it will give out a summer and spring vibe. The blue tips are elegant and classic and the flowers add a touch of warmth and whimsical vibe to it. 7. Depth and dimensions https://www.instagram.com/reel/C9BdCgqtppb/?utm_source=ig_web_copy_link&igsh=MzRlODBiNWFlZA== Another trend that is going to make it big in 2025 is 3D nail art. Elle Gerstein, one of the celebrity nail artists, mentioned that this “depth & dimension” trend is going to stay. Everyone wants to add some dimensions to their nails and would mimic anything. 8. More metal https://www.instagram.com/p/DBJxEEiy5LL/?utm_source=ig_web_copy_link&igsh=MzRlODBiNWFlZA== Chrome and metal, whether they are blended, isolated, or ombre, elevate the manicure and give it a good finish. This is something that will never be outdated, and there is nothing not to like about these nails. 9. Patent leather https://www.instagram.com/p/CmMitRuOmxY/?utm_source=ig_web_copy_link&igsh=MzRlODBiNWFlZA== If you are looking for something moody yet neutral and trending, then the leather black nails are just the right fit for you. Black manicures are believed to make a comeback in 2025. This is one of those nail designs 2026 missed a bit, but it is going to make a comeback definitely. 10. Animal print https://www.instagram.com/p/DAaLu96OyBz/?utm_source=ig_web_copy_link&igsh=MzRlODBiNWFlZA== Animal print never actually went out of style. So, if you are looking for the best nail designs. 2026, then these are definitely going to make the list. Different geometric patterns and animal prints have been in the trend. 11. Modern aura nails https://www.instagram.com/p/C7_riYNxZw5/?utm_source=ig_web_copy_link&igsh=MzRlODBiNWFlZA== The modern, colorful aura design is for those people who are never afraid to try something new and make a statement even when they are standing in a crowd. If you want an out-of-the-box design, then this one is for you. The vibrant and bold shares will definitely turn heads. 12. Summer yellow mix https://www.instagram.com/p/DCj4kklxERp/?utm_source=ig_web_copy_link&igsh=MzRlODBiNWFlZA== This is perfect for spring and summer as the color lifts up your mood and adds a warm vibe. With a combination of butterfly nail art, ombre, and French tips, it creates a playful look and oozes out summer vibes. 13. Cow and tortoise print combination https://www.instagram.com/p/CaDCfrjJM_s/?utm_source=ig_web_copy_link&igsh=MzRlODBiNWFlZA== This nail design features a combination of cow and tortoise print, giving a completely unique design. Classic and modern nail designs blend into this combination and create a chic look. This adds a playful touch to your outfit with a hint of edginess. 14. Golden chrome French manicure https://www.instagram.com/p/C4GKT6dMTnO/?utm_source=ig_web_copy_link&igsh=MzRlODBiNWFlZA== Classic French tips with a modern twist? Yes, this is what this nail design is all about. The rhinestones add glamour and sparkle to the look, making it perfect for any event or occasion. The golden chrome gives a shiny finish and makes a statement. 15. Short and sweet https://www.instagram.com/p/DCSkKhGMFSD/?utm_source=ig_web_copy_link&igsh=MzRlODBiNWFlZA== Soft and sweet shades are a hit this year. You can go for nudes, pastels, or anything that is subtle. The aim is to be delicate. The light hint of color with the polished finish creates an amazing look. 16. Glass of merlot https://www.instagram.com/p/DDcwWJex7dJ/?utm_source=ig_web_copy_link&igsh=MzRlODBiNWFlZA== If you think going absolutely dark is not your style, then you do not have to go with brown or black. Instead, you can choose a shade of red wine. The merlot manicure is absolute class and you can rock any event with these perfect nails. 17. Dark aura https://www.instagram.com/p/DBMOK7GPA_y/?utm_source=ig_web_copy_link&igsh=MzRlODBiNWFlZA== Dark aura nails are something people choose during the winter. With the aim to create a mysterious and dark vibe, these nails perfectly complement the season. Not to forget they give you an absolute chic look. 18. Mannequin hands https://www.instagram.com/p/Ca9HllIP3pc/?utm_source=ig_web_copy_link&igsh=MzRlODBiNWFlZA== Mannequin Hands has made a comeback, and these nails have been on and off in trend since 2010. The skin-tone nail colors gave the hands a look like the mannequins. And the shades have improved with time and come up with different varieties to match every skin tone. 19. Crocodile nail art designs https://www.instagram.com/p/Cx1yn9kLL3h/?utm_source=ig_web_copy_link&igsh=MzRlODBiNWFlZA== This is a nail design which is for those who like to go bold with aspects of their fashion choices. When you make a crocodile skin pattern on your nails, it definitely grabs attention and puts you in the limelight. 20. French swirly nails https://www.instagram.com/p/CdBe5y2pNNG/?utm_source=ig_web_copy_link&igsh=MzRlODBiNWFlZA== This nail features French tips with some playful swirly patterns on the tips. If you like to add a hint of color and edge to your nails these are the perfect kind for you. You can choose red and orange if you want to go with the summer or spring vibe or anything else you think would compliment your personality. 21. Textile patterns https://www.instagram.com/p/BgNzmTblDBr/ The black and white knitting patterns are perfect for those who want a bit of texture in their style. It gives a minimalist, chic, and sleek look, perfect for those who do not want a lot of colors and want to keep things simple. Moreover, there is a hint of quirkiness in the entire style. 22. Glazed donut nails https://www.instagram.com/p/Cgj4NiOL2nS/?utm_source=ig_web_copy_link&igsh=MzRlODBiNWFlZA== This kind features chrome nails and suits those who always opt for a simple, flawless look. The chrome finish adds shine and reflects on the nails. You get a clean, minimalist look with a hint of elegance and class. 23. Flowers+nude nail arts https://www.instagram.com/p/DBaweEPSw_W/?utm_source=ig_web_copy_link&igsh=MzRlODBiNWFlZA== This particular design has beautiful nude shades which complement the spring and summer seasons. Along with that, there are different flower designs that add a bit of nature to it. The blend of flower and nude gives a summer vibe and is perfect for any outdoor event. 24. Blush nails https://www.instagram.com/p/CdgPXdQJ32y/?utm_source=ig_web_copy_link&igsh=MzRlODBiNWFlZA== Combine two different shades of pink, hot pink and baby pink, and transform your nails into blush nails. For that gradient effect, apple baby pink at the sides and hot pink at the center of your nails. Just finish it off with clear nail paint as the topcoat. 25. Groovy French https://www.instagram.com/p/CfZrop5pO4Z/?utm_source=ig_web_copy_link&igsh=MzRlODBiNWFlZA== While Nail Designs 2026 embraced minimalist designs, they did not miss out on those bold beautiful colors. They also evolved. Moreover, they evolved in different patterns and abstract designs. It is a classic design with a colorful pop. 26. Mod monochrome https://www.instagram.com/p/CmzT2GKvWlN/?utm_source=ig_web_copy_link&igsh=MzRlODBiNWFlZA== Patterns and abstract designs like swirls and unconventional French tips are very much in trend. With just one color, it gives a sophisticated look like nothing else. 27. Psychedelic vibes https://www.instagram.com/p/CnNz78XLhui/?utm_source=ig_web_copy_link&igsh=MzRlODBiNWFlZA== The spiritual, trippy, and virtual nail designs are quite in trend, and it is going to gain popularity in the upcoming years as well. More specifically, summer will have bright, cream, and warm tones, and spring will have holographic, pearlescent, and psychedelic tones. 28. Rainbow & nude nails https://www.instagram.com/p/CtmsNwBSsHb/?utm_source=ig_web_copy_link&igsh=MzRlODBiNWFlZA== This design features nude colors that go with every occasion. Moreover, it is enhanced with rainbow colors that look like abstract art on the nude colors. There is something playful and fun about this design, whereas the fren tips and nude colors keep it minimal and classy. 29. Ombre glitter nails https://www.instagram.com/p/C__rg6eyTZ-/?utm_source=ig_web_copy_link&igsh=MzRlODBiNWFlZA== Who dosen’t like those classic French tips? Moreover, it is even better if there is a modern twist to it with a golden glitter finish. The glitter finish gives a metallic, shiny look, adding glamour to the entire look. It is perfect if you want a timeless and classic look without having to give up on elegance and luxury. 30. Rainbow French Tips https://www.instagram.com/p/CtHXclfp5Ad/?utm_source=ig_web_copy_link&igsh=MzRlODBiNWFlZA== This nail design plays with colors and gives a playful twist on the French tips with different colors. You can pick your choice of colors and create a combination like no other. If you like to show off your colorful personality and stand out among the crowd, this is perfect for you. 31. Square French tips https://www.instagram.com/p/CnH1SGoJFDv/?utm_source=ig_web_copy_link&igsh=MzRlODBiNWFlZA== Another classic way to improvise your French tips is to give them a square shape. It is unique and modern, and you do not have to lose out on the originality. You also get to show the creative side without being over the top. 32. Blue ocean nail design https://www.instagram.com/p/C-Zq27GxGi0/?utm_source=ig_web_copy_link&igsh=MzRlODBiNWFlZA== With some natural nude color with abstract blue ocean design, you will be able to enhance the touch of chrome. This ocean design adds a sense of serenity and a touch of nature to it, whereas the chrome finish gives out a modern and luxurious vibe. 33. Polka dot nails https://www.instagram.com/p/C_S98iiuCWk/?utm_source=ig_web_copy_link&igsh=MzRlODBiNWFlZA== This design features polka dots and you can pair it with some other vibrant plain color on other nails. You get both a cheerful vibe along with some playfulness. 34. Smiley nails https://www.instagram.com/p/C_MHCDsyExs/?utm_source=ig_web_copy_link If you have a fun and cheerful personality, then this is the perfect design for you. You can use various nail arts like cloud, cherry, smiley, and flame, but all on a nude base. These cheerful designs are definitely going to put you in a cheerful mood. 35. Third eye nails https://www.instagram.com/p/CQ2U-cWDcgc/?utm_source=ig_web_copy_link&igsh=MzRlODBiNWFlZA== If you are the spiritual kind, then making the third eye on your nail might open up your chakras. If you believe in it, then why not paint it on your nails and show off youe aesthetics? 36. Japanese minimalist ombre https://www.instagram.com/p/C-a4Y_CRsfY/?utm_source=ig_web_copy_link&igsh=MzRlODBiNWFlZA%3D%3D You get these designs in shades of light brown and blue. This color scheme gives off a serene and calm vibe. This is amazing for those who like to add something different to their style but do not like to be over the top. Nail it! These are some of the best nail designs 2026 every saw and some of the best ones that will be coming in 2025. With the growing trend of designer nails, it is difficult to pick one. However, you can pick any you want, depending on your personality and style. Nail art studios are always open to personalization, so if you have something specific in mind, they will help you get that as well if it is possible for them. So, go big and choose something that will grab attention even in a room full of people. Read Also: How Long Do Gel Nails Last? Polish Your Creativity: A Colorful Journey into Self-Care With Nail Polish
READ MOREDetails
Function of Beauty: Products, Benefits, and How to Order!
There are many popular beauty and skincare brands around. However, hyped brands like Function of Beauty are rare. They’re so popular you will almost feel that they are overhyped. Quality so good that it makes you wonder if it’s possible for any cosmetic skin and personal care brand! What makes Function of Beauty so hyped up? They are always visible on magazine fronts and social media news feeds. Indeed, you will feel it's worth trying at least once. This is called Fear of Missing Out (FOMO). I tried their hair care range. Before trying, I was confident some products would not meet expectations. However, I was indeed happy when I proved myself wrong. So, what stood out? Firstly, the shampoo worked as it claimed. I was also mesmerized to find out I wouldn’t have to go for loads of products for my hair. Instead, I would buy this shampoo for all my hair concerns. Secondly, the price fits in my budget. Know the Brand in Details: Function of Beauty The brand is a nascent one, launched in 2016. MIT engineers and tech developers Joshua Maciejeweski, Hienn Kaplan, and Zahir Doossa are the minds behind the brand and its excellent products. Their conceptual skills and knowledge in product innovation worked wonders here! They could easily land six figure jobs. However, they were sure that Function of Beauty’s winning formula could make them successful entrepreneurs. The brand mission The founders tuck to one mission. They thought people should not spend hundreds of dollars on custom hair care. Moreover, they addressed that one product could be enough to address the fundamental concerns we discussed. However, the Function of Beauty is now more than just a brand. They have taken custom hair care to the next level. Surprised? It’s true. The brand has offered people almost 87 trillion combinations of different ingredients needed to solve your hair problems. Undoubtedly, it is one of the cult brands that will change the image of the beauty industry in the US. The Function of Beauty Products in the Limelight Function of Beauty now offers shampoos, conditioners, serums, masks, and primers for healthy hair styling. However, the line moves around the static hair goals of users. Hence, they let you customize your product online before you place the order. To have a Pan-American inventory of customized products catering to thousands of customers daily is nothing short of amazing! The function of Beauty is expanding. They have also included body washes and face wash in their product list. The latest inclusion in moisturizers for the body and face. Their market research analyst keenly understands the pressing customer demands. Now, the brand is taking it to the next level! Brands like Dove, CeraVe, and Aveeno already dominate the market. However, the Function of Beauty is penetrating the market for a reason. They want to disrupt the market with their customized product proposition. How Does the Function of Beauty Work? Are you already using any customized skin or personal care products? Then, this first step won’t seem intriguing to you. However, if you haven’t, you will feel thrilled. There are actually a lot of potential options to choose from. The First Step Firstly, you have to update details about your natural hair type. I mean, your unkempt hair here. It might be wavy, curly, coily, or basic straight. At the same time, make a handy illustration of the hair to ensure you get the right product suggestions even if you haven’t got your hair type right! The Second Step Secondly, you have to select your hair structure. Usually, people have fine, medium, or coarse hair in the US. Here, Function of Beauty offers an illustration again. It will also include a description to help you understand how to judge the thickness of your hair. I stumbled a lot in this step. I had to watch each of their illustration videos to decide what category my hair would suit. The Third Step Thirdly, Function of Beauty would like to know in detail about your scalp health. Scalps can go from dry to balance too oily. Choose your type and enter the correct information on the Function of Beauty website. The Fourth Step Fourthly, Function of Beauty would ask you about the recent hair treatments you have done. Any hair treatment leaves its effect on your strands for 6 to 8 months at the most. However, it would be challenging to suggest products if you’ve done significant treatments in 1 week. Some of the effective hair treatments that can stunt the effect of Function of Beauty products are: 1. Keratin 2. Perm 3. Hair coloring 4. Highlighting 5. Bleaching You can go for their purple shampoo, hair conditioner, and hair mask if you are a blondie. However, a silicone-free formula by Function of Beauty would be the best for you. The Final Step This is the most interesting and crucial step in the process. Meanwhile, you have to choose your hair goals at this step. You may select as many as five goals together. I have already mentioned that their products can target five hair concerns or goals simultaneously. For instance, you might choose anti-frizz, shine, or hair volume growth. These are only the common hair goals that people get in the US. In addition, you can always do your research and choose the hair goal you like. If you don’t know what goal to choose, ask for referrals from their experts or any hair care expert of your choice. Learn how to ask for a referral. The Extra Step This is the sixth step. However, it is not a compulsory step. You might skip the step if you do not opt for any styling product for your hair. Some people prefer their core hair strength to develop. However, they don’t like any added effect on their natural hair. They can easily skip this step. However, you mustn’t harm the hair, even if you choose to style it. Hence, you must get your styling products from Function of Beauty only. It’s Not Over Yet! Well, the essentials are done with. However, the customizing part is still left. Your goal is to pick a name that you want to go on the bottles. Moreover, you can pick the scent that you like your products to have. The most common scents that function of Beauty users choose are: Floret Coco Mango Peach Pear Eucalyptus If you have any fusion scent on your mind, you can request that in the comments section. However, I prefer going fragrance-free. The fragrances add to the prosthetic chemicals that degrade the quality of the products to some extent. So, it is better to avoid that and go fragrance-free. How To Get Function of Beauty Products? Place your orders first. Submit all details following the sequence of the quiz that the website offers. After that, submit your details. At first, the website will ask for your email ID. Then, you must submit your choice of ingredients that would be add-ons to your products and the core formula. Some of them might be free add-ons. However, others might cost you extra. Choosing add-ons depends on the products you are using. The last thing you must do is select the color you want for the product. However, the shades are of limited edition. Moreover, you can revert your choices once you’ve finalized. In the same vein, I always favor a dye-free product. Here, the same issue surfaces as it happens with the scent of the product. There’s no harm in choosing a color and scent-free formula. Sure, your product would not smell great. But it would serve the purpose that it is meant to serve. What Customers say The function of Beauty doesn’t guarantee that your products will serve your purpose. The results are going to be subjective. However, the products will work better than the other similar formulas in the market. 80% of customers say it worked for them. Check out client reviews on their site! The Function of Beauty brand was launched with much fanfare. Then, nobody thought that they would be so severe with their product and innovation. However, customization is their main USP now. Have you tried Function of Beauty products and their customization experience yet? Read Also: Bedtime Beauty Routine: Secrets And Tips Amazing Beauty Tips For Women Of All Ages
READ MOREDetails
Unlock Incredible Savings With SavvyCoupons India’s Trusted Promo Codes
Shopping smarter and saving more is now simpler than ever, thanks to Promokodus India. This go-to platform is your ultimate destination for verified promo codes, irresistible coupons, and exclusive deals tailored for online shoppers in India. Whether you’re updating your wardrobe, upgrading gadgets, planning a trip, or ordering food, Promokodus India ensures your money goes further. How SavvyCoupons India Revolutionizes Savings SavvyCoupons India makes discovering discounts an effortless experience. By aggregating and verifying promo codes from countless retailers, the platform provides a seamless way to save big. Its user-friendly design and regularly updated database make it the perfect tool for finding active deals in just a few clicks. Why Choose SavvyCoupons India? Wide Range of CategoriesFrom fashion and electronics to beauty, travel, and food, SavvyCoupons India offers a plethora of promo codes that cater to diverse shopping needs. No matter your preference, there’s a deal waiting for you. Reliable and Verified DiscountsAvoid the annoyance of non-functional coupons. Every code on SavvyCoupons India is rigorously checked, ensuring it works smoothly at checkout. Effortless NavigationThe platform’s intuitive interface allows you to filter offers by category, brand, or discount type, making it easy to pinpoint the perfect deal. Exclusive OffersGain access to unique promotions unavailable elsewhere, offering you an edge when it comes to savings. Simple Steps To Save With SavvyCoupons India Visit the Platform: Head to SavvyCoupons India and browse the latest offers or search for your preferred retailer. Select a Deal: Find a promo code that suits your needs and click to unveil it. Copy the Code: Save the code and head over to the retailer’s website. Apply the Code: Add items to your cart, paste the code at checkout, and enjoy instant savings. Top Categories For Big Savings On SavvyCoupons India Fashion & Accessories: Score discounts on stylish apparel and accessories from top brands like Flipkart and Myntra. Gadgets & Electronics: Cut costs on smartphones, laptops, and appliances with codes for platforms like Amazon and Croma. Travel & Leisure: Plan your next adventure with promo codes for flights, hotels, and tour packages from leading travel providers. Food & Dining: Save on meals and snacks with codes for delivery apps like Swiggy and Zomato. What Sets SavvyCoupons India Apart? SavvyCoupons India is exclusively tailored for Indian shoppers, focusing on curated deals that align with local preferences. Unlike generic coupon sites, the platform emphasizes quality over quantity, ensuring that every promo code delivers genuine value. With SavvyCoupons India, you’ll save time and money, all while enjoying a stress-free shopping experience. Stay Updated On New Deals Never miss out on fresh offers! Visit the website regularly or subscribe to the SavvyCoupons India newsletter to receive updates on the hottest discounts and upcoming promotions. How Cashbacks Revolutionize Indian Spending Habits? In the current dynamic economic scene, Indians are constantly looking for ways to save every cent without sacrificing their current lifestyle. To support their saving initiative, the groundbreaking solution of cashback and promo codes is becoming highly popular. This cashback not only gives immediate satisfaction and gratification but also the same time serves as a tool for long-term financial planning. So, let’s dive deeper into how cashback and promo codes are reshaping the saving scenario across India. Cashback, The Money-Saving Marvel Cashbacks in the form of rewards, promo codes, rebates, or rewards have become a game changer for Indian consumers' spending behavior. They can leverage shoppers; cashback platforms can get a percentage of the spending and reduce the overall price of the product. This financial tool can empower consumers to stretch their shopping budget further to receive quality services and products. Maximizing Value Through Cashbacks The beauty of these cashback lies in their versatility. From luxury indulgence to day-to-day amenities, these cashbacks are available in every transaction possible. Whether they are electronics, groceries, utilities, or travel bookings, every savvy consumer utilizes these cashbacks to get a myriad of rewards. By strategically aligning their purchases with lucrative cashback and promo code promotions, consumers can easily amplify their savings potential exponentially. Seizing The Digital Advantage In this digital world, cashback and promo codes work smoothly and integrate seamlessly into online shopping apps, giving a smooth shopping experience. Only with a few clicks consumers easily browse a whole bunch of cashback deals and promo codes from top retailers to e-commerce giants. The digital evolution democratized savings, making it much easier for consumers from all walks of life to participate in this promo code and cashback revolution. Budget-Friendly Financial Planning The promo codes and cashback do not just facilitate immediate savings but foster a saving culture of prudent finance management. By marking cashback and promo code earnings for their specific goals, such as paying off debts, building an emergency fund, or investing in the future, consumers can easily secure their financial resilience over a period of time. This disciplined approach to spending and saving empowers consumers to navigate their economic uncertainties with a certain amount of confidence and peace. Harnessing the Power of Cashback SEO For those who are looking to unlock the entire potential of promo codes and cashback savings, it is important to understand cashback SEO. Use relevant keywords like “best cashback offers in India,” “cashback deals on (product/service),” or “how to save money with cashback.” So online content makes businesses visible and attracts cashback enthusiast consumers searching for saving opportunities. With SEO optimizations like adding meta descriptions, URL structures, and title tags, you can elevate your website in the search engine. Embracing A Thrifting Future As Indian consumers continue to embrace the mindset of meaningful and resourceful spending, cashbacks are an increasing way of shaping the consumer's financial behavior. With this cashback and promo code, the consumer can embark on a journey of financial empowerment with strategic budgeting, digital savviness, and cashback SEO optimization. Conclusion SavvyCoupons India is your trusted companion for saving big on online purchases in India. With a vast selection of verified promo codes and exclusive deals, the platform ensures a smooth and rewarding shopping journey. Explore Promokodus India today and start enjoying unbeatable discounts on your favorite brands and services. Shop smarter and save better with SavvyCoupons India! Read Also: 6 Surprising Retail Trends In 2024 & Beyond Elevating Your Retail Display: The Mastery of Display Stands Expecting? Dive Into The World Of Online Maternity Shopping!
READ MOREDetails
Early Signs Of Oral Cancer: What You Need To Know?
Early signs of oral cancer are persistent mouth sores, unexplained bleeding, difficulty swallowing, and changes in voice. In such cases, you must visit an oncologist, an expert who deals with cancer diagnosis and treatment. Oral cancer is one of the most common cancers worldwide. It can affect the mouth, tongue, gums, and throat. In fact, there are several factors that contribute to its development. These include tobacco use, excessive alcohol consumption, prolonged sun exposure, and infections like HPV. However, early detection plays a crucial role in increasing the chances of successful treatment. Also, it helps in improving outcomes. In this article, you will get details about the early signs of oral cancer and what you should be mindful of. Hence, to learn more, read on to the end of the article. What Is Oral Cancer? Oral cancer is one of the most common forms of neck/head cancer. Generally, it affects people above 60 years of age. In fact, oral cancer first affects your lips, tongue, mouth roof, and mouth floor. Apart from that, it also affects your oropharynx, which is the last part of your tongue. Also, it might affect the roof of your mouth, the sides and the back of your throat, and your tonsils. At first, oral cancer can look like a common problem in your mouth and your lips. For instance, you can see white patches or bleeding sores. Basically, the difference between a common problem and a potential cancer is that the problems do not go away. Here, if you leave the problems without any treatment for a long time, it can spread through your mouth and your throat. Moreover, it will also spread to other areas of your head and neck. 8 Common Warning Signs of Oral Cancer You Shouldn't Ignore Recognizing the early signs of oral cancer can significantly improve treatment outcomes. Here are eight common symptoms you must watch for and discuss with a cancer specialist promptly. 1. Presence of White/Red Patches in the Mouth A classic sign of potential oral cancer is the presence of white or red patches in the mouth without any reason. Patches can occur on the tongue, roof of the mouth, inner cheeks, or gums. Patches can be painful sometimes but are usually asymptomatic. However, you must not ignore them. If you see any of these patches extending more than a few weeks, visit an oncologist for a checkup at Apollo Hospital Belapur. Here, you will get a thorough examination. 2. Persistent Mouth Sores Oral cancer can be indicated by mouth sores that do not heal within two weeks. The sores may be on the tongue, inside the cheeks, or gums, or on the roof of the mouth. However, getting sores in the mouth is quite common. Still, you must let an oncologist evaluate sores that don’t improve. Don’t ignore the sores if they are painless or persistent. It could mean something more serious. 3. Difficulty Swallowing or Chewing Pain or discomfort when swallowing or chewing food may be a sign of oral cancer. When there is a tumor blocking the throat or esophagus, difficulty swallowing or dysphagia often occurs. In some cases, this symptom may be accompanied by a feeling that food gets stuck in the throat or chest. However, if this continues, it is important to see a specialist to help diagnose any underlying health issue early on. 4. Unexplained Bleeding Unexplained bleeding on the inside of the mouth is a cause for concern. It could be blood in your saliva or while you brush your teeth. However, if there is any unexplained bleeding from the gums, tongue, or mouth, you must immediately visit a healthcare professional. Apart from that, bleeding from your gums can be a sign of a minor gum problem. However, if it’s consistent or unusual, it could mean something more serious, such as oral cancer. If you are bleeding, don’t hesitate to visit the best oncologist in Mumbai to get it evaluated. 5. Numbness or Pain in the Mouth or Jaw If you have numbness or persistent pain in the mouth or jaw that doesn’t go away with over-the-counter pain relief, don’t ignore it. This may mean that cancer is affecting the nerves in your mouth or jaw area. This pain can get worse over time and often comes with other symptoms, such as difficulty moving the jaw or feeling fullness in the mouth. Hence, you must consult a medical expert. Basically, the expert can help in figuring out the reason behind it and suggesting reasonable treatment alternatives. 6. Unexplained Weight Loss Sudden weight loss, especially if it is unintentional, can be a sign of a number of health conditions, including oral cancer. Cancer cells can interfere with your body’s metabolism, leading to weight loss. Moreover, if you get sudden weight loss along with other symptoms such as mouth sores, pain, or difficulty swallowing, see a medical expert as soon as possible. Early diagnosis can enhance the prognosis and treatment options for oral cancer. 7. Changes in Voice or Hoarseness If you find that your voice or hoarseness doesn’t go away, it could be because oral cancer is affecting your vocal cords or the area around them. If the hoarseness lasts more than a couple of weeks, it’s a good idea to consult an oncologist. Any change in voice should be evaluated to rule out any serious condition, including oral cancer. 8. Lumps or Swelling in the Neck Signs that the cancer may have spread to nearby lymph nodes include swelling or lumps in the neck. At first, these lumps may be painless, but they can become tender as the disease progresses. If you see any lumps or swelling in your neck, you should see a doctor right away. An oncologist will evaluate these lumps. Also, the expert will ensure an accurate diagnosis to find whether these lumps are cancerous. Activities that Increase Oral Cancer The following are some of the major activities that increase oral cancer: Smoking (cigarettes, pipes, and cigars) Other tobacco products include chewing tobacco, snuff, water pipes, dip, etc. Drinking excessive amounts of Alcohol daily. Spending a lot of time under the sun without protecting the lips. Having the Human Papillomavirus (HPV). Having a history of oral cancer in the family. Detecting Oral Cancer: The Way Forward Recognizing the early signs of oral cancer is critical for effective treatment and improving your overall prognosis. If you notice any of these symptoms, it’s essential to seek professional medical advice promptly. For instance, the Apollo Hospital Belapur, located in Navi Mumbai, is equipped with state-of-the-art facilities. It has expert oncologists who specialize in diagnosing and treating oral cancer. You can consult the best oncologist at Apollo Hospital for a thorough evaluation and a personalized treatment plan. Basically, you must stay vigilant and consult an expert as soon as you notice unusual symptoms. This way, you can increase your chances of early detection, ensuring that your oral health remains in the best condition possible. Do you have more suggestions to add on how to detect oral cancer? Please share your ideas and opinions in the comments section below. Read Also: 5 Skin Cancer Warning Symptoms & Early Signs to Know How Talcum Powder & Ovarian Cancer Is Related?
READ MOREDetailsPopular

Technologies For Creating A Startup Idea
20 Feb 2023

How to Download Facebook Videos on Android?
07 Feb 2019

7 Rules of Effective Ecommerce Web Design
28 Jan 2021

Why Are Online Transactions Convenient?
07 Dec 2023
