


Category: Lifestyle
ContentRally is a leading source of reliable news and trending topics on Lifestyle. Get hard-to-find insights and advice on Lifestyle from industry-specific leaders.

Is Indian Food Healthy? – Major Nutritional Benefits of Indian Cuisine
Is Indian food healthy? – Of course, they are. There are plenty of Indian dishes that are rich in nutrients, spices, and whole foods. Although there are innumerable gastronomic options, there are many healthier options. In fact, some food recipes are based on Ayurveda, which is Ancient India’s system of medicine. In this article, you will learn about the nutritional benefits of Indian food and the balanced dietary profile of Indian food. Also, you will learn about the health benefits of Indian food and healthy Indian cooking techniques. Moreover, you will also learn about common myths about Indian food. Hence, to learn more, read on to the end of the article. Is Indian Food Healthy? Indian cuisine has a variety of food options consisting of both healthy and unhealthy options. Here, this article aims to consider only healthy Indian food. Generally, in Indian food, you will find a blend of diverse flavors and healthy food traditions. In fact, apart from satisfying your taste buds, Indian food will improve your health. One of the most notable aspects of Indian food is that you will find a rich array of ingredients. Traditionally, the Indian diet uses a variety of whole grains, fruits, legumes, and vegetables. Interestingly, each of them contributes significantly to health benefits. Whole grains like whole wheat, brown rice, and millet play a significant part in Indian meals. Apart from that, Indian food items are rich in antioxidants. This is because they have many spices that are full of antioxidants. For example, antioxidants in cloves and ginger contain anti-inflammatory properties. Apart from that, cardamom also contains antioxidants. Basically, antioxidants are molecules that prevent oxidation damage in your body cells. Moreover, it also reduces when damage is done. Hence, Indians mostly follow a diet that is high in antioxidants. As a result, there are fewer risks of diseases like heart disease and cancer. Balanced Dietary Profile Of Indian Food Here is a balanced dietary profile of Indian food that you need to know about: Food ItemsBalanced Dietary ProfileFruits and VegetablesGenerally, an everyday Indian diet includes 400 grams of vegetables and 100 grams of fruits.Cereals and PulsesEach day, a balanced diet consists of 250 grams of cereals.DiaryA balanced Indian diet consists of 200-250 ml of milk and milk products daily.ProteinIndian food contains 85 grams of protein in the form of eggs, animal protein, and pulses daily.Nuts and Seeds35 grams of nuts and seeds daily also fall under a balanced diet. To ensure a balanced diet, you must cook your food well and make sure that the food is soft and less salty and spicy. Although Indian food has a lot of spices, the healthy options contain multiple healthy spices in the right amount. Moreover, when consuming meat, milk, poultry, or any animal protein, make sure they are moderate in number. Furthermore, when you have a balanced diet, you must drink plenty of water and take fewer beverages. Health Benefits Of Common Indian Ingredients The following are the health benefits of common Indian food ingredients: 1. Spices Since ancient times, India is known as the land of spices. Even today, India is the biggest exporter of spices in the world. Moreover, Indian food contains a variety of spices. Here are some spices and their benefits: Turmeric: It contains curcumin. This item has antioxidant and anti-inflammatory properties. Cumin Seeds: They help in the digestion process and boost the immune system of your body. Coriander Seeds: These help you to regulate your blood sugar levels. Cardamom: It helps you to lower blood pressure levels. Cinnamon: This spice can reduce heart risks. 2. Vegetables, Pulses, And Lentils Indian foods contain vegetables in food items. These vegetables provide vitamins inside your body. Also, vegetables lower cholesterol and improve vision. Moreover, many pulses contain vitamins A, B, C, and E. Apart from that, they also contain minerals like iron, potassium, and zinc. On the other hand, lentils and vegetables also promote heart health. This is because they have less saturated fat and high fiber. 3. Whole Grains And High Fiber Foods Healthy Indian food items contain whole grains like wheat flour and brown rice. These items provide fiber, carbohydrates, and protein. On the other hand, chickpeas, and other fruits and vegetables help you in the digestion process. Thereby, you can maintain a healthy weight and ensure there are no risks of chronic diseases. Indian Cooking Techniques And Their Impact On Health Generally, Indian cooking techniques preserve nutrients in the food items (vegetables, seafood, and meat). On the other hand, there are tempering methods and slow-cooking techniques, with the help of which you can ensure you get all the nutrients in your body. Here are some of the major Indian healthy cooking techniques that you must know about: 1. Steaming This is one of the healthiest cooking methods, where you ensure all nutrients in the food stay. Here, you cook the food with minimum water and little to no oil. In this case, you preserve all the vitamins and minerals in vegetables, fish, and meat. 2. Tadka In this technique, you have to heat spices quickly in a little oil. Then, you have to add them to the main dish. Thereby, you add flavor without increasing the fat content in the food. 3. Dum Cooking Dum is a slow-cooking method. Basically, you have to seal food in a pot-shaped cooker and add a small amount of liquid. Hence, you can allow flavors to develop inside the food. As a result, there is no need for excessive oil in the food. 4. Grilling As you might already know, grilling is a simple way to cook vegetables and meat. Meanwhile, with this process, you can retain all the nutrients in the food. Also, you can add a nice-looking character to the food. 5. Pressure Cooking In this way, you can cook food quickly with a low amount of water. As a result, you preserve most of the nutrients in the food item. Apart from that, this process also helps you to reduce your cooking time. Why Is Indian Food One of the Healthiest Cuisines in the World? Indian food is one of the healthiest cuisines in the world. This is because of good reasons. One of the major reasons is that it relies heavily on lentils, whole grains, vegetables, and diverse spices with low health benefits and saturated fats. As a result, these food items are rich in nutrients and are dense with fibers when prepared with traditional techniques. The following are some of the major reasons why Indian food items are healthy: Stable ingredients in Indian food are high in fiber. Due to India being a large and diverse country, a wide variety of vegetables are available. As a result, all the essential vitamins and minerals are available through food. Moreover, a variety of spices available in India come with potential health benefits. Traditional Indian food items use less amount of oil in cooking. Also, they focus mostly on healthy fats like ghee (moderate amount, of course). Lentils are common in Indian cuisine and offer a complete profile of amino acids. Many Indian foods feature fermented items like yogurt, which improve your gut health. The Vegetarian Advantage of Indian Cuisine India has an extensive variety of dishes full of flavors and delicacies. However, most consist primarily of lentils, vegetables, legumes, and whole grains. This provides a nutritious, high-fiber, and well-rounded diet for vegetarians. Apart from that, these food items are full of diverse vitamins and many protein sources. There is a vast array of vegetarian dishes in Indian cuisine. Moreover, due to the high range of species, it enhances the taste and offers potential benefits. Common Myths About Indian Food Being Unhealthy Here are some myths about Indian food that you will find common (however, they are just myths): “Indian food is unhealthy and fatty”: This is a common misconception in the West because most Indian restaurants in Western Countries add a lot of oil and ghee to food items. However, this is not the case in Indian households. “Indian foods are spicy”: When people think of spices, they align it with the word hot. Actually, India produces a lot of healthy spices. By adding those spices to food, you can make your food healthy. “Indian desserts are too sweet”: Again, this is a myth as desserts differ with changing regions. Some regions in India create homemade desserts which are actually healthy. Try Indian Food Now Is Indian food healthy? – Now you know the answer to this question. You can see that there are multiple myths about Indian food, and they multiply with misinformation on social media. India is the land of Yoga and Ayurveda. Hence, multiple healthy food options are available if you cook with the right ingredients. Do you have more information about healthy Indian foods? Please share your opinions in the comments section below. Read Also: 15 Healthy Mexican Food Items With Immense Health Benefits Eat Your Heart Out A List Of Restaurants That Are Open On Christmas Lift Your Home Cooking: Mysteries From HMD Bar And Grill’s Kitchen
READ MOREDetails
Food Pyramid 2024: A Simple Guide To A Balanced Diet
If you want a guide to healthy eating habits, the USDA Food Pyramid 2024 is one of the best sources you must refer to. To stay healthy, you need different types of nutrients in your body. Hence, you must consume a variety of foods from each of the major food groups. Basically, the food pyramid makes healthy eating easier. In this article, you will learn about the food pyramid and how it works. Here, the article will contain a brief explanation of each shelf in the pyramid. Moreover, you will learn about the major changes in Food Pyramid 2024. Finally, you will get essential tips to follow the pyramid for a healthy lifestyle. Hence, to learn more, read on to the end of the article. Food Pyramid 2024: What Is It? With the help of a food pyramid, healthy eating will be easier for you. Basically, it shows different groups of food and how much food in these food groups you need to have a healthy diet. For instance, if you eat the right amount from each food group, you will have a balanced diet. It is important to eat well. This has both short-term and long-term benefits. By eating well, you can feel good, look your best, and maintain a healthy weight. Moreover, in the long term, with the help of a healthy and balanced diet, you can reduce heart risks. Apart from that, eating healthy will also help you deal with diabetes, osteoporosis, and some types of cancers. The recent food pyramid has equal parts of healthy fats, fruits, vegetables, and whole grains at the base. However, almost three decades ago, the base had carbohydrates. Currently, the food pyramid is an improved version and caters to the actual needs and demands of an actual person. Basically, when you are looking at the food pyramid, use it as a guideline for your diet. Do not use it to follow a strict diet. Hence, if you want a diet chart as your starting point to lead a healthy lifestyle, the pyramid is a good option. However, you must modify it as per your diet, lifestyle, and eating habits. Explaining Each Shelf of the Food Pyramid 2024 The food pyramid consists of five main shelves. Basically, there is a shelf for every food group. Here, the most important shelf is at the bottom of the pyramid, while the least important is at the top of the pyramid. The following are some basic details of each of the shelves on the food pyramid: Level 1 This level consists of vegetables, fruit, and salad. Basically, you can eat plenty of these food items every day. Level 2 Here, you have starchy foods. These consist of whole-meal cereals like bread, pasta, potatoes, rice, etc., which you can have with every meal. In fact, having a wholegrain diet is one of the best options to consider for a healthy diet. Level 3 The next level of diet belongs to dairy. Here, you must focus on consuming milk, yogurt, and cheese. Moreover, to choose the level of fat, you can go with reduced fat or low fat. Level 4 This level consists of meat, chicken, poultry, eggs, fish, and nuts. Here, you must ensure that you choose lean meat options. Also, make sure to have fish at least twice a week, especially if it is oil. This will help you consume essential fatty acids and protein. Level 5 The fifth level consists of fats, spreads, and oils. Basically, these are not fully essential, and you must consume them in small amounts. Moreover, choose unsaturated or reduced-fat oils only. Level 6 These are non-essential foods and have high amounts of salt, sugar, and fat. Hence, this shelf is of the least importance. You must have these foods at least once or twice a week. Major Changes in the Food Pyramid 2024 from Earlier Ones The following are some of the major changes you can find in the Food Pyramid 2024 from earlier food pyramids: 1. Plant-Based Proteins Modern science and nutrition understand the importance of plant protein such as legumes, tofu, and tempeh. These protein sources are not only beneficial for your health, but they also have a lower environmental impact. 2. More Refined Sugars Sweets, sugary beverages, processed snacks, and desserts are on the top shelf of the pyramid. Hence, it is better to avoid them. However, if you have a sweet tooth, look for natural options like fruits. 3. Less Dairy Products A few years ago, people considered a glass of milk as a healthy option. However, the Food Pyramid 2024 suggests you cut full-fat dairy products. Rather, it suggests you stick to low-fat dairy products or plant-based dairy alternatives. 4. More Whole Grains The old days of refined grains are over. Now, the food pyramid suggests you include whole grains as the base of your diet. For instance, you can include quinoa, buckwheat, brown rice, and whole wheat bread. Basically, these items are rich in fiber and nutrients. Hence, these should be an important part of your diet. 5. A Higher Number of Fruits and Vegetables The importance of green vegetables and fruits is increasing with time. Hence, you must include veggies that are rich in nutrients. Apart from that, you must also include fruits in your daily diet for better health. 6. More Healthy Oils Earlier, oil was present on the top shelf of the food pyramid. However, experts now encourage the use of healthy oils. For instance, to include healthy oils in your diet, you must consider virgin oils, nuts, seeds, olive oil, etc. However, you must not overuse them. 7. Inclusion of Supplements The world of health and nutrition is understanding the importance of food supplements like multivitamins and multi-minerals. In fact, these supplements help fill up the shortage of nutrients in your body. Moreover, you also need Vitamin D in your body, which you can only get from certain food options. 8. The Importance of Exercise No matter how much healthy you eat, you must exercise your body. Actually, exercise and diet go hand in hand. Hence, always exercise when you are following the Food Pyramid 2024. Related: Great Health Benefits You Get From A Protein Coconut Bar Tips To Follow Food Pyramid 2024 One of the first things you must understand regarding the USDA Food Pyramid 2024 is that you do not need to strictly follow it. Here, all you need to do is integrate it with what your diet already is. The following are some simple tips you must consider in this case if you want to have a healthier lifestyle: 1. Cook Meals At Home Of course, you might not have enough time to cook your meals at home. However, to start with, you can cook one meal per day. Moreover, if you cook at home, you can use fresh products and will also have control over portion sizes. 2. Plan Your Meals Beforehand By planning your meals, you can save a lot of time and money. However, if you consider planning for the week too much, you can start by planning what you need to buy from the grocery store. Here, you can refer to the pyramid. Also, by sticking to the pyramid, you can save yourself from impulsive purchases. 3. Try New Recipes By trying new recipes, you can include food that you have not tried before. As a result, you can expand your food pyramid. Also, this will give you a chance to include healthy options in your meals. Moreover, you might end up discovering a recipe that you really enjoy. 4. Hydration Apart from a healthy diet, you also need to drink enough water. Make sure to drink plenty during the day. This will help your body stay hydrated. Moreover, it will support your overall health as well. Start Following Food Pyramid 2024 Now The Food Pyramid 2024 offers a nutritious, balanced, and environment-friendly diet. Hence, if you incorporate each level of food into your diet, you can benefit a lot in the long run. However, you do not need to strictly follow the diet. All you need is to align your current diet with the Food Pyramid and change slowly. Do you have more suggestions on how to follow the Food Pyramid 2024? Please share your ideas and opinions in the comments section below. Read Also: 7 Benefits Of Eating Protein Rich Snacks 15 Healthy Mexican Food Items With Immense Health Benefits What Are the 5 Components of Fitness? – Let’s Find Out
READ MOREDetails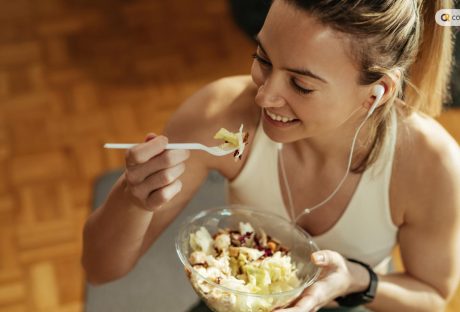
Best Bulking Foods That You Need For Fast Muscle Gains
When you are into bodybuilding, your primary goal is to build muscles through weightlifting and proper nutrition. Bulking is a part of the bodybuilding process. However, bulking requires proper nutrition along with weightlifting. You need to consume the best bulking foods to ensure the right nutrition. In this article, you will learn about the best bulking foods. Here, this article will explain the key nutrients bulking nutrients and the best protein sources. Apart from that, you will also learn about the best fat and carbohydrate sources useful for bulking. Finally, you will also get some tips for effective bulking. Hence, to learn more, read on to the end of the article. Why Is Bulking Integral To Bodybuilding? Generally, bodybuilding involves two phases: bulking and cutting. In the former, the goal is to gain weight and build muscles, while the latter consists in reducing body fat. Basically, bulking is a dietary process where you consume excess calories for muscle growth and weight gain. In fact, it is a common approach that athletes and bodybuilders use to increase their strength and muscle mass. Hence, bulking refers to an increase in calories that your body consumes when it is in the process of intense weight training. It is the stage where you gain muscles in your body. Here, you have to consume more calories than your body needs. However, you do it for a set period of time (4-6 months). The extra calories that you consume works as a necessary fuel for muscle growth. Moreover, it provides strength to your body through weight training. Best Bulking Foods: A General Overview In bulking, your focus should be to give your body more energy than it consumes, thus creating a calorie surplus. Meanwhile, this surplus creates extra energy, with the help of which your body creates muscle mass. Moreover, this energy helps you repair damaged tissues and fuel intense workouts. Actually, bulking is one of the most important aspects of muscle growth. This is because if you build muscles, you must provide your body with enough energy. This way, it can build and repair damaged muscle tissues after your workout. However, just because you are bulking, it does not mean that you have to consume as much food as possible. In fact, you must choose the best bulking foods and count your macronutrients. This way, you can support your muscle growth and minimize fat gain. Key Nutrients For Bulking If you want to achieve a clean bulk, you have to make smart food choices. In fact, if your choice of food is poor, it will lead to “dirty bulking.” As a result, you will end up with a lot of accumulated fat and minimal muscle gain. In fact, in healthy bulking, you must consume quality foods and minimize your fat gains. This is because your goal is to maximize your muscle gain and ensure proper metabolism. When bulking, you must focus on protein, carbohydrates, and healthy fats. Here is a breakdown of each nutrient you need for muscle gain: Proteins The importance of protein in muscle growth and repair is the highest. This is because proteins are the building blocks of muscles. Hence, in your bulking phase, aim to have a higher protein intake. Consume 1g of protein for each pound of your body weight. For example, if your body weight is 180 lbs, consume 180 grams of protein each day when you are bulking. Some good sources of lean protein include lean meats, eggs, poultry, fish, dairy products, lentils, beans, etc. Carbohydrates Carbohydrates help you in providing energy for intense workouts. Also, it helps create a bulk in the muscles. Basically, carbs replenish the glycogen inside your muscles. However, when you are bulking, take 1.5 grams of carbs for 1 lb of your weight. For example, if your body weight is 180 lbs, consume 250-270 grams of carbs daily when you are bulking. When choosing carbs for bulking, focus on consuming complex carbohydrates. These include brown rice, whole grains, fruits, sweet potatoes, and vegetables. Fats Healthy fats are necessary for overall health and hormone production. Apart from that, it also helps in nutrient absorption. Hence, to consume healthy fats, you can include sources like nuts, seeds, avocados, olive oil, fatty fish, etc. Best Protein Sources For Bulking The following are some of the best protein sources when you are in your bulking phase: Lean Meats: Some good sources of protein are chicken or turkey. This is because they have less saturated fat than red meat. For instance, you will get 18-25 grams of protein from 100 grams of chicken breast. Dairy Products: Generally, Greek yogurt, cottage cheese, and milk have high protein and high calories. Hence, they help you to build muscles faster. Apart from that, cottage cheese helps you in muscle recovery and growth due to its slow and steady dissolution. Fish and Seafood: Fishes like salmon, tuna, and shrimp are high in protein and healthy fat. Hence, you can consider consuming them from time to time. Eggs: Eggs are a good and fast-acting source of lean protein. Also, it contains healthy cholesterol. However, do not consume the egg yolk (yellow part) more than 2 in a day as it will increase cholesterol in your body. Meanwhile, you can consume multiple egg whites of boiled eggs in a single day. In fact, this is a good source of lean protein. Plant-Based Proteins: Plant-based proteins are lean and healthy at the same time. Some good sources of such protein are beans, lentils, tofu, and tempeh. Protein Supplements: If you eat too much, you will feel bloated at the end of the day. Hence, you need protein supplements that will help you supplement the shortage of protein that you consume in a day. Some examples of protein supplements are whey protein, casein protein, and plant-based protein powders. Best Carbohydrate Sources For Bulking Here are some of the best bulking foods for carbohydrates that will help you during the bulking phase: Sweet Potatoes: a great post-workout snack that contains nutrients and fibers. Also, it will help you restore glycogen levels in your body. Fruits: Different types of fruits come with various nutrients and carbohydrates. Apart from that, fruits also add antioxidants to your body. For instance, a good fruit option to consume after a workout is a banana. Whole Grains: You can find whole-grain bread and pasta helping you consume complex carbs. Generally, they contain more vitamins, fiber, and minerals. Apart from that, you can also choose brown rice to get good-quality carbs. Legumes and Quinoa: Quinoa, beans, and lentils are excellent sources of carbohydrates. Best Fat Sources For Bulking Here are some of the best bulking foods for healthy fats that you can use during your bulking phase: Nuts and Seeds: Some essential and healthy sources of fats are almonds, chia seeds, walnuts, and flaxseeds. Oils: For instance, coconut oil, olive oil, and avocado oil are great additions when considering fat for your diet. Hence, try to use coconut oil and olive oil in your cooking. This way, you can increase healthy fats and additional calories. Avocados: Avocadoes are rich in healthy fats and nutrients. Basically, they contain monounsaturated fatty acids that add healthy calories and fat to your diet. Also, it is a source of antioxidants and vitamin E. Fatty Fish: Salmon, mackerel, and sardines are fatty fishes that help you remain healthy and achieve clean bulk. Also, a large dose of omega-3 fatty acids, can improve your joints and cardiovascular health. Dairy: Full-fat yogurt and cheese help your muscle restore glycogen stores. This helps more in the muscle-building process. Tips For Effective Bulking The following are some of the major tips for effective bulking: Meal Frequency: Eating multiple times a day is important to ensure a good flow of nutrients and faster metabolism. Hence, make sure to eat small multiple times throughout the day. Caloric Surplus: Always count your calories and your nutrients. For instance, if you see a caloric surplus to support muscle growth, you will have more energy for intense workouts and repairing damaged tissues. Hydration: Since you are working out and eating a lot, you must stay hydrated. This will support overall health and performance. Consistency: When you are in your bulking phase, be consistent with your diet and workout. Moreover, make sure to adjust your Intake. For instance, you can tweak calorie and nutrient intake based on progress and goals. Common Mistakes To Avoid To ensure efficient bulking, here are some common mistakes you must avoid: Do not eat too much quickly, as it will get difficult to cut later on. Make sure there is not a big gap between the two meals. Getting ample rest will not be helpful for your muscles. Basically, your muscles need to get rest for growth. Hence, it would help if you got enough sleep when you are working out regularly. Do cardio at least once a week. This helps you increase your appetite and helps you break down your calories faster. Summing Up Now you know the best bulking foods to help you grow your muscles and gain muscle weight. However, your nutrient intake and workout must go hand in hand. Only then will you get your desired results. Do you have more suggestions on the best bulking foods to consume? Please share your ideas and opinions in the comments section below. Read Also: From Gym To Workplace: A Complete Guide To Lead A Healthy Lifestyle What Are the 5 Components of Fitness? – Let’s Find Out 8 Home Gym Systems You’ll Want To Try Out
READ MOREDetails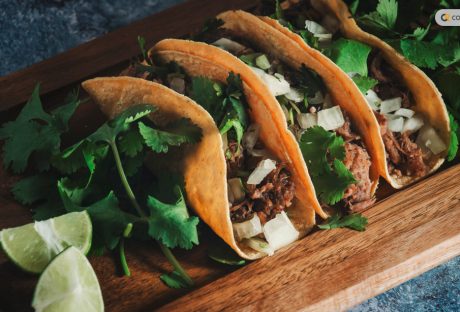
15 Healthy Mexican Food Items With Immense Health Benefits
Mexican food is famous for its spices and flavors. However, many people are confused about whether they can include Mexican food in a healthy lifestyle or not. Actually, there are plenty of misconceptions about Mexican cuisine. In fact, healthy Mexican food options are many, and you can easily include certain dishes into your balanced diet. In this article, you will learn about various healthy Mexican food options to include in your balanced diet. Apart from that, you will also get to know the health benefits of each item. Moreover, this article will also explain why people commonly misunderstand Mexican food as unhealthy. Hence, to learn more, read on to the end of the article. A General Overview of Healthy Mexican Cuisine The Mexican cuisine is famous for its rich flavors, diverse ingredients, and cultural significance. Hence, there are multiple healthy food options available as well. Actually, a lot of Mexican food has a lot to teach us about nutrition. In fact, apart from the staple food items, there are quite a lot of additional factors to consider. For example, there are some special healthy Mexican ingredients, including pumpkin, chia seeds, cactus, etc., which are quite popular among health-conscious people. Apart from that, you will find a lot of vegetables in Mexican food. These include tomatoes, avocados, bell peppers, chili peppers, etc. Hence, there is never a shortage of vitamins, minerals, and fibers. Additionally, many traditional Mexican food items include lean protein sources, like chicken, beans, and fish. Basically, you can use them as excellent options to maintain a healthy diet. Why Is Mexican Food Often Misunderstood As Unhealthy? Generally, the misconceptions about Mexican foods are due to the way many restaurants and food stalls prepare them in the US. For instance, you will frequently find high amounts of cream, cheese, and fried items on top of ingredients. The following are some of the major reasons why many people misunderstand Mexican food as unhealthy: Many Mexican restaurants in the US offer dishes that have large portions of sour cream, cheese, and deep-fried items. Hence, this increases your calorie count after consumption. In many cases, Mexican dishes do not use lard. In fact, there are many healthier cooking options. Restaurants generally serve large portion sizes of Mexican dishes. So, obviously, they contribute to overeating. Therefore, if you want to eat healthy at a Mexican restaurant, you might face difficulties. When it comes to healthier food options, there are many dishes you can consider – legumes, grilled meats, vegetables, whole grains, etc. Basically, when you want to have Mexican food, you must make healthy choices. For example, you must choose lean protein, grilled items, and control cheese and cream portions. This way, you can enjoy Mexican food even when you are maintaining a balanced diet. 15 Healthy Mexican Food Items And Their Health Benefits The following are some of the best and healthy Mexican food items for you if you are on a balanced diet: 1. Beans This is a staple source of fiber, protein, and iron for Mexicans. Apart from that, it also helps you to stay full. Additionally, if you consume it on a regular basis, it will help you lower your cholesterol levels. Moreover, beans also help you to boost your heart health and help to maintain blood sugar levels. 2. Guacamole The major health benefit of guacamole comes from avocados. Basically, avocadoes are monounsaturated fat and hence help to lower bad cholesterol. Also, since avocados have high fiber, it helps you to maintain your digestive tract. Additionally, there is also no risk of colon cancer. Moreover, avocados also ensure eye health and skin health and prevent inflammation. 3. Salsa Salsa is a good addition to your diet. With it, you can add more flavor to your food without adding excess sugar, salt, or additional fat. Apart from that, it also contains various vitamins and minerals. In addition to that, salsa is also high in fiber and antioxidants. As a result, it will help you to remove harmful toxins from your body. 4. Grilled Chicken Grilled chicken is a lean and high-quality protein option. Hence, it can help you to build and repair your muscle tissues. Apart from that, it will help you to maintain a healthy immune system and facilitate muscle growth. In addition to that, lean chicken also improves your bone health and helps you fight infection in your body. 5. Sweet Potato and Black Bean Quesadillas Basically, sweet potatoes are full of nutritional qualities. For instance, it is rich in fiber, vitamins, and minerals. Apart from that, they also add a little sweetness to the quesadillas. As a result, it complements the earthy flavor of black beans. On the other hand, black beans come with a good amount of protein. 6. Vegetarian Enchiladas When you make enchiladas with whole grain tortillas, vegetables, beans, and lean protein, you can control the calories. Basically, enchiladas offer you a balance of fiber, protein, and other essential nutrients. Moreover, you can also boost your protein and vitamin intake if you want. However, one tortilla of vegetarian enchiladas contains 580 calories (approx.). 7. Brown Rice Brown rice is primarily a whole grain which will help you reduce the risk of stroke or any other heart diseases. This is because of the presence of magnesium. Moreover, it also helps in controlling blood sugar since brown rice has a lower glycemic index than white rice. Furthermore, vitamins and minerals also ensure a healthy immune system. 8. Grilled Vegetables Grilled vegetables are filled with vitamins and minerals. Also, when you grill vegetables, it reduces the amount of fat in vegetables. As a result, it becomes easier to digest. Moreover, with grilling, you can bring out the natural sweetness of vegetables. 9. Cilantro Lime Cauliflower Rice If you want a low-calorie, grain-free carb, the cilantro lime cauliflower rice is a better option. Moreover, the recipe is vegan and gluten-free. This can be a great alternative to traditional white rice. Apart from that, due to the presence of vitamins and minerals, it is a healthy Mexican food option. 10. Corn on the Cob Due to its high fiber content, corn helps in maintaining bowel health and helps in preventing constipation. Apart from that, corn also contains antioxidants, folate, potassium, and plant sterols. This will help you to lower cholesterol levels. Apart from that, it will also help you to support heart health. 11. Zucchini Zucchini has high fiber and water content. This helps in the digestion process and reduces the risk of constipation. Additionally, since zucchini is low in carbs, it also helps you to regulate blood sugar levels. 12. Fresh Tomatoes Generally, tomatoes contain potassium, which helps to regular blood pressure in the body. Moreover, since they release antioxidants, they can also help prevent cancer. Additionally, if you consume a tomato-rich diet, you can ensure better digestion. Furthermore, you will have an improved immune system. 13. Shrimp Ceviche Shrimp ceviche is healthy because it is high in protein content. Apart from that, it also comes with a good number of vitamins and minerals. As a result, it not only helps to build muscles but also ensures bone health, immunity, and nerve function. Moreover, if you are following a low-calorie diet to lose weight, shrimp ceviche is a healthy Mexican food option. 14. Pozole It is a stew that is rich in protein. Here, for each cup you consume, you get 18 grams of protein. Additionally, it also contains fiber. However, you can add more fiber to it by adding vegetables like avocado or cabbage. This will help you to digest your food better. 15. Chicken And Vegetable Tacos Since chicken is a lean source of protein, it provides amino acids for muscle building. Moreover, it is also a good source of vitamin B. On the other hand, vegetables are rich in fiber, vitamins, and minerals. Hence, with a combination of chicken and vegetables, you can have a healthy diet. Try Your Favorite Healthy Mexican Food Now Hence, you can see that there are plenty of healthy Mexican food options. However, this is not common in the US because most Mexican restaurants in this country serve Mexican food items with a lot of oil, spices, and cream. Hence, it looks unhealthy to common people. Therefore, if you want to have a healthy Mexican diet, you have a lot of choices. Do you have more suggestions on healthy Mexican food items? Please share your ideas and opinions in the comments section below. Read Also: Eat Your Heart Out A List Of Restaurants That Are Open On Christmas 7 Benefits Of Eating Protein Rich Snacks Tips to Lose Weight Naturally
READ MOREDetails
How Long Does Pre Workout Last? – Best Ways to Maximize It
How long does pre workout last? - Once you consume pre-workout, its effects last for 3 to 6 hours in your body. Basically, the job of a pre-workout is to improve your physical and mental performance during exercise. If you want to consume pre-workout, you have to consume it as energy shots or as a powder that you mix with water. In this article, you will learn about how long a pre-workout lasts. Apart from that, you will also learn about the key factors that influence a pre-workout’s duration. Moreover, this article will also explain how to maximize the duration of pre-workouts. Hence, to learn more, read on to the end of the article. How Long Does Pre-Workout Last? Generally, a pre-workout has a noticeable effect for 1 to 2 hours when you are working out. However, the ingredients remain in your body for around 4 to 6 hours. In fact, the ingredients of a pre-workout supplement remain in your system. Basically, it depends on the amount of caffeine it contains. Here are a few points you must consider about pre-workout duration: Peak Effect: For a pre-workout, after you consume it, you will feel the most intense effects within the first 30-60 minutes. Caffeine Half-Life: Caffeine is the primary contributor to the duration of a pre-workout. In fact, the duration of caffeine is around 5-6 hours. Hence, it takes longer for the body to eliminate half of what you consume that has caffeine in it. Individual Variations: The amount of time up to which a pre-workout lasts also depends on your individual bodily factors. For example, how good your metabolism is or how sensitive your body is to caffeine matters a lot. Key Factors That Influence the Duration of Pre-Workout Depending on the amount of pre-workout you consume, you will experience a rise in physical and mental energy for 30 minutes to 2.5 hours. Moreover, the pre-workout stays in your body for a much longer time due to caffeine content. The following are some of the major factors that influence the amount of time a pre-workout will last: 1. Dosage The pre-workout dosage affects the amount of time up to which you will experience its benefits. In fact, the more pre-workout you consume, the longer it will have an effect on you. Moreover, if you take higher doses, your energy levels will remain high between these periods. Also, there shall be lower feelings of exertion. Generally, this is the effect of individual ingredients. However, always remember to take a dosage that your nutritionist recommends. 2. Ingredients in Pre-Workout The common ingredients of pre-workouts include caffeine, beta-alanine, creatine, etc. Basically, these ingredients determine the amount of time the pre-workout affects you. In fact, each ingredient offers you something different. Hence, a pre-workout with more than one thing will affect you in different ways. a. Caffeine Caffeine is present in multiple beverages, energy drinks, and tea. Generally, you will experience the effects of caffeine for 2.5 to 4.5 hours. However, depending on your personality and your body type, this will vary a bit. b. Nitrates Most pre-workout supplements contain nitrates and amino acids. This helps in producing nitrate oxide, which helps to produce a higher amount of oxygen than the body needs during exercise. However, once you consume it, nitrate will remain for 1-3 hours. c. Beta-alanine This is a type of amino acid that comes with multiple benefits. However, you must consume it before you start exercising. Such a pre-workout will offer you higher aerobic and anaerobic endurance. Apart from that, you will benefit from higher muscle mass, better capacity to exercise, and a reduction in lactic acid buildup. 3. Personal Tolerance If you use pre-workout consistently or for a long period of time, your body will start tolerating it and its effects. Hence, most experts recommend that you use pre-workout in a cycle. For example, you take a pre-workout for six weeks and then take a break of six weeks from using this supplement. Hence, after you retake a pre-workout later, it will have an effect on your body. This is a useful way to make the most of pre-workouts. 4. Workout Intensity and Duration The workout length and effort level influence how long the pre-workout lasts. For instance, your body might use up individual ingredients faster when you are in a high-intensity workout. However, if you resort to lower-intensity training, you will not fully utilize your pre-workout to the fullest. Hence, you will not experience all the benefits it offers. Actually, pre-workout is useful for high-intensity exercises. Apart from that, some studies suggest that if you consume pre-workout before cardio, it will be beneficial for you. How Long Do Specific Ingredients Last? Generally, it depends on the individual when it comes to the duration of specific ingredients like beta-alanine and caffeine can vary a bit. However, in most cases, you can notice the effect of caffeine within 30 minutes to an hour. Also, the effect of caffeine can last for 2-3 hours. This is because caffeine has a half-life of 3-5 hours. On the other hand, the half-life of beta-alanine is about 25 minutes. Hence, you will experience the effects of beta-alanine for a shorter period of time. 1. Caffeine Caffeine is the primary stimulant in most pre-workouts. Generally, you will notice its effect for 1-2 hours. Moreover, its half-life can be extended by 3-5 hours. Also, its effect depends on your metabolism and workout intensity. 2. Beta-Alanine Beta-alanine causes a tingling sensation in your body since your body absorbs it faster. Here, the effect of beta-alanine peaks within 30 minutes. Also, it will last for about 2-3 hours. 3. Creatine Creatine is actually a muscle-building ingredient. In fact, you need to consistently use it for a few weeks if you want to fully saturate it to muscle stores. Also, its effects last much longer than immediate pre-workouts. 4. Nitric Oxide Boosters Nitric oxide ingredient in pre-workouts has an effect on blood flow and pump duration. This actually helps you with better endurance levels. Nitric oxide provides more oxygen in your body when your body needs it. In fact, once you consume it, it will peak after 1-3 hours. How to Maximize the Duration of Pre-Workout? If you want to maximize the duration of your pre-workout, consider taking it around 30 minutes before you start working out. This way, you give your body enough time to absorb all the ingredients inside your pre-workout. Also, you must avoid taking it too early since the effects might diminish before you start your workout. However, make sure you stick to a dose that is recommended for your case. Apart from that, it is important to hydrate your body. Drink plenty of water during and after the workout. This will maximize the absorption of supplements. Moreover, make sure to choose a pre-workout that has a long-lasting effect (for example, creatine). On the other hand, try to be mindful of caffeine. Too much caffeine is not good for anyone. Additionally, if you are sensitive to it, adjust your dosage accordingly. However, if you want more energy to sustain in your body, consider consuming a pre-workout with creatine in it. Potential Side Effects and How They Relate to Duration The following are some of the potential side effects of pre-workouts: headaches stomach upset nausea anxiety jitters dehydration an increase in heart rate sleep disturbances Generally, these side effects vary in terms of intensity depending on the time and duration of use. If you use pre-workouts for the short term, you can see only mild side effects like mild stomach upset, jitters, a little increase in heart rate, etc. These problems go away once the effect of the pre-workout is gone. On the other hand, if you use pre-workout consistently, there is a greater risk of severe side effects. For instance, you might face caffeine dependence, dehydration, higher blood pressure, heart issues, sleep disruption, etc. Apart from that, it also depends on the sensitivity of the individual to the ingredients. Moreover, make sure not to take pre-workouts close to your sleep time as it can impact your sleep quality. What Happens After Pre-Workout Effects Wear Off? Here are a few things that might happen after your pre-workout wears off: You will feel a drop in your energy levels. This may result in a reduction in performance. Slight irritability and agitation are common. Moreover, your individual caffeine sensitivity also determines your loss of energy and performance. Summing Up How long does pre workout last? - Now you know the answer to this question. Generally, the effect of pre-workout lasts for 30 minutes to 1 hour. However, it still stays in your body for 3-5 hours. However, these numbers might vary depending on your individual physicality, sensitivity, and metabolism. Do you have more information to provide regarding the timing and duration of pre-workouts? Please share them in the comments section below. Read Also: Morayfield Fitness Unleashed: A Journey Into A Unique Fitness Experience 4 Tips For Getting Starting With Your Fitness Journey Today
READ MOREDetails
How Many Exercises Per Workout You Must Do? – Let’s Find Out
It is important to exercise and stay in shape if you are on a fitness journey. However, if you are on a busy schedule, you might think about how many exercises per workout you must do to be efficient. This is a question that is important to both an amateur and an advanced individual who is looking for a good workout schedule. In this article, you will learn about how to make a workout schedule based on your needs and demands. Hence, this article will primarily answer the question, “How many exercises per workout must you do?” Apart from that, you will also learn about various factors that influence the number of exercises. How Many Exercises Per Workout You Must Do? When you ask, “How many exercises per workout must you do?” - the direct answer is three to five exercises for a group of muscles. For instance, if you are working out your leg muscles, you must not do more than three to five exercises in a day. Although it is the general guidance for most people, it is important to learn why this is the case. This is because the number of exercises in your case depends on your needs and demands. When you target a muscle group, you can be effective with your exercises. Also, you will not end up overwhelming or overtraining yourself. Basically, when you have a better idea of how many workouts you must do while you exercise, you can plan your fitness goals easily. Also, a low but effective number of exercises in a workout will help you track your results better. However, if you are a beginner, you can start with two exercises for each muscle group. For example, to hit your chest muscles, you can start with bench presses and push-ups. On the other hand, you can start training your triceps with diamond push-ups and tricep push-downs. Factors Influencing the Number of Exercises There are many factors that influence the number of exercises you need to do in a workout. Generally, these include a combination of personal preferences and how you design your training program: 1. Fitness Goals As a beginner, you can start with simpler and fewer exercises. However, for advanced individuals, fitness goals fall into one of these categories: Strength vs. endurance vs. hypertrophy (muscle growth). a. Strength Training (Rep range: 2-6) Here, your focus is on lifting heavy weights, and your repetitions are low. This helps you to activate your muscle growth and helps to force production. Basically, this technique is common among powerlifters. b. Endurance Training (Rep range: 6-12) Endurance is your muscle’s ability to perform activities for long periods of time. To increase your muscle endurance, you must do lighter weights with high repetitions. This is a good idea for someone who wants to be more athletic. c. Hypertrophy Training (Rep range: 15+) Here, your goal is to increase the size of your muscles. Hence, you train with moderate weights with moderate repetitions. Generally, this is common among bodybuilders. 2. Experience Level In fact, when you have a good experience with weights, you can perform a higher number of exercises per session. This is because individuals with more experience have the ability to handle higher-intensity workouts. Also, they can handle higher volume because their muscles are developed. Apart from that, they have enough knowledge about technique, and they have higher endurance. Hence, they can incorporate more exercises into their workout routine. As you gain more experience, your muscles become strong and resilient. Hence, it can handle a higher repetition count with each set. On the other hand, if you do regular exercises, you have better aerobic capacity, which is a higher level of fitness. Hence, you can perform more exercises with less fatigue. 3. Time Constraints With more time constraints, you can significantly decrease the number of exercises you do in a session. This is because when you have a time limit, it will restrict the amount of time you dedicate to exercise. Hence, many individuals choose to dedicate less time to workouts when they have busy schedules. Basically, time constraints are a major barrier for many when it comes to regular exercise. This prevents you from engaging in physical activities that you might like. Moreover, this also influences the type of exercise that you choose to perform. Hence, you select those activities that you can do in shorter timeframes. For example, high-intensity interval training. 4. Workout Split With workout splits, you can focus on fewer muscle groups in a single day. This enables you to perform higher-volume exercises to target specific muscles of your body. In fact, with a split routine, you can do a higher number of exercises for each muscle group in one week. Apart from that, a workout split will also help you in faster recovery. Moreover, with a split outline, you can also perform a higher number of sets and reps for every muscle group that you target. This is because you are using more exercises to target a muscle group. Also, workout splits allow for more number of rest days between your training sessions. Hence, there is a better chance for recovery, and you can also prevent overtraining. Guidelines for Number of Exercises Based on Goals No matter what exercise you choose to do, it is important to focus on proper form. Apart from that, you must also ensure adequate recovery time. The following are a few guidelines you can consider if you want to consider how many exercises per workout you must follow: 1. For Strength Training If you want to gain strength with your workouts, you must focus on compound lifts (e.g., squats, deadlifts, bench presses). Basically, you have to lift heavy weights with low repetitions. This will increase your maximal strength. Here, the rep range is 2-6 reps per set. Also, you must stick to 3–5 exercises per workout. Additionally, you must ensure longer rest periods between your sets. This will help you to recover faster. 2. For Hypertrophy (Muscle Growth) In hypertrophy, the focus is to lift moderate weights with higher repetitions. This will help you to maximize muscle growth. Here, the rep range is 8-12 reps per set. Also, you must stick to 5–7 exercises per workout. Some examples of hypertrophy include bicep curls, shoulder lateral raises, leg extensions, chest flies, etc. 3. For Endurance and Conditioning Here, the emphasis is on functional movements and higher repetitions. Basically, you have to perform exercises for longer time periods and also at a moderate intensity. This will increase your cardiovascular health and stamina. Here, the rep range is high, and there are fewer rest periods between sets. Also, you have to perform 4–6 exercises per workout. In fact, the rest periods are fewer to ensure your heart rate stays at a higher level. Some examples of endurance and conditioning training include running, cycling, swimming, jumping jacks, burpees, etc. Factors to Consider While Structuring a Workout Here are a few factors you must consider while you structure your workout routine: Your workout routine depends on your lifestyle, schedule, and physical activities. Apart from that, it also depends on your current strength and size. Without specific goals, you cannot structure your workout routine. Basically, you have to find the best ways to chalk out your goals. Make sure that there are enough rest and recovery periods between two training sessions. This will help in muscle growth, and will not overstrain your muscles. Structure Your Workout Now How many exercises per workout? - Now you know that it is better to have 3 to 5 workouts in a single training session. Apart from that, you also need enough rest and recovery time between two consecutive training sessions. However, if you are performing endurance and conditioning, the recovery periods will be fewer. Do you have more suggestions on how to structure your workout routine? Please share your ideas and opinions in the comments section below. Read Also: An Ultimate Wall Pilates Free Workout Plan for Beginners From Gym To Workplace: A Complete Guide To Lead A Healthy Lifestyle
READ MOREDetails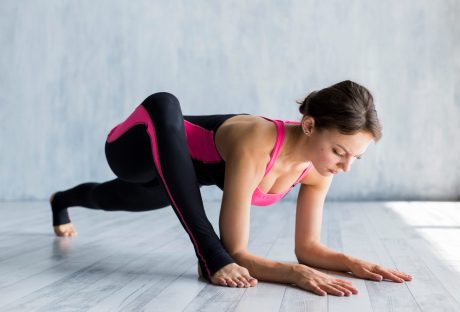
How to Perform Workout Splits? – A Comprehensive Guide for Beginners
With the help of workout splits, you can divide your workout routine throughout the week. Here, the division is such that it focuses on specific muscle groups. In fact, it is a great option to choose if you want to add variety and structure to your training regime. This way, you can train different regions of the body. In this article, you will learn about workout splits and their importance for all-round training regimes. Apart from that, this article will also explain different types of workout splits and how to choose the one that suits you the best. Moreover, you will also learn tips to effectively perform workout splits. Hence, to learn more, read on to the end of the article. What Are Workout Splits? Workout splits are really helpful if you are looking for ways to structure your exercise regimen. For instance, it is not possible to do a full-body workout daily. Also, it is not a way if you want to maximize your results. In such cases, workout splits help a lot. Basically, with a workout split, you can work on different parts of your body on different days of the week. This way, you also give enough time to your muscles to recover after wear and tear that happens during a workout. Hence, with this divide-and-conquer approach, you can focus your efforts accordingly to train each part of your body daily. This is a really good way if you want to optimize your training results. Here, you are not working out without a goal by just joining a gym. In fact, you have a goal that you are breaking down with a plan. In this case, workout splits help you to work as per your plan. Hence, you can work not only harder but smarter, too. As a result, you will end up with faster and better results. Major Types of Workout Splits The type of workout splits can vary as per the goal of the person. For instance, if your goal is to improve athleticism, your splits will be different from ones that focus more on aesthetics or someone whose plan is to gain strength. Hence, it is important to learn about different types of workout splits: 1. Body Part Workout Split In this workout split, you have to train one/two body parts per training session twice every week. Actually, this workout split is a popular option among bodybuilders. This is because such a split lets them train their muscles more often. For example, you train back with biceps one day and chest and triceps the next. 2. Upper-Lower Workout Split With this workout split, you can train the upper body one day and train the lower body on the other. In fact, this is a good option for beginners and people who are on a tight schedule. If your focus is to get stronger when you are starting to train your muscles, this is a good option to consider. 3. Push-Pull-Legs Workout Split This works similarly to the upper-lower workout split. However, you actually divide the workout into three days: pushing, pulling, and lower-body training. This type of workout split is a great option if you focus on powerlifting. For example, you can build your program like this: pushing, pulling, and squats. The Benefits of Workout Splits in Training The following are the major advantages of workout splits that you will benefit from: 1. Focused Training Focused training is one of the major benefits of workout splits where you train specific muscle groups. Also, you will get better muscle recovery between workouts since you are dedicating separate days to different muscle areas in your body. Apart from that, workout splits also ensure better workout intensity since you are targeting each area of your body. On the other hand, with a workout split, you can also get shorter workout sessions. Moreover, you have the ability to address different imbalances in your muscles since you get chances to train weaker areas of your body. Hence, there shall be all-round muscle growth and fitness. 2. Better Muscle Growth As you dedicate a full workout session to different muscle groups, you get the chance to target these muscle groups with more exercises. Hence, you will have high volume and muscle growth. However, this is something that you will not get with a full-body workout. 3. More Recovery Time As you follow a workout split routine, you are giving your muscles adequate rest days between training sessions. Thereby, you do not end up overtraining your muscles. Hence, your muscle recovery is better. Also, if you have a busy schedule, using splits helps you create shorter workout sessions. Hence, exercise fits easily into your schedule. 4. More Workout Intensity By using workout splits, you are only working on a few muscle groups per workout. As a result, you can push your muscles with heavy workouts. Hence, you can stimulate your muscles more. Moreover, you can also train your weak muscle groups that are weaker than other muscles. Choosing the Right Workout Split: How to Create One? The right workout split depends on factors like training, goals, experience, recovery needs, weaknesses, and more. Depending on your bodybuilding needs, you can choose your type of workout split. However, if you are a beginner who is starting out bodybuilding, a full-body workout is more helpful. The following are the factors you must consider when you are selecting your workout split: Training Experience: If you are a beginner, you should start with simple splits and must mostly stick to full-body workouts. However, if you are an advanced individual, you can try complex workout splits. Training Goals: With different goals, workout splits change. For instance, if you want muscle training, you can choose body part workout split. On the other hand, if you want to save time, you must choose the upper-lower workout split. Moreover, the push-pull-leg workout split works more for powerlifters. Frequency of training: If you train two to three days per week, you need a full-body workout. However, if you train 5-6 days per week, you must start with workout splits. Tips for Effective Workout Splits Before you create your workout split, you must always consider your fitness level, goals, schedule, and recovery time. This will help you create a workout split that tailors to your needs and demands. The following are a few tips you must consider if you want to create effective workout splits: Your fitness levels matter. For instance, if you are a beginner, you must go with a full-body workout. On the other hand, as an advanced individual, you can try a workout split like push-pull-legs. Be consistent and sure about your workout schedule. Hence, you can design a split that fits your needs and demands. When you have sufficient days for rest, you can ensure muscle repair. Also, you can prevent muscle strain due to overtraining. If you want to have optimal strength gains, you must focus more on compound movements. Here, you work in different muscle groups simultaneously. Common Mistakes to Avoid and Precautionary Steps Here are a few precautionary steps you must take if you do not want to end up with no results: 1. Do not start with workout splits if you are a beginner. As a beginner, you need a full-body workout with a resting day between two workout days. 2. After you train a muscle area after a workout, make sure there are adequate rest days in between. This allows for better muscle recovery. 3. When you are working out, make sure to gradually increase its intensity, repetition, or weight. This will help you with growth as you progress. 4. Once you include different workouts for the same muscle groups, you end up targeting different muscle fibers. This helps in all-around muscle growth. 5. To get the best results, make sure to have the right form while you lift weights. Start Workout Splits Now Now you know the importance of workout splits and how they work to produce better results. However, if you are preparing for a split training program, make sure to prepare beforehand. Moreover, keep track of your exercises and make sure to have rest days for recovery. Do you have more suggestions on how to create workout splits? Please share your ideas and opinions in the comments section below. Read Also: 8 Motivations to Start Up Health & Fitness Guide to Understanding Training, Strenght Cycles and Alternatives
READ MOREDetails
Bungee Workout Benefits: Learn the Basics of Bungee Fitness
A bungee workout is the best option for you if you are looking for a dynamic, effective, and interactive workout. For instance, if your current workout regime bores you, you must try out bungee fitness. Generally, this workout combines resistance training with aerobics and dance to create a unique training experience. In this article, you will learn about bungee workouts and a training plan to start with. Additionally, this article also explains the benefits and risks of this fitness training. Moreover, you will learn about the types of bungee workouts and the equipment you need. Finally, you will learn some safety tips and precautions. Hence, to learn more, read on to the end of the article. What Is a Bungee Workout? In a bungee workout, you have to perform body-weight exercises while hanging from a bungee cord. Here, the cord connects to the ceiling. On the other hand, you have to connect to the cord either by a harness or by holding it tight with your hands. Basically, the bungee cord hangs from the ceiling of the gym. As a result, you get to perform a myriad of exercises. Meanwhile, you are also experiencing buoyancy as the cords pull you upward. Apart from that bungee cord and the harness, you can also use a mat or a floor pad to perform certain exercises where you need to jump or do floor workouts. In fact, when you are in a bungee fitness class, you can engage in different types of exercises. These include jumps, lunges, squats, cardio dances, and more. In all these cases, the bungee cord pulls you upward by creating buoyancy. Hence, you achieve resistance and stability from different directions. Basically, this resistance helps you to challenge different muscle groups. Moreover, it improves your overall strength, agility, and endurance. Apart from that, even some bungee fitness classes incorporate resistance bands, weights, and fitness props. This helps in enhancing the workout experience. In fact, it is a low-impact exercise that helps you to perform full-body cardio and bodyweight exercises. Benefits of a Bungee Workout The following are the major advantages you will benefit from if you perform a bungee workout: 1. Muscle Building When you are in a bungee fitness class, you will generally be doing bodyweight exercises to build muscles. In fact, it is important to perform exercises that strengthen your muscles at least twice a week. This will help you gain strength and maintain muscle mass. 2. Posture Enhancement To have the right posture, you need to work on your shoulders, back, and chest muscles. Hence, with the help of a bungee workout, you can maintain flexibility and balance. 3. Better Balance and Stability Generally, a bungee pulls you against gravity. Hence, you need balance and stability to remain on the ground. Moreover, you can switch your stance and perform exercises in different types of foot positions. Thereby, you can gradually improve your balance. Apart from that, you will also become more familiar with movements while hanging from a bungee. 4. Low-Impact Exercise Although it can be a bit difficult at the start, bungee workouts are adaptable quite easily. Moreover, a bungee workout mainly includes jumping, bouncing, and bodyweight exercises. Also, they do not put pressure on the joints and also prevent injuries. Hence, it counts as a low-impact exercise. 5. Weight-Loss With the help of bungee workouts, you can burn calories in an enjoyable way. Hence, it can help you a lot in weight loss. Basically, if you use a fund way to lose weight, it will be more effective than traditional exercises that seem demotivating. 6. Heart Health In most cases, a bungee workout consists of cardio moves. These moves are enough to ensure that your heart pumps well. Hence, you will strengthen your heart muscles and pump more blood to your lungs. What are the Risks of a Bungee Workout? If the fitness studio or gym properly installs all the bungee equipment, it will be safe. However, if you have a recent injury or surgery, you might need to avoid bungee workouts. Moreover, if you are pregnant, a bungee workout is unsafe for you. This is because the bungee harnesses around the waist. Also, it is unsafe if you recently gave birth. Hence, you must consider consulting a healthcare professional to discuss whether a bungee workout is good for you or not. Who Can Do Bungee Workout? Actually, a bungee workout ensures a well-rounded and low-intensity fitness. Hence, if you want to perform low-impact exercises that are easy for your joints, you must consider this workout plan. Basically, the bungees will help you remove the pressure from your joints, which is usually the case when you use weights. Also, running and high-intensity workouts put pressure on joints. However, it is always a better idea to follow the instructions of a certified trainer. In fact, a trained instructor can help you harness your requirements and abilities. Moreover, a bungee workout is not a safe option if you are pregnant. However, in some cases, a mild workout can help you boost energy and decrease fatigue. Despite that, do not start a bungee workout regime without discussing a healthcare professional. On the other hand, if you are a senior, you can try out bungee fitness to restore your muscle mass and bone strength. Generally, seniors lose bone and muscle mass with age. This affects your stability and increases the risk of falls. Hence, with muscle-strengthening exercises with bungee, you can build or preserve strength. Essential Bungee Workout Equipment You Need Here are the major equipment you need if you want to start bungee workouts: Fitting and moisture-wicking athletic clothes. This will help you see how your body moves in front of the mirror in the gym. Also, it will be easier for the instructor to check your form. Socks and Sneakers/Running Shoes. A water bottle to hydrate your body while you work out. Types of Bungee Workouts The following are the major types of bungee workout you will have when you join a bungee fitness studio: Bungee Dance Here, the trainer combines dance choreography with resistance training with the help of the bungee cord. This helps you to enhance your heart rate, and helps you to tone your muscles, and improve coordination. Bungee Yoga It combines traditional yoga with bungee resistance. Here, the cords provide support and resistance for various poses. Thereby it helps improve stability and coordination. Bungee Bootcamp This is a high-intensity workout that combines strength training, agility exercises, and cardio with bungee resistance. As a result, you can build muscles, burn fat, and improve your health. Aerial Bungee Fitness Here, you perform aerial acrobatics while you hang from your bungee cords. Basically, it helps you with strength, coordination, and flexibility. This helps you improve core strength, generate body awareness, and get more balance. Bungee Rebounding This involves bouncing on a small trampoline while you are attached to your bungee cords. It helps you in coordination, balance, and cardiovascular health. How to Start a Bungee Workout? To start a bungee workout, you must join a bungee fitness studio near you. Here, you can consult the trainer regarding how to wear the bungee harness, depending on your comfortability. Moreover, before you start intense exercise with bungee resistance, make sure to perform some stretching exercises without the bungee cord. Sample Bungee Workout Routine Here is a sample bungee workout routine: Bungee Lunges: 20 lunge reps in each leg of 3 sets. Squats: 25 reps of corded squats of 4 sets. Jumping: 30 reps Jumping of 3 sets Safety Tips and Precautions Before you start a bungee workout, here are some safety tips and precautions you must consider: Always were fitting and moisture-wicking athletic clothes. Moreover, always wear socks and sneakers. Listen carefully to your instructor. Do not perform bungee workouts if you are injured or pregnant. Do not eat before a workout (at least for 1.5 hours prior). Before attaching yourself to a bungee cord, check the weight adjustments. Start Bungee Workout Now Now you know the basic details of a bungee workout and its benefits. However, before you join a bungee fitness studio and you are injured, consider consulting with a healthcare professional. Moreover, always discuss every detail of the training with your trainer, and do not try anything new without your trainer’s permission. Do you have more information to add regarding bungee workouts? Please share them in the comments section below.
READ MOREDetails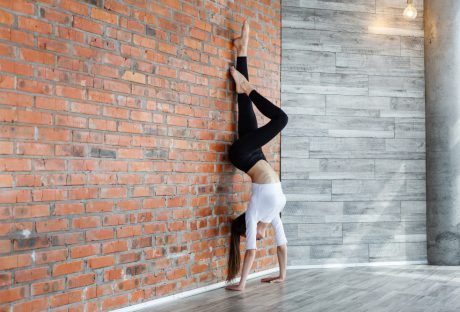
An Ultimate Wall Pilates Free Workout Plan for Beginners
To start your Pilates workout, all you need is a wall. With wall Pilates free workout, you can blend traditional Pilates with home exercise. This workout can be helpful for you whether you are a beginner in Pilates or have been practicing Pilates for a few years. Consider starting out with wall Pilates if you want to transform your fitness journey. In this article, you will get a Wall Pilates workout plan. Apart from that, you will also get a general overview of what a wall Pilates exercise is as well as its benefits. Moreover, this article will also set a Wall Pilates free workout plan. Finally, you will also get essential tips to perform this exercise. Hence, to learn more, read on to the end of the article. What is Wall Pilates? Wall Pilates is a form of Pilates training. It is a low-impact exercise where you have to use a wall for support and resistance. Basically, the wall provides support for your back, shoulder, and hips. Hence, you can use it as a resistance to perform exercise. Generally, when you perform traditional Pilates, you have to exercise on a mat or a reformer machine. Here, you use your body weight or the machine for resistance. However, with wall Pilates, you press your body and its parts against a wall. You make movements by exerting force on the wall and by using it as a support. Actually, in this exercise, you have to do the same repetitive movements that you practice during a mat. Some examples of wall Pilates are single-leg stretch, criss-cross, the hundred, etc. Benefits of Wall Pilates Free Hand Exercises The following are some of the major benefits of Wall Pilates that you must: By performing wall Pilates daily, you can strengthen your core muscles. As a result, this will help you prevent injuries and maintain a good posture. With time, you will improve your flexibility with wall Pilates. Additionally, it also helps you to improve your coordination and balance. As you are using a wall for your support, the stable surface can help you maintain the right form. Thereby, with time, you will get a better spinal alignment, which will ensure a lower risk of injury. With wall Pilates, you engage your full body for the exercise. This way, you can target all muscle areas of the body. Moreover, Wall Pilates free hand exercises are also effective in reducing blood pressure. Hence, if you do it regularly, you lower your risk of heart attacks and strokes. Wall Pilates also involves mindful movement, which can help you work on your mental health. People of all ages and fitness levels can perform wall pilates. This is because it is a low-impact exercise. Apart from all these benefits, one of the biggest factors to consider Wall Pilates is that it is a budget-friendly exercise. All you require here is a wall. Who is Wall Pilates Good for? Since Wall Pilates is a low-impact exercise, it will not be physically demanding and exhausting. Hence, this form of exercise is good for people of all ages and fitness levels. Moreover, this exercise is also good for pregnant and injured people. Furthermore, if you are someone who finds it difficult to lie on your back, you can even do Wall Pilates. Generally, traditional Pilates, like mat or reformer Pilates, are difficult to perform. This is especially true for people who have physiological issues or injuries. Hence, if you want to perform a light exercise to stay fit, Wall Pilates is one of the best options to consider. 15-Minute Wall Pilates Free Hand Workout To start a Wall Pilates workout, you need an open wall and a yoga mat. Here are the steps you must follow to perform your Wall Pilates workout: Start your warmup with a Cat-Cow pose and Thread-the-Needle stretch. Warm up for 2-3 minutes. Once you complete your warmup, start your wall Pilates exercise. Here, make sure to have consistency with the reps for each move. Once you complete the five Pilates exercises, repeat the circuit twice more. The next section consists of 5 back-to-back exercises that you must perform in each circuit. 5 Wall Pilates Free Hand Exercises Here are the Wall Pilates exercises you must perform to complete each circuit: 1. Single-Leg Knee Crunch The following are the steps to follow if you want to perform a single-leg knee crunch: Sit one foot away from the wall. Then, lie down on your back. After that, place your feet on the wall so that your legs look like a tabletop, horizontally. Stretch your left leg diagonally so that your toes are just touching the wall. Then, extend your arms over your head. Meanwhile, be sure to press your lower back into the floor. This way, you can engage your core. Pull your left knee toward your chest and curl your shoulders, hands, and your head towards your core. Then, slowly, go back to the initial position. Repeat these fifteen times to complete one set. 2. Wall Bridge and Calf Raise The following are the steps to follow if you want to perform the wall bridge and calf raise exercise: Sit one foot away from the wall. Then, lie down on your back. After that, place your feet on the wall so that your legs look like a tabletop, horizontally. Press your feet on the wall. This way, you can engage your glutes and your hamstring. Then, lift your hips off the floor. However, do not arch your back in the process. Moreover, when your body makes a straight line from the knees to the shoulder, lift your heels for a calf raise. This will balance out the movement. Then, return to the starting position to complete one rep. Repeat these fifteen times to complete one set. 3. Reach Backs The following are the steps to follow if you want to perform reach-backs: Start with a high plank by pressing your feet on the edge of the wall. Here, ensure to keep your feet apart by shoulder-width. Also, be sure to place your shoulders directly over your wrists. Moreover, your body must be in a straight line from your heels to your shoulder. Use it as your starting position. Then, lift your hips up. When you are lifting up, touch your left foot with your right hand. Then, come back to the starting position. Do the same with your left hand by touching your right foot. Again, come back to the starting position. Make sure to repeat this 10 times for one set. 4. Marching Bridge The following are the steps to follow if you want to perform a marching bridge: Sit one foot away from the wall. Then, lie down on your back. After that, place your feet on the wall so that your legs look like a tabletop, horizontally. Then, press your feet to lift your hips off the floor. Here, make sure to form a straight line from your knees to your shoulder. However, make sure not to arch your back. Consider this as your starting position. Then, lift your left foot and bring your knee toward your chest. Meanwhile, make sure to keep your hips still. Here, maintain the same bend in your knee and stop when your thigh is at a right angle to your torso. Then, come back to your starting position by reversing the movement. This is one rep. By performing 10 reps, you complete one set of the marching bridge. 5. Wall Sit and Calf Raise The following are the steps to follow if you want to perform the wall sit and calf raise exercise: Become a human chair: Stand with your back against a wall and take your feet about a foot forward. Then, lower your hips down to a position such that your knees are perpendicular to your hips. Also, make sure your ankle is perpendicular to your knees. Then, extend your arms horizontally so that it is perpendicular to your torso. This is your starting position. Hold the squat position to raise your arms, and reverse the movement to the starting position. Simultaneously, raise your heels to do a calf raise and reverse the movement. This is one rep. Perform 12 reps to complete one set of Wall Sit and Calf Raise. Tips for Effective Wall Pilates Practice Here are some useful tips if you want to perform Wall Pilates free hand exercises effectively: Don’t over-exert yourself with your exercises. Basically, start with simple exercises and gradually increase your intensity. Make sure to breathe steadily and have control of your breathing. Use good-quality mats to support your back and hips. There is no substitute for a professional instructor. Hence, consult with an instructor to perform your exercises correctly. Do you have more suggestions on how to perform Wall Pilates free hand exercises? Please share your experiences and opinions in the comments section below.
READ MOREDetails
Externship vs Internship: What Are The Major Differences?
Externship vs Internship – Often many beginners in the job market or students in universities confuse these two terms. Generally, both are short-term professional learning experiences. Moreover, both are professionally valuable for beginners. Hence, knowing the difference between the two is important. In this article, you will learn about the difference between an externship and an internship. Additionally, this article will also explain the benefits of each of these professional experiences. Moreover, you will also learn common myths that persist among students and beginners. Hence, to learn more, read on to the end of the article. Definition Of Externship In an externship, you have to perform job shadowing for a short time span. Basically, the focus here is to learn about a job profile by observing someone’s daily work routine. In general, people who go through externships (externs) are college/University students. However, the college might not choose to give credit to the student for an externship. Moreover, the length of an externship depends on the professional that the student is job-shadowing. In fact, it is the time that the professional can afford to offer to the learner. Basically, the program can last for a day or even eight weeks. Hence, a student can choose to perform multiple externships during a break period. Definition Of Internship An internship is a training program where the student/beginner learns while being on the job. Here, the intern works under an employer and learns by working on projects. Hence, an intern can have employee-like responsibilities. These include working on projects, organizing files, updating information, and more. Moreover, the learner can also earn college credits by working on internships. In some cases, the employer might also offer a small base salary to the learner. However, in other cases, an employer might not offer payments to the learner. For instance, if you are a student or a college grad, you can choose to complete an internship with a company during your school year. Moreover, if you have enough time, you can choose to complete multiple internships. However, you will need to inform your internship coordinator if you have a school semester to prepare for. Both externships and internships are helpful for college students to learn about different careers and job roles. Apart from that, in both cases, students can learn whether they want to pursue a career or not. Externship vs Internship: Key Differences The following are the major differences between an externship and an internship: Factor Externship Internship Compensation You might get no payment in an externship. This is because the work involves only observing a professional for a certain time period. Since you get to work with hands-on experience, you will receive compensation. However, in some cases, an employer might not offer compensation to an intern. Length An externship does not extend to more than eight weeks. In fact, in some cases, the externship can even end in a day. Basically, it depends on the amount of time that the professional you are observing can provide you. An internship requires at least two months and can extend to six months. In some cases, it can require more time. This is because you are learning with hands-on experience. Moreover, you will also find internships that align well with your University schedule. Course Credit Generally, students don’t receive course credits after an externship. This is because the length of an externship is short. In most cases, colleges/universities offer course credits for internships. Moreover, universities even encourage students to work as interns before they graduate. This is because students get good industry experience as they make progress. However, to ensure that your University recognizes your internship, you have to submit proof. Responsibilities In an externship, you do not need to complete any task. Also, there is no supervisor to give feedback on your work. In an internship, you will receive on-the-job training. Also, you have to contribute to the company’s workflow. Moreover, if your performance is good enough, the employer might provide you with a full-time opportunity after your graduation. Externship vs Internship: Major Benefits Here are the major benefits of an externship and an internship: Benefits Of An Externship One of the major benefits of an externship is that you will learn a lot about a particular job role. For instance, as a student, you will understand whether a given career is suitable for you or not. Moreover, if you are a professional, an externship will let you understand a career change better. Basically, with the help of an externship, you will have a good perspective on your career options. For example, if you are a business major and not sure about whether you want to join accounting or finance, you can do an externship in both. Moreover, you will also learn how to prepare for an interview or how to build a resume for the job role. Benefits Of An Internship The most important benefit of an internship is that you will have work experience before you become a full-time employee. In fact, it will be a competitive advantage while you are still in college or University. This is because employers always prefer someone with industry experience to a fresher candidate. Meanwhile, you will also learn the duties and responsibilities of different departments and responsibilities. This will help you a lot in your future jobs. Apart from that, while being an intern, you will get the chance to create a professional network. This will open up options for you after you graduate. Basically, if your internship has been a positive experience for you, you can transition easily to a permanent job. Additionally, if your performance was good enough during your internship, the employer can even consider offering you a permanent role. Externship vs Internship: Which One To Choose? Both externship and internship have their own benefits and opportunities. Hence, you must assess your situation and your future needs to choose the one that suits you the best. For instance, if you are unsure about whether to pursue a career or not, an externship might be the best option to choose. Here, you can check the daily work-life of a professional that you strive to be in the near future. On the other hand, if you are sure about your career path, you must look for an internship with an employer. This way, you will get practical work experience in a field. As a result, it will be easier to find a job after you complete your graduation. However, you will need to consider whether you have enough time to take on a full internship. How To Find Externships And Internships? To find a good externship or an internship, you can use your college’s resources and personal and social media connections. In fact, one of the best ways to find an internship or an externship is by completing your LinkedIn profile. This is one of the best platforms to create a professional network and look for job opportunities. Apart from that, you can also contact your college’s placement cell or talk to your academic counselor to offer some advice. Additionally, you will also learn about internship or externship opportunities through professional networking events. On the other hand, if you are confident enough, you can even try a head-on approach. For example, if you want to work for a particular company that you think can offer you a good opportunity, reach out directly to them. Ask them whether they have an internship or externship opportunity for you or not. Externship vs Internship: Common Myths A common myth of externships is that it does not help much in knowing about a job role. However, the fact is that if you choose the professional properly with the guidance of your academic mentor, you will have a great experience. Thereby, you will know whether a particular job is good for you or not. On the other hand, a big myth about internships is, “Interns mainly do beginner-level tasks…” However, the fact is interns do work on important and complex projects. This helps them gain industry experience early on. Another myth about internships is that only top-performing students get internships. However, the fact is that although internships are competitive, there are many places to look into. All you need is the right set of skills. Final Thoughts Externship vs Internship - Now you know the major differences between them. Basically, if you are unsure about whether to choose a career or not, an externship is helpful. On the other hand, if you want early industry experience, an internship is the way to go. Do you have more suggestions on how to look for externships and internships? Please share your ideas and opinions in the comments section below. Read Also: How Many Jobs Are Available in Consumer Services? Copywriting Jobs 101: Essential Steps To Become A Copywriter How Many Jobs Are Available In Real Estate Investment Trusts?
READ MOREDetails
15 Amazing Jobs For 15 Year Olds And Teenagers In 2025
There are some amazing jobs for 15 year olds that do not require a college degree or an age limit to apply. Also, there can be many reasons why a teenager wants to have part-time employment. For instance, it can be either to spend money, pay for college, or save for a big gift. Hence, it is important to learn about jobs that a teenager can apply for. In this article, you will learn about various job options for 15-year-olds. Apart from that, this article will also discuss factors like legal considerations, balancing work and school, parental considerations, and gaining work experience. Moreover, this article also explains how a 15-year-old can get a job. Hence, to learn more, read on to the end of the article. Jobs for 15 Year Olds: Legal Considerations The enforcement and administration of federal child labor laws fall under the purview of the US Department of Labor’s Wage and Hour Division (WHD). According to the US Department of Labor, “The FLSA's child labor provisions are designed to protect the educational opportunities of youth and prohibit their employment in jobs that are detrimental to their health and safety.” Basically, according to the Fair Labor Standards Act (FLSA), the minimum age of employment is 14 years. Apart from that, it also states the hours a child of under-16 can work. Additionally, it also prohibits the employment of youth under 18 in hazardous jobs. Moreover, the FLSA also sets the wage standard for employees who are less than 20 years of age. Furthermore, there are also wage standards for apprentices, student learners, full-time students, and employees with disabilities. 15 High-Paying Jobs for 15 Year Olds and Teenagers The following are some of the best and high-paying jobs for 15 year olds that you must learn about: 1. Cashier You will find cashiers in grocery and departmental store. Here, the duty is to attach rings to customers’ products, and also to ensure a smooth checkout process. Generally, the job requires you to perform price checks, validate coupons/cards, collect cash, and package items. 2. Grocery Stocker As the name suggests, the job requires you to stock the shelves of the grocery store that you are working for. Basically, you have to store the groceries soon after the store receives and checks in its inventory. In most cases, you might have to work in a particular part of the store. Moreover, in other cases, you might need to work overnight or might have early morning hours. 3. Pet Sitter As a pet sitter, you have to watch over animals, mostly dogs, when their owners are not present. In most cases, you will have to take care of dogs. Generally, you have to feed them, take care of them, and take them outside. Also, you must ensure that their living areas are clean. Moreover, in some cases, when the pets are sick, you might even need to take them to the vet. 4. Lifeguard In this case, you will be working near natural or artificial waterbody (for example, a swimming pool, lake, river, or ocean). Here, your job is to enforce safety rules and regulations around the facility. Moreover, you might also need to assist in swimming lessons, perform first aid, and rescue swimmers. 5. Server As a server, you will have to work in a restaurant or a fast-food establishment. For instance, you have to take orders from customers and hand them the food/drinks from the kitchen. Moreover, your job also requires you to collect payments and tips. Apart from that, you must also clear up tables after the customer is gone and reset the area for the next customer. 6. Sales Associate In this case, you will need to work in a store and assist customers who want to make a purchase. Here, the major duties include responding to inquiries and complaints. Additionally, you will also need to maintain an orderly appearance and make product recommendations. 7. Delivery Associate As the name suggests, you will be delivering fast food or retail orders to customers. Moreover, you must review orders, accept payments, and ensure quality customer service. Apart from that, in some cases, you might need to handle complaints and maintain documentation. 8. Actor You already know what an actor does. Depending on your role in a stage play, movie, advertisement, or TV show, you have to portray a certain role. Also, you have to memorize your lines in a script and act out your character. 9. Babysitter In this case, you have to look after young children when their parents are away. For instance, you have to bathe and dress them. Also, you must feed them by preparing their meals. In some cases, babysitters help babies with homework and keep them occupied with games. 10. Landscape Laborer The duties of a landscape laborer are manifold. For instance, it includes mowing lawns, trimming hedges, pulling out weeds, watering plants, and more. Moreover, the job may change a little depending on the location. 11. Youth Sports Referee As the name suggests, a youth sports referee oversees games of sports teams at a high school level. Generally, you need to keep track of games and adhere to game rules. Also, you have to make game calls and inspect teams between games. 12. Caddy Caddies are golfers’ assistants. Basically, you have to carry golf bags, measure yards, clean golf pins and golf balls, replace ball marks, hold flags, etc. In some cases, you might even need to advise golfers on how to use the club. 13. Tutor The tutor teaches and aids students in their coursework. However, you have to do it outside their regular school hours. Moreover, you must also review their performance in class and hand out assignments. Also, you can point out trouble areas and devise strategies to teach them and make them study. 14. Dog Walker As a dog walker, you have to take other people’s dogs out for a walk. Here, you will also be exercising the dogs and helping them socialize with other dogs and animals. Generally, you have to walk the dogs when their owners are away. Hence, if you love dogs, this can be one of the most rewarding jobs for you. 15. Automotive Technician If you know about car parts and machinery, this is a great job for you. Although you have to start as an apprentice, there is a lot to learn. Moreover, you will also learn how to carry out diagnostic tests and maintenance tasks. How To Find Job Opportunities? The following are the places you must consider if you are looking for jobs for 15 year olds: Check online job portals like LinkedIn, indeed, etc. Contact a relative or a friend person to recommend a job opportunity. Look for job advertisements on online sites and newspapers. Reaching out to a job consultant for job recommendations and suggestions. Moreover, make some effort to build your resume as well. For example, information about how many bullet points per job on a resume, how to add skills to a resume, etc., can help a lot. Why 15 is a Good Age to Start Working? Reasonably speaking, 15 is actually a good age to start working. It not only helps the child to understand the true meaning of responsibility but also helps in developing work history from an early stage. Also, they will be able to learn valuable life skills, including organization, time management, communication, etc. Basically, by starting to work early, the 15-year-old child can learn how to be accountable and responsible. Also, they will learn how to take early initiative, keep commitment, and work independently. Moreover, some teens may start working to find a sense of belonging and learn to be a part of a team. On the other hand, one of the major advantages of starting to work as a teenager is to learn money management. For instance, a 15-year-old child will learn early how to earn, spend, and save for the future. Jobs for 15 Year Olds: Why Is It Beneficial for You? Here are the major advantages of early work experience you will benefit from if you start working as a teenager: You will have practical experience from a young age. Hence, you will have an advantage in future jobs. You will learn essential skills like teamwork, communication, soft skills, social skills, etc. An early job and earning from a young age will heavily increase your self-confidence. Moreover, you will have a lot of time to experiment with career options. Apart from that, an early job will help you build a professional network around your area of expertise. Are You Looking For Jobs For 15 Year Olds If you are looking for well-paying jobs for 15 year olds, start by looking for job opportunities online. Apart from that, you can also ask people you know for opportunities and recommendations. However, don’t try to get into a job that you don’t like. Start with what you are good at or something that interests you. Do you have more suggestions for jobs for 15 year olds? Please share them in the comments section below. Read Also: 7 Proven Tips To Leave A Lasting Impression On Your Interviewer How Many Jobs Are Available in Consumer Services? Top 9 Signs You Will Get The Job After Interview
READ MOREDetails
How To Invest In Yourself For A Stress-Free Daily Life
In today's fast-paced world, stress has become an almost inevitable part of daily life. Balancing work, family, and personal commitments can leave us feeling overwhelmed and drained. However, investing in self-care can be a game-changer, helping us to manage stress and improve our overall well-being. In this article, we will tell you the best way to invest in yourself so that you can have a more stress-free daily life. Whether it's small daily habits or bigger lifestyle changes, these tips will help you take care of your mental and physical health so you can handle whatever life throws your way with a bit more ease and a lot more calm. How To Invest In Your Self? When you start doing some research on the internet or ask your friends and family for advice on how to invest in yourself, the search results and the suggestions can overwhelm you. On the other hand, Investing in a personal trainer or therapist, while beneficial for many, is both expensive and a big commitment. They are good options for making change, but if you are just beginning your self-care journey, there are plenty of ways to start small. Paying a professional isn’t the only way to reduce stress and better your wellbeing. There are small ways to invest in yourself daily without spending too much money or time. Not only will it help in your personal growth and well-being, but it will introduce some calm to your busy week: Your Closet Deciding what to wear is a stressful part of most mornings, particularly before work. Digging through your options may slow you down and even cause you to be late. Giving yourself a good wardrobe selection doesn’t have to be costly. Start by investing in essential basics like tees you can dress up or down. Having a couple of sweaters for layering will ease your transition into the colder seasons. For those working from home, ensure you have a few cozy essentials like soft sweatpants and sweatshirts. Having these options in your closet will make it easier to make a quick decision in the morning. Having good undergarments may relieve your stress as well. Comfortable socks that don’t slip down while you walk can prevent blisters. No-show socks will add comfort to shoes that don’t cover the whole foot. Investing in high-quality underwear will enhance your comfort during the day. For women, purchasing a set of period underwear will prevent stress during that time of the month. These aspects, little by little, will relieve certain areas of stress that you may experience on any given day. Skincare Nobody likes waking up in the morning with a fresh pimple, and nothing causes that early morning stress like trying to hide a breakout. Products that are good for your skin and prevent breakouts may save you from having a last-minute panic. There are also products like serums and oils that can help you treat specific needs. Investing time into your skincare may calm your anxieties and make you feel better about yourself over time. Skincare is an opportunity to improve skin health while also making you smell and feel good. Buying quality body wash and lotion to fit your needs will make you excited to do your morning and evening routines. Using a special scrub on important days puts a spring in your step, while calming lotions wind you down. Whether you have special skin concerns or just need a way to destress, skin care will make you feel more comfortable and confident in your body regularly. Meal Delivery Service For many people, planning meals and grocery shopping is a large source of stress. For those with children, making three meals a day requires even more time and effort. Even if dinner is the only meal you cook from scratch, it can still be a lot on your plate, especially after finishing a day at work. Meal or food delivery services make the meal planning process easier for those working full-time. Even if you’d prefer to pick your own recipes, services like Instacart or Doordash will help you save a few hours every week by delivering groceries to your door. For people with social anxiety, it also saves you the stress of walking around a bustling store. Those with kids can stay home and avoid managing young ones in public. No matter which subscription service you use, you'll be able to use your time to focus on family or self-care instead of meal planning and shopping. Self-care Apps When you have a busy life and are always on the move, it’s a challenge to fit in new self-care habits. Self-care mobile apps have allowed people to fit new routines into their pockets. Apps like Calm enable people to have guided meditation tools at their fingertips. Meditation apps will introduce intentional relaxation into your routine. Including this routine right before bedtime may even encourage better sleeping patterns. Fitness apps can track your sleep and aid you in building those good habits. Self-care apps on the market include more than just meditation and fitness. There are plenty of journaling and organizational apps that will motivate anyone to introduce a new habit into their daily life. Journaling apps are a good way to relieve stress by getting all your thoughts out, especially after a long day. Organizational apps may help you better schedule your tasks for the week and will assist with time management. No matter your needs, you can find an app that aids your mental well-being and reduces stress in your day to day. Invest In Yourself: It Will Be Worth It! There are plenty of ways to invest in your self-care routine that don’t involve spending large sums of money. There are even more options than listed above that may help you relieve your stress and improve your mental well-being. Whether it’s through changes in your appearance, planning, or tools you use, you can make positive changes in a number of different ways. It’s up to you to determine what works best for your needs and lifestyle, but regardless of your choices, your self-care habits will be worth the investment. Read Also: How Music Therapy Empowers Recovery in Substance Abuse Treatment 10 Tips on How to Ditch the Stress and Start Living a Peaceful Life 10 Health Problems Eased by Yoga
READ MOREDetailsPopular

Technologies For Creating A Startup Idea
20 Feb 2023

How to Download Facebook Videos on Android?
07 Feb 2019

7 Rules of Effective Ecommerce Web Design
28 Jan 2021

Why Are Online Transactions Convenient?
07 Dec 2023
