


Category: Home Improvement
ContentRally is a leading source of reliable news and trending topics on Home Improvement. Get hard-to-find insights and advice on Home Improvement from industry-specific leaders.
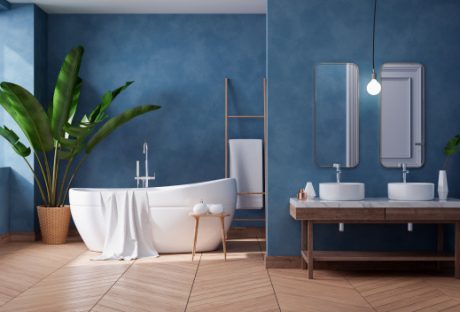
How to Keep Your Bathroom Clean All the Time
It's frustrating to have a messy bathroom. You want to maintain the place, but it always looks terrible. You can't keep things the same. Changes need to happen. Given that we're at the height of a pandemic, you have more reasons to maintain the bathroom clean. These are some tips to help you. Involve your family members: You shouldn’t be the only one taking care of your bathroom. Your entire family uses it, and everyone should have a role in keeping it clean. You can even involve your children by assigning them easy tasks. Eventually, they will learn how to clean the place and be responsible. Invest in bathroom improvement: If you invest in bathroom improvement, space will look amazing. Imagine if you considered the many options for complete suites for a new bathroom. Anyone who enters the bathroom will feel fascinated. Your family members will also feel bad if they don’t spend time cleaning it. Once the appearance changes, the attitude of the people using it will also change. A number of homeowners lose sight of the fact that simply improving the drainage can go a long way in helping keep it clean. For example, standing water in the shower area can be splashed around as it slowly gets drained. However, if the process was better, there would be less accumulation. This would prevent splashes on the walls and make the bathroom dirty. Interior designers suggest using easy drain products to ensure that the bathrooms stay clean, even when there are kids in the house. Don’t wait until the weekends: Another reason why your bathroom looks messy is that you wait until the weekend before you decide to clean. You can start with small and easy tasks that won’t take long to finish. For instance, you can keep the floor dry. You can also empty the bin regularly. In doing so, your bathroom will look great. The problem with waiting until the weekends is that mess starts to pile up. As a result, you spent hours cleaning the bathroom, and you can't keep it in excellent condition. Create rules: If you already feel exhausted maintaining your bathroom, you have to inform your entire family members. Let them know that they can’t continue with their terrible behavior when using the bathroom. There should be rules for everyone to follow and consequences for not following the rules. It’s the best way to instill a sense of responsibility. You might hear complaints at first, but it’s natural. Eventually, your family members will realize that everyone needs to be responsible for maintaining the place. The rules shouldn’t only apply to the bathroom but the entire house. Install a heated floor: Another reason why your bathroom looks messy is that it's damp. You shower in it, and it's natural for it to be wet all the time. However, if you install a heated floor, you can keep the floor dry without mopping it. You also prevent the growth of mold and mildew. It might be costly to install, but you won't regret the decision. If you decide to pursue these changes, it might take time before seeing results. Be patient in trying to involve your family members. Once they feel the impact of having a clean bathroom, they will cooperate. You also have to take note of the strategies that work. Consider doing them regularly. Having a clean bathroom is necessary to keep everyone safe and healthy, and you should do everything to maintain it. Read Also: Considerations When Choosing the Ceramic Tile Bathroom Mirror Decorating Ideas To Style Your Bathroom Considerations When Choosing the Ceramic Tile Bathroom
READ MOREDetails
The Best Way Of Keeping Stink Bugs Outside Your Home
Stink bugs earned their name because they emit a foul smell when they are threatened. The aim is to make them less appealing to predators. However, if you are simply trying to remove the bug and they release the odor, you’re going to need to put up with it for a while. It is not pleasant! That’s why, if you think you have a problem with stink bugs, it’s a good idea to get professional help from a local pest control company. When They Are Likely To Visit Stink bugs enjoy warmer weather. As such they will look for somewhere to stay over winter. The moment the temperature starts to drop the stink bugs will look for a warm winter spot. This is when they are most likely to head into your home as it is warm and there will be plenty of places for a stink bug to hide and hibernate. Surprisingly, this is not when you will have the biggest issue with these bugs. While you may accidentally disturb them over the winter, the biggest issue is in the spring. This is when the stink bugs come out of their winter slumber and head back outside. Unfortunately, like most insects, they can’t see the glass in their way. That means they often sit on the window where you will spot them and attempt to get rid of them. This is when they will feel most threatened and will release their obnoxious odor. Annual Inspection One of the most effective ways of keeping stink bugs out of your home is to click here and book an annual inspection in the winter. The experts can locate any stink bugs in your home and eradicate them before they wake up and leave you a smelly present. This is also a good opportunity to check for other pests that can cause issues in your home. Damp Towels Surprisingly, a damp towel is an effective way of keeping the stink bugs out of your home. Simply drape the damp towel across a chair in your yard and the stink bugs will be attracted to it. In the morning you may find it covered with stink bugs but they won’t be inside your house. You can then kill the stink bugs outside if you wish. The easiest technique is to drop them into a bucket of soapy water. Squash Some Stink Bugs Use an old shoe or a piece of wood that doesn’t matter if it has stink bug odor on it. All you have to do is squash several stink bugs outside your home. They will emit their foul odor and this warns other stink bugs of danger. They will avoid the area, effectively protecting your home. Screening Screening stops stink bugs from coming into your windows and doors. But, it doesn’t stop them from landing on the screens. However, if you rub the screens with dryer sheets you’ll find the stink bugs are repelled and will avoid your home. That’s easy and effective! Read Also: Things to Take Care of to Keep Bugs Out of Your House Do you have to sell your home to pay for care? 3 Remedies for Winter Cabin Fever in Silverthorne
READ MOREDetails
How Do You Match Sofas With Accent Chairs?
It is unarguable that decorating our own home will surely excite us. The thoughts of what color palette to use or what furniture to put or how to arrange them will get us a bit carried away for sure. The entire decoration plays a key role as it sets up the mood for the house. Whether you want a refresh or moving into a new space, it is vital to purchase durable furniture to incorporate your home. Choosing your furniture can take you a lot of time to consider its design and quality. In Chesterfield furniture, they offer a wide range of designs that will not compromise your comfort as they only intend to use the finest materials for their sofas and chairs. The most crucial spot of the house to decorate is the living room. Being the center of the house, a heart is considered a symbol for the living room. The living room is the primary room you will see upon entering a home, and it is where guests are entertained. The living room should be an area to indulge and lie on the couch as you enjoy a bowl of popcorn watching your favorite movie. Most importantly, the living room is where families should spend time together to relax and share stories. There is a long list of furniture to consider putting in the living room. The essentials are the sofa, coffee table, accent chairs, media stand, and side table. Putting together all these are overwhelming; thus, one should consider hiring an interior decorator to do the job, or if not, dig deep on Pinterest for design inspiration. One of the common mistakes in arranging your furniture is the improper incorporation of your sofa with your accent chair. If you want to create a pleasing space to the eye and a solid setup, you should consider a few tips and tricks to have a successful mix and match. What Do I Have To Put In Mind: In pairing your sofa with your accent chair, contrasting them is most crucial. You will have to make these pieces complement each other and, at the same time, can stand on their own. You shall also consider the style, color, and form of your selections. 1. Style Style is an essential element to consider. If you opt for minimal decoration, both your sofa and accent chair should embody that style. 2. Color Carefully decide on the color palette you will use for your sofa and your accent chair. Your choice can either be a monochromatic or complementary color scheme; always make sure they don’t crash with each other. 3. Form Always be mindful of the form. A skirted sofa would go along well with an accent chair that has an intricate or evident leg style. How Do I Arrange These Pieces? There are various ways to arrange your sofa and your accent chair: front and center, and section-off space. When you follow the front and center arrangement, you must consider where you will be facing as you sit down. The section-off space arrangement considers arranging the furniture in ways that can accommodate visitors and guests. There are no rules on how you should decorate your place; as being said, it is your home and your own space. However, it would help if you always put in mind that the design must go together harmoniously. Read Also: Some Common Reason why we Use Futon Mattress Modern Home design ideas for crowded families Top 5 Trending Home Renovation Ideas For Australian Families
READ MOREDetails
Window Glass Buying Guide: How To Choose The Best Glass?
Windowpanes are important parts of your house that contribute to aesthetics as well as energy efficiency. Good quality window glass allows light to enter your home and blocks the heat. Also, it prevents the cooling of your air conditioning system from escaping from your house to improve its energy efficiency. A window glass should be strong enough to tolerate strong winds and extreme temperatures without getting cracked or damaged. However, there are many types of glass available in the market. It can be challenging for some people to choose the right glass for their windows. Whether you want to install window glass or want a glass window replacement, this post shares some tips for choosing the best window glass for your home. Hence, to learn more, read on to the end of the article. Different Types Of Window Glass Options The following are some of the major window glass options you must consider for your home: 1. Clear Float Glass Or Annealed Glass: Float glass is formed by floating the molten glass on the molten tin to produce thin glass panels. The clear float glass allows 100 percent penetration of natural light into the house and offers viewing clarity to see the outdoors. However, it is not good for heat and sound insulation. If natural light and outdoor views are your priority, you can install clear float glass on your windows. These glasses are quite affordable and a good option for people who want to design their windows on a low budget. 2. Toughened Glass: As the name suggests, the toughened glass is made strong to withstand strong winds and extreme temperatures. It is more expensive than clear float glass and is available in reflective, clear, and tinted forms. You can get them in green, blue, grey, and bronze colors. When a toughened glass is broken, it usually splits into small fragments that are harmless. Window glasses made of toughened glass are excellent for French windows and front doors as they offer enhanced safety and enhance the aesthetics of your entrance. 3. Tinted and Reflective Glass: Tinted glasses are formed by adding metal oxides to glass. Reflected glasses are made by applying a metallic coating on the glass. If you want tinted light and outdoor views, you can use tinted glass, but it is not very energy efficient. If energy efficiency is your goal, you can use reflective glass as they reflect most of the heat back into the outdoors, keeping your interiors cool. Stained glass is also an option if protection from harmful ultraviolet rays is a priority for the owner or his family. The common standard is to use tinted glass in skylights, vehicles, or decorative panels, but you can also use them for outdoor windows. 4. Obscured Glass: Obscured glass refers to any glass that allows light to pass through, but the material is not completely transparent like normal glass. The customized options include a design in which a gaze can see more than the shadow behind the fuzzy glass window. This property makes it an ideal choice for bathroom windows or shower doors that require privacy. It can also be used to bring more natural light into the home. 5. Double Or Triple-Glazing Windows: Residential window glass is a thing of the past. With energy efficiency being the primary concern of home builders and homeowners today, most windows now have at least double glazing – meaning that each window has two glass panels connected by a spacer, with space between the two. The space between them is filled with an insulating gas. Window glasses can also have triple glazing – in other words, an additional glass is added to the window. Triple-glazed glasses are costlier than double-glazed glasses and offer you a significant return on your investment, whether you want to sell your house or save on utility bills. 6. Tempered Glass These are also called safety glasses. Actually, manufacturers heat and cold them simultaneously to perform the process quickly. Hence, this makes tempered glass four times stronger than untreated glass. Aussie Aluminum Enterprise offers a variety of aluminum doors and windows in Australia. They have been offering aluminum doors and windows for more than 20 years in Australia. If you have a property in Australia, you can hire them for the installation of windows at your home or office. How To Choose Window Glass For Your Home? When you choose the best window glass for your home, the following are some of the major factors to consider: 1. Noise Reduction Choose a window glass that is thicker and can help you reduce noise. For instance, you can use laminated or double-pane windows with thicker glass. 2. UV-Ray Protection If you want your window glasses to block harmful UV rays from the sun, you can choose low-E glass. This is a great option if you live in an area with hot weather. 3. Energy Efficiency The best glass for energy efficiency is insulated glass. Generally, these have two layers of glass with an inert gas in between. 4. Safety To ensure safety, you must use tempered glass. These glasses are four times stronger than untreated glass. 5. Privacy Tinted glass is the best option if you want privacy. However, it allows natural light during the day. 6. Complying With Building Codes Find out what the building codes in your area are. Depending on the coeds, you have to choose your type of window and performance. Frequently Asked Questions (FAQs) On Window Glass The following are some of the most common questions you will find about window glass: What Is The Cost Of A Window Glass? The cost of window glass replacement ranges from $180 to $409. Here, the average cost of replacement is $279. However, depending on your location, type of glass, and size of the glass, the price can change. What Is The Best Quality Window Glass? Generally, toughened glass or tempered glass are some of the best quality glasses you can buy for your windows. Which Glasses Are The Best For Windows? Toughened laminated Glass is the best option for house windows. This is because they not only reduce the risk of injuries, but they are also shatterproof. Moreover, they offer additional sound insulation and UV protection. Final Words: These are the major options to choose window glass for residential and commercial properties. The first step is to analyze your requirements and budget to choose the best available option. For example, double or triple-glazed windows are best for energy efficiency. Float glass windows are best for natural light and outdoor views. Once you come to know your requirements, it will be convenient to choose the right window glass for your property. Do you have more suggestions on how to choose window glass for homes? Please share your ideas and opinions in the comments section below. Read Also: Inspiring Window Treatment Ideas Tips for Selecting a Window Frame Color Replacement Windows – Benefits of Vinyl Windows 10 Tactics To Maintain Clear Windows
READ MOREDetails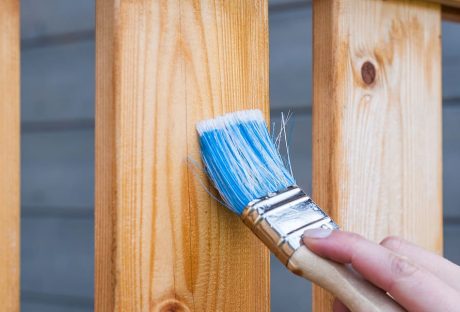
Tips for Painting Interior Doors
Freshly painted doors can enhance the makeover of any house. You can paint your doors on your own or hire a professional painter to do it for you. Many people prefer painting their doors themselves as they want to enjoy painting them on their own. However, if you don’t have any experience or want high-quality paintwork, you should always hire professionals for complete painting service. If you choose to paint or spray paint your interior doors, you need to know some tips and skills to do the job right. Let us explore some tips by professional painters that you can use to paint your doors. Remove or cover the door handles: Paint can stain the door handles and locks. So, it is better to remove them or cover them with painter’s tape to prevent them from getting stained. You will need a screwdriver with multiple heads to remove the handles and locks. Call a locksmith to remove the inbuilt lock systems as they are difficult to remove. Removing these things will make it easy to clean, sand and then paint the doors. Fill the cracks and holes: If there are any holes or cracks in your doors, you can fill them with a wood filler, gypsum plaster, or a filling compound. Put a small amount of wood filler or filling compound on a putty knife and put it into the hole or crack uniformly. Place it as uniformly as possible and leave it to dry for at least two hours. Check the filling the next day, and it requires more filling, add the required amount of filling compound to fill the space completely. Sand the surfaces: The old paint gets worn and imperfections develop with time on the door surfaces. That is the reason why homeowners want to repaint their doors. Sanding removes the worn paint and imperfections easily and prepares the surfaces for a clean and uniform finish. Start painting with a Roller: If you have already chosen the paint color, mix several cans in a bucket so that you can have the same shade on every door. Sometimes, the shade in different cars can vary a little, although not noticeable in the interiors in low light. Use a 4-inch roller to apply a thin layer of paint on the door starting from an edge. If you want to paint the trim first, you can use a 2-inch brush. To remove any lines, move the lightly loaded brush or roller from bottom to top. Using this technique will help you paint quickly and uniformly while leaving a wet edge. Painting a paneled door: Many homes have paneled doors and the technique to paint them is different from painting a flat door. Paint every panel beginning from the upper left side downwards in a sequence. Always use a brush of appropriate width to paint a paneled door. Don’t worry if you paint a bit outside the edges of a panel. Once the edges are painted, use a small roller to paint the space between the panels. If the rollers of appropriate size are not available, use a 2-to-4-inch brush to paint the center of the panels. Minimize the drying time: Paint in light and uniform coats to minimize the drying time. Thick coats of paint take a bit longer to dry and may look nonuniform after drying. If you are using a brush, you should dip its bristles halfway in the paint and tap the brush against the container edge slightly to remove the excess paint. If you plan to use a roller, place it in a pan and use the back-and-forth strokes to paint uniformly without soaking it. Let the paint dry before installing knobs and locks: Let the paint dry completely before installing the doorknobs and locks. Also, tell your kids and family members not to touch the doors until they dry completely. Once they dry up completely, you can install the accessories and start using the doors as you use them normally. Final Words: Painting the doors is not difficult, even if you are painting them for the first time. All you need to do is to follow the correct sequence of steps, use the right size of tools and prepare the surfaces before grabbing a brush or roller. Following these tips can help you to paint your interior doors easily and conveniently. Read Also: 10 Pro Tips To Minimize Commercial Door Repair & Maintenance Cost All About Commercial Fire Doors Why Should you Consider Security Doors for Your House?
READ MOREDetails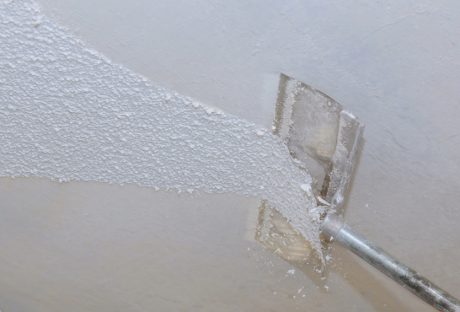
Elevate Your Home With Unique Ceiling Textures
Drywalls are those construction materials that are used to create walls and ceilings in your home. Not all that, but drywalls also come in handy if you want to create design features like eaves, arches, or any mind-blowing architectural requirements!!! Do you know the best part about drywalls? These are super easy to install, highly durable, and only require simple repairs when damaged. So, drywall is a flat component composed of calcium sulfate dihydrate, typically between thick sheets of backer paper, and facer, used to construct interior ceilings. Let’s talk about the ceiling textures and the drywall options you can choose for your home!!! The Ceiling Textures And Your Drywall Options Decorating your home can be a real challenge for many !!! Therefore, choosing the right drywall finish or texture can prove to be a hard nut to crack. And it’s very natural to get in a state of indecision if you are handpicking it for your new home or renovation project. There are so many options that it feels like you are “searching for a pearl in an ocean.” Making up your mind about whether or not to go texturing your ceiling can be a tough job. And even if you choose to texture your ceilings, there are chances you’ll be confused about which one to go for!!!! And remember, getting the drywall right is the first step of tiling projects?”. But No Need to Worry!! This article will guide you in choosing the perfect texture and drywall option for your ceilings to look more elegant than ever!! 1. Sheetrock Texture: Old Is Gold Sheetrock ceiling texture is a drywall ceiling texture that has been famous since 1917. The reason this drywall texture is so awesomely renowned is because of the artistic look that it gives to your ceiling And the best part is you don’t need to use any sort of spray paint in this case. You can achieve this texture by using your artistic hand technique and without using any special brushes. This texture is perfect for any room. There are no restrictions on the use of this ceiling texture. 2. Stipple Brush Texture: A Test Of Your Skill This texture is not as easy as it seems. You need skills to create this texture. To create this texture, you need a roller and slap brush. The fascinating fact about this texture is it can cover the bumps and holes on your ceiling. And if you have the skills, then this texture can surely make your ceiling look gorgeous than ever!! 3. Swirl Texture: Creativity Taken To A New Level To achieve this texture, you need either a roller or sprayer. You can also do this by using a technique called “the basic swirl” method. But one thing that you need to keep in mind is while creating this texture, you’ll need a lot of patience to get the best result. And the difficult part is you need to create the pattern before the mud dries. So, make sure to have a helping hand by your side. Overall, the texture can really give that awesome look on your ceilings if you do it in the right way!!! 4. Orange Peel Texture: A Color Of Choice The name suggests all the colors of orange skin, but sometimes it’s also called “an eggshell” ceiling texture. If you really love this color, then this can be on the top of your favorite lists. To create this texture, you need to apply thin mud to the ceiling using a spray gun set at very high pressure. The more artistic mind you have, the more artistic look it has got!!!! 5. Smooth Textures: Choice Of Many If you are someone who wants the best at a cheap cost, then this texture is just the right choice for you. Moreover, you don’t need to have many skills to create this texture design. The look of this texture is just mind-blowing, and if you are someone who likes things to be consistently gorgeous, then this is the texture you can have for your ceiling. This texture is effortless to remove and is also perfectly suited for any room. 6. Tree Bark Texture: Beauty Of Nature If you are someone who loves nature and wants to bring the reflection of nature inside your home, then this textured style is just the option you can have. This ceiling has the look of a tree. You can create this texture just by using a heavy roller. The texture might look simply, but it’s very artistic and can surely catch the eyes of many. If you have a farmhouse, then this texture will double the beauty!!!!! 7. Slap Brush Texture: Slap The Beauty Out Artistic, gorgeous, beautiful, and elegant are the nicknames you can give to this texture. A complete package of beauty!!!! To get this texture, you’ll need a brush with very stiff bristles and thin mud. Firstly, you have to cover your ceiling with mud using a roller, then take the brush and slap the ceiling from the edge. This can be a hard nut to crack because if you don’t get it right on the first shot, the whole ceiling might end up looking messy. 8. Popcorn Texture: Cottage Cheese This texture, also known as the “cottage cheese” or “acoustic” ceiling texture, is probably one of the most famous ceiling textures ever!!! If you look closely, you’ll see it’s kind of a look-alike of “popcorn.” That’s why it’s called “popcorn texture.” To achieve the correct texture, you need to use a sprayer to apply to your ceiling. This contains Styrofoam with mud which gives that puffy effect. But it will require you to have a lot of skill to achieve this effect. That’s because the “popcorn texture” is both challenging to apply and remove. I hope this article will help you to know about the needs of ceiling textures and drywall options. And now I believe you’ll be able to get yourself the perfect texture for your ceilings. How Can I Remove Old Ceiling Textures Safely? Removing old ceiling textures can be a big job, but it doesn’t have to be intimidating! If you want to update your ceiling and get rid of that outdated texture, I’m here to help. No matter if you have popcorn, stipple, or another type of texture, this process takes a little bit of care, but don’t worry! Here’s a step-by-step guide on how to remove an old ceiling texture without breaking your back or the bank. Step 1: Test For Asbestos Before you get out any tools…safety first! Remember, many older ceilings (especially those with popcorn texture installed prior to 1980) contain asbestos. Before doing anything else, have your ceiling tested for asbestos. You can hire a pro to test the ceiling or buy a self-test kit. If asbestos is present, halt all work and consult pros immediately. Asbestos removal is not a do-it-yourself job because it poses serious health risks if mishandled. Step 2: Clear The Room If there’s no asbestos present, it’s time to get the room ready. Cover all the furniture. You’d be amazed at how far a fine mist of water, compound, and paint can travel! Also, plastic should be removed from the floors, and tape should be around any ceiling fans or lights that are not being removed. I can personally tell you we didn’t do this. We found dried white dust on our bedspread when we were stripping the wallpaper in our bedroom, and we had to clean up all the residual dust a little too late. It was wild! Step 3: Soften The Texture For Better Finish Here’s where the fun starts! To make that texture easier to remove, you’ll need to soften it. Fill a spray bottle with warm water and mist the ceiling. You don’t want to drench it. If you put too much water on the ceiling, it could end up damaging the drywall underneath. Allow the water to sit for about 15–20 minutes or so, giving it time to penetrate and loosen up that texture material. Don’t rush this step. It’ll only cause more work for you in the long run. Step 4: Clean Your Work Grab a wide putty knife or scraper and start scraping off the texture. Do small sections at a time, and scrape at a shallow angle so that you don’t gouge the drywall underneath. If it’s not coming off well, spray some more with the water bottle and let it sit for a little longer. This step can be kind of messy and time-consuming, but have patience because, in the end, you will have a nice smooth ceiling. Step 5: Patch & Sand Once the texture is gone, you may notice a few dings or dents in the ceiling. Don’t worry! Just fill them with some joint compound, sand it smooth, wipe away any dust and you’re ready for a new ceiling. And that’s it! A fresh, smooth ceiling in no time! Read Also: Here’s How to Turn Your Garage into a Bedroom on a Budget! Turn your attic into a living space
READ MOREDetails
Improve Your Home With Concrete Lifting Services
As a homeowner, keeping your home safe, comfortable, and attractive will be important. However, problems can sometimes make it difficult for you to achieve this. Certain issues can affect many aspects of your home, from the aesthetic appeal to the safety levels. So, getting these problems addressed by a professional with specialist knowledge and tools is important. One of the problems you may experience at your home is areas of sinking concrete. Most such homes consider taking help from concrete lifting companies. However, as a homeowner, it’s common to worry about whether you should opt for one or not. Here’s an article that’ll help you – Sinking Concrete & How It Might Affect Your Home Sinking concrete can affect many areas of your home, such as the sidewalk, the steps to the property, the patio area, and more. Once these issues arise, you must ensure they are sorted out quickly. Otherwise, your home could suffer. You also need to consider the cause of the sinking concrete, which could indicate serious foundation issues. Finding a reputable concrete lifting company will enable you to resolve the issue and improve your home. In this article, we will look at how an experienced professional can help to improve your home. About Concrete Lifting Concrete Lifting or Concrete Leveling is a process of leveling or lifting up sunken concrete slabs out of the ground. The process involves injecting concrete material beneath the concrete slab to lift it up or level it. Typically, the material used fills up the void created under the slab. When it solidifies or dries, it creates a strong surface under the slabs. There are different concrete lifting methods, and the most common ones include – Polyurethane foam concrete lifting Stone slurry grout concrete lifting Mudjacking How Is Concrete Lifting Done? Concrete lifting is a heavy-duty task. But, with the right skills, tools, and training, concrete lifting is an easy and straightforward process. It also requires a basic understanding of the matters in use and the method utilized for lifting up the concrete slabs. Here’s the detail of the process – First, the holes are drilled in different locations strategically. Then, it involves pumping a component through the holes and underneath the concrete slabs, where it fills any voids and creates enough backpressuback pressure to cause the concrete to rise. They patch the drill holes when the concrete is in a specific place. Different Types Of Concrete Lifting While the process may involve using different types of concrete materials, the lifting process can also require different methods beyond the three we mentioned above. Stone Slurry Grout Concrete Method Lifting Compound: In this process, a mixture of crushed agricultural limestone is used with water. The mixture forms a strong and dense base under the newly lifted concrete. Sometimes, they add Portland cement to the mix using extra strength. Drill Hole size: the drill hole used for this leveling method is close to 1 inch in diameter. It can also be about the size of a quarter. Polyurethane Foam Concrete Lifting Lifting compound: The lifting compound for this method includes two-part polyurethane foam as the lifting substance. When they inject it under the concrete slab, the substance can lift up the concrete slab. Then, that expansion puts pressure on the slab that’s settled on the ground. Drill Hole Size: The drill hole size that’s needed for foam concrete leveling is close to ⅝ inch in diameter. Mudjacking Lifting Compound: Mudjacking is a process that includes water, soil, and sand as a mix and they are pumped at a high pressure and speed to lift up the settled concrete. You can also use Portland cement and add it to this mixture to make it stronger and more stable. The drill holes have to be bigger in size for there to be a high pumping pressure. Typically, the Mudjacking drill Holes are 2 inches in Diameter. Some of the Benefits of Having the Work Done- There are lots of ways in which you can improve your home by getting concrete lifting carried out. This will help you strengthen the affected areas around your property and also increase its longevity. Some of these are: Improving Safety Levels: As mentioned earlier, a range of safety issues can arise when you have to sink concrete in your home. The main issue you are likely to experience is people tripping and falling because of the uneven floor surfaces. As areas of your floors start to sink further, they can become very uneven and difficult to walk on. This can create serious difficulties for some people, such as those who are elderly and at increased risk of falling. In addition, those with mobility issues and even younger kids could be at increased risk of trips and falls that could cause all sorts of serious injuries. Having your sinking concrete addressed will help you improve safety levels at your home by reducing the risk of trips and falls. Increasing Aesthetic Appeal: Another thing that will happen when you have this work carried out is that you can improve the aesthetic appeal of your home. When you have areas of sinking concrete, it can have a really damaging impact on the appearance of your home. Sinking concrete can make your property look out of condition and unattractive, which is something that any houseproud owner wants to avoid. By getting the concrete lifted, the affected areas of your home will look far more attractive. Improving Scalability: It is also important to try and improve the salability of your home in case you decide to sell in the future. This is something that lifting concrete can do. If you have people viewing your home, they can be put off by lots of areas of sinking concrete, and this could cost you your sales. These are some of the ways in which you can improve your home with concrete lifting services. Read Also: How To Pick The Perfect Flooring For Your New Home Ideas for Modern Flooring Designs for Home Improvement Plans Senior Staircase Safety: What You Need to Know
READ MOREDetails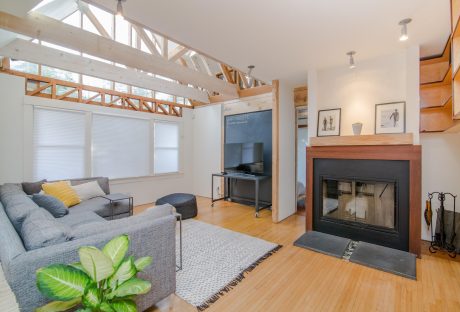
Budget Friendly Home Improvement Hacks To Save Your Pockets
Home improvement is a big deal now, with more people embracing their creativity and letting it show in the places they live. This has led to the rise of incredible trends and hacks that provide the perfect opportunity for people to work in their homes. However, with all this development, it also gets confusing and daunting for some people. This is mainly because they have no idea where to start or some of the hacks they can include in different areas. These hacks are meant to be easily doable tasks that will transform your space when implemented. We’ve categorized these hacks in terms of placement and application. Some of them include: Floors In the home, floors play a big role in how the home looks and the general style you’ll be working with. A few tweaks here and there can completely change the look of your floors and add style and character. Some of the most versatile hacks to include for your flooring include: Peel And Stick Tiles When it comes to finding the perfect flooring for that annoying red floor or just need a new look, peel and stick tiles will do the trick. These tiles are amazing given that you can easily install them yourself. They are designed to give off the illusion of regular tiles without having to deal with grout, glue, and other tedious processes. You can get them in different colors, styles, and patterns making them the perfect option. Replacing Your Tile Grout When dealing with tiles for your flooring, you may find that the grout may get stained and turn to a different color which becomes hard to clean. However, you have the option of replacing the grout with a new one in the same color or a different one. Adding A New Finish This is especially a great idea if you are dealing with wooden flooring. With this, it is easier to add a new finish when needed to give the floors a new and vibrant look. Lighting One of the most understated hacks is the ability to switch out your light fixtures and improve the overall look significantly. Most people don’t know what role lighting plays in your space. You need to improve your lighting situation, which will give your space more life. To make it more appealing, consider getting light fixtures that feature some detail and a unique design. Additionally, you could also include under-cabinet lighting for your kitchen featuring the use of custom led lights. You also have the option of choosing to go with statement chandeliers, floor lamps, wall lights, and pendant lights among others. When it comes to lighting, you are spoilt for choice and can easily improve your space. Walls Adding some style to your walls is another great way to improve the overall look of your home. For this, you have a few options to choose from that are easy to work with and get quality results. They include: Adding a Fresh Coat of Paint Paint is a great easy way to get a different look when working on your walls. With this, you have the option of working with a variety of colors depending on the vibe you are going for. Additionally, you could paint one wall a different color and have that as your accent wall. This will improve the look of your room significantly. Adding A Wallpaper Wallpapers provide a layout, especially if you don’t want to do a paint job on your walls. They come in different types, patterns, and designs to ensure that they cater to everyone’s needs. With this, you can choose to cover all your walls or use them on one wall that will serve as your accent wall. Hanging Art Art is another great way to bring your taste and style into your home. For this, you can create your art piece or purchase one made by another artist. Entryway When it comes to your entryway, the first thing you need to consider is your storage options. Once you get into the house, where do your shoes, bag, coat, and keys go? Having a station where all these items can be kept will keep the home tidy and add a great design aspect to your space. Additionally, you can also add other decor items to make your entryway arrangement more visually appealing. Patio When it comes to dealing with the outdoors, one of the most effective ways to change it is by adding a seating area. Be creative with this and go for something that portrays who you are. Don’t be too rigid and only stick to what’s normal. Find what works for you and add it to your space. Play around with colors and create a cozy space to relax with family and friends. Greenery Adding some green aspects to your home is an amazing way to improve the look and add some character. The best part about adding greenery to your space is that it will help improve air circulation. When working with greenery, you need to take the time to water them to ensure they are healthy at all times. You could also opt for fake plants, given that they will add the same look and style. Adding Budget-Friendly Feng-Shi To Home-Decor Are you looking to bring more balance and good vibes into your home without breaking the bank? Feng Shui is all about creating harmony in your living space, and you don’t need to spend a fortune to make it happen. With just a few budget-friendly changes, you can invite positive energy, or "Chi," into your home and make it a calming, welcoming space. Clear The Clutter The first and easiest Feng Shui tip: declutter! It’s amazing how much difference a tidy room can make. When you get rid of the excess, you’re not only creating physical space, but you're also allowing the energy to flow freely. Take a walk around your home and ask yourself: Do I really need this? Less clutter equals more clarity and positive energy. Maximize Natural Light Good lighting is key to great Feng Shui. Natural light boosts the energy in any room, so open up those curtains and let the sunlight pour in. If you’re working in a space that doesn’t get much natural light, don’t worry. You can place mirrors strategically to reflect and amplify what little sunlight you have. Mirrors are like energy boosters! Bring in Some Green Plants are a staple in Feng Shui. They not only clean the air but also represent life, growth, and vitality. Even a small potted plant can make a huge difference. If you’re not exactly a plant person (hello, brown thumbs!), opt for easy-to-care-for plants like succulents or snake plants. And don’t worry; artificial plants can also work if they look realistic. Use Soft, Calming Colors You don’t need to repaint your entire house to improve the flow of energy. Start by adding calming colors like soft greens, blues, or neutrals in small touches, think cushions, throws, or wall art. These tones promote peace and relaxation, which is exactly what you want in a balanced space. Arrange Furniture With Intention Did you know that where you place your furniture can affect the energy in a room? Try to arrange your furniture so that you can see the door from where you’re sitting or sleeping. It promotes a feeling of safety and control. Plus, don’t block pathways with furniture, as it interrupts the flow of energy. Ready to try it out? Let Feng Shui transform your space! Improve Your Living Space! Investing in your home and interior design is essential to ensure that you are content with your living space. This is something you can do by implementing a few hacks here and there. Take your time to go through them and add them to your space one at a time. Transformation is a gradual process which means you’ll need to keep at it until you get to your desired outcome. Read Also: How To Increase The Value Of Your Home Important Things to Know Before Starting a Home Improvement Project Home Sweet Home Improvement: How to Find the Best Home Improvement Loans
READ MOREDetails
How Can I Incorporate Gadgets Into My Interior Design?
There are many options that you can choose from if you are looking to decorate your room based on your preferences. You can choose more mundane products like posters, figurines, decals, and many more that are available on the market. With that said, you can now use gadgets for much the same thing thanks to the emphasis on gorgeous designs. Some electronic products are made with beauty and grace in mind. This is to complement your room's aesthetic, while upping the technology game. With gadgets becoming such a big part of everyday life, it’s only natural that they would evolve in function, as well. These days, you can count on smartphone makers to spend a lot of money on designing their products to perfect detail. There has been a huge emphasis on making smartphones and other electronics beautiful to look at, as well. This means that you can use gadgets to make any room seem more stylish without losing function. LED Frames The great thing about LED is that it has so many unexplored applications in terms of decorations for most people. In terms of decorations, you can use them to literally light up any photo or image you might have on display. This includes family pictures, paintings, sketches, and even printable. This will then help establish your personality in the things you display and what you want everyone else to notice. It’s also worth noting that these LED frames can come in any color and with any setting, like Christmas lights. They can blink, cycle, spell words, or form certain shapes that would add more substance to the item being framed. This would then go a long way toward catching even more attention and injecting some merriment into the room. These LED frames can be purchased from stores or ordered online as is, or you could have them customized, too. Stylish Screens Screens are often thought of as a means of watching videos, playing games, or working with various computer programs. This is not wrong, per se, but screens have also undergone quite an evolution over the years in terms of design. Many of them have become sleeker, more stylish, and, best of all, more eye-catching when displayed alongside other gadgets. This is the ultimate expression of the fusion of both function and fashion in a clear and tangible manner. Now, these screens can take on many forms, including computer monitors, flatscreen TVs, and commercial video display units. They can play different media files while they are not in use, such as screensavers, looping video files, and more. This is one of the most effective and most common ways that gadgets are used for decoration. Imagine a huge screen that spans a wall and features crackling flames and see if it doesn’t inspire you. Neon Lighting A lot of rooms have neon lighting and for good reason, since they are some of the most attention-grabbing implements. You will find them among commercial districts, blaring invitations to dine or take part in their services. In the case of decorations, you will appreciate the amount of interest that they can draw from others. The best part is that you can make them into literally anything you could imagine, from names to entire landscapes. If you are looking for some neat neon sign ideas to base your own decor on, there are plenty available. You can find them on the web via photo-sharing platforms and video streaming sites like YouTube or Instagram. Once you get inspiration for your own neon light decor, you can have them customized via specialized service providers. However, it would be best to make sure that you choose the right sizes relative to the space in your room. Fashionable Accessories And Gear Who would have thought that something as simple as a keyboard could be stylish, but they can be bought? You will find accessories and gear in the market that were made for the specific purpose of looking good. At the same time, they are also functional in that you can use them for their intended purpose. This goes for a mouse, speakers, controllers, cooling fans, and many more that you can find on the web. Then, there are the various other appliances, gear, and novelty items that you can order or even get customized. Fans, coolers, humidifiers, lamps, and so many others are available in stylish, ultramodern designs that will enhance your room’s sophisticated air. It would be advisable, however, to keep things minimalist as much as you can to maintain neatness. It’s important that you don’t put too much clutter in the room that can distract you from the main attractions. Thin, Minimalist Laptops And Tablets Laptops come in all shapes and sizes, with some models being as small as an iPad or as big as a suitcase. These are worth decorating your room with if you are aiming for a more modern style. Gadgets are now a part of everyday life, and tablets, laptops, computers, and smartphones are intrinsic to how society functions. If you are going to get them anyway, you might as well get the ones that add to your room’s elegance. Choosing this route would also complement a minimalist theme for your interior, where everything is simplistic and has neat tones. The idea is to make the room less cluttered and more organized but with a hint of grace and poise. More Digital Aesthetic To Add Let’s check out some more cool gadget options to spruce up your room! The sky is the limit, and gadgetry has gone to a whole new level in not just functionality but in style as well. Smart Mirrors Who knew mirrors could use some sprucing up? Smart mirrors are a great chance to infuse tech with class in your room. Visualize a classically posh mirror on your wall that can not only show how you look but give you details about the weather, time or even your plans for the day! Believe it or not, some of these get built with lights for those flawless selfies and make up routines. Literally form meeting function at its finest. Floating Speakers Yes, you read that right! Floating speakers are a fun and futuristic way to play your favorite music while adding a unique twist to your room decor. These speakers use magnetic levitation, making them hover in mid-air, and instantly drawing everyone’s attention. And they don’t just look good. Trust us when we say that these floating sound systems sound amazing too! Ambient Lighting Lighting that sets the vibe of the space you’re in is something that’s always been popular. LED lights have already proven their staying power, but ambient lighting with smart bulbs or light strips takes it to another level. You can change colors, brightness, and even patterns all from an app on your phone. Want a relaxing feel? Do it right from your bed. Want a party room? Go crazy! So much easier and better than changing out the colors of different colored light bulbs. Wireless Charging Wireless charging has been around for some time now, but not as easily accessible as it is today and not through matching technology centers with USB plugs built in without paying custom prices for everything. These stations are sleek gadgets that do double duty, adding style and convenience to your room. They come in all shapes and sizes, some even sleek pad or stands that fit right into your decor. Plus, you just put your phone or other device on it an bam! they start to charge. Another use for this if you work at a desk is they can serve as one of those really cool desk accessories and keep your area clean. Read Also: Your own space: decor ideas for your private place to relax How to Make your Home Look Beautiful in the Upcoming Holidays Here Are A few Of The Benefits Of The LED Strip Lights How To Increase The Value Of Your Home
READ MOREDetails
How to Improve Your Living Conditions in a Small Living Space
Living in a small space requires you to be innovative and well equipped to ensure that you have a comfortable place to stay. There are a lot of things you can do to make this happen. However, to ensure that you make the most of your space, you need to avoid adding clutter to your house. If you are going to add anything to your space, ensure that you get some items out of your house that you don't need. This is essential given that if you were to clutter your space, your goal to improve your space wouldn't be realized. Once you have your system for keeping clutter out, here are a few things to consider for improving your living conditions, including choosing a wooden sofa set that offers both functionality and style without overwhelming the room Invest in the Right Furniture: Furniture is one of the most important home additions especially when it comes to improving your living conditions. When working with a small space, your furniture choices are very crucial. You need to consider how they'll fit into your space. Since this is a small living space, consider going with medium or small-sized furniture that is not too bulky. This will help you ensure that you use your space well without taking up too much space. Additionally, you should consider using alternative seating options like floor pillows and ottoman. This will also help you improve your living conditions. Tweak Your Lighting: When it comes to small spaces, you need to ensure that you invest in bright lighting options. These lighting options will help illuminate your space and make it feel bigger than it is. Adding light will incredibly improve your living conditions and allow you to enjoy your small space. This can be achieved by adding more or brighter light Fixtures. The best part about this is that you have a lot of options to consider. You could invest in led lights that you can dim or make brighter when you need to. Add Mirrors: Mirrors are important and can be used in different parts of the house to add character to your space. When working with small spaces mirrors help make your room look bigger and enhance your living conditions. The best way to ensure that you get the best out of this is by investing in larger mirrors. These mirrors will work great for your living room and bedroom. Diversify Your Storage Options: When it comes to small spaces, storage is one of the things that prove to be quite tricky. Without enough storage, you find that your space becomes cluttered and doesn't result in better living conditions. This is why you need to reconsider your storage options. Make use of your high ceilings and the empty spaces on your walls. Install cabinets and shelves that will help you take advantage of this space and get some extra storage space. This will significantly improve your living conditions while in the small spaces. Go with Light Wall Colors: There are different ways to improve your wall spaces and make your room more lively. One of them is incorporating warm wall colors on your wall. This is a great way to ensure that you improve your living conditions. You could consider going with pure white on your walls or warmer colors. With this, you can be sure that your small space can accommodate you. Improve Your Home’s Air Quality: Air quality in the home is one of the things that gets forgotten when working on improving your living conditions. Given that you are working with a small space, you need to ensure that you pay attention to this. You don't have as much space for air circulation as you would in a larger space. To make working with better air quality in your space, consider using air purifiers. They will help you ensure that your space has amazing air circulation throughout. If you're in the market for quality air purifiers, check out Hisoair.com to get the best deals. Add Decor and Greenery: Adding decor to any space is a great way to add character and improve the overall conditions of the space. With this in mind, you should consider investing in decor items. Decor items will vary depending on your personal preference and the style you are going for in your home. Additionally, adding greenery is also a good way to ensure that you improve the conditions in your home. Invest in indoor plants that are either real or faux depending on the commitment you are willing to put in. Remember real plants will require regular weeding and watering while faux plants are not as demanding. Incorporate Some Texture: When adding texture into your home, you have different options to consider. You have the option of going with area rugs, pillow covers, and throw blankets to achieve this. Adding texture into your home will give it character and improve your small space significantly. Additionally, consider adding some patterns as well to add to your space. Multi-Functional Furniture for Maximum Efficiency When you’re working with limited space, multi-functional furniture is a must. Get a sofa bed, and you’ll have somewhere comfy to sit during the day that also doubles as a guest (or your) bed at night! The best two for one when it comes to furniture? Or maybe an ottoman with storage so you can hide blankets, books, or anything else you want out of sight. Tables and desks that fold away or extend only when needed are another great way to save some space. Think About Room Dividers Does your living room feel like it’s in your bedroom or maybe your kitchen? Or does it feel like a mixture of all three with too much hoarded furniture? This is why I ordered room dividers! In such a small space, I needed one room to feel separate. So, if you have a bookshelf, you can even find a room divider somewhere. We justify the use of whatever type of solution to the problem that can make certain places within the studio apartment feel not as squished. Whether it is a proper divider, long curtains, or just a bookshelf, whatever feels better! Stay Organized with Vertical Solutions How much wall space do you have? If you’re not using your walls, you could be missing out on some great storage opportunities. Floating shelves or hooks can keep things off of the floor and out of the way. Maybe your kitchen needs an easy storage fix. So, why not try some hanging shelves for spices or mugs? Or, if your counter always seems to be cluttered in the bathroom, add shelves above your sink or toilet. What room do you think this would work best in? Utilizing wall space will save floor space and keep everything organized with a modern look. Try these tiny home fixes and upgrades, and you'll see that even the smallest dwelling can feel spacious, comfortable, and all yours. You can Manage It! Living in a small space can be a bit complicated given that you don’t have a lot of space to work with. However, this doesn’t mean that you should live in a cluttered space just because you live in a small space. This is why you need to invest in additions that will help improve your living space. They will help you improve your living conditions and enjoy your small living space. Take your time to incorporate these aspects into your home with ease. Read Also: How To Increase The Value Of Your Home How You Can Choose the Ideal Ceiling Light for Your Living Area Unique Furniture to Transform Your Home The New Trend: Drawer Boxes
READ MOREDetails
3 Home Upgrades to Make Your Property Unique
Your home is one of the most valuable things you’ll ever buy. Whether you plan to stay long-term or sell soon, making your property unique is worth considering by Home Upgrades. While upgrading the kitchen or bathroom adds value, it won't always attract attention. These basic changes may not transform your lifestyle. That’s why we’re exploring clever ways to make your home the talk of the town. Invest in Fun and Relaxation: Having the most modern kitchen or bathroom on the block is great, but it doesn’t make your home much different from any other on your street. On the other hand, investing in the things you enjoy the most could be a great way to make your home stand out, and improve your lifestyle at the same time. For instance, if you’re the kind of person who loves movies, why not turn a spare room or basement into an entertainment center for you and your friends. If you love taking trips to the spa with your loved ones, why not invest in having your own luxury spa experience at home, by installing your own sauna or hot tub. It might seem indulgent at first, but this is one of the best ways to ensure that you get the house of your dreams, and it could mean that you could sell your property for more too. Spend on Long-Term Convenience: Have you ever considered installing awe-inspiring residential elevators into your home? Many people assume that they should only begin thinking about a home elevator when they’re getting older or having trouble with their mobility. However, these investments can also make it much easier to get around the house and move things between floors too. You can carry huge amounts of shopping and laundry up and down stairs without having to worry about hurting your back or dropping things along the way. What’s more, as you do get a little older, you’ll find that having your own home elevator protects you from a range of accidents. All that, and you’ve got a fantastic way to make your home stand out. Experiment with Tech: These days, we're all adding more technology to our homes. Smart speakers and AI-enhanced devices are becoming more common. If you want to join the tech revolution, consider upgrads your home’s tech solutions. One option could be a security system with facial recognition or biometric scanning. Forget about keys that are easy to lose. Another option is smart lighting and entertainment systems controlled by your smartphone or voice. The number of smart home upgrades is increasing every day. Home Office Enhancements: Elevate Your Remote Work Experience With remote work becoming the norm, transforming your home office into a functional and appealing workspace is essential. While many focus on basic furniture, upgrading your home office can significantly boost productivity and comfort. Here’s how to make your home office more effective and enjoyable. Ergonomic Furniture: Comfort Meets Functionality The foundation of a great home office is ergonomic furniture. Start with a high-quality, adjustable office chair. Look for one with lumbar support to reduce back strain during long workdays. An ergonomic chair promotes good posture and helps avoid discomfort. Next, invest in a desk that suits your needs. Whether you prefer a standing desk or a traditional setup, ensure it’s the right height and provides ample space for your work essentials. Adjustable desks offer flexibility, allowing you to switch between sitting and standing throughout the day, which can improve your overall health and comfort. Soundproofing: Create a Quiet Work Environment Noise can be a significant distraction, especially if you live in a bustling household. Soundproofing your home office can enhance concentration and productivity. Start by adding acoustic panels to the walls. These panels absorb sound and reduce echoes, creating a quieter space. Consider using a white noise machine or noise-canceling headphones to further block out background noise. Heavy curtains or blinds can also help minimize outside disturbances. If possible, choose a room away from high-traffic areas to create a more serene work environment. Tech Integrations: Upgrade Your Workspace Modern technology can greatly enhance your home office experience. Begin with a high-quality monitor or dual monitors to expand your workspace and reduce eye strain. Ergonomic monitor stands or adjustable arms can help you position your screens at the right height and angle. This is also known to increase the overall productivity of your day. Upgrade your keyboard and mouse to ergonomic models designed to reduce strain. Consider investing in a docking station to keep your workspace tidy and streamline connections between your laptop and peripherals. Smart home technology can also be a game-changer. Use voice-controlled assistants to manage your schedule, set reminders, or control smart lighting. Adjustable lighting is crucial; choose a desk lamp with customizable brightness to reduce eye strain and enhance focus. Personal Touches: Make It Your Own Finally, personalize your home office to make it a space you enjoy spending time in. Add some artwork, plants, or personal items that inspire you. A well-decorated workspace not only boosts your mood but also makes working from home more enjoyable. In conclusion, upgrading your home office involves more than just buying new furniture. By investing in ergonomic pieces, soundproofing, and advanced tech, you can create a workspace that enhances both productivity and comfort. Read Also: Home Remodeling Tips 3 Trendy Lighting Ideas for Your Kitchen Island Small Kitchen Storage Ideas Top 5 Trending Home Renovation Ideas For Australian Families
READ MOREDetails
Amazing Homemade Inventions For You To Try In 2021
Disclaimer: This is a paid advertisement done by Diamond Bloggers. Are you interested in trying new things at home? If yes, you must know the ways properly to get the required response for your homemade renovations and inventions. You must ensure that you must develop your mind so that you can accept the new changes at your end. Fortunately, we have the best gadgets in the world that can help you achieve your goals better. Homemade innovations can make your life easier. It can help you to make your work more comfortable than before. You must make your efforts to innovate new things in such a way that they can fulfill your requirements. Fantastic Home Made Renovations You Can Try In 2021 There are several homemade renovations that you can try in 2021 are illustrated in this article. You can try these innovative ideas to make things comfortable for you. Therefore, let’s find out the facts to get a better insight into it. 1. Finger Guard You can use the finger guard to chop the onion and save your fingers from any kind of accident at the time of onion cutting. It will help you to increase the chances of your safety to a great extent. The Davison invention can be of great help in this regard. Just do not use the finger guard to chop the onions while your face is full of tears due to the onion effect. You can avoid accidents to a great extent. If you want to develop your cooking experience, can help you use the finger guard to get things done to a great extent. 2. Bottle Opener Remote It can be a practical innovation that you can use when you do not want to miss an epic match from your end. The sip of a cold chilled beer that you must look into your freezer. It will help you to make your enjoyment remain uninterrupted. Make things creatively that can help you to make your life easier. Ensure that you have made your choices and the sense of your creativity to another level for making your daily life comfortable and easier. Ensure that your innovative thought process has made significant changes to your life. 3. Self Locking Bendy Bike You do not have to carry the rusted metal chain everywhere when trying to self lock your chain. The self-locking bending bike can help you keep your bike safe and is interlocked when you do or want to carry a different locking system with yourself. Ensure that you have made things right from your end. Selection of the innovation can make your life comfortable than before. You must not make wrong choices from your end, for which you have to pay heavily later. 4. Gum Packaging With Built In Garbage Compartment The gum packaging with an inbuild garbage compartment will help you to make sure that you have chosen the right place for your garbage disposal from your end. Small innovation can make big changes to your life. Your thought process here matters a lot. If you want to make significant changes to your life, you must make things happen. You must think out of the box to get things done on time. You must not make wrong choices in this regard. The more you can think proactively, the better innovative ideas you can generate from your end. 5. Suitcase Scooter Suppose you are traveling to long-distance places and you need to carry heavy luggage with you. At this time, you need to have a suitcase scooter that can help you to carry your luggage quickly from one place to another. Your creative thought process can help you to achieve your desired objectives in a better manner. Just you need to hop with your suitcase from one place to another with this new technology to reach the destination on time. Conclusion Hence, if you are searching for the best innovative ideas that can make your homemade task more comfortable, the above ways can help you achieve it. It will make things much more comfortable than ever. You must be prepared to accept the innovations from your end to get the desired results you want from your end. Make sure that you have selected the right innovative ideas from your end. More Resources: The Best Multi-Tools for Woodworkers –Top Awesome Inventions. Tips to Choose the Best Inventory Management Software. New Technology in Business: 4 Inventions in 2019 That Are Changing the Game.
READ MOREDetailsPopular

Technologies For Creating A Startup Idea
20 Feb 2023

How to Download Facebook Videos on Android?
07 Feb 2019

7 Rules of Effective Ecommerce Web Design
28 Jan 2021

Why Are Online Transactions Convenient?
07 Dec 2023
