How to Install a Fabric Expansion Joint

Published on: 15 January 2022 Last Updated on: 05 February 2025
Fabric Expansion Joint

A fabric expansion joint is a metal device that attaches to your ceiling above the door frame and expands into the attic. It’s then used as part of a roof venting system that reduces condensation. The installation process requires you to drill holes in the rafters and use a special shrink tube to seal the seams from inside and outside.

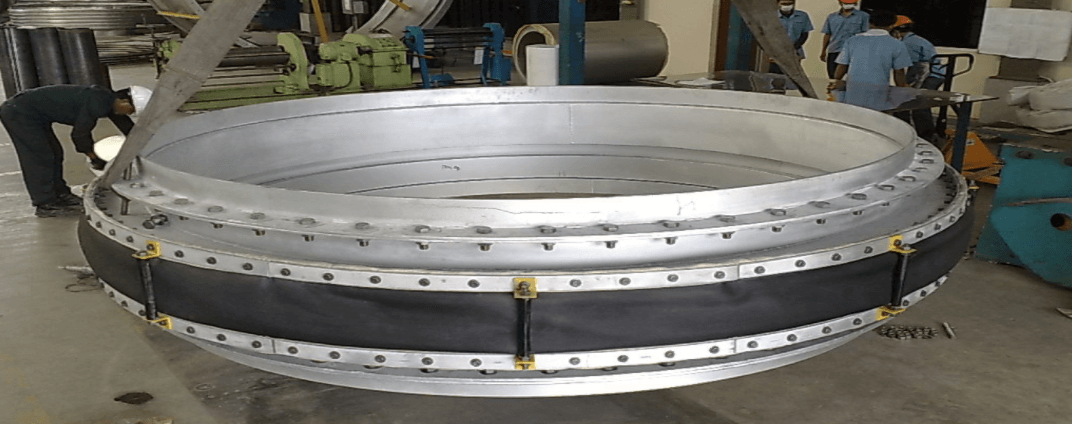
What is a Fabric Expansion Joint?

A fabric expansion joint is a metal device that attaches to your ceiling above the door frame and expands into the attic. It’s then used as part of a roof venting system that reduces condensation. The installation process of a fabric expansion joint requires you to drill holes in the rafters and use a special shrink tube to seal the seams from inside and outside.

The main benefit of installing a fabric expansion joint is that it allows for higher ventilation rates, which can result in lower humidity levels in your attic. This is especially helpful during times when people are prone to developing asthma symptoms due to high humidity levels.

Additionally, with this option, you will also be able to install ductwork without having any openings visible from the outside of your home. And of course, there’s no need for any work on your roof or chimney as well!

Installation Process

The installation process is pretty straightforward and doesn’t require a lot of skill. If you’re handy with tools, it should be relatively easy to do.

First, you’ll need to remove the old venting system and install the new fabric expansion joint. Then, you’ll need to cut holes in the ceiling rafters and use a special shrink tube to seal the seams from inside and outside. Once your fabric expansion joint is installed, you can finally attach your fabric expansion joint.

The entire process should only take about an hour or two.

How to Install a Metal Roof Vent

If you’re a homeowner who wants to install a metal roof vent, you’ll need to gain access to the attic space and remove some of your existing roofs covering. This includes removing the rafters, which could be difficult and costly if they’re not accessible from the inside.

To make it easier on yourself when installing a metal roof vent, here are some tips for how to go about it:

  • Get help with this task. It can be very difficult to get up on top of your roof without any assistance, so be sure that someone with experience is available to help you out.
  • If possible, use a ladder instead of climbing up on top of your house’s roof. This will make it much more comfortable and less dangerous.
  • Use wood shims or spacers to support the rafter while you drill holes in the ceiling above them. You can also use these shims underneath the vent where it meets the frame to create an airtight seal between the two components.

Conclusion

That’s a wrap!

If you’re installing a metal roof vent, or a fabric expansion joint, you’ll need to find a way to secure the vent to the roof. You’ll need to find a way to secure the vent to the wall as well. There are a few options available: screws, nails, glue, wire, or screws and nails. If you have access to the roof from the exterior, use screws and nails. If you have access to the roof from the interior of your home, use screws and glue. If you have limited access to the roof, use wire or screws and nails.

Read Also:

Content Rally wrapped around an online publication where you can publish your own intellectuals. It is a publishing platform designed to make great stories by content creators. This is your era, your place to be online. So come forward share your views, thoughts and ideas via Content Rally.

View all posts

Leave a Reply

Your email address will not be published. Required fields are marked *

Related

Homemade Inventions

Amazing Homemade Inventions For You To Try In 2021

                           Disclaimer: This is a paid advertisement done by Diamond Bloggers. Are you interested in trying new things at home? If yes, you must know the ways properly to get the required response for your homemade renovations and inventions. You must ensure that you must develop your mind so that you can accept the new changes at your end. Fortunately, we have the best gadgets in the world that can help you achieve your goals better. Homemade innovations can make your life easier. It can help you to make your work more comfortable than before. You must make your efforts to innovate new things in such a way that they can fulfill your requirements. Fantastic Home Made Renovations You Can Try In 2021 There are several homemade renovations that you can try in 2021 are illustrated in this article. You can try these innovative ideas to make things comfortable for you. Therefore, let’s find out the facts to get a better insight into it. 1. Finger Guard   You can use the finger guard to chop the onion and save your fingers from any kind of accident at the time of onion cutting. It will help you to increase the chances of your safety to a great extent. The Davison invention can be of great help in this regard. Just do not use the finger guard to chop the onions while your face is full of tears due to the onion effect. You can avoid accidents to a great extent. If you want to develop your cooking experience, can help you use the finger guard to get things done to a great extent. 2.  Bottle Opener Remote   It can be a practical innovation that you can use when you do not want to miss an epic match from your end. The sip of a cold chilled beer that you must look into your freezer. It will help you to make your enjoyment remain uninterrupted. Make things creatively that can help you to make your life easier. Ensure that you have made your choices and the sense of your creativity to another level for making your daily life comfortable and easier. Ensure that your innovative thought process has made significant changes to your life. 3. Self Locking Bendy Bike   You do not have to carry the rusted metal chain everywhere when trying to self lock your chain. The self-locking bending bike can help you keep your bike safe and is interlocked when you do or want to carry a different locking system with yourself. Ensure that you have made things right from your end. Selection of the innovation can make your life comfortable than before. You must not make wrong choices from your end, for which you have to pay heavily later. 4.  Gum Packaging With Built In Garbage Compartment  The gum packaging with an inbuild garbage compartment will help you to make sure that you have chosen the right place for your garbage disposal from your end.  Small innovation can make big changes to your life. Your thought process here matters a lot. If you want to make significant changes to your life, you must make things happen. You must think out of the box to get things done on time. You must not make wrong choices in this regard. The more you can think proactively, the better innovative ideas you can generate from your end. 5. Suitcase Scooter Suppose you are traveling to long-distance places and you need to carry heavy luggage with you. At this time, you need to have a suitcase scooter that can help you to carry your luggage quickly from one place to another. Your creative thought process can help you to achieve your desired objectives in a better manner. Just you need to hop with your suitcase from one place to another with this new technology to reach the destination on time. Conclusion Hence, if you are searching for the best innovative ideas that can make your homemade task more comfortable, the above ways can help you achieve it. It will make things much more comfortable than ever.  You must be prepared to accept the innovations from your end to get the desired results you want from your end. Make sure that you have selected the right innovative ideas from your end. More Resources: The Best Multi-Tools for Woodworkers –Top Awesome Inventions. Tips to Choose the Best Inventory Management Software. New Technology in Business: 4 Inventions in 2019 That Are Changing the Game.

READ MOREDetails
Emergency Moving Process

7 Helpful Tips During an Emergency Moving Process

Are you finding yourself in a tight crunch to move quickly? Are you worried about making sure that everything that is involved with moving gets done in a short amount of time? There is a multitude of reasons why you may need to move out of your current residence quickly. The emergency moving process is not that simple as it seems to be. Whatever your reason is for scheduling an emergency move, you are probably feeling stressed and overwhelmed. There is so much that needs to be done to get ready to move that it can be hard to know where to begin. Below, we have seven tips to help you get ready to go! Different Ways You Can Work On Emergency Moving Process     There are multiple ways you can work on the emergency moving process whenever you are looking for a moving company. Work out the plans that can work well in your favor. Secure the Services of a Top-Notch Moving Company or Furniture Removalists Since time is limited, you are not going to want to waste any time before finding a reliable moving company. Make this the first item on your list so you can be sure to secure movers for your moving date. When you are looking for a moving company, be sure to find one that will treat your items with care. You don't want to sacrifice quality just because you are short on time. It would be a shame to get to your new home and have dinged furniture, broken items, or dirty boxes. Do some research and find a dependable moving company with positive reviews. You want to be able to trust the people who are carrying all your possessions. If you are looking for a company that will be available at the last minute for an emergency move, call Platinum Furniture Removalists Caloundra. They will help you when you are in a pinch. Plus, they are experienced movers who will take good care of your belongings. They even have options for the temporary storage of your belongings if you won't be moving directly to your new residence. Purchasing Packing Supplies: After you have secured your moving company, it is time to start getting everything ready to pack. The first thing you'll need to do is to purchase packing supplies. Be sure to get enough supplies so you don't have to waste time making a second trip to the store to pick up extras. You will want to pick up plenty of boxes in different sizes, packing tape, scissors, bubble wrap, packing paper, and markers. Check with your moving company to see if they provide quilted pads to protect your furniture and plastic wrap to secure drawers. If they don't provide these items, then you'll want to pick them up too. Declutter: Before you just start throwing everything in boxes, take a little time and see if there are any items you can get rid of. The less you pack, the less there will be to move and to unpack at the other end. Look for broken items or obvious trash that can be thrown away. Look through your belongings for items you don't use anymore. Consider donating some of these items. When you are unpacking at your new destination, you will be so glad that you got rid of unwanted items before you packed. You'll be able to just focus o putting your belongings away and organizing your new space, instead of trying to sort through everything. Emergency moving process can work well in your favor. Get Packing! Once you have decluttered, it is time to start packing! Even though time is tight, do your best to stay organized as you pack. If you just throw items in boxes, unpacking will be a true nightmare. Work in one room at a time and pack items from that room in the same boxes. Be sure to label your boxes so it is easier to direct the movers where to put them in your new location. If you can, try to take a quick inventory of your boxes so you know what you have. Be especially sure that you know where any items of value (either monetary or sentimental) are. If it makes you more comfortable, you may want to pack these items separately and transport them with you instead of with the movers. Set Aside a Few Days' Worth of Essentials: When you are packing boxes, be sure to set aside enough clothing to last you until you'll have time to unpack. You will also want to make sure you have toiletries, medications, or other items you need every day where you'll be able to easily access them. Consider packing these essentials in a suitcase or duffel bag so you'll always have easy access to these items. When you have a separate bag with essentials and enough clothing to last a while, it will alleviate some of the pressure to unpack immediately at your new home. Plus, if anything unforeseen happens to the movers or your belongings causing a delivery delay, you'll be covered. You have to count on the Emergency process that can work well in your favor. Utilize Wardrobe Boxes for Your Clothing: Using wardrobe boxes to pack hanging clothing items is a big time saver. You don't have to waste time taking your items off the hangers, folding them, and putting them in a box. Instead, you can simply take the hangers out of the closet and hang them on the bar going across the top of the wardrobe box. Then, you'll just need to seal the box and label it! Plus, using wardrobe boxes will make unpacking easier too, since you'll just have to remove the items from the boxes and hang them up in your new closets. Plan for Moving Day: Lastly, you'll want to make sure you have a plan in place for the big moving day. Find out what time your movers will be arriving so you're ready for them. Also, if you have any children or pets, be sure to have a plan for them. Will they be staying with you as you move, or will a friend or family member be watching them for the day? You will also want to plan out your meals for moving day. Consider packing a lunch so that you can grab it whenever you get hungry, regardless of where you are. That way, you won't have to worry about having access to a stove or microwave to cook something. You also won't have to worry about trying to schedule a food delivery with all the chaos that happens on moving day. An emergency move can be overwhelming, but when you have a good plan in place, your move should go smoothly! Final Take Away  The emergency moving process can make things possible in your favor while you want to develop your shifting process in a better way. Do make some research regarding the selection of the Emergency moving process. Work out the plans that can work well in your favor. Do not make your choices in the wrong direction. There are several factors you have to make sure while you want to improve your business in the right direction. Read Also: The Five Most Important Things To Know Before Moving Moving Home Checklist: What You Need To Know Moving To Another Country Alone: How It Can Change Your Life The Ultimate Moving Checklist – Things You Need To Do When Moving

READ MOREDetails
driveway

Is Asphalt Pavement Expensive?

Asphalt is the common driveway paving option since it’s suitable for any climate. Besides, asphalt has several advantages over other paving options like concrete, bricks, and other paving materials. The color and durability of asphalt allow it to stand up to any weather. Moreover, it’s easier to maintain asphalt than gravel and is cheaper than concrete or brick driveway. Also, asphalt provides a safe walking and driving surface, with very little keep up—and that’s why most homeowners choose this option. And, since the process of installing an asphalt pavement requires specific equipment and lots of labor, it should be done by an experienced asphalt professional. With that said, one might be wondering, is asphalt pavement expensive? Well, the cost of your asphalt pavement maintenance and installation will entirely depend on several factors. And when planning to install an asphalt driveway, you need to gather all the important details, as this allows you to make the best practical and financial decisions for your project. 1. But first, how much does an asphalt pavement cost? The average cost of installing an asphalt pavement is $4,737—with a range of $2,900 - $6,600. It will cost you around $7 - $13 per square foot to install an asphalt pavement. This cost is inclusive of labor and material costs. However, if you want to replace your asphalt pavement, it will cost you around $8 - $15 per square foot. Now, since you understand the average cost of installing an asphalt pavement, what factors affect the overall cost of asphalt pavement? 2. Size of the project The larger the area of the asphalt pavement, the higher the cost. This is because more material needs to be used in servicing a large size compared to a small one. Additionally, as explained above, asphalt comes with various benefits that make it suitable for any climate and weather conditions. For this reason, most people decide to pave their entire driveway, which is why more material needs to be used on such a project, hence increasing its overall cost. But on average, you can expect to spend around $8 - $15 per square foot if your asphalt pavement installation includes replacement services like resurfacing or overlaying your existing road surface. An overlay involves applying hot mix asphalt over the current gravel and crushed stone, whereas resurfacing involves the use of a brand new layer of hot mix asphalt over an existing road surface. This is done to create a more durable and smoother road surface for better traction and long-term protection against any damage or corrosion. 3. Type or quality of aggregate used Different types of aggregates are typically used in the construction of the pavement. The most commonly used type is crushed stone, which can be further classified into coarse, fine, very fine, and superfine. A standard-sized aggregate that measures ½” - ¾” will cost around $7 - $8 per ton. Costs are higher when using finer grades. Furthermore, you need to ensure that the ordered material is suitable for the pavement you want to create. For example, some aggregates are ideal for use in warmer climates, while some are better suited for colder climates. This is because they’re either more durable or cheaper than others which may be needed depending on the climate. 4. The difficulty of the project Asphalt pavement costs vary depending on their levels of difficulty. For instance, asphalt pavement cost will go up (or down) if it’s large in size or area; has an unusual shape; has a complicated design; and requires more complex installations like curbs, drainage systems, etc. Additionally, some factors affect the overall cost of asphalt pavement installation, such as: Your location Accessibility to materials Weather conditions Time constraints (i.e., working hours) 5. Labor cost According to the experts from CSG Sealcoating, Tampa, most contractors factor in labor costs in their estimate since they determine how much money should be charged for equipment, fuel, and the number of workers needed to complete the job. If you hire a contractor who employs more workers, your cost will decrease. Likewise, if you choose to work with one that uses less labor, your price will be higher.  6. Location of where asphalt pavement is located This is an important factor in determining how much asphalt pavement costs because location affects many things such as transportation costs (i.e., getting materials from quarries or mines), fueling expenses, and worker wages. 7. Asphalt pavement maintenance costs The cost of asphalt maintenance can vary depending on the quality of the material used for paving your driveway, parking lot, or highway. For example, if you choose to go with a low-quality asphalt product, you need to spend more money on repairs every few years, which means that your overall expense is higher than when you use top-quality pavers. 8. Experience of the contractors The contractors’ experience is one thing that will determine how much money you should spend on contracting services like resurfacing or overlay. A contractor that charges less than the average price may not necessarily mean that they’re offering a great deal since they often don’t know how to do the job properly. However, there may be times when you can find a contractor that charges less than $3 per square yard but is still able to give you the quality work results that you want. Read Also: Best Uses for Stainless Steel in Construction Waterjet Vs. Laser Cutting: Which Is Worth The Hype? Waterjet Vs. Laser Cutting: Which Is Worth The Hype?

READ MOREDetails