Published on: 23 April 2021
Last Updated on: 31 December 2024
Are you looking for the most roof care tips? Here you will learn about roof care tips including, repair, installation, and maintenance. Although your roof may be designed to protect your home for long years (say 10-15 years), you need to inspect your roof every year. It will help you remain calm and relax that you are living under a safe roof.
In this article, you will learn some valuable tips from the Minnesota roofing company. These tips ensure the safety and comfort of your home.
Roofing Tips
You can apply the following tips on your own. However, you may need expert assistance or hire a roofing agency like A to Z Construction to repair your roof.
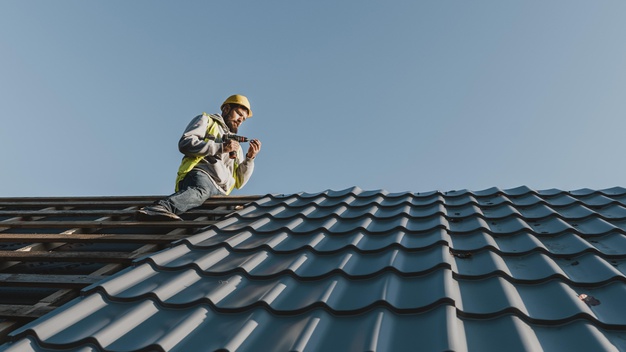
Think About Your Safety First
Whenever you find that there is a leak on your roof, don’t rust to find it out. Being on the roof when it is raining is not the right way. It can be dangerous to walk on the roof to find a leak while raining, or there is ice buildup on your roof.
Have patience and wait until the rain stops. A temporary fix if the leak is not a solution; keep in mind that there is no quick fix for a roof leak. So, you shouldn’t meddle on the roof as soon as a leak happens. Think about your safety and take precautions before you go to spot the leak.
Wear a rubber shoe when you’re going to find a leak on your roof.
Don’t work alone; take help from a buddy when you’re on the roof.
Clean Gutters and Spray the Roof
Usually, gutters are a common reason for a leak. If your gutters are not clean and clogged with leaves and debris, that can be a reason for leaks during rain. So, you should first clear the gutters.
The next step is to spray various areas of the roof to locate the leak. You can spray water on your roof with your garden hose. If it’s winter, though, you shouldn’t spray water. Since it’s not safe to spray water on your roof when it’s freezing outside, you can wait until the winter is over.
Prevent Ice Buildup
Ice buildup is a common problem in the wintertime. You cannot do anything about the ice buildup in the exterior area, such as the roof membrane, gutter, and shingles. However, you can prevent ice buildup in the interior.
For that, you should use ice and rain shields along with proper ventilation. Ice buildup in the interior causes drips inside your home. Also, you can use an edge drip to prevent this problem.
Fix Your Roof Boots
Another major problem for leakage is your roof boots. It’s common that we check the flash, skylights, roofs, and gutters for finding any possible leakages. Another thing that most people miss is the rubber roof boots.
So, you should also check the roof boots if there is any leak. If you find any defect in the roof boot, you can quickly fix it by purchasing a new one from a local store.
Inspect Your Roofing Material
Sometimes your roofing material and shingles can be of low quality or faulty, which may cause leakage soon. So, you should check the roofing material too. Always use good quality material on your roof. Since the roof is one of the most important parts of your home, you should use the standard quality material with high longevity.
Final Words
These are some of the common roofing tips to protect your home from leakage. However, you should consult a reputed roofing agency if you think that you cannot handle it on your own. Do proper research and ask for referrals before you choose a roofing agency.
More Resources:
Professional Roofing Services and Different Decorating Styles
Choosing the right roof for your home – Types to select from
Roofing Painting Contractor Leads: Ask Before Hiring One
Content Rally wrapped around an online publication where you can publish your own intellectuals. It is a publishing platform designed to make great stories by content creators. This is your era, your place to be online. So come forward share your views, thoughts and ideas via Content Rally.
You may not expect that it is necessary to do yard work in the winter, but it is more important than you think. Properly preparing your lawn in the beginning months of cold weather and even though snowy conditions will ensure you have the best-looking lawn come springtime. These four tools are essential in maintaining a healthy yard during the winter.
4 Essential Tools For Maintaining Your Winter Garden
When you love to spend your leisure time in front of your lawn. The maintains of your garden is quite an important task to preserve the beauty of your favorite garden. Every time seeking professional help is costly so better look at how you can maintain a garden in winter using some simple tools.
However, you need to understand that maintaining your garden during winter can be a tough affair. Not only will freezing temperatures deter you from engaging in outdoor work, but the tools and machines can become non-operational. This is why a good idea would be to engage an expert to do the needful. Tree Service Round Rock can maintain your garden during the winters and ensure that you stay safely and cozily within the warm confines of your home.
Here are the names of four tools to maintain a garden in the winter season.
1. Aerator:
Cool-season grass, which is the most common type, should be aerated in the early spring and late fall. For those of you that may not be familiar with this machine, it digs small plug-like holes out of the ground. This helps the grassroots have access to more water, nutrients, and air. The point of this is to make the roots deeper and healthier so the grass has a stronger foundation to grow.
Use this equipment on a day that the ground is slightly moist, maybe the day after rain, for the best results. It will relieve the soil from compaction that causes the roots to be starved and suffocated. Making sure your grass gets all the nutrients it needs before it is covered in snow will help it grow back better when the weather warms up.
2. Chainsaw:
Pruning your trees and bushes during the wintertime is an essential part of a healthy yard. Plants will waste too much energy trying to send nourishment to dead limbs which affect the living ones. Investing in a chainsaw would be beneficial so that you can cut down the dead branches.
If you are a seasoned expert, you will know to not only trim dead branches but also cut any that are rubbing together. Damage to the tree from the rubbing can create an entry for bugs to get inside. When it comes to finding a good quality chainsaw, get this it works! The better the quality of equipment, the less risk when it comes to the safety and wellbeing of your yard.
3. Drop Spreader:
Fertilizer is the basis for giving your lawn what it needs to look its best for next year. There are winterizing products that slowly release nitrogen during the offseason. Using a spreader makes this task time-efficient and well done. It allows you to evenly distribute the fertilizer throughout the lawn, maximizing the benefits of this product.
Putting grass seed down at the beginning of the winter can help maintain your yard as well. You will use the same drop spreader to put this down, but you’ll want to make sure you set the amount it is releasing slightly less than recommended. In doing this, you can overlap your passes, so nothing is missed, and you still have enough to do the whole yard. As a pro tip, it is encouraged to spread a thin layer of compost before laying the seed. Combining the seed and the compost keeps your grass moist and germinated during dry and cold weather.
4. Rake:
Before a snowfall, it is crucial to clear your yard of any leaves, branches, or debris. When this waste sits on your grass all winter it will cause these patches to brown or die. Simply raking every once in a while will prevent dead spots and inconsistency in height and color. Raking will also help mix in any seed or fertilizer you have laid down in the soil previously.
Something to keep in mind is to make sure you are not raking when the ground is frozen. The protective layer in the frozen blades of grass gets destroyed from the pressure of footsteps. While this will not kill the grass, it may cause it to be brown when it grows back in.
Get a leg up on those who do not know to still maintain during the winter months. Investing in these tools will ensure you have the lushest green grass on the block come spring and summertime.
Wrapping It Up:
Maintain Garden is simple when you are already having the essential tools to do the job. But the professional touch every time required. When you already have these tools your hard work related to garden maintains in the winter is becoming a much easier process. So what is your opinion? Are you going to maintain your garden on your own? Or do you seek professional help? Do not forget to share your opinion with us.
Read Also:
5 Summer Garden Maintenance Tips And Tactics You Have To Know
5 Essential Tips To Designing A Beautiful Front Yard Garden
In today's fast-paced world, accessibility is not just a luxury but a fundamental necessity.
Whether it's navigating public spaces, buildings, or even our own homes, the ability to move freely and comfortably is something many of us often take for granted. However, this seemingly simple task can present significant barriers for those with mobility challenges.
Fortunately, technological advancements have paved the way for solutions that revolutionize accessibility, with lifts emerging as a transformative tool for enhancing mobility. In their various forms, such as elevators, platform lifts, and stairlifts, lifts have become indispensable assets in modern infrastructure.
These ingenious devices offer a range of benefits, from facilitating effortless movement between different building levels to enabling access to previously inaccessible spaces. Beyond the tangible benefits of enhanced accessibility, lifts also foster a more inclusive and empathetic society.
Let us take a closer look into all the possible ways domestic lifts provide ease of mobility and champion the cause of accessibility for all.
Facilitating independent living
Lifts play a significant role in facilitating independent living by allowing individuals to navigate their living spaces and access different levels of buildings without assistance. Maintaining independence within their homes is often a primary concern for seniors and individuals with mobility challenges.
By eliminating the need to navigate stairs, these lifts allow individuals to access all levels of their homes independently, reducing reliance on caregivers or family members for assistance. For individuals with mobility issues, navigating stairs can pose significant safety risks.
Lifts mitigate these risks by providing a secure and stable means of vertical transportation. They also enable individuals to participate fully in social activities, pursue hobbies, and engage with their surroundings without feeling limited by mobility challenges.
Enhancing safety
Lifts enhance safety in various ways compared to traditional methods of vertical transportation. Lifts eliminate the need to navigate stairs, minimizing the risk of tripping, slipping, or falling. Climbing stairs can physically strain the body, leading to fatigue, muscle strain, and cardiovascular stress, especially for those with preexisting health conditions.
Lifts alleviate this strain by providing a comfortable and effortless means of vertical transportation. The lift designs also accommodate wheelchairs, mobility scooters, and other mobility aids, ensuring that individuals with disabilities can access different levels safely and comfortably without the risk of tipping over or getting stuck on stairs.
In emergency situations such as fires or earthquakes, lifts can be used to safely evacuate individuals, especially those with mobility challenges who may struggle to navigate stairs quickly.
Promoting inclusive design
Lifts are vital for promoting inclusive design by ensuring that spaces are accessible to people of all abilities, ages, and sizes. By incorporating lifts, designers create environments that everyone can access and enjoy, regardless of their physical abilities.
Lifts eliminate architectural barriers such as stairs, steps, and uneven surfaces, which can pose significant obstacles for people with mobility impairments. This removal of barriers ensures that spaces are equally accessible to everyone, promoting a sense of belonging and inclusivity.
Moreover, accessible lifts empower individuals with disabilities to move independently within built environments, preserving their autonomy and dignity. Whether it's installing a home elevator for aging homeowners or integrating platform lifts in heritage buildings, lifts can be customized to meet specific accessibility requirements while preserving the architectural integrity of the space.
Supporting leisure and recreation
Lifts support leisure and recreation by enhancing accessibility and enabling individuals with mobility challenges to participate in various activities and explore recreational spaces. Installing lifts in recreational facilities, outdoor settings, cultural places, and amusement parks allows individuals with mobility limitations to access elevated viewpoints and enjoy all amenities like everyone else.
By providing equal access to leisure and recreational spaces, lifts promote social inclusion and facilitate opportunities for people with disabilities to participate in social activities, connect with others, and build meaningful relationships.
Horizontal and vertical transportation
Lifts for houses contribute to both horizontal and vertical transportation, addressing different types of mobility needs and overcoming various barriers. Lifts are primarily designed for vertical transportation, enabling individuals to move seamlessly between different levels of buildings.
They are designed with spacious interiors, accessible controls, and audiovisual indicators to accommodate individuals with diverse mobility needs, ensuring equitable access for all users. They offer a safe and comfortable mode of transportation, equipped with safety features such as emergency brakes, interlocks, and backup power systems to ensure passenger safety during operation.
By providing a means of horizontal transportation, these lifts also empower individuals with mobility challenges to navigate their surroundings independently, promoting autonomy and freedom of movement.
Improving public transportation
Lifts play a significant role in improving public transportation by enhancing accessibility and inclusivity for a diverse population. Lifts installed in transportation hubs provide an alternative for those who cannot use stairs, ensuring everyone can enter and exit stations safely and independently.
For passengers transferring between different modes of transportation, such as from a subway to a bus or vice versa, lifts make the transition seamless. Lifts also contribute to the safety and security of passengers by providing a controlled and monitored means of vertical transportation.
Removing barriers to public transportation, lifts support the autonomy and freedom of individuals with mobility challenges, enhancing their quality of life.
Empowering employment opportunities
Lifts contribute to the environment by empowering employment opportunities and ensuring equal workplace access for individuals with disabilities. Lifts provide a vital means of accessing different building levels, allowing employees with disabilities to reach their workplaces without barriers.
By providing lifts, workplaces create an inclusive environment where architectural barriers do not limit employees with disabilities, fostering a sense of belonging and equality among all employees. Access to lifts allows employees with disabilities to move freely within the workplace independently, promoting their sense of dignity and autonomy.
Conclusion
Domestic lifts represent more than just convenience; they epitomize the liberation of mobility and the expansion of home accessibility. By seamlessly integrating into residential spaces, these lifts empower individuals with mobility challenges to navigate their homes with ease and dignity.
Beyond functionality, domestic lifts symbolize a commitment to inclusivity, creating living environments where everyone can thrive regardless of physical limitations. Many lift installation providers and contractors ensure that they are mindful of all these inclusions to provide a holistic and practical usage of these machines.
Read Also:
How Well Does Carbon Fiber Perform in the Cold?
4 Ways To Bring A New Look To Your Home
Mold Inspection And Testing
Since lettuce plants grow best in cool growing seasons, most lettuce varieties are classified as spring or fall greens. However, if the longer days are keeping your lettuce plant producing leaves well into the summer and it hasn't bolted yet, here are some excellent tips to follow to maximize your harvest.
Taking individual leaves off the plant is one way to increase its yield. Alternatively, you could sow in succession every two weeks in the early spring or fall to continue the harvest. To offer lettuces shade and protection from the hot summer sun and high temperatures, a third method is to interplant with a taller crop. Lastly, cultivators should seek out cultivars known for their slow bolting, like the looseleaf varieties "Slobolt" and "Sierra."
Here is how to harvest lettuce so you can eat some leaves right away and encourage the plant to continue growing more.
How To Harvest Lettuce?
If you want to harvest lettuce and do not know how to go about it, here are all the details. Follow the steps closely to get the healthiest and crispiest lettuce for your salads and sandwiches.
Plant Looseleaf Varieties
Your lettuce variety should be ready to harvest in 35 days, according to the seed packet, which means you should have large enough leaves to pick a little more than a month after planting. By regularly picking the outer leaves, you may be able to extend the harvest until late June if you sow seeds in March or April.
Begin Harvesting Early in The Season
Young lettuce plants will be harmed by light frost, but mature plants can withstand it. If you live in an area where there is no winter frost, you can plant early and begin harvesting the outer leaves when they get to be 4 or 6 inches long. Your harvest can last up to 30 days longer if you plant and harvest early.
Pick Lettuce in The Morning
It is ideal to harvest lettuce early in the day to avoid the leaves wilting due to the intense heat. The leaves are crispest and flavorful in the morning because they contain the most water.
Look For Plants with Large Outer Leaves
The center of the crown is where the new growth starts on the lettuce. You must remove the largest, oldest leaves that are about 4-6 inches long. You will find these leaves on the outside of the plant.
Cut or Pinch The Outer Leaves
At 1/4 to 1/2 inch from the base, pinch off each outer leaf. To break the leaf off the crown, apply just enough pressure with your thumb and forefinger. Another option is to use a sterile, sharp scissor or snipping tool, though there is disagreement about whether doing so accelerates the browning of cut edges.
Harvest Until it Flowers
When older, mature leaves are consistently removed, the lettuce plant is encouraged to grow new leaves in their place. Harvesting individual leaves is possible until the plant produces a flower stalk, which indicates that it is ready to bolt and set seed. Lettuce turns bitter once it bolts.
When to Harvest Lettuce?
As soon as the lettuce is large enough to pick, it can be harvested. A seed packet will typically tell you how many days it will take to harvest. For the "cut and come again" method of harvesting loose leaves, standard-size varieties are the most effective. When outer leaves are 4 to 6 inches tall, that's the best time to begin harvesting.
There are many varieties of lettuce seeds available, including blends and mesclun mixes. The best varieties to plant for a continuous harvest are called bi-colored, spotted, or loose-leaf lettuces in green and red or burgundy tones. The following are some varieties you might want to try:
Black Seeded Simpson
Green Salad Bowl
Freckles
Lolla Rossa
Gourmet Mesclun Blend
Deer Tongue
Garden Leaf Blend
Loose leaf lettuce varieties yield the best results from the cut-and-come-again method. Red, green, and oak leaf lettuce are a few examples. Additionally, you can wait to pick until a full head has matured or harvest early leaves from loose-heading varieties like butterhead and romaine.
When and How to Gather Lettuce Heads
The growth habit of head lettuce is akin to that of cabbage. In order to form a dense, rounded, or clumped shape, younger leaves emerge from the center, and older leaves form layers. There are two types of head lettuce: loosehead (similar to romaine) and crisphead (like iceberg).
Let the crisphead varieties mature for a single harvest and keep an eye on them in accordance with the days to harvest specified on the seed packet. When the heads are dense and the appropriate size, they are ready to be picked.
If you remove the outer leaves once or twice, loosehead lettuces will still head. However, the size of the fully mature head may decrease as a result. These lettuces can produce a head of looser layering or wrapping leaves (butterhead) or a clump of tall, straight leaves (romaine).
Remove crispheads by chopping off the stem just below the center. Loose heads can be trimmed similarly or removed, with roots and subterranean stems cut back to the leaf base, depending on size.
What Happens If a Flower Stalk Bolts
A lettuce plant will eventually shoot up a flower stalk in the center, a sign that it has reached the end of its life and is ready to bolt, or bloom, and set seed. Though they might still be edible, the lettuce leaves are starting to get tough and bitter. There is no stopping flowering once this process has begun. Throw away the plant and plant again if the weather permits.
Types of Lettuce
There are four types of lettuce you can choose from when choosing which to grow: leaf, butterhead (loosehead), romaine, and head lettuce.
When it comes to cultivation and harvesting, the main distinction is that leaf lettuce crops yield several harvests, whereas head lettuce varieties, such as iceberg, romaine, and butterhead, only yield one harvest. Leaf lettuces are, therefore, a favorite among home gardeners since you can grow them in raised beds, on the ground, or in patio containers.
Keep in mind that lettuce is a cool-season crop, so you should schedule your harvest for the spring when the temperature is still cool. Such temperatures are usually around 70 degrees. Find out when the first frost occurs in your area each fall and plant appropriately. Starting fall crops from seed indoors and moving them outside as the weather cools down may be the best option.
Seek out head lettuce cultivars such as Crisphead and Iceberg that you can grow from seed. In roughly six weeks, the lettuce will reach maturity and be ready for harvest after the seeds have germinated in 10 to 21 days.
One loose butterhead variety that you can grow from seed or seed tape is called Buttercrunch. It takes 65 days to be ready for harvest.
Vivian is one of the romaine varieties that yields soft, flavorful leaves. Directly sow seeds in the garden in the spring. Start seeds indoors in the fall and transplant them to your garden.
Varieties of loose-leaf lettuce grow quickly and are enjoyable to experiment with in salads, sandwiches, and other culinary creations. Look for mesclun mixes and heirloom cultivars such as "Black Seeded Simpson." Many come in simple-to-grow seed tapes that can be harvested in roughly seven weeks.
How to Harvest Leaf Lettuce?
When the weather gets chilly, you can harvest salad from a leaf lettuce crop in your home garden whenever you're ready to eat. You can harvest an entire crop of lettuce at once by waiting for it to mature. However, cutting fresh lettuce leaves off as they grow is the easiest way to prepare them for consumption at any time.
Depending on the variety, lettuce leaves should be harvested when they reach a length of 3 to 6 inches. Gather leaves continuously until the lettuce plant "bolts." This indicates that the plant has focused its energy on developing seeds and flowers, and as a result, the leaves typically develop tough stems and a bitter taste.
How to Harvest a Full Head of Lettuce?
A lettuce plant can continue to grow until it produces a full head of leaves. Use the "one and done" approach when harvesting head lettuce. Just make a clean, above-soil knife cut across the entire head of lettuce at the base of the plant. For this, a harvest knife comes in handy.
Remember the seed packet and note the maturity or harvesting days. As your plants get bigger, keep an eye out for indicators of maturity, which are typically firm, full heads. Harvest in the spring before it gets too hot, usually when the daytime highs hit 70 degrees Fahrenheit. The bitter taste of the leaves and the mushy head of lettuce can result from warm weather.
How to Store Lettuce?
When the lettuce is inside, you can use a colander to wash the leaves and thick cotton towels to dry them so you can use them in salads and sandwiches. In case you cultivate a lot of lettuce, investing in a salad spinner would be wise. It helps dry and wash Lettuce quickly.
Lettuce leaves without water should be refrigerated. For most greens, store the leaves in a loose plastic bag for approximately a week. When the salad greens are ready to be eaten, give them a good rinse in several runs of cold water and then pat dry.
How to Harvest Lettuce Microgreens?
Microgreens are incredibly simple to harvest! When the first true leaves appear, after ten to fifteen days of planting the seeds, they will be ready. When the microgreens are two to three inches long, harvest them if you are measuring them by height.
Investigating the flavor profiles of the microgreens at various heights is enjoyable. Cut the entire plant ½ inch above the soil line with a pair of scissors or grass shears. If you need more inspiration, check out our many other interesting gardening tips for growing microgreens, like growing lettuce microgreens!
How to Harvest Romaine Lettuce?
The leaves of romaine lettuce (also known as cos) have the perfect amount of crunch or crispness. The lettuce plant's outer leaves can be harvested as it grows. The leaves can be chopped off one to two inches above the ground. Gathering these tender green leaves now will give the lettuce more time to ripen before full plants can be harvested.
Before Romaine lettuce reaches maturity, it can take 55–70 days to grow from seed. To determine when the lettuce is ripe, examine it directly. When the romaine lettuce leaves are 6 to 8 inches tall, the ribs are firm and juicy, and the leaves have formed a tightly compacted head, the lettuce is ready for harvesting. To test if the lettuce head is firm, squeeze it.
Overripe head lettuce will be tough, while young head lettuce will be soft. Harvest by making a cut an inch above the ground, saving the crown for a subsequent harvest. You can harvest the lettuce head by digging up the entire plant if it is nearing the end of its garden lifespan.
Read More: Everything You Need To Know About Harvesting Basil!
Loose Leaf lettuce
The harvest window for leaf lettuce varieties is quite broad. After planting, the young, baby lettuce leaves can be harvested 25 days later, and the plant will mature fully in 50–60 days. Make sure your crop is harvested prior to it bolting.
Since you can harvest loose-leaf lettuce more than once during the growing season, it's ideal for repeated harvesting. You can chop the entire lettuce plant 1-2" above the soil line once the leaves reach 4". In 10 to 15 days, fresh leaves that have sprouted from the base will be ready for harvesting again if the crown is left intact. Try spreading out your seed sowings and doing multiple sowings to ensure a consistent harvest all season long.
If you want to preserve the crisp flavor of the young baby greens, you should sow them again. Another method of harvesting involves leaving the inner leaves to grow while pruning the young leaves on the outside of the head for greens. When the plants are 4 inches tall, you can begin harvesting lettuce by cutting them just above the soil line.
Crisphead Lettuce
When grown locally, crisphead or iceberg lettuce makes for incredibly tasty salad greens. You might not get a whole head of lettuce, but this can be a cut-and-come-again harvest. A single harvest is more appropriate for this green lettuce. After planting, there is a 50 to 75-day window for harvest.
Iceberg lettuce can be harvested as soon as the head appears before the outer leaves turn brown and as soon as the center feels firm, and the leaves are compacted tightly. Before the crisp lettuce starts to open and the seed stalk starts to form, harvest it. More importantly, if you see the lettuce beginning to bolt—a common issue in hot weather—or the seed stalk, harvest it right away.
Harvesting iceberg lettuce is best done by digging up the entire plant and then cutting off the stalk. Because of its thick stem, this lettuce plant can be challenging to harvest while it is still in the ground. If you decide to harvest the lettuce while it's still in the ground, please take care not to harm it. You can cut the stem just below the leaves by lifting the lettuce upwards.
Wrapping Up
Nothing compares to the sheer satisfaction of harvesting and regrowing fresh, new lettuce from the same plant. You are far superior to other lettuce owners if you can figure out how to harvest lettuce correctly so that it keeps growing.
Thus, if you want to become a rich lettuce farmer, make sure you constantly and meticulously follow all the above steps! If you have thoughts to share or questions to ask about how to harvest lettuce, then please leave a comment below. We would love to hear from you.
Read Also:
Some Facts You Need to Know About Rainwater Harvesting
Asparagus 101: When, How, And How Often To Harvest?
Exploring Ideas For A Biophilic Home Design