Top Easy Way To Fix Avast UI Failed To Load Error In 2024

Published on: 19 August 2021 Last Updated on: 23 December 2024
Avast UI failed to load

Avast Antivirus is the most famous Antivirus in the world. It is so popular among PC users because it offers both a Free Version and a Premium Version, which can be used in computers such as desktops and laptops. There is an Android version of this application as well. If you are not so tech-savvy, let me first tell you in short what Antivirus is.

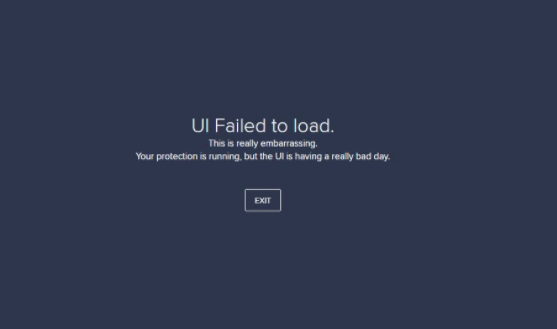
An antivirus is software that protects your system from viruses, malware, and Spyware. Ever since the Windows 10 update, people have been reporting that they are getting an error message saying Avast UI failed to load.

Windows is infamous for providing buggy updates. The same thing was reported in Windows 7 as well as Windows 8. It’s quite sad to see that Windows, even after becoming the most used Operating System on the planet, has failed to achieve proper security, and adding to that, most of their updates are quite buggy. 

However, they fix the bugs in later updates. But the avast UI failed to load has been bothering people for quite some time now. In this article, we will suggest a few troubleshooting methods, following which you can sort out the issue. 

What Causes Avast UI Failed To Load?

Here are some of the root reasons listed below for this error.

  • There is a good chance that this error pops up because of some error in the configuration of Windows. 
  • Another reason for showing Avast UI Failed to Load pop up is that you might be using more than one antivirus simultaneously on the same device.
  • The last reason we could think of is if there is any problem with your system’s Remote Desktop Services.

How Can You Fix Avast UI Failed To Load Issue?

UI failed to load

In order to fix the “Avast UI Failed to Load” issue, you need to check a few things first. Make sure that you have exited the Antivirus. Restart Avast Antivirus. But still, if the issue is not fixed, you can follow these procedures to say bye-bye to this issue. 

Procedure 1: Turn On The Remote Desktop Services

Remote Desktop Services

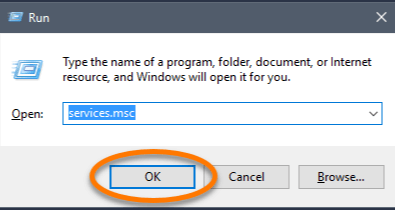
What you need to do is press the Windows key and R simultaneously. This will open up the RUN box. 

After having that box on your screen, you have to type ‘services.msc’ in that box and press the enter key.

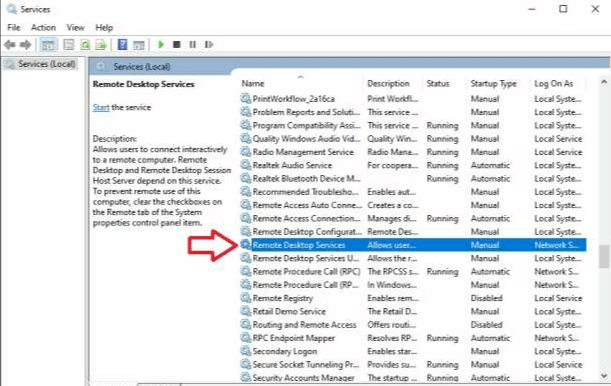
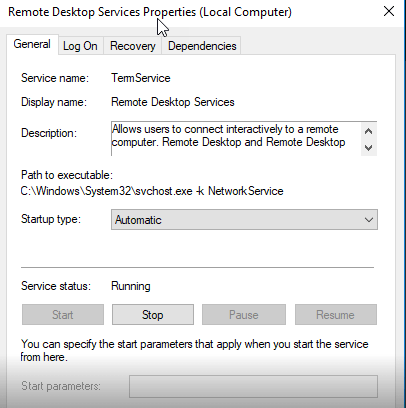
Now check for the Service Page. After finding the Service Page, you have to search for Remote Desktop Services. After you have found the remote desktop services, what you need to do is right-click on it and then select the option of ‘Properties.’

remote desktop

After clicking on properties, you have to double-click on the button that says start and set the startup type to automatic. After you have done that, click on ‘OK” to confirm the changes you have made. Now, you have to close the services page and manually restart your PC, laptop, or whatever you are using. It will complete the process. If you are still facing Avast’s problem, UI failed to load, then kindly follow the next procedure closely.


parameters

Procedure 2: Try Repairing The Avast Antivirus Software

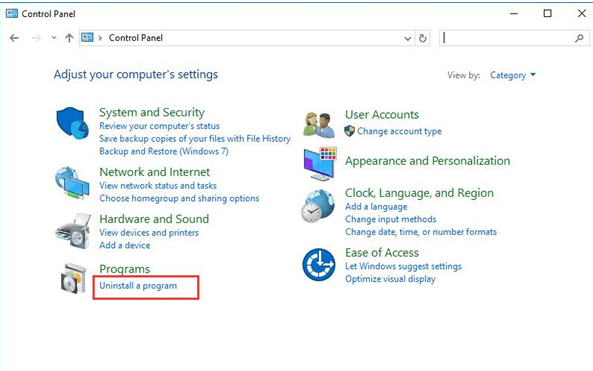
Kindly follow this procedure closely to repair. You have to go to the Control Panel Section. You can find the Control Panel in the settings section of your computer. If you do not know how to open the control panel.

Click on the start button and type the control panel. After opening the Control Panel, search for the Program & Features option, find it, click on it, and look for Avast Antivirus software. Now, you need to right-click on Avast; you will get the option to uninstall/change. 

Be very careful while doing this, as a single mistake can uninstall Avast from your PC. Select the option to repair after having clicked on change. Now, you need to wait for Avast to repair itself, and after Avast completes its repair, reboot your PC. If the error of avast UI failed to load persists, kindly follow the next procedure.

Procedure 3: Uninstall And Reinstall Avast Antivirus Software 

uninstall and reinstall

If any of the above methods did not work for you, then you try to uninstall Avast Antivirus. To uninstall Avast Antivirus Software, you need to open the Control Panel. You can open Control Panel by merely typing Control Panel in the Run dialog box; another way to open Control Panel is by searching the control panel after clicking on the Start button. 

After opening the Control Panel, go to the programs and features section and find the Avast Antivirus software. Right-click on it and select uninstall this time instead of selecting change as you did in the previous procedure. 

Please wait for some minutes for Avast Antivirus Software to completely uninstall itself from your computer. Reboot your computer as the final step of the process. Switch back on your computer, download Avast from the official website, and install it again as a whole new software.

Make sure you do not do anything else on your computer while Avast Antivirus is being installed, as it puts extra pressure on the computer’s RAM. After the installation process, open Avast and check if the Avast UI failed to load the error persists. If it does, kindly follow the next procedure. 

Procedure 4: Get The Recognition Issue Fixed

If the error of Avast UI failed to load persists, you could follow the last and final procedure.You need to look up from the Avast icon on your desktop and Open the shield’s control. In shields control, right-click on the Disable to disable the shields. You will get the option to disable it for 10 minutes to an hour. Disable it for 10 minutes, wait for 10 minutes, and check if the ‘avast ui failed to load’ issue persists. If the error is still showing, then try out some other methods.

  • Press the Windows Button and R buttons simultaneously. It will open up the Run dialog box. Type cmd in that box so that it opens the Windows Command Prompt Box. Type ‘winmgmt/verifyrepository’ on the search field and hit the enter button. 
  • If it shows the status as inconsistency, you need to type ‘winmgmt/salvagerepository’ in the search field and press the enter key to finish the process.
  • If the result shows that the Windows management instrument was consistent, you need to type ‘winmgmt /resetrepository.’ 
  • After doing that, Windows will send you a message showing that the WMI repository has been rebuilt successfully.

Finally, you need to reboot the system and start Avast antivirus, and hopefully, it will not show the error of Avast UI failing to load. We are sure that after trying all these steps, your Avast Antivirus will run just fine. But still, if the error exists, we suggest you contact Avast Customer Care as soon as possible.

Procedure 5: Update Your Avast Software

Most of the time, what can fix such an error message is a simple update. Fortunately, you can update the app without the hassle of having to re-download the app. Redownloading can be a viable option if you cannot access the interface at all. Here is how you can update Avast Antivirus as well as other Avast applications that offer easy updates to its users.

  1. Press the Windows+X keys at the same time, then select the app and features from the context menu.
  2. Find the Avast Antivirus or any other app that is causing you to see the UI failure arrow. Click on it, and from teh options that unfold, choose Uninstall.
  3. Click the Update button and wait for the software to locate any new updates that might be ready to download. It will automatically install the latest version, which will take quite a bit of time, depending on the configuration of your system.
  4. When the repair process is complete, launch the Avast app that you were having trouble with. This should get your app up and running.

It is possible that updating the Avast app the way mentioned above will fix the internal corruptions or missing files, thereby restoring the UI. But if you are still facing the same issue, try speaking to Avast Customer Support.

Conclusion

Avast is one of the best antiviruses in the market. The story of avast goes way back to 1995. Initially, it did not offer the best of services, but they have been improving their services year by year. It’s one of the few antiviruses that offer a premium version and a free version as well. 

Do not think that the free version has limitations like other antivirus software because it’s not so. The free version provides a few premium features, which include a WIFI inspector and ad blocker, etc.

However the recent trend of Avast showing that the Avast UI failed to load is not what users are expecting. Whether it’s the fault of Avast or Windows 10 is yet to be found out. Rest assured, you can try the above procedures to get rid of the issue.

You May Also Like:

Content Rally wrapped around an online publication where you can publish your own intellectuals. It is a publishing platform designed to make great stories by content creators. This is your era, your place to be online. So come forward share your views, thoughts and ideas via Content Rally.

View all posts

Leave a Reply

Your email address will not be published. Required fields are marked *

Related

Blown Head Gasket

Googling How to Fix a Blown Head Gasket? Find Out Here

Nothing can be more frustrating than a blown head gasket in your vehicle. The worst nightmare is if you cannot access a mechanic to fix it for you. You have only one option left in that situation; do it yourself. You may consider several options to fix the problem, but the ideal solution will be a steel solution to solve the problem permanently. The steel seal solution is a combination of various chemicals that react under given conditions to form a permanent seal to the crack that is causing leakage in the engine. Therefore, if you were wondering how to fix a blown gasket, find out here how to use a steel seal solution for that purpose. Remove the Radiator Cap When learning how to fix a blown head gasket, please remember not to start the engine if the coolant is not in place. You need to ensure that the engine radiator is cold before removing the cap. Carefully pour the clear steel seal solution into the radiator. If you unload the coolant, put the sealant into the system, then follow with the coolant. Start the Engine Switch on the fan and heater and turn them to the maximum. Start the engine and run up to maximum operating temperature. On reaching operating temperature, run the engine for thirty more minutes. It may take approximately half an hour, though the time depends on the automotive’s condition. If your vehicle is roadworthy, you can drive on a freeway for up to five miles at 3000 to 4000 RPM. After that, cut the engine and let it cool down. Refill with antifreeze or water, then secure the radiator cap. Drive the Vehicle as Usual After finishing the second step, your vehicle is suitable for the road. Let the steel seal fix in the system and start your ride usually. However, if you use an expansion tank to put the steel seal, please be careful that the sealant does not remain in the tank reservoir. Ensure there is enough space for the solution to go inside the cooling system. If you complete the treatment with only water, please replace the coolant once you finish the repair before driving. Further Instructions on Steel Seal It is possible to try various substandard products to fix a blown head gasket. If this happens, please use clean water to flush the cooling system once you remove the radiator hose at the bottom. Nb, avoid using a flushing agent. Directions for Backpressure Some vehicles have a lot of back pressure building up in the cooling system. Read more here on fixing a blown head gasket if you are facing the backpressure problem. Find the cylinder producing the bubbling in the spillage tank or backpressure. You can achieve this by removing one plug after another until the bubbling subsides. Remove the injector from the cylinder with the bubbling in the backpressure before you start to drive. That is to limit the volume of unburnt fuel flowing to the combustion chamber. To Sum It Up Trying to fix a blown head gasket can be a nightmare if you lack the necessary knowledge. It can drain your money and time to look for an expert. However, steel seal fix is your number one DIY solution. This step-by-step guide will help you do your head gasket repair yourself. Read Also: LPG Safety Tips and Precautions for your Home Which Type Of Forklift Your Industry Need: Have A Look At Them! Portable Generators: 5 Ways To Keep Them Clean and Running

READ MOREDetails
Machine Automation

Why Sensors are Essential in Machine Automation

In machine design, the role of a sensor is paramount in converting any physical property into an analogue signal which facilitates automation. Machine automation is responsible for the industrial revolution that bolstered economies around the world. Different physical properties require the interpretation of a sensor such as distance, position, temperature, and liquid flow. This article aims to describe each sub-category of sensors according to the property converted. Reason For Using The Machine Automation Sensors  There are different reasons for using the machine automation sensors that you need to take care off while you want to improve your learning process. Position sensing: Detecting the position of an object is possible using different types of sensors specifically measuring linear or angular motion. Encoders, potentiometers, and linear transducers are some of the preferred methods of sensing linear displacement. These devices are compatible with different types of machine assembly. Linear sensors used in rugged industrial applications commonly use a non-contact inductive technology to reduce the effect of friction and wear and tear. Distance sensing: Distance sensors can measure the rough distance and often function as a “within range” detecting device. Some distance sensors are programmable such that you can identify the distance of a target object even at an approximate location. Photoelectric sensors which use light in sensing distance can also work as a distance transmitter. A photoelectric transmitter can detect a distance range of between less than 5 mm to more than 10 m. The resolution is better at short range, but even if the resolution quality decreases at a more extended measurement range, it is still good enough for most machine automation applications. Speed sensing: Hall-effect, photoelectric, and inductive sensors are commonly used to sense speed and location. The preferred output is usually a train of digital pulses. A speed switch is typically used for machine automation in monitoring the speed of rotating shafts and identifying whether it is turning too fast or too slow; hence creating problems with the process. As a control mechanism, a sensor signals when the machine is running too fast so that it can automatically shut off. Fluid flow sensing: A fluid flow indicator is a sensor used explicitly in measuring the flow rate of liquid or gas. A typical flow sensor consists of a paddle wheel or a float. Some practical applications of a fluid flow sensor include water monitoring in wastewater processing plants and flow indication in HVAC systems. In most applications using a flow sensor, the sensor can provide either a digital or analogue output. Although there are several ways to measure liquid flow, one that works to detect differential pressure produces the most precise measurements and fastest response time. Temperature sensing: Sensors used in monitoring temperature come in a wide range of configurations suited for different applications. Sensing changes in temperature in machine automation is essential. It helps determine when a machine overheats, and to maintain the optimal setting for the device to work correctly. Examples of uses for temperature sensors include boilers, large motors, and compressors. Aside from the temperature sensor, switches are also included in the configuration to aid with temperature control and monitoring. Read Also: How Portable Metrology Tools Are Making Manufacturers More Flexible Image: Unsplash.com  

READ MOREDetails
data recovery

The best free software for data recovery

It has happened to us all on more than one occasion, we have lost important data on our computer. Whether we removed them by accident, a malware attack or you formatted your computer without having backed up the information, among other causes, the truth is that it is an exasperating situation that makes us have a hard time. Quiet! This is not a catastrophe as it may seem, in a situation like the ones described above, it is necessary to have data recovery software that allows us to have those documents that we so desire. It is well known that there are many programs that offer to recover deleted files, however none like the one offered by EaseUS - the best program to recover deleted data from any situation is accidental or intentional. This day I want to talk to you about a unique program that offers several options to recover deleted information, I mean EaseUS Data Recovery Wizard Free. This is a wonderful data recovery software that impresses any computer expert given its enormous advantages. What does EaseUS Data Recovery Wizard Free offer? EaseUs Data Recovery Wizard Free allows you to recover deleted files, even if you have emptied the Recycle Bin or deleted them directly. You can retrieve data from the USB flash drives, hard drives, SD memories, and other storage devices. It supports dynamic disks and all Windows file operating systems, from FAT to EXT and NTFS, and can bypass defective sectors automatically for the faster scanning process. EaseUS Data Recovery Wizard Free is a fully functional software with a recovery limit of 2 GB that serves as proof for a paid update that is really worth it if you appreciate the value of a deleted file. EaseUS Data Recovery Wizard Free is a data recovery software essential in case of data loss. This free data recovery software guarantees a safe and accurate format and eliminates recovery from numerous threats such as formatted or damaged drives, critical file system structures, file deletion, application blocking, computer viruses, partition or boot issues, damage due to a power failure or current increase, etc. When a data loss disaster occurs, it is then that EaseUS Data Recovery Wizard Free does its incredible work. As if that were not enough, it allows you to recover more than 1000 file formats of different types: documents, videos, images, audio, among others. What devices does it support? EaseUS Data Recovery Wizard Free supports a large number of devices including Hard Drives, Pendrives, External Disks, Cameras, SSD and many more. What operating systems are compatible? The systems in which you can use this fabulous software are from Windows XP to Windows 10 and also in the versions of Windows Server since 2003. Do you use Mac? Do not worry EaseUS Data Recovery Wizard Free also has a version for Mac users. As I mentioned before, it supports various file systems among which I can mention: FAT (FAT12, FAT16, FAT32), exFAT, NTFS, NTFS5. Is EaseUS Data Recovery Wizard Free for me? If you are in the uncomfortable situation of having lost valuable information that you want to recover as soon as possible, this software is the ideal one for you. You can recover your deleted data easily with the help of EaseUS recovery software, regardless of the circumstance in which you have lost them. There is no better software available today that offers everything that EaseUS Data Recovery Wizard Free has, so do not hesitate and download it now and recover your all data with the help of this file recovery software. Read Also: Recover Your Data From SD Card Through EaseUS Data Recovery Software Recover Data From MacBook Using EaseUS Data Recovery Wizard Review On Free Data Recovery Wizard Based On Photo Recovery

READ MOREDetails