Published on: 28 May 2020
Last Updated on: 05 November 2024
There are many misconceptions about elevator shoes for men. Some people believe only women should wear them while others feel shoes that make you look taller do not make you look real; hence it is bad for men to wear elevator shoes.
There is an increasing demand for shoes that make you look taller for men and the rising number of prominent men in the political, entertainment, and sports sphere who are adorning their feet with guidomaggi.com elevator shoes.
People are slowly beginning to see the immense benefits of wearing shoes that make you look taller for men. However, some persons are still stereotyped to think that elevator shoes for men are not cool.
Let us erase such mindset by highlighting the exceptional benefits of men’s shoes that make you look taller and dispelling the misconceptions about elevator shoes. Here are some of the wrong notions about elevator shoes for men and what we have to say about them.
Misconception 1
Anyone looking at you will know you are wearing shoes that make you look taller.
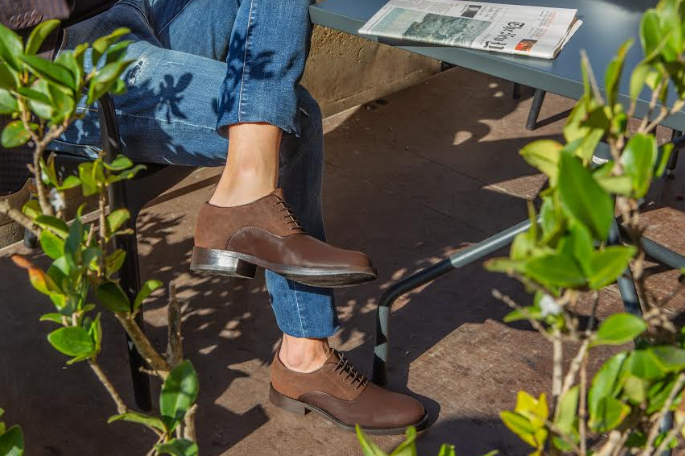
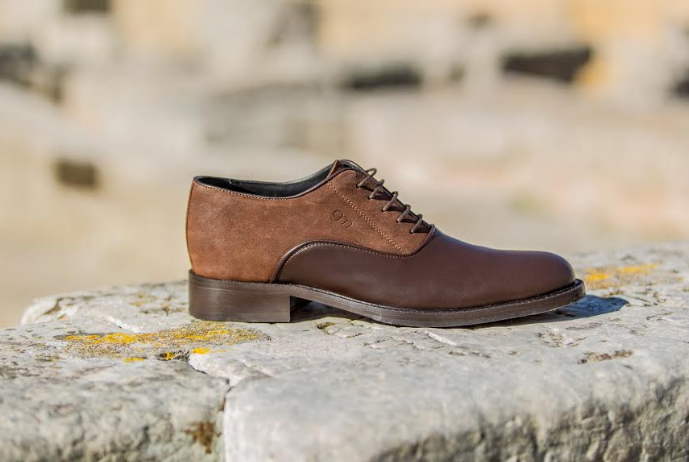
It is not true that everyone looking at your feet will tell you are wearing a pair of elevator shoes. GuidoMaggi elevator shoes are designed with insoles hidden inside the shoes to prevent people from noticing the elevated soles. The outsoles of elevator shoes are similar to the traditional flat soles shoes, making it difficult to tell the difference. When viewed by an observer, you can choose the specific height of the insoles you want. When you buy a pair of elevator shoes that are a few inches higher than your standard height, it may be difficult to tell that you are wearing shoes that make you look taller.
Misconception 2
The sole purpose of wearing elevator shoes is to increase your height
Some people fail to realize that shoes that make you look taller offer more than just height. GuidoMaggi elevator shoes are trendy and fashionable. They offer you class and style whenever you walk. They come with several unique shoe materials, designs, and colors to match whatever top or pants you are putting on. Elevator shoes help to improve your posture and also boost your confidence.
Misconception 3
Elevator shoes for men are not durable because the soles wear off easily
GuidoMaggi elevator shoes offer just the opposite. These pairs of shoes that make you look taller for men are long-lasting because they are made from high-quality shoe materials and weaved with perfection. The insoles and outsoles of guidomaggi.it elevator shoes are designed to offer you top quality.
Misconception 4
It is essential to walk comfortably on elevator shoes
It is the belief by most people that walking comfortably on elevator shoes may be difficult and even impossible. However, such an assertion is false because GuidoMaggi elevator shoes offer you comfort while walking.
You may feel a little different because of the increase in height, especially if you are wearing elevator shoes for the first time, but that does not disrupt the comfort you may feel when wearing GuidoMaggi elevator shoes.
Content Rally wrapped around an online publication where you can publish your own intellectuals. It is a publishing platform designed to make great stories by content creators. This is your era, your place to be online. So come forward share your views, thoughts and ideas via Content Rally.
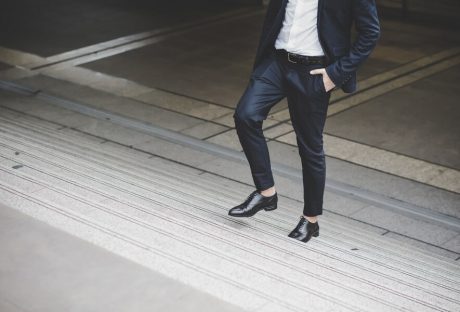
When it comes to formal attire, every detail is essential. Every detail, from the fit of your jacket to your tie selection, contributes to your entire appearance. People sometimes ignore the fit of their suit trousers. While classic fits are appealing, the rise of muscle fit suit trousers has overtaken the formal fashion world. These trousers cater to people with a more athletic physique and provide several advantages that can take your standard style to new heights. This blog post looks into muscle-fit suit trousers and sees how they might improve your formal wardrobe.
Defining Muscle Fit Suit Trousers
Muscle fit suit trousers are a modern style of formal pants developed explicitly for people with a more athletic or muscular physique. Muscle-fit trousers, as opposed to standard straight or normal-fit trousers, are fitted to give a streamlined and tapered silhouette that matches the natural contour of the wearer's legs and thighs. This distinct cut improves the overall appearance and provides a comfortable and fashionable option for individuals who want a more form-fitting look.
Muscle-fit suit trousers include the following distinguishing features:
Tapered Leg
Muscle-fit trousers have a smaller leg than typical fits. Tapering begins at the thighs and gradually narrows towards the ankle. This slim design emphasises the contours of the legs, giving them a sleek and modern appearance.
Fitted Thighs
These trousers are intended for people with well-developed thigh muscles. The thigh fit is snug but not excessively tight, ensuring comfort and mobility while highlighting muscular definition.
Streamlined Silhouette
Muscle-fit trousers have a streamlined and fitted design. It gives a unified look that matches formal attire pieces such as suit jackets, shirts, and accessories.
Slight Stretch
The fabric structure of many muscle-fit trousers includes a tiny stretch. This stretch improves the wearer's comfort and flexibility, allowing them to move freely without feeling confined.
Contemporary Appeal
Muscle-fit suit trousers have a modern and attractive look. Those who want a more contemporary style for formal occasions will appreciate the sleek shape and trendy design.
Waistband And Rise
Muscle-fit trousers' waistbands often lie nicely on the waist, offering a secure fit without feeling overly tight. The rise, or the distance between the band and the crotch, is intended to accommodate the natural posture of the trousers while remaining fashionable.
The Advantages Of Muscle Fit Suit Trousers
Muscle-fit suit trousers have grown in popularity for a good reason: they provide several benefits that distinguish them from regular-fit trousers. Whether you're going to a business meeting, a wedding, or any other formal occasion, here are some significant benefits of wearing muscle-fit suit trousers:
Flattering Silhouette
The attractive silhouette of muscle-fit suit trousers is one of their main features. The tapered cut embraces your legs without being overly tight, emphasising your muscles' natural structure. This fitted fit creates the illusion of a well-proportioned body, instantly improving your confidence and presence.
Modern Aesthetics
Muscle-fit suit trousers add a contemporary flair to your formal attire. Their compact shape and clean lines offer a more streamlined and fashionable appearance. Whether going to a business meeting or a wedding event, these trousers will update your look.
Versatility
Contrary to popular belief, muscle-fit trousers do not have to be restrictive. Many styles contain a tiny elasticity in the fabric. This combination of design and comfort makes them suitable for various occasions. You can wear them confidently from the office to an evening function without feeling constricted.
Tailored Comfort
When it comes to formal dress, comfort is vital. Designers create muscle-fit suit trousers to combine comfort and style. The meticulous construction guarantees that the trousers flow with your body, allowing you to sit, stand, and walk comfortably. This personalised comfort is a substantial improvement over standard off-the-rack pants.
Elevated Confidence
Wearing clothes that fit correctly can considerably increase your confidence. Muscle-fit suit trousers intend to enhance your physique, potentially boosting your confidence. When you're comfortable in your clothes, it shows in your posture, manner, and entire presentation.
Attention To Detail
The art of formal attire is in the attention to detail. Muscle-fit suit trousers help to draw attention to your outfit by emphasising it. Their outfit matches your suit jacket, shirt, and accessories, resulting in a unified and put-together impression.
Tailoring Options
While off-the-rack muscular fit suit trousers are available, custom tailoring elevates your formal clothing. A professional tailor can make custom trousers that fit your body shape and size. This tailored touch provides an ideal fit that complements your natural figure and draws attention to your most outstanding features.
Styling Muscle Fit Suit Trousers
Styling muscle-fit suit trousers requires a keen sense of balance and coordination. Here are some pointers to help you put together a stylish outfit:
Proportion Is Key
Combine muscular-fit trousers with a suit jacket that is similarly slim. It keeps your upper and lower bodies in proportion. A fitting coat completes the sleek and stylish look.
Monochromatic Elegance
To preserve a streamlined appearance, use a monochromatic colour scheme. It involves wearing a shirt, tie, and suit all the same colour. Monochromatic clothing makes you appear longer and more elegant.
Shirt Selection
To keep the overall silhouette consistent, choose a slim or tailored-fit shirt. Too-loose shirts can detract from the streamlined impression of muscle-fit trousers.
Footwear And Accessories
Complement your muscle-fit suit trousers with footwear appropriate for the occasion. A well-polished pair of dress shoes or loafers complete the look. To tie the suit together, match your belt, connect, and pocket square.
Occasion Consideration
While muscle-fit suit trousers are versatile, remember the occasion and dress code when arranging your ensemble. Darker and more traditional designs are appropriate for most formal occasions, while lighter colours can be used for daytime or less formal gatherings.
Takeaway
Muscle-fit suit trousers provide several advantages that can significantly boost your formal appearance. Their flattering silhouette, current aesthetics, and customised comfort make them a fashionable choice for people who want to show off their bodies while being elegant. You may create a sophisticated combination that communicates confidence and refinement by paying attention to proportion, colour coordination, and the proper accessories. So, the next time you're getting ready for a formal event, consider including muscle-fit suit trousers into your ensemble for a noticeable improvement in your appearance.
Read Also:
Souq Fashion Outlet: Avail Up To 70% Off On Top Brands
Top 10 Fashion Brands Of 2018
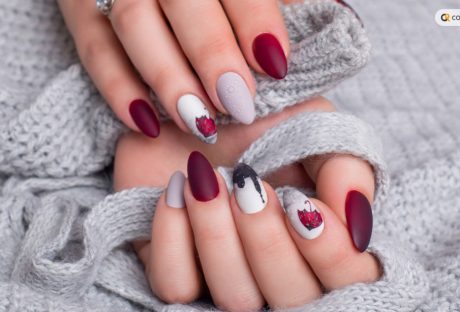
There is no particular time to get your nails done. You can give those pretty perfect nails a makeover anytime you want, be it any season. It is one of those things which would boost your confidence instantly.
It is simple. A fresh coat of nail polish can boost your style and confidence. All you have to think is how you want your nails to look. However, to get that polished look, you have to take good care of your cuticles and skin as well.
You can get some gel, ombre nails, pastel nails, or try some French manicure acrylic nail paint this time. So, it's time to steal the spotlight with some gorgeous nail paints.
36 best nail designs, 2024
Thinking of what to do next with your nails? Well, we have got you covered, and here are some of the best nail designs 2024 has ever seen. They are still in trend, and you can try any of these out anytime.
However, it might be difficult to choose as all of these are amazing. Also, lets check some of the upcoming nail designs which are going to be trending in 2025 as well.
1. Blue Aura & Metallic Nail Design
https://www.instagram.com/p/Cu4yspIOIiE/?utm_source=ig_web_copy_link&igsh=MzRlODBiNWFlZA==
The first one features Blure Aura with a little hint of Metallic Chrome. This particular takes inspiration from the ocean and tries to give a refreshing, cool vibe perfect for summer. The metallic chrome adds some edge to it.
2. Plain Silver Chrome Nails
https://www.instagram.com/p/C5oKYFcMn0e/?utm_source=ig_web_copy_link&igsh=MzRlODBiNWFlZA%3D%3D
This one is pretty simple but adds a little bit of sass to the entire look. This is perfect for someone who does not like anything bedazzling. The modern sleek finish makes it an amazing choice if you want to make a statement.
3. Dark chocolate
https://www.instagram.com/p/CjNy0YArzud/?utm_source=ig_web_copy_link&igsh=MzRlODBiNWFlZA==
Well, why not start 2025 with a moody and dark vibe? This New Year’s Eve, try some dark chocolate brown nails and take the spotlight. Dark shares are high in fashion and give out a chic look.
4. Cool cat eye
https://www.instagram.com/p/DDT3r1TtZZV/?utm_source=ig_web_copy_link&igsh=MzRlODBiNWFlZA==
This is going to be the trend in 2025. Cat eye with some metallic polishes is going to be on trend, and there is no denying it. These are fully customized and give out a chic look. They look complicated and intricate, but with the right products you will be able to DIY at home.
5. Modern aura pink nails
https://www.instagram.com/p/C35gk2oOx4j/?utm_source=ig_web_copy_link&igsh=MzRlODBiNWFlZA==
Want a little touch of glam in your regular mundane life? Paint your nails in this soft pink shade and create a playful and sophisticated look. The little bit of sparkling adds a touch of glam. This will pop your daily look as well as if you are prepping for any event.
6. French spring tips
https://www.instagram.com/p/C4Dz6CaxhTs/?utm_source=ig_web_copy_link&igsh=MzRlODBiNWFlZA==
The French tips are fresh, and if you add some flowers, it will give out a summer and spring vibe. The blue tips are elegant and classic and the flowers add a touch of warmth and whimsical vibe to it.
7. Depth and dimensions
https://www.instagram.com/reel/C9BdCgqtppb/?utm_source=ig_web_copy_link&igsh=MzRlODBiNWFlZA==
Another trend that is going to make it big in 2025 is 3D nail art. Elle Gerstein, one of the celebrity nail artists, mentioned that this “depth & dimension” trend is going to stay. Everyone wants to add some dimensions to their nails and would mimic anything.
8. More metal
https://www.instagram.com/p/DBJxEEiy5LL/?utm_source=ig_web_copy_link&igsh=MzRlODBiNWFlZA==
Chrome and metal, whether they are blended, isolated, or ombre, elevate the manicure and give it a good finish. This is something that will never be outdated, and there is nothing not to like about these nails.
9. Patent leather
https://www.instagram.com/p/CmMitRuOmxY/?utm_source=ig_web_copy_link&igsh=MzRlODBiNWFlZA==
If you are looking for something moody yet neutral and trending, then the leather black nails are just the right fit for you. Black manicures are believed to make a comeback in 2025. This is one of those nail designs 2024 missed a bit, but it is going to make a comeback definitely.
10. Animal print
https://www.instagram.com/p/DAaLu96OyBz/?utm_source=ig_web_copy_link&igsh=MzRlODBiNWFlZA==
Animal print never actually went out of style. So, if you are looking for the best nail designs. 2024, then these are definitely going to make the list. Different geometric patterns and animal prints have been in the trend.
11. Modern aura nails
https://www.instagram.com/p/C7_riYNxZw5/?utm_source=ig_web_copy_link&igsh=MzRlODBiNWFlZA==
The modern, colorful aura design is for those people who are never afraid to try something new and make a statement even when they are standing in a crowd. If you want an out-of-the-box design, then this one is for you. The vibrant and bold shares will definitely turn heads.
12. Summer yellow mix
https://www.instagram.com/p/DCj4kklxERp/?utm_source=ig_web_copy_link&igsh=MzRlODBiNWFlZA==
This is perfect for spring and summer as the color lifts up your mood and adds a warm vibe. With a combination of butterfly nail art, ombre, and French tips, it creates a playful look and oozes out summer vibes.
13. Cow and tortoise print combination
https://www.instagram.com/p/CaDCfrjJM_s/?utm_source=ig_web_copy_link&igsh=MzRlODBiNWFlZA==
This nail design features a combination of cow and tortoise print, giving a completely unique design. Classic and modern nail designs blend into this combination and create a chic look. This adds a playful touch to your outfit with a hint of edginess.
14. Golden chrome French manicure
https://www.instagram.com/p/C4GKT6dMTnO/?utm_source=ig_web_copy_link&igsh=MzRlODBiNWFlZA==
Classic French tips with a modern twist? Yes, this is what this nail design is all about. The rhinestones add glamour and sparkle to the look, making it perfect for any event or occasion. The golden chrome gives a shiny finish and makes a statement.
15. Short and sweet
https://www.instagram.com/p/DCSkKhGMFSD/?utm_source=ig_web_copy_link&igsh=MzRlODBiNWFlZA==
Soft and sweet shades are a hit this year. You can go for nudes, pastels, or anything that is subtle. The aim is to be delicate. The light hint of color with the polished finish creates an amazing look.
16. Glass of merlot
https://www.instagram.com/p/DDcwWJex7dJ/?utm_source=ig_web_copy_link&igsh=MzRlODBiNWFlZA==
If you think going absolutely dark is not your style, then you do not have to go with brown or black. Instead, you can choose a shade of red wine. The merlot manicure is absolute class and you can rock any event with these perfect nails.
17. Dark aura
https://www.instagram.com/p/DBMOK7GPA_y/?utm_source=ig_web_copy_link&igsh=MzRlODBiNWFlZA==
Dark aura nails are something people choose during the winter. With the aim to create a mysterious and dark vibe, these nails perfectly complement the season. Not to forget they give you an absolute chic look.
18. Mannequin hands
https://www.instagram.com/p/Ca9HllIP3pc/?utm_source=ig_web_copy_link&igsh=MzRlODBiNWFlZA==
Mannequin Hands has made a comeback, and these nails have been on and off in trend since 2010. The skin-tone nail colors gave the hands a look like the mannequins. And the shades have improved with time and come up with different varieties to match every skin tone.
19. Crocodile nail art designs
https://www.instagram.com/p/Cx1yn9kLL3h/?utm_source=ig_web_copy_link&igsh=MzRlODBiNWFlZA==
This is a nail design which is for those who like to go bold with aspects of their fashion choices. When you make a crocodile skin pattern on your nails, it definitely grabs attention and puts you in the limelight.
20. French swirly nails
https://www.instagram.com/p/CdBe5y2pNNG/?utm_source=ig_web_copy_link&igsh=MzRlODBiNWFlZA==
This nail features French tips with some playful swirly patterns on the tips. If you like to add a hint of color and edge to your nails these are the perfect kind for you. You can choose red and orange if you want to go with the summer or spring vibe or anything else you think would compliment your personality.
21. Textile patterns
https://www.instagram.com/p/BgNzmTblDBr/
The black and white knitting patterns are perfect for those who want a bit of texture in their style. It gives a minimalist, chic, and sleek look, perfect for those who do not want a lot of colors and want to keep things simple. Moreover, there is a hint of quirkiness in the entire style.
22. Glazed donut nails
https://www.instagram.com/p/Cgj4NiOL2nS/?utm_source=ig_web_copy_link&igsh=MzRlODBiNWFlZA==
This kind features chrome nails and suits those who always opt for a simple, flawless look. The chrome finish adds shine and reflects on the nails. You get a clean, minimalist look with a hint of elegance and class.
23. Flowers+nude nail arts
https://www.instagram.com/p/DBaweEPSw_W/?utm_source=ig_web_copy_link&igsh=MzRlODBiNWFlZA==
This particular design has beautiful nude shades which complement the spring and summer seasons. Along with that, there are different flower designs that add a bit of nature to it. The blend of flower and nude gives a summer vibe and is perfect for any outdoor event.
24. Blush nails
https://www.instagram.com/p/CdgPXdQJ32y/?utm_source=ig_web_copy_link&igsh=MzRlODBiNWFlZA==
Combine two different shades of pink, hot pink and baby pink, and transform your nails into blush nails. For that gradient effect, apple baby pink at the sides and hot pink at the center of your nails. Just finish it off with clear nail paint as the topcoat.
25. Groovy French
https://www.instagram.com/p/CfZrop5pO4Z/?utm_source=ig_web_copy_link&igsh=MzRlODBiNWFlZA==
While Nail Designs 2024 embraced minimalist designs, they did not miss out on those bold beautiful colors. They also evolved. Moreover, they evolved in different patterns and abstract designs. It is a classic design with a colorful pop.
26. Mod monochrome
https://www.instagram.com/p/CmzT2GKvWlN/?utm_source=ig_web_copy_link&igsh=MzRlODBiNWFlZA==
Patterns and abstract designs like swirls and unconventional French tips are very much in trend. With just one color, it gives a sophisticated look like nothing else.
27. Psychedelic vibes
https://www.instagram.com/p/CnNz78XLhui/?utm_source=ig_web_copy_link&igsh=MzRlODBiNWFlZA==
The spiritual, trippy, and virtual nail designs are quite in trend, and it is going to gain popularity in the upcoming years as well. More specifically, summer will have bright, cream, and warm tones, and spring will have holographic, pearlescent, and psychedelic tones.
28. Rainbow & nude nails
https://www.instagram.com/p/CtmsNwBSsHb/?utm_source=ig_web_copy_link&igsh=MzRlODBiNWFlZA==
This design features nude colors that go with every occasion. Moreover, it is enhanced with rainbow colors that look like abstract art on the nude colors. There is something playful and fun about this design, whereas the fren tips and nude colors keep it minimal and classy.
29. Ombre glitter nails
https://www.instagram.com/p/C__rg6eyTZ-/?utm_source=ig_web_copy_link&igsh=MzRlODBiNWFlZA==
Who dosen’t like those classic French tips? Moreover, it is even better if there is a modern twist to it with a golden glitter finish. The glitter finish gives a metallic, shiny look, adding glamour to the entire look. It is perfect if you want a timeless and classic look without having to give up on elegance and luxury.
30. Rainbow French Tips
https://www.instagram.com/p/CtHXclfp5Ad/?utm_source=ig_web_copy_link&igsh=MzRlODBiNWFlZA==
This nail design plays with colors and gives a playful twist on the French tips with different colors. You can pick your choice of colors and create a combination like no other. If you like to show off your colorful personality and stand out among the crowd, this is perfect for you.
31. Square French tips
https://www.instagram.com/p/CnH1SGoJFDv/?utm_source=ig_web_copy_link&igsh=MzRlODBiNWFlZA==
Another classic way to improvise your French tips is to give them a square shape. It is unique and modern, and you do not have to lose out on the originality. You also get to show the creative side without being over the top.
32. Blue ocean nail design
https://www.instagram.com/p/C-Zq27GxGi0/?utm_source=ig_web_copy_link&igsh=MzRlODBiNWFlZA==
With some natural nude color with abstract blue ocean design, you will be able to enhance the touch of chrome. This ocean design adds a sense of serenity and a touch of nature to it, whereas the chrome finish gives out a modern and luxurious vibe.
33. Polka dot nails
https://www.instagram.com/p/C_S98iiuCWk/?utm_source=ig_web_copy_link&igsh=MzRlODBiNWFlZA==
This design features polka dots and you can pair it with some other vibrant plain color on other nails. You get both a cheerful vibe along with some playfulness.
34. Smiley nails
https://www.instagram.com/p/C_MHCDsyExs/?utm_source=ig_web_copy_link
If you have a fun and cheerful personality, then this is the perfect design for you. You can use various nail arts like cloud, cherry, smiley, and flame, but all on a nude base. These cheerful designs are definitely going to put you in a cheerful mood.
35. Third eye nails
https://www.instagram.com/p/CQ2U-cWDcgc/?utm_source=ig_web_copy_link&igsh=MzRlODBiNWFlZA==
If you are the spiritual kind, then making the third eye on your nail might open up your chakras. If you believe in it, then why not paint it on your nails and show off youe aesthetics?
36. Japanese minimalist ombre
https://www.instagram.com/p/C-a4Y_CRsfY/?utm_source=ig_web_copy_link&igsh=MzRlODBiNWFlZA%3D%3D
You get these designs in shades of light brown and blue. This color scheme gives off a serene and calm vibe. This is amazing for those who like to add something different to their style but do not like to be over the top.
Nail it!
These are some of the best nail designs 2024 every saw and some of the best ones that will be coming in 2025. With the growing trend of designer nails, it is difficult to pick one. However, you can pick any you want, depending on your personality and style.
Nail art studios are always open to personalization, so if you have something specific in mind, they will help you get that as well if it is possible for them. So, go big and choose something that will grab attention even in a room full of people.
Read Also:
How Long Do Gel Nails Last?
Polish Your Creativity: A Colorful Journey into Self-Care With Nail Polish
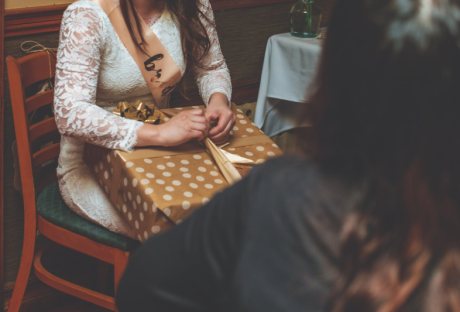
When planning what to wear to a bridal shower, it is important to remember to keep things conservative.
Rather than offending anyone, opt for something conservative and classic. Also, a tea party is much better than a party at a bar as it does not steal the bride's attention.
It is also best to avoid plunging necklines and short skirts. Remember, a little nod to the party theme goes a long way!
Things To Avoid:
1. Revealing, flashy, or over-the-top formal
While a revealing, flashy, or over-the-top formal dress may look lovely, it will probably not be appropriate at a bridal shower. Instead, opt for a more modest style that won't offend anyone.
A tea party is a better option than a bar. Whether you attend a traditional shower or a more modern version, there's a dress to match.
While there are plenty of stylish options to choose from, a dress for a bridal shower is the most suitable option. It's both feminine and understated, making it a great choice for any type of venue. Avoid wearing jeans or corduroy pants to a bridal shower, as they don't convey respect to the hosts.
Besides, dresses are not just for the shower. Historically, the bridal shower is usually a fun, festive party (www.wikipedia.org/Bridal_shower). While white is never appropriate, black is a great choice. Black is also bold and can make a stunning statement. Of course, any color other than black or navy is perfectly acceptable.
2. Wearing studded accessories
The first thing to remember when attending a bridal shower is the location. There are several factors to consider, including footwear.
The country club, restaurant, or backyard tends to have a higher level of formality, so you may want to avoid chunky heels and wedges. For an outdoor venue, try wearing flat shoes or a plain sterling silver bracelet.
As far as fabrics go, stay away from leather biker jackets or other edgy pieces. Instead, choose feminine fabrics like chiffon or jersey. Decorative items like earrings or necklaces can add a little bit of bling to the ensemble, but don't go overboard. Instead, stick with fine, delicate jewelry. Embroidered bracelets and anklets are not appropriate for a bridal shower.
As for colors, avoid bright red or blue. Dark colors don't fit the mood for the right bridal shower dress or accessories, so avoid wearing them. Those colors will only make you look like a party snob instead of a bride-to-be. Instead, stick to pastel colors and go for more muted hues.
You can visit this website to see more suggestions. You don't want to overwhelm the bride, but it's still important to look presentable.
3. Wearing all black
Although a bridal shower does not typically have a dress code, there are a few things you should avoid, especially if the event is outside. This is because the atmosphere is often less formal than the bride-to-be's big day. Another thing to keep in mind is what time of year the shower is held.
For example, a winter shower is not the time to wear all black, so you should opt for a more feminine, sexy dress instead. Similarly, for a spring bridal shower, a flowy dress or midi skirt would be appropriate. Flowy blouses or pants would also work well and would be appropriate for spring and autumn showers.
For a bridal shower, it is also important to avoid all black. Black is often considered too formal for a bride-to-be party. Some older family members might frown upon you wearing all black, and some outdoor daytime parties don't allow for that. Moreover, you don't want to impose a certain look on the bride-to-be. She may also be wearing white.
It would be best if you can find a compromise between these two extremes and wear whatever colors you like. Although white is the color of choice for a bride-to-be party, black is not appropriate.
While white is reserved for the bride, light shades of other colors are also appropriate. Wide-leg pants are chic, but you should make sure to wear shinies.
Don't wear anything too loud, as this could make you stand out among other attendees. A simple necklace is enough to make a statement. In addition to neutral colors, you should avoid all-black ensembles. Black can look too somber at a bridal shower. Instead, opt for pastels, neutrals, and floral prints.
For a spring or summer event, you may want to wear a midi dress with a floral print. Regardless of what color scheme you prefer, there’s probably a theme for it that you can find by clicking here, so consider the season and weather for the event. If you're attending a summer bride-to-be party, then a floral is okay I guess.
You May Also Check: 7 Perfect Accessories to Match Your Wedding Dress
4. Wearing denim
While you're welcome to wear whatever you like to the bridal shower, avoid jeans. Denim is casual and will cause discomfort over time, and will make your mobility difficult.
Instead, opt for a dress or skirt. There are plenty of flattering, comfortable options. Listed below are some tips to avoid wearing denim to a bride-to-be party. Read on to find out how you can look beautiful and make a great first impression.
Before going to a bridal shower, determine the venue. If the shower is being held at a family member's home, jeans are acceptable. Otherwise, a country club or backyard would be more appropriate. Remember that the bride-to-be's personal style will likely determine the theme of the shower.
For example, she may opt for a boho-chic bride-to-be party theme. However, there are also many types of bridal showers, so check out this Pinterest board for more. Some of them are themed, meaning that a particular dress is recommended. Guests should avoid wearing jeans to a bridal shower. This is bad etiquette and could put the bride in a hot mess.
While denim is acceptable for casual attire, the bride should also avoid wearing baggy jeans. While you might be tempted to wear a skirt that is too short, consider wearing a skirt that covers the ankles. This way, you won't risk flashing the bride's grandmother.
Read Also:
5 Ways to Save Money on Your Wedding Invites5 Perfect Fashion Clothing Choices for Petite WomenReasons for Using Your Handwriting for Wedding Invitations