Top Utility Tools You Need For Your Website

by

15 January 2019

Technology

utility tools

Whether you are a web developer or tester or a Project Manager, tools are always available at your disposal to help you. From our daily need tools like screenshotting tools to software testing tools we need a variety to make our work easier.

Looking to share an image? Take screenshot

Want to share a video? Use a screen recorder

Need to tell the developer, the code doesn’t work? Use a communication tool

From this to that, we need a ton of tools every day. Even you’re using one to read it! But which one is the best to use at a time is where one get stuck. And I’m here to help you with that!

Let’s find out which tool to use for your website and for what.

1. Testing : LambdaTest

image002

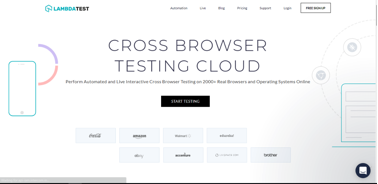
If you own a website or web page or work for one, it is a must to perform its testing. LambdaTest in itself is a complete tool for your website to perform its cross browser testing (both manual and automation), visual screenshots testing, responsive testing, image comparisons, and a lot more.

With a pool of 2000+ browsers and device combinations, it helps you make sure that your website works perfectly in all browser and device combinations and provides a seamless experience to your users.

2. Code Editor: Sublime Text

image003

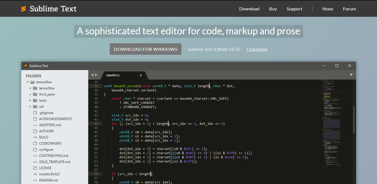
Great websites need great environment and a code editor with well-designed, super efficient, and ultra speedy user interface to develop your code.

Sublime Text is on top to fulfill this need of your best code editor tool for your website. Sublime is unique in terms of Ease of use, easy shortcut keys and Eyes friendly user interface.

Developers spend 8-9 hours a day on code editor and Sublime text can prevent developers from getting frustrated. User-friendly and eyes friendly user interface is what one looks for while finalizing a Code editor tool and Sublime Text is all of them!

3. Design : AdobeXD

image004

Adobe XD is a vector-based UX/UI design collaboration tool developed and published by Adobe Inc for designing and prototyping user experience for web and mobile apps for macOS and Windows.

XD supports vector design and website wireframing, and creating simple interactive click-through prototypes.

4. SEO: Uber Suggest

image005

When it comes to SEO, no one can ignore Neil Patel and his toys. Uber Suggest is one of the top SEO tools in the current decade by Neil Patel.

SEO is what needs to optimize your website and make Google search friendly. Uber suggest can help in Keyword review whether it is for SEO or PPC, Keyword suggestion (from primary term to long tail phrases, you can get thousands of suggestion along with search volume, the competition, and even seasonal trends of that particular keyword), Keyword Difficulty and Competitive Intelligence. You can also assess your website against other competitors.

5. Design Mate: Zeplin

image006

To build a website, you need to design it first and when it comes to it, Zeplin is Designer’s best friend. With all CSS details and minute information available in the design itself, it makes it easier to collaborate between developers and designers. It provides integrations with top tools like Slack, Trello and allows a user-friendly designing environment.

6. Analysis: SEMrush

image007

SEMrush is an all in one tool for marketers. You can use it various analysis and help for your website. SEMrush has SEO toolkit, Advertising toolkit, Social Media Toolkit, Content Marketing toolkit, and Competitive Research toolkit to help you.

You can analyze your competitors, check which keywords they are ranking upon, monitor your keyword ranking, your website’s visibility, check which pages of your website are driving more traffic and a lot more.

As said SEMrush is all in one tool for Marketers.

7. Design Assistant: Canva

image008

Canva is free to join and provides a vast variety of templates and graphics. It has everything that you need for an amazing design as a starting blogger, web designer, or app developer.

If you are promoting your website through social media, Canva can help you with images. Banners, posts, thumbnails, insta, snapchats, Google display ads, Facebook ads in standard required sizes. Equipped with so many tools, Canva is an awesome tool for marketers, web designers, artists, and social media enthusiasts.

8. Chat bot: Intercom

image009

Putting a real-time chat bot is really a good option if you want your users and visitors of your website to connect to you any time. Intercom is undoubtedly the best tool to help you interact with your customers.

9. Screen Recorder:  OBS Studio

image010

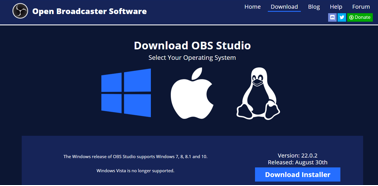
Many times, we need to record our website’s animations for future reference or for forwarding it to some of our team members. OBS Studio is a screen recording tool along with various features like HD Streaming and recording. The best part about OBS studio is that there is no restriction upon the video length and it is very quick to set up.

10. Analytics: Google Analytics

image011

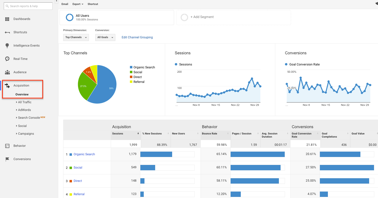
Analytics of visitors and user coming on your website or platform is key metrics to measure your company’s growth. You can set up custom channel from where you are getting traffic and can analyze which channel is performing good and which is not. Google analytics can help you play with numbers and take actions based on it. It’s a must-have tool if you are running your business online and have a website to showcase your products.

As a very famous saying goes:

We shape our tools and afterwards our tools shape us. – Marshall McLuhan

Hence, once we learn to use these tools, these tools can help us improvise and grow more. It is wiser to take help of the following tools for your website and increase your productivity. So, go ahead, try these tools and enjoy the fruits they reap.


Content Rally wrapped around an online publication where you can publish your own intellectuals. It is a publishing platform designed to make great stories by content creators. This is your era, your place to be online. So come forward share your views, thoughts and ideas via Content Rally.

View all posts

Leave a Reply

Your email address will not be published. Required fields are marked *

Related

steam disk write error

How To Troubleshoot Steam Disk Write Error? [Fixed]

Steam is a well-known name in the video gaming industry. It is a social gaming website, which allows you to play, buy, and discuss games. If you are using steam for some time, then there is a lot to know about it. Have you ever faced the Steam disk write error? Are you looking for the solution to Steam disk write error windows 10? Are you unable to solve the issue? This article will help you with multiple solutions in order to remove the error. Go through the steps and enjoy an interruption-free gaming experience.        What Is The Steam Disk Write Error? While you are updating or downloading any game you bought from the Steam Platform, you may face the Steam disk write error. At the time you are attempting to download or install a new game, this message can appear on the screen. You also can face the same issue when you are trying to update a game that you have installed earlier. In case your game needs an update, at the time of launching the game, the screen will show this error. Reason For Steam Disk Write Error? Whenever Steam is not able to download and save the data of the game to the storage drive of your computer during a new installation or an update. One of the messages mentioned below will appear on the screen, Any error occurred at the time of updating the  game_title Any error occurred at the time of installing game_title The steam disk write error can happen, when There are no defects on the hard drive. The Steam folder or drive is write-protected. There are outdated or steam corrupt disk files in the Steam directory. Your firewall or antivirus is blocking Steam from saving and downloading data.  Fixing Steam Disk Write Error If you have encountered the steam error while downloading, error while installing, updating, or launching the Steam game and want to know the ways of fixing disk write error steam, here are the answers #1. Restart The Steam Open the Steam window Click the word “Steam” on the top-left corner The Dropdown menu will open For Windows, click on “Exit,” and for Mac, click on “Quit Steam.” Again open Steam. In case you have been logged out, log in another time Check for the Steam disk write error is gone or not #2. Restart Your PC Click on the start icon Power Icon Restart #3. Clear All Download Cache Open steam Go to “settings.” Click on “downloads.” Select the option “clear download cache.” Reopen and check if it is working or not #4. Repair All The Steam Disk Bad Sectors EaseUS Partition Master to check bad sector Install it Click on the disk which you want to check Click “surface test.” It will red mark the bad sectors. In case of any error, it is a good idea to replace the drive or clone it to another HDD apart from the steam disk write error SSD. You can take help from EaseUS Partition Master to replace the failing disk. After opening the EaseUS Partition Master, select the disk, which you want to clone. Click on “Clone” Select your destination or SSD/HDD whenever you want to clone it Click on “Next” Click on “Continue” to wipe out all data. If you have any valuable data, take a backup of it. Click on “Autofit the desk” or “Edit disk layout” or “Clone as the source.” Click on “Execute the operation.” Click on “Apply” to solve the steam disk write error #5. Run As Administrator Go to your Steam folder Right-click on “Steam.exe” Click on “Properties” Select the tab named “Compatibility.” Click in “Run this program as an administrator.” Click on “Apply” then “OK.” See whether the Steam disk write error is solved or not #6. Move The Game Folder Sometimes transferring the game to a healthy drive can solve the issue. But here, manual transferring will not work. You can use EaseUS Todo PCTrans for transferring the file.  Connect your computer with the destination drive Select the games that you want to transfer Now transfer them to the destination drive #7. Confirm Integrity For Steam Game Files  Reboot the system Launch Steam Click on the “Library” tab Right-click on the game that is causing the error Select “Properties” Click on the “Local Files” tab Click on the “Verify Integrity Of Game Files…..” button It will take some time to verify the game files Once the verification is done, try to install the updates and see if the Steam disk write error is showing or not.  #8. Remove The Write Protection From The Steam Drive For Steam Disk Write Error Press “Win + R.” Type cmd Command Prompt will open. Type “disk part” there Press “Enter” Type “list disk.” Press “Enter” Type “select disk 0.” Press “Enter” Type “attribute disk clear read-only.” Press “Enter” After the write protection process is done, type “Exit.”  Press “Enter” The disk part window will close.  #9. Some Other Fixes Of Steam Disk Write Error Apart from all the steps mentioned earlier or techniques, there are two more ways to eliminate the Steam disk write error. You can uninstall Steam and reinstall it. In order to uninstall  Go to “Control panel.” Open “Add or Remove programs.” Search for Steam and select it Click on the “Remove” After selecting the automatic option, click on “Next.” Click “Finish” Once the uninstallation is completed, you can install it again. For installing Steam, follow the below steps. Visit https://store.steampowered.com/about/ Click on “Install Steam” After the download is completed, click on “Open” or “Run.” Follow the on-screen instruction to install Steam. Open steam and log in. Final Talk Though you have tried and everything to resolve the issue, it is not working. You can seek help from Steam’s official support. Opt for the Steam support team. You also can visit the community forum of Steam for any further or additional help. Apart from the above-mentioned nine solutions of steam disk write error, if you know any other practical solution, do let us know.   More Resources: The Complete Guide To Choosing VPS Hosting Best Server Management Tips for Startups Best Bulk Sd Cards Of 2020 – Review And Buying Guide

READ MOREDetails
unzipping

Ways of Unzipping Files on Mac

There are several low-cost and third-party compression apps that you can use on your Mac device. This operating system comes with inbuilt compression systems that you can use to unzip and zip files. The inbuilt system is primary, which is the reason why many apps are available in the market. When you look in the store, you will realize over fifty applications that will show you ways of unzipping and zipping files. Below are ways and instructions that will direct you on decompressing and compressing folders and files using zipping tools that come with the Mac operating system. The device is basic, and it gets your job done. The OS X Compression Application: When you have this app, it will be secure when you are pondering on how to unzip files on mac the easy way since it comes from the Set app. It also comes with possibilities of modifying the data. There is no need of wasting time looking for it in the apps folder because it is not there. The app is not readily visible because it is a primary service of the operating system. App developers and apple can employ core services for purposes of enhancing the capabilities of an application. For instance, Mac Mail employs this service to decompress and compress attachments; and Safari uses it to decompress downloaded files. The utility of archives has several settings that you can modify, and you can make changes after some time. As at now, it is better to keep using this utility the way is configured in the default state because it is possible to try new settings later. This utility may not be visible, but it is not to mean that you cannot access the services. Apple makes unzipping and zipping folders and files very easy by allowing the finder to get utilize the utility archive app. Zipping a file: The first step when you are learning how to unzip files on mac the easy way from the settings app is by knowing the procedure of zipping. When you are zipping a file or folder, you begin by opening the finder window and then navigate to the folder or file that you want to zip. You will then have to press control-click if you have the mouse with this capability on the file and then choose compress from the menu. The item’s name will show up after the term compress so that the ideal menu item will compress “item name.” Unzipping a File: How to unzip files on mac the easy way from Setapp has never been easier. Double-click a zip-file and the folder or file will become decompressed in the same folder as the compressed file. If the compressed file contains one file, the decompressed item will have a similar name as the primary file. In case the file has the same name as an existing name in the folder, the file undergoing decompression will have the number appended to the name. For files with multiple items: When the zip file contains several items, the files that undergo unzipping will then get stored in the folder that has a name that is similar to the zip file. For instance, if you zip the file with the name archive.zip, files will get placed in the folder that has a name called Archive. The folder will then get placed in a similar folder to the archive.zip file. In case the folder already has the folder called archive, a digit or number will get appended on the new folder as the archive. By default, compressed folders and files open by use of the archive utility. It shows inside the dock while files are undergoing unzipping, not unless you are choosing to open them with another program. Read Also: Why DRM Is The New Standard For Document Security MSVCP140.Dll File Missing Problem And Ways To Tackle It

READ MOREDetails
WASM

The Foolproof Step-By-Step Guide To Running WASM Unikernels 

If you are looking for the latest technology and universal translation, you will want to check out WASM. This is a new type of web assembly that provides a format for a virtual machine. While at first glance, this may seem frighteningly overwhelming, the process itself isn’t that hard.  The use of being able to use your computer inside a virtual machine may seem like a level even superheroes can not reach, but the only thing you need is to understand how to deploy a repo.  Many people have an interest in languages and where they come from. As a result, anything that has to do with the latest in technology and understanding is bound to gain some attention.  What Is A Unikernel? A WASM Unikernel is a highly specialized machine image. You choose from a stack of modules and go through a set of libraries to correspond with the necessary constructs for the process to be run at the maximum level.  The libraries will then be placed with the applications together to seal the configuration code. These will run on a specific hardware system for the best chance of running smoothly. While this may sound new, the process has been around since the nineteen nineties, though the technology was, of course, not as far along as today.  Because we are far more advanced, the design and libraries have improved vastly and are now much more evolved. When you are using Unikernel, you can easily maximize productivity with the use of the server hardware. How To Run A WASM Unikernel? The process of running WASM unikernels isn't overly complicated; you simply need to create a C program. From here, you will compile it to WASM. You will need to have an EMSDK after setting up the proper environment, as it is an essential part of making the Unikernels run correctly.  A tool known as WASMER is another vital part of this, and you will need to run your WASM through the WASMER next. Using OPS next, you will turn the process into a Unikernel. Create a small config.json for it and tell your OPS to load the file and pass it.  While this process may change in the future, as of right now, it is the fastest and most secure way to run your Unikernels correctly and safely. However, keep in mind that technology is constantly changing, so you will have to stay on top of it to ensure that you are not falling behind.  Unkernel’s booting process is relatively faster. Unikernel can function on the bare base metals and the hypervisor. The fast booting process of the Unikernel is making the system fast. Minimum overhead and the memory requirements are making the system fast working and without using very large memory space.  The complicated operating process is undeniable. When you are using the WASM Unikernel, the pertaining system is relatively complicated but all the booting processes and the functional efficiency increase. Fans Of Unikernels Love This  Research has shown that fans of WASM Unikernels love running them using this process because it is quicker, saves time, and unneeded frustration. While the steps may seem complicated, they are easy to execute and offer the chance to have everything be done safely. That shows you better security, and you can be safe in the knowledge that you haven't forgotten a critical process or made unnecessary mistakes. Another benefit is the libraries we have mentioned above offer direct access to the hardware, which offers little to no transition between kernel mode. Using the tips we've provided above, you will now be ready to use Unikernels like a pro.  Read Also: How Have Python Made Machine Learning Convenient? Kids Will Get These Benefits if They Learn Coding New Platforms to Explore in Advertising this Year

READ MOREDetails