5 Other Uses for Your Garage

Published on: 07 April 2017 Last Updated on: 09 August 2019
office-worker

Traditionally, the garage is used for parking your cars. However, even though it can definitely be great for shielding your vehicles from the elements, there are plenty of other things that you can do with this part of your home as well. These are a few ideas that you can try.

Read also: Will Self-Driving Cars Replace Human Error?

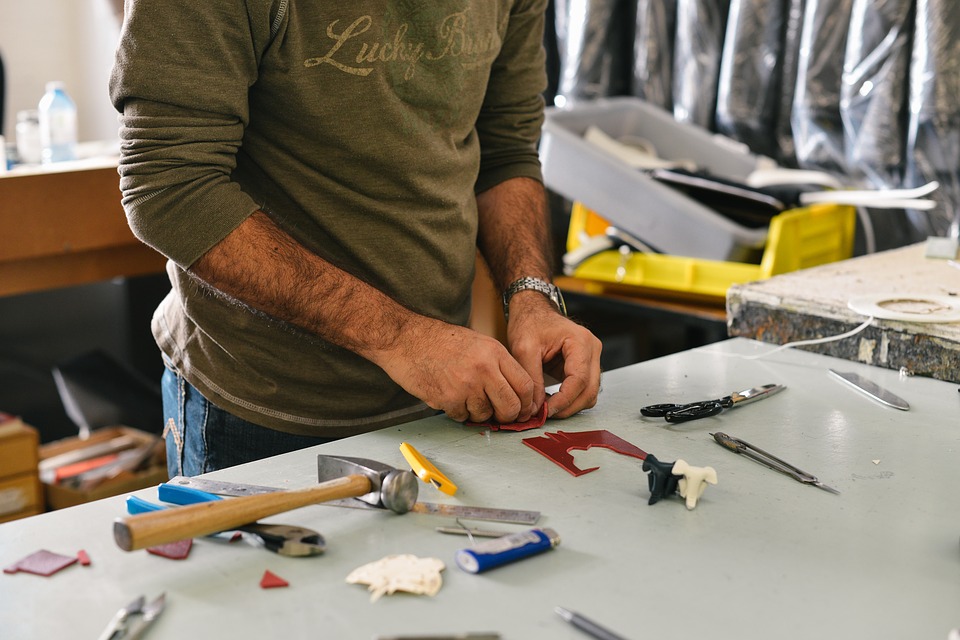
1. Use it as a Workshop

One great use for your garage is to use it as a workshop. If you like woodworking, for example, your garage can provide you with the perfect space to keep your tools tidy and organized and to work on your projects. This makes it easy for you to work indoors without having to drag the mess into your actual house.

2. Create a Game Room

Has your family always wanted a game room? You don’t have to build an addition to your home to make this happen; instead, you can use your garage for this purpose instead. Your garage probably has ample space for a pool table or for other types of game tables, such as for air hockey or Foosball. You can also hang up a dartboard, install a stereo system and otherwise turn the area into a comfortable place for hanging out with family and friends.

3. Make a Play Area for Your Kids

If your kids have a lack of space for playing, you can turn your garage into a safe place for them to do so. You will probably need to take some steps first, however, to ensure that it isn’t dangerous. For example, you’ll probably want to disable the garage door so that it cannot be opened, remove any dangerous tools, and put down rubber mats to help cushion any falls. If you take these steps, however, the garage can actually make for a nice, spacious play area for your children, and it can allow you to store books and toys outdoors so that they aren’t cluttering up your home. Plus, your little ones can play to their hearts’ content, and you won’t have to worry about their messes being on display inside your home for everyone to see.

4. Store Out-of-Season and Rarely-Used Items

If you are like a lot of people, your home might be cluttered with out-of-season and rarely-used items. You might not want to get rid of these items, since you might need them later, but you probably don’t want them in the way inside your home. Luckily, your garage can be perfect for storing stuff.

For example, you can store your suitcases and other items that you only use when you travel, or you can pack up seasonal clothing like coats and sweaters and only bring them into the house when it’s seasonally appropriate to do so. Additionally, you can store holiday decorations, outdoor items and other things that you only need to use every now and then. Then, these items will be out of the way but will be easy to access when you need them.

5. Create a Craft Room

If you’re really into crafting, you might wish that you had a dedicated space for your crafts. Luckily, your garage can function perfectly for this purpose. You can set up a nice craft table that you can use for making things, and you’ll have more than enough space to stash fabric, ribbons, glue guns and anything else that you might need for crafting purposes.

As you can see, there are tons of uses that you can use your garage for rather than just using it to park your vehicles. If you’d like to maximize the space that is available for you and your family and would like to customize your home so that it properly suits your family’s needs, following these tips can help.

Content Rally wrapped around an online publication where you can publish your own intellectuals. It is a publishing platform designed to make great stories by content creators. This is your era, your place to be online. So come forward share your views, thoughts and ideas via Content Rally.

View all posts

Leave a Reply

Your email address will not be published. Required fields are marked *

Related

how to harvest lemongrass

How TO Harvest Lemongrass: Tips AND Tricks FOR Growing AND Using This Versatile Herb 

Lemongrass is a tropical herb that has a fresh and citrusy flavor and aroma. It is one of the most essential herb that is people widely use in Asian cuisines. They especially use it in Vietnamese, Thai, and Indonesian dishes. It is also a popular ingredient in teas, soups, curries, salads, and marinades. Lemongrass has many health benefits, such as improving digestion, boosting immunity, reducing inflammation, and relieving stress. But did you know that you can grow and harvest your own lemongrass at home? Yes, you can! Lemongrass is easy to grow and maintain, and can thrive in pots, containers, or gardens. You can enjoy fresh and organic lemongrass all year round, and save money and time from buying it at the store. In this article, I will show you how to harvest lemongrass, and share some tips and tricks for growing and using this versatile herb. By the end of this article, you will have a better understanding of how to harvest lemongrass, and how to make the most of this wonderful herb. So, if that is something that you want to know, I have you covered! Keep on reading this blog till the end to learn more… How to Grow Lemongrass? Lemongrass is a wonderful herb that can add a refreshing and citrusy flavor to your dishes, drinks, and teas. It is also a beautiful ornamental plant that can brighten up your garden with its tall, graceful stalks and fragrant leaves. Lemongrass is native to tropical regions, but you can grow it in cooler climates as well with some care and preparation. Here are the steps and conditions for growing lemongrass successfully at home: 1. Choose a healthy lemongrass plant or stalk You can buy a potted lemongrass plant from a nursery or garden center, or you can start your own from a fresh lemongrass stalk that you can find in most grocery stores or Asian markets. Look for a stalk that is firm, green, and has some roots at the base. Avoid any that are dry, brown, or moldy. 2. Prepare a sunny and warm spot for your lemongrass Lemongrass loves full sun and heat, so choose a location that gets at least six hours of direct sunlight per day. If you live in a colder region, you can grow lemongrass in a container that you can move indoors during the winter. Use a large pot with drainage holes and fill it with rich, loamy soil that is high in organic matter. You can also add some compost, manure, or leaf mold to improve the soil quality and fertility. 3. Plant your lemongrass in the soil If you bought a potted plant, simply transplant it to the ground or a larger container, making sure to bury the roots well and leave some space between the stalks. If you are starting from a stalk, peel off any dead or yellow leaves and trim the top part to about six inches. Place the stalk in a glass of water and keep it in a sunny windowsill until roots start to grow, which can take a few weeks. Then, plant the rooted stalk in the soil, leaving about two inches of the stem above the ground. Space the plants about two feet apart to allow them to spread 4. Water and fertilize your lemongrass regularly Lemongrass needs moist soil to thrive, so water it frequently and deeply, especially during hot and dry periods. A good rule of thumb is to water it once a week or whenever the top inch of the soil feels dry. You can also apply a layer of mulch around the plants to conserve moisture and prevent weeds. Lemongrass also benefits from a monthly dose of liquid organic fertilizer during the growing season, such as fish emulsion or seaweed extract. This will help it grow faster and produce more leaves and stalks. 5. Harvest and enjoy your lemongrass You can start harvesting your lemongrass when the stalks are about a foot tall and half an inch thick. Cut the stalks at the base with a sharp knife or scissors, leaving about two inches of the stem in the ground. Additionally, you can use the whole stalk, or peel off the outer layers and use only the tender inner part. You can also harvest the leaves and use them fresh or dried for teas and infusions. Lemongrass can be stored in the refrigerator for up to two weeks, or in the freezer for up to six months. You can also dry it and store it in an airtight container for later use. How to Harvest Lemongrass? Harvesting lemongrass is a simple and satisfying process that can be done in a few steps. Here are the basics of how to harvest lemongrass: Choose the right time  The best time to harvest lemongrass is when the stalks are about 12 inches tall and 0.5 inches thick. This usually happens after 3 to 4 months of planting. You can harvest lemongrass throughout the year, as long as the temperature is above 40°F. You can also harvest lemongrass in batches, leaving some stalks to grow and regenerate. Cut the stalks To harvest lemongrass, you need a sharp knife or scissors, and a clean cutting board. Cut the stalks at the base, as close to the soil as possible. You can cut as many stalks as you need, or as many as you can use within a week. You can also trim off the leaves, as they are not edible and can be used for other purposes. Wash and store the stalks After cutting the stalks, wash them under running water, and pat them dry with a paper towel. You can store the stalks in the refrigerator, wrapped in a damp paper towel, and placed in a plastic bag. They can last for up to a week. You can also freeze the stalks, chopped or whole, in a freezer bag. They can last for up to 6 months. Dividing Lemongrass: What is It and How to Do It? Dividing lemongrass is a great way to propagate and maintain this aromatic and flavorful herb. Lemongrass is a perennial plant that grows in clumps of stalks and leaves. Over time, these clumps can become crowded, woody, and less productive. By dividing lemongrass, you can rejuvenate the plant, increase its yield, and share it with others. Here are the steps and reasons for dividing lemongrass: 1. When to divide lemongrass? The best time to divide lemongrass is in the spring, after the last frost date when the plant is actively growing and has new shoots. You can also divide lemongrass in the fall if you live in a warm winter climate or if you plan to overwinter the divisions indoors. Avoid dividing lemongrass in the summer, when the heat and drought can stress the plant and reduce its survival rate. 2. How to divide lemongrass? To divide lemongrass, you must dig up the entire plant and separate it into smaller sections. You can use a shovel, a sharp knife, or your hands to do this. Each section should have at least one inch of root and several healthy stalks and leaves attached. You can trim the leaves to about six inches to reduce water loss and make the divisions easier to handle. Discard any old, brown, or damaged parts of the plant. 3. Where to plant lemongrass divisions? You can plant lemongrass divisions in the same spot where you dug up the parent plant or in a new location with full sun, moist and well-drained soil, and plenty of organic matter. You can also plant lemongrass divisions in containers at least 10 inches deep with drainage holes. Space the divisions about two feet apart to allow room for growth. Plant the divisions at the same depth as they were before, with the crown just below the soil surface.  4. How to care for lemongrass divisions? Lemongrass divisions need regular water and fertilizer to establish and thrive. Water them deeply and frequently, especially during the first few weeks and during hot and dry periods. You can also apply a layer of mulch around the plants to conserve moisture and prevent weeds. Fertilize the plants once a month with a liquid organic fertilizer, such as fish emulsion or seaweed extract, during the growing season. Protect the plants from frost in the winter by moving them indoors or covering them with a frost cloth. 5. How to harvest and use lemongrass divisions? You can start harvesting lemongrass divisions when they are about a foot tall and half an inch thick. Cut the stalks at the base with a sharp knife or scissors, leaving about two inches of the stem in the ground. You can use the whole stalk, peel off the outer layers, and use only the tender inner part. Additionally, you can also harvest the leaves and use them fresh or dried for teas and infusions. Lemongrass can be stored in the refrigerator for up to two weeks or in the freezer for up to six months. You can also dry it and store it in an airtight container for later use. How to Use Lemongrass in Food? Lemongrass has a long, green stalk with a bulbous base and grassy leaves. It has a lemony taste with a hint of mint and ginger. Lemongrass can be used fresh, dried, or powdered, depending on the recipe and preference. Here are some ways related to how to use lemongrass in different ways: Fresh lemongrass Firstly, fresh lemongrass is the most aromatic and versatile form of lemongrass. You can find it in the produce section of most supermarkets, Asian markets, or online. To prepare fresh lemongrass, you need to peel off the tough outer layers and trim off the root end and the top third of the stalk. You can use a sharp knife or scissors to do this. The part that you want to use is the pale and tender lower part of the stalk. After that, you can slice it thinly, chop it finely, or bruise it with a pestle or the back of a knife. Slicing or chopping is good for salads, stir-fries, curries, and marinades, while bruising is good for soups, stews, and broths. You can also make a paste by pounding or blending lemongrass with other ingredients, such as garlic, ginger, chilies, and cilantro. A paste is great for adding flavor to meats, seafood, tofu, and rice. You can store fresh lemongrass in the refrigerator for up to two weeks or in the freezer for up to six months. Dried lemongrass Secondly, dried lemongrass is less potent than fresh lemongrass but still has a nice, lemony flavor. You can buy it in whole or sliced form or dry your lemongrass by hanging the stalks in a warm and airy place until they are brittle. Dried lemongrass is good for making teas, infusions, and herbal blends. You can also use it to flavor soups, stews, and broths, but you must soak it in hot water for about 20 minutes before adding it to the pot. Additionally, you can store dried lemongrass in an airtight container in a cool, dark place for up to a year. Powdered lemongrass Lastly, powdered lemongrass is the most convenient form of lemongrass, as it does not require any preparation. You can buy it in spice shops, Asian markets, or online. Powdered lemongrass has a mild and sweet flavor and can be used in baking, desserts, sauces, and dressings. You can also sprinkle it over salads, soups, and stir-fries for a touch of freshness. The shelf life of powdered lemongrass is also great. For up to six months, you can store powdered lemongrass in an airtight container in a cool and dark place. How to Use Lemongrass in Other Things? Apart from cooking, you can use lemongrass in many other ways. Some of the best and most popular uses of this herb are as follows: Beautifying You can use lemongrass to make your own beauty products, such as soap, lotion, or shampoo. You can infuse the stalks or the leaves with oil, such as coconut, olive, or almond oil. Moreover, you can also add other ingredients, such as honey, aloe vera, or essential oils. You can use the products to cleanse, moisturize, or scent your skin and hair. Healing You can use lemongrass to treat various ailments, such as headaches, colds, or infections. You can inhale the steam from boiling the stalks or the leaves, or apply the oil to your temples, chest, or throat. Additionally, you can also drink the tea, or gargle with the syrup. You can use the products to relieve pain, inflammation, or congestion. Wrapping It Up! If you want to know how to harvest lemongrass, I hope that this blog has been of help to you. If there are any other queries about the same, please feel free to let me know. All that you need to do is scroll down till you reach the bottom of the bottom of the page. Then leave your suggestions and comments in the box below. And I will be there to answer them all for you! Learn More About: Everything You Need To Know About Harvesting Basil Asparagus 101: When, How, And How Often To Harvest? How to Harvest Spinach the Right Way: A Step-by-Step Guide

READ MOREDetails
how to harvest dill

How to Harvest and Preserve Dill for Year-Round Use?

The tender, fern-like leaves of dill almost beg to be touched. If you want to cook them, trim the fresh dill foliage and gather the seeds for pickling. Or you can chop the feathery leaves and yellow umbels for attractive bouquets of homegrown flowers. In addition, black swallowtail caterpillars love to feed on it. Its tiny yellow blooms are great at drawing in a wide range of pollinators. Dill grows as an annual for summer harvests in USDA Hardiness Zones 2–8. In other parts, it may self-seed and is hardy in the winter in Zones 9–11. Here is everything you need to know about how to harvest dill. Keep reading for a comprehensive guide. How to Harvest Dill? Fresh dill clips easily, but it soon starts to droop. Sounds familiar to Cilantro, right? Its flower umbels may look lovely in a mixed bouquet, but after a few hours, don't be shocked if they start to wilt. When harvesting dill for recipes, use it as soon as possible because its flavor starts to fade after a few days. Cut off the flower stalks of dill after the yellow blooms have faded but before the seeds start to ripen and come away from the umbel. Cover the entire flower head with a small paper bag that has a few tiny holes for ventilation. Hang the plant upside down in a cool, dry place. Watch for the seeds to fall and collect them in the bag's bottom. The seeds should be kept in a cool, dry, and dark area in an airtight glass container. When and How to Plant Dill? Dill grows best outside and is simple to start from seed. Plant the seeds directly into the ground, 1/4 inch deep and spaced 1 to 2 inches apart, in the springtime following the last frost. If you want the dill plants to be able to self-sow, plant the seeds in tufts so the seeds can fall and sprout the following year. Or you can plant them in rows spaced about 6 inches apart. You might want to think about succession planting if you want a reliable supply of dill. During the growing season, start by planting a small number of seeds from the packet at a time and then a few more every week. Typically, seeds take 7 to 14 days to germinate. Also, dill can be grown from transplants grown in nurseries planted in the ground or in containers in spring. You can plant dill outside a few weeks before the last predicted spring frost because it can withstand light frost. To achieve lush growth and stop crowded seedlings from producing seed heads, which stops the production of foliage, thinning is essential. Every 12 to 24 inches, reduce the number of seedlings to just the strongest one once they reach 3 or 4 inches in height. As they get bigger, some start to flop. Plants can be kept upright by placing a stake or a sturdy twig in the ground close to the plant's base. To loosely secure the plant to the stake, use garden twine. You can start the dill seeds indoors four to six weeks prior to the last frost. And you can move the seedlings to the ground once the risk of frost has passed. Transplanting mature dill does not work well, so plant your seedlings where they will be able to grow and thrive. Where To Plant Dill? Dill should be planted in a spot with well-drained soil and at least 6 to 8 hours of daily full, direct sunlight. Particularly for cottage gardens, the delicate foliage gives garden beds and borders textural interest. Choose a location for your dill that will shield it from the wind if possible. Just like spinach, high winds can easily damage its stalks if you do not stake the dill. You can plant dill's fragrant foliage in perennial garden container plantings. Or you can plant them alongside other herbs or vegetables in a traditional kitchen garden. In an edible garden, cruciferous vegetables such as Brussels sprouts, collard greens, broccoli, and cabbage are good companion plants for dill. Dill draws beneficial insects like ladybugs and bees and drives away common brassica pests like loopers and cabbage worms. But avoid planting dill close to carrots. Carrots can be stunted by dill, and because they are closely related, dill can cross-pollinate with carrots to produce inferior hybrid plants. Planting dill close to tomatoes is also not recommended. Mature dill will probably stunt your tomatoes' growth, even though some studies have indicated that tomatoes and dill can be beneficial companions when they are young. How to Propagate Dill? Seed is the most effective method of dill propagation. Cuttings can also propagate Dill, though this isn't as dependable. Seed: Direct sow the dill seeds in early spring at a depth of 1/4 inch in a prepared garden bed. Dill does not tolerate transplanting well. Thin the seedlings so they are 12–24 inches apart when they are 3–4 inches tall. Cuttings: Using shears or scissors, cut off the stem with at least 3 to 4 inches of new growth to take a dill cutting. Place the cutting in a water-filled container, making sure to remove any leaves below the water's surface, and allow the roots to grow for two to three weeks. Fertilizer and rooting hormones are not required. Plant the dill in a container or on the ground once the roots are 2 to 3 inches long. Is Dill a Type of Weed? No, I am not talking about WEED weed (read: marijuana). Although dill isn't technically a weed, some individuals and spice companies call the plant dill weed, possibly due to its feathery leaves. Dill weed is a dried or fresh foliage plant. Flower umbels are yellow and used to make dill seeds. How Should Dill Be Stored for Optimal Quality? You can keep fresh dill in the fridge by wrapping its leaves in a moist paper towel. Or you can tuck its stems into a container of water. Fresh dill can be frozen by submerging it in water in ice cube trays. Place the cubes in cooked dishes that have enough moisture to withstand them. Dill seeds and leaves can also be easily dried for later use, though the flavor is a lot more muted. Water and Soil Sow dill in soil that is moist but well-drained. If there is a lot of clay in your soil, add organic matter to the top few inches to aid in drainage. If you have trouble with poor soil drainage, plant this herb in raised beds or containers. Growing dill requires proper irrigation. As the seeds germinate, keep the soil evenly moist. Dill plants require one to two inches of rain or extra water each week once they begin to grow. Humidity and Temperature Dill tolerates temperatures as low as 25ºF, but 70ºF is the ideal temperature for it. Dill often bolts, sending up flower stalks to set seeds when temperatures rise. This annual herb dies after it flowers and produces seeds. Get rid of the flowers to prolong the plant's growing season. Apply Fertilizer While most herbs, including dill, don't require extra fertilizer, you can give them once or twice during the growing season by applying a balanced 10-10-10 fertilizer. When planting, either mix a liquid fertilizer with water or etch a time-release fertilizer into the soil. Refer to the product label for instructions on how much to use. Trimming Dill should be pruned early in the growing season to prevent limb bending. Cut off the top leaves of the plant to promote more growth of the lower leaves. Food preparation and cooking can be done with anything that has been pruned. Repotting and Potting You can grow dill in pots on a sunny balcony or deck, even if you don't have an outdoor garden. Due to the deep taproot that dill plants have, choose a container that is at least 12 inches deep. Because clay and terracotta pots don't retain as much moisture as plastic or glazed ceramic pots. They are ideal for growing dill. Make sure the container you select has good drainage and is big enough to allow you to space your plants 12 to 24 inches apart. It is best to start over in a new, larger container. Especially if your dill plant outgrows its current one because it does not take well to transplant. If the temperature where you are planting is not too high, you can keep planting seeds into the summer. Types of Dill Dills can be of many types with each of their distinct looks and flavors. Here are the three different types of dill you can grow in your kitchen or backyard. Long Island Mammoth Also known as Long Island Mammoth this one is an old-time favorite. Its fern-like leaves can be dried and stored for a long time, or they can be harvested fresh. It produces big clusters of yellow flowers with flat tops. They turn into brown seed heads, and they can reach a height of five feet. Fernleaf Grown to a height of only 18 inches, Anethum graveolens, or Fernleaf, is a highly productive dwarf variety. It works well in container gardens or small in-ground beds. Its feathery, delicate foliage has a great flavor of dill. From midsummer into fall, it blossoms. Bouquet The 'Bouquet' cultivar produces plants up to thirty inches tall with fine bluish-green foliage. The enormous, six-inch-diameter yellow flower heads are ideal for drying, creating an enduring arrangement. Or you could chop them for fresh floral arrangements. How to Keep New Dill Fresh? Dill weed quickly wilts after harvesting and gradually loses its distinctive flavor and aroma. If you know how to store your freshly harvested dill, this shouldn't be a problem. Here are two straightforward techniques that you can use: Put It in the Crisper Drawer of the Refrigerator Loosely wrap the recently cut and cleaned leaves in damp kitchen towels before putting them in a container or sealed bag. Put the container in the crisper drawer of the refrigerator, which has a lower humidity than the other sections of the appliance. Utilize the herbs before they begin to wilt and dry out, which should happen in a few days. Put It in Water To make this method function, when harvesting the herb, you must cut off the entire stem. After gathering the stems, put them in a glass of water and seal the opening with a plastic bag. Every day, change the water. Unlike potatoes, dill leaves can remain fresh for up to a week when stored in this manner. How to Freeze Fresh Dill? Freezing is the best way to preserve extra dill for later use if you've harvested more than you can use at once or in a few days. Dill freezes most effectively when chopped into smaller pieces and added to ice cube trays with just enough water to cover the freshly minced dill. This allows the herbs to be kept for four months or longer. This will ensure you always have dill on hand for when a recipe calls for it. How to Dry Fresh Dill? Dried fresh dill is a popular method if you're searching for another way to store dill for a long time. The herb has many uses, even though it won't have as much flavor as when it's fresh or frozen. All year long, you can use it as a herb in cooked dishes or to make tea. Stick to hang-drying if you don't want much of the flavor to be lost. This is a very easy method to use. All you must do is gather a few dill leaves and then bind them with a string. Later, place them in an area with adequate ventilation upside down.  Place them in an airtight container once they're crumbling and dry. Even though fresh dill is always preferable, make sure to save some for later use. Particularly if you don't have a year-round indoor herb and spice garden. Wrapping Up Growing dill is a great way to add flavor to fish and seafood dishes. A little goes a long way because fresh dill leaves have a strong licorice flavor. It is best that you add dill toward the end of cooking, in salads, or as a garnish for soups. Because once cooked, it tends to lose its flavor. If you have thoughts to share or questions to ask about how to harvest dill, please leave a comment below. We would love to hear from you! Read Also: Asparagus 101: When, How, And How Often To Harvest? How To Harvest Sunflower Seeds: A Fun And Easy Activity For The Whole Family How TO Harvest Lemongrass: Tips AND Tricks FOR Growing AND Using This Versatile Herb

READ MOREDetails
Edmonton landscape

Edmonton Landscape Maintenance Tips

A healthy and well-maintained Edmonton landscape comes with a sense of formality, stability, and elegance. One of the best ways to contribute to the value of your property is through a healthy landscape. It also improves the total appearance of one’s neighbourhood. A healthy landscape also provides your family with a safe, natural surface where they can relax and play. Your children will also have a place for picnics, to play or aimlessly wander around to enjoy the garden. Your landscaping requires some ongoing maintenance to make it tidy and presentable even after many years. You can maintain your landscape by keeping it healthy to be beneficial to your environment by following these few simple tips. Top Dress Your Lawn: Make plans ahead for the coming of spring. Be sure to top dress your lawn during the early fall. You can make use of topsoil or a thin layer of compost for this. This is also the most favorable time to include grass seed in your lawn. With the use of slow-release fertilizers or compost, the growth of your lawn will be promoted against the next spring. Watering: Watering your lawn deeply helps to encourage deep roots. There is no specification about the amount of water to apply on an Edmonton landscape because it depends on the type of temperature, mowing height, wind, soil type, species of grass and some other factors. Use a rain gauge to sprinkle water. An inch is generally considered to be an adequate soaking but makes sure to add more water to south-facing slopes and high spots areas. Shady areas with less than 4 hours of sunlight per day should receive less water. Make sure to water early morning since you won’t lose much water to wind and evaporation.  Doing it in the after wastes a lot of water Mowing: It is true that buzz-cutting your lawn makes it look really cool, like a golf green, but in the long run, the health of your lawn will suffer. Not only will a short lawn dry out and quickly burn, but it not have the ability to combat invasive weeds. Be sure to sharpen your blades every spring and slightly set them higher. The root system of your lawn is only as efficient and deep as the length of your grass’ blades. This is why your lawn should about preferably 2.5 to 3 inches high when you mow it. Go For Durable Materials: The landscape is all about plants for majority of home gardeners but another way to contribute to the ease of maintenance is through a good landscaping. This is why you need to spend some quality time to research the maintenance requirement of the materials you use and their durability. Check the pathways, edging, decking and so on. You should consider the ability of your materials when it comes to withstanding the extremes of your climate during your materials selection process. Conclusion: Everyone leads a busy lifestyle with sports, work, hobbies, school, housekeeping, and the lists appears endless, which is why a lot of house owners don’t have enough time to fiddle with endless blooms that are deadhead or with fussy plants. If you decide to do your landscaping work yourself, you should go for more easy-care plants, which will require minimal maintenance of your landscape and less hours of work. However, if you don’t really enjoy yard work and also have small extra dollars to spend, you can pay for the services of others such as Terra Nova Edmonton to do the work for you. This means you can as well include labour-intensive plants. The services of a professional also ensure good design, diverse and beautiful Edmonton landscape without you sacrificing several hours of your previous time. Read Also: Landscape Edging In Sandy/Beach Areas Create A Stunning Outdoor Space With These Residential Landscape Lighting Tips

READ MOREDetails