Published on: 27 February 2021
Last Updated on: 26 December 2024
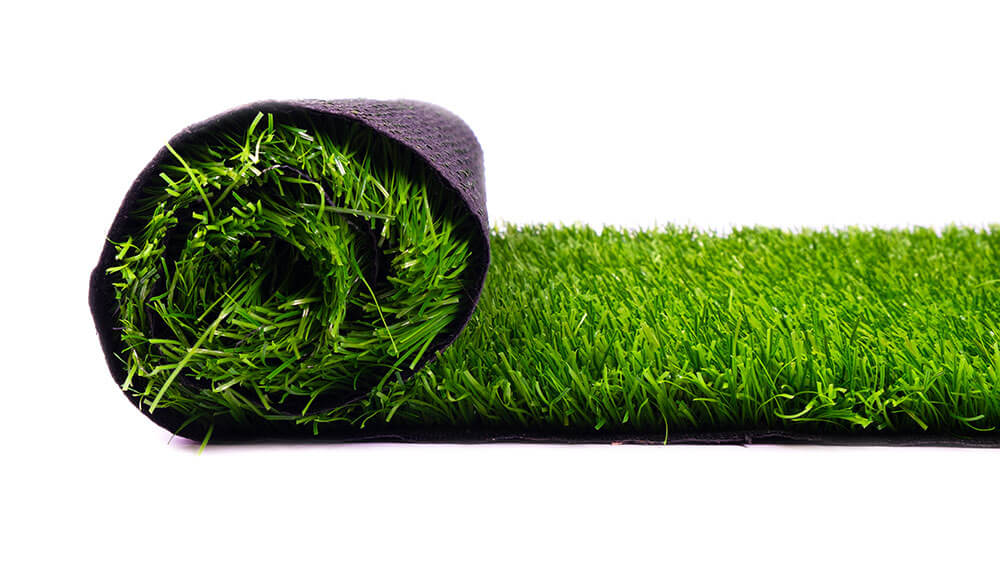
Artificial grass or fake grass is more popular than ever. The best part is you don’t have to hire a professional to install artificial grass in your garden. With the help of this article, you can do it by yourself with the help of your friends or family members. With proper installation, you don’t have to maintain your artificial grass in the long run. You just have to keep it neat and clean with a spray. On the other hand, maintaining real grass seeds is very difficult and may not be possible for busy individuals who don’t get enough time to maintain the same. If you still love natural grasses and want to play games on grass, you can consider growing them that may give you a real feeling of natural grasses.
What Is Artificial Grass?
Artificial grass is basically a material made up of artificial, human-made fibers that seem like real grass, but in reality, it is not! This saves you both money and time in the long run. This fake grass was first installed in the multipurpose sports stadium. This grass has made leaps and looks real. On the other hand, this type of grass is designed for those individuals who don’t have enough time to plant grass seeds.
Why Should You Consider Artificial Grass?
Artificial grass may have various benefits for consumers. It saves you both time and money and is regarded as an excellent landscaping option. The best part about artificial grass is that it does not require any water and includes less maintenance. You can also consider centipede grass seed for this because it also requires low maintenance and can grow in any condition. Real grass can die, but artificial turf can last for more years. Moreover, you don’t have to buy any fertilizers or pesticides to maintain your fake grass. However, there are various pros and cons of artificial grass that you need to consider before buying. You can buy good quality artificial turf with the help of turf near me feature on EasyTurf to make it last for a longer time.
How To Install Artificial Grass In Your Garden – Step By Step Guide
Installing artificial turf is not as easy as it seems. To do this work, you need a good amount of time and hard work. Also, be prepared to get your hands dirty to install the fake grass on your lawn. Now, there are four elements to almost every installation that can reduce the cost of installing fake grass are:
Tools used
Seaming system
Material waste
Subbase material
Here are the major steps to follow in order to install artificial grass in your garden in 2021.
1. Measure Your Area
It is obvious that the area of the garden will differ for everyone. First, you need to measure the length and width of the area that you want to install with the artificial grass. Thus, measuring the area is an important factor that you need to consider at the earliest.
2. Gather Tools And Equipment
The second step to install artificial grass in your garden is to gather vital tools and equipment for the same. You cannot complete the task without the use of a Stanley knife, geotextile weed killer, a turf cutter, and accessories such as tape and glue.
3. Remove The Existing Surface
Now, it’s time to remove the existing surface with your hand if the area is small. However, you need to use a turf cutter if the lawn is very big. You can also plan this before removing the existing surface.
4. Compact The Ground
Another step to install artificial turf in your garden is to compact the ground. You can take the help of a roller or a vibrating plate to meet your objectives. You need to follow this step again later.
5. Place Grass Edging Down
Placing this is not mandatory but optional. If you have a desire to use timber or other edgings, you can follow this step. However, you need to ensure that your final grass line should not be smaller than edging. This is generally done to enable water to run off the turf.
6. Lay Your Sand Or Stone Base
Another step to install fake grass in your backyard is to lay your sand or stone base, and this is one of the most vital factors that you need to consider. Place at least 40mm of compact sand and add more wet sand if the sand is dry. Then, you need to compact the ground again.
7. Roll Out Your Underlay And Grass
Now, roll out your underlay grass first. By keeping in mind not to disturb the weed-killing underlay, roll out the artificial grass on top of that. In this step, you need to do it very carefully.
8. Let The Grass Settle
One of the most vital things to do while installing your artificial turf is to let your grass settle after you have completed the above steps. This is generally done to stop the grass from creasing or wrinkling.
9. Trim The Edges
After completing the above steps, you have successfully installed artificial grass. Trimming is the only thing left now. Trim and cut the artificial grass from the edges neatly. You can use a sharp Stanley knife for trimming.
10. Brush The Grass Up And Relax!
Before brushing up the artificial grass, you need to pin it down using landscape pins. You need to brush up again to bring the fibers of the artificial turf upright. Now, it’s time to sit back and relax and enjoy the artificial grass in the garden.
The Final Thoughts
The best part about artificial grass is that it saves you lots of time and effort that you can spend on other important projects. Once you lay your artificial grass in your garden, it will always be green without any maintenance. Isn’t this amazing? Let me know your views about this in the comment section below.
Reference: https://www.buzzgrass.com/how-to-install-artificial-grass/
Content Rally wrapped around an online publication where you can publish your own intellectuals. It is a publishing platform designed to make great stories by content creators. This is your era, your place to be online. So come forward share your views, thoughts and ideas via Content Rally.
In the realm of property ownership, maintaining the health of your roof is paramount. Aerial roof inspections emerge as a game-changer, providing a unique perspective that goes beyond traditional methods.
In this comprehensive guide, we will be discussing what aerial roof inspection is all about and how it benefits. So, what are we waiting for?
Let's delve into the world of aerial inspections and discover how they can revolutionize your roof maintenance routine.
What Is Aerial Roof Inspection?
Automated aerial systems or vehicles that work remotely generally do not need human intervention. But, most often, the inspector has to take control of his devices to ensure safety. With the advancement of technology, aerial roof inspection came into being.
The drone is helpful in reducing risks because it provides a 360-degree view of the roofs. Moreover, it can trace even the smallest faults at the earliest. In the next section of the article, we will be discovering the advantages of inspecting roofs aerially.
How Does A Typical Aerial Roof Inspection Process Look Like?
A general roof inspection is a bit different. Here, the contractors and building professionals make use of off-the-shelf drones accompanied by software applications. Other steps included in the roof inspection procedure are as follows:
The pilot, operator, or estimator uses the application to make a flight plan. It is possible to do this either on-site or within the workplace. Furthermore, it includes building address specifications and defining the roof’s perimeter.
After the plan is ready, the pilot confirms the proper order of everything. They make use of the mobile app or controller to control and launch the drone.
Next, the drone follows the path automatically along with collecting images and other relevant information. This basically depends on the inspection’s cause and the sensors.
After 10 minutes, the drone automatically lands as per the program and transfers the data to other devices.
What Are The Benefits Of Aerial Roof Inspection?
Roof inspection plays a critical role in ensuring the longevity and durability of your house. Conventionally, these inspections are a bit expensive. But even after the price factor, there are some advantages of aerial roof inspection. Check them out here:
Unlocking Precision with Aerial Insights
Aerial roof inspections leverage cutting-edge technology to scrutinize every inch of yourroof with unmatched precision. Drones equipped with high-resolution cameras soarabove, capturing detailed imagery that might be easily missed during groundinspections. This method ensures a thorough examination, leaving no room foroversight.
Bolstering Structural Integrity
One of the key advantages of aerial roof inspections is their ability to detect structural vulnerabilities early on. By identifying potential issues such as cracks, leaks, or weakened areas, proactive measures can be taken to address these concerns promptly. This not only safeguards your property but also prevents costly repairs down the line.
Time and Cost-Efficiency at Its Finest
Traditional roof inspections often involve time-consuming processes and extensivemanpower. Aerial inspections, on the other hand, streamline this operation. The swift deployment of drones reduces the time required for a comprehensive assessment, translating to cost savings for property owners.
Embracing Sustainability in Maintenance Practices
In an era where sustainability is paramount, aerial roof inspections align seamlesslywith eco-friendly practices. The minimized need for physical access to the roof reducesthe carbon footprint associated with maintenance activities. Property owners cancontribute to environmental conservation while ensuring the longevity of their roofs.
Supporting Innovation and Progress
As we navigate the realms of modern technology, embracing innovative solutionsbecomes imperative. Aerial roof inspections showcase a commitment to progress andefficiency in property maintenance. Property owners adopting this method not onlyenhance their roof health but also position themselves at the forefront oftechnological advancements in the real estate landscape.
Transitioning to Aerial Excellence
In conclusion, aerial roof inspections stand as a beacon of progress in the realm ofproperty maintenance. From precision to efficiency and sustainability, this method ticksall the boxes for an optimal roof care strategy.
Elevate your roof asset management by embracing the power of aerial insights – your roof deserves nothing less. Remember, a well-maintained roof is not just an investment in your property; it's aninvestment in peace of mind.
Read Also:
How Often Do You Need A Roof Inspection?
Choosing A Siding And Roofing Companies In Delaware
Why You Must Use A Residential Roofing Company For Your Home
Selaginella lepidophylla, or resurrect plant, is a desert plant that belongs to the Spikemoss family, Selaginellaceae. Across the desert of Mexico and the United States, you will find this plant. However, it is considered that the desert of North Africa is the native place of this plant.
It is also called the False Rose of Jericho. The creeping stems of this plant grow horizontally, and the leaves are like scale.
What Is A Resurrection Plant?
Any poikilohydric plant that is able to survive extreme dehydration is called a resurrection plant. These plants can survive without water for several months and even for years.
For example, the Rose of Jericho, which is native to the North African deserts, is an example of the resurrection plant. The scientific name of this plant is Anastatica hierochuntica.
Overview Of The Resurrection Plant
Common NameResurrection plant, Rose of Jericho, false Rose of Jericho, stone flower, dinosaur plantBotanical NameSelaginella lepidophyllaFamilySelaginellaceaePlant TypePerennialMature Size2-6 in. tall, 3-6 in. wideSun ExposureFullSoil TypeNone neededHardiness Zones10Native AreaNorth America
Some Interesting Facts About The Resurrection Plant
Here are some interesting facts about the resurrection plant that will surely amaze you.
Scaly Stems
These plants have scaly stems that are arranged in the form of a rosette. A few stems that the resurrection plant produces always grow close to the ground. The entire plant covers a diameter of less than only 1 foot. Just like other plants, this plant also uses its roots in order to extract nutrients and water from the ground.
Resurrection plant is a primitive plant that falls between the category of ferns and mosses. You can not see any leaves on the resurrection plant. All you will find are small, scaly extensions of stems that look like junipers.
Absorb Water
After rainfall, the resurrection plant quickly absorbs the water and enters the phase of rapid growth. As this plant is unable to accumulate water in the roots and stems, once the soil dries out, it also dries shortly. The dry plant curls up into a tight ball with a very small amount of water that is stored in the center.Though the curled ball looks like it is dead it is only dormant. During the whole period of dormancy, the plant minimizes metabolic activities and can last a few years or till the time of the next rain.
Reviving Ability
Due to its reviving ability, this plant is called a resurrection plant. This plant is able to rehydrate. Once it is exposed to moisture, after a few hours, it unfolds its stem and reactivates its metabolism. After it absorbs the water, the stem starts swelling and unfolds itself. Even if the stems do not have any live protoplast within them, this will indeed happen. “Siempre Viva,” which is another name for the resurrection plant. The phrase mentioned earlier means “everlasting.”
Reproduce Sexually
Resurrection plants do not produce flowers, fruits, and seeds. This plant reproduces sexually. Strobili, which is a club-like structure and produced via spores. 400 million years ago, this plant appeared on the planet. Most of the ancient lycopods were giant plants.
But as a result of climate change, all of them became extinct. Small lycopods like resurrection plants have managed to survive without any morphological changes till the modern days.
Dinosaur Plant
Another name for the resurrection plant is the “Dinosaur plant" because it has lived side by side with dinosaurs. Tea made from the resurrection plant can treat sore throat and the common cold due to its antimicrobial properties. The resurrection plant is the longest-living plant on earth.
Does the Resurrection Plant Need Soil?
When you will buy a resurrection plant online or from your nearest nursery on the resurrection plant for sale, you will receive a brown ball of dried moss. This brown ball of moss does have roots, but the roots are not attached to anything. So, in order to grow, this miracle plant does not need soil.
Similar to a hydroponic system, when there is no water or moisture for a really long time, the plant will curl into a ball and turn brown with a diameter of around 6 to 10 inches. which generally has a height range of 15 to 35 centimeters. This plant is very convenient in terms of taking care of and growing.
Can a Resurrection Plant Die?
From the earlier discussion, it may be clear that this plant is really hard to kill. You can simply put the plant in the dark corner of a room without water. But once you bring it out and leave it in water, it will get relieved once again. There is one way to kill this plant. That is overwatering. You can leave this plant in water for a few days, and it will start rotting, and eventually, it will die.
How to Grow the Resurrection Plant?
In order to grow and to care for a resurrection plant, all you need are:
A broad and shallow container that should not have any drainage hole.
Another wide container that should have drainage holes.
For spreading at the button, gravel or pebbles.
Distilled water at room temperature.
A bright but shady place.
And lastly, a dried resurrection plant.
Process
First, fill the wide and shallow container that has no drainage system with water. Do not fill it wholly. Put in two-thirds water.
Place pebbles or gravel up to the waterline. Now, put the dried resurrection plant on the pebbles. For a completely dry and brown plant, it will take around 3 to 4 hours to turn green.
Now, take the wide container that has drainage holes and spread the gravel or pebbles upto the level of water. Mix peat moss. Add humus and sand and spread it on the pebbles. Now, place the resurrected plant on the top.
Do not place it in direct sunlight. Instead, place it in a shady place that has a temperature of higher than 40 degrees Fahrenheit.
Once you notice the plant is getting brown, continue to water it.
Conclusion
This plant is super convenient for plant lovers who can not afford much time to take care of plants. Due to its relative properties, this plant can come back to life just after receiving water. That is why this brown dry ball of moss is so popular among plant lovers.
More Resources:-
DIY Ways To Control Pests In Your Garden
Maintain A Bright And Beautiful Garden During Winter
5 Best Vegetables You Should Try Growing In Your Garden
Your home office would look incomplete without flowers. If you are fond of flowers, you would be looking for the best flowers to decorate your home. Flowers are an important part of your life. There is hardly anyone who is not fond of flowers.
You can check out the florist in Jurong East flower shop and find flowers of your choice. Flowers make you feel lively and beautiful. Looking at the flowers reminds you of your young days or maybe about your childhood. If you are starting your business, you can start your day by buying flowers for yourself. You can also send flowers to your customers on their achievements.
Consider the following 3 reasons to get flowers for your home office:
#1. Flowers Create Beautiful Ambiance
If you are looking for a beautiful ambiance, it’s time to decorate your home office with beautiful flowers. It’s a good idea to check out the florist in Jurong East flower shop for finding flowers. You can find flowers of different colors for your home office.
If there is a special occasion, it would be a great idea to decorate your whole house and don’t forget the flowers. If the occasion is related to your business, it would be best to hire professionals so that you can do other important tasks. So if you want your home office to look good, it would be a good idea to select flowers that match the overall theme of your office especially if you are concerned about the looks of your office.
You may also like: Ready to Take the Leap into Self-Employment? Here’s How to Set up an Awesome Home Office
#2. Flowers Smell Good
Instead of using artificial fragrances, you can rely on flowers. Fresh flowers would smell great! You would feel great by smelling the flowers. The flowers can be a great start to your day. It would make you feel great!
When you are concerned about using artificial fragrances, using fresh flowers can be a suitable alternative. Find the best flowers for yourself! You can also send flowers to someone you care about.
You may also like: Leather Furniture is An Essential Improvement for Any Home or Office
#3. Flowers Remind You of Who You Are
When you were a kid, you had rose flowers in your house. Now when you are a grown-up and working from home, you miss the person you once were! How about adding flowers to your home office and getting lost in the memories of your sweet childhood. The flowers in your home office would serve as a reminder of who you were and who you are!
In fact, if you have customers coming to your home office, they would admire the fresh flowers on your desk. It’s a good way to cheer anyone up. You can put flowers on the table. And it’s possible that your customers would be sending you flowers for great performance.
Wrapping It Up
Your home office looks empty without beautiful flowers. It’s a good idea to keep flowers near you so that you can look at the fresh flowers. Plus, the fragrance would make you feel great! You can decorate your home office with flowers on a special occasion.
Read Also:
Transform Your Garage into a Home Office
8 Tried and Tested Secrets of a Productive Home Office
How To Use A Shipping Container As A Home Office