Published on: 27 February 2021
Last Updated on: 26 December 2024
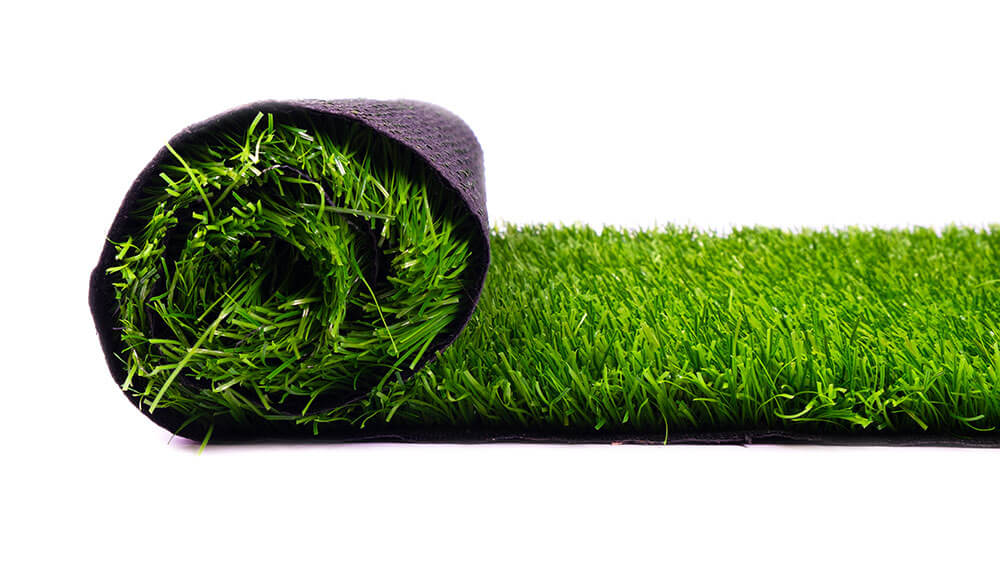
Artificial grass or fake grass is more popular than ever. The best part is you don’t have to hire a professional to install artificial grass in your garden. With the help of this article, you can do it by yourself with the help of your friends or family members.
With proper installation, you don’t have to maintain your artificial grass in the long run. You just have to keep it neat and clean with a spray. On the other hand, maintaining real grass seeds is very difficult and may not be possible for busy individuals who don’t get enough time to maintain the same. If you still love natural grasses and want to play games on grass, you can consider growing them that may give you a real feeling of natural grasses.
What Is Artificial Grass?
Artificial grass is basically a material made up of artificial, human-made fibers that seem like real grass, but in reality, it is not! This saves you both money and time in the long run.
This fake grass was first installed in the multipurpose sports stadium. This grass has made leaps and looks real. On the other hand, this type of grass is designed for those individuals who don’t have enough time to plant grass seeds.
Why Should You Consider Artificial Grass?
Artificial grass may have various benefits for consumers. It saves you both time and money and is regarded as an excellent landscaping option.
The best part about artificial grass is that it does not require any water and includes less maintenance. You can also consider centipede grass seed for this because it also requires low maintenance and can grow in any condition.
Real grass can die, but artificial turf can last for more years. Moreover, you don’t have to buy any fertilizers or pesticides to maintain your fake grass. However, there are various pros and cons of artificial grass that you need to consider before buying. You can buy good quality artificial turf with the help of turf near me feature on EasyTurf to make it last for a longer time.
How To Install Artificial Grass In Your Garden – Step By Step Guide
Installing artificial turf is not as easy as it seems. To do this work, you need a good amount of time and hard work. Also, be prepared to get your hands dirty to install the fake grass on your lawn. Now, there are four elements to almost every installation that can reduce the cost of installing fake grass are:
Tools used
Seaming system
Material waste
Subbase material
Here are the major steps to follow in order to install artificial grass in your garden in 2021.
1. Measure Your Area
It is obvious that the area of the garden will differ for everyone. First, you need to measure the length and width of the area that you want to install with the artificial grass. Thus, measuring the area is an important factor that you need to consider at the earliest.
2. Gather Tools And Equipment
The second step to install artificial grass in your garden is to gather vital tools and equipment for the same. You cannot complete the task without the use of a Stanley knife, geotextile weed killer, a turf cutter, and accessories such as tape and glue.
3. Remove The Existing Surface
Now, it’s time to remove the existing surface with your hand if the area is small. However, you need to use a turf cutter if the lawn is very big. You can also plan this before removing the existing surface.
4. Compact The Ground
Another step to install artificial turf in your garden is to compact the ground. You can take the help of a roller or a vibrating plate to meet your objectives. You need to follow this step again later.
5. Place Grass Edging Down
Placing this is not mandatory but optional. If you have a desire to use timber or other edgings, you can follow this step. However, you need to ensure that your final grass line should not be smaller than edging. This is generally done to enable water to run off the turf.
6. Lay Your Sand Or Stone Base
Another step to install fake grass in your backyard is to lay your sand or stone base, and this is one of the most vital factors that you need to consider. Place at least 40mm of compact sand and add more wet sand if the sand is dry. Then, you need to compact the ground again.
7. Roll Out Your Underlay And Grass
Now, roll out your underlay grass first. By keeping in mind not to disturb the weed-killing underlay, roll out the artificial grass on top of that. In this step, you need to do it very carefully.
8. Let The Grass Settle
One of the most vital things to do while installing your artificial turf is to let your grass settle after you have completed the above steps. This is generally done to stop the grass from creasing or wrinkling.
9. Trim The Edges
After completing the above steps, you have successfully installed artificial grass. Trimming is the only thing left now. Trim and cut the artificial grass from the edges neatly. You can use a sharp Stanley knife for trimming.
10. Brush The Grass Up And Relax!
Before brushing up the artificial grass, you need to pin it down using landscape pins. You need to brush up again to bring the fibers of the artificial turf upright. Now, it’s time to sit back and relax and enjoy the artificial grass in the garden.
The Final Thoughts
The best part about artificial grass is that it saves you lots of time and effort that you can spend on other important projects. Once you lay your artificial grass in your garden, it will always be green without any maintenance. Isn’t this amazing? Let me know your views about this in the comment section below.
Content Rally wrapped around an online publication where you can publish your own intellectuals. It is a publishing platform designed to make great stories by content creators. This is your era, your place to be online. So come forward share your views, thoughts and ideas via Content Rally.
Asphalt roofing is a type of residential roofing that is being used in 80% of The Homes that you will get to see all over the United States. However, this might look very attractive to the eyes, but it is essential to give and keep in mind that you will have to replace it after some time.
If you want to reduce the frequency of the replacement of the roof of your home, then there are certain measures you have to take for that. The solution for this is to work with professional roofing companies, and it is going to bring multiple benefits along with it as well.
What Are The Advantages Of Taking The Help From Residential Roofing?
In this article, we will discuss why you should use a residential roofing company for your home. Keep on reading to find out more information below about longrun companies.
1. Quick
The first major benefit of working with a residential roofing company is that they are going to get the job done real quick. Whenever you are looking for a quick roof replacement, then you can get in touch with them, and they will get the service done within a few hours instead of weeks or days.
Nothing is that you cannot reside in your home when the roofing replacement is going on, and you need to find some other place to live for some time.
However, that is not going to be a problem for you whenever you get in touch with a professional residential roofing company because they will get the job for a few hours. You only need to be out of your house so everything will return to normal.
2. No Damages
Commonly, many times different areas of houses get damaged whenever they are getting the residential roofing replacement job done because the companies are not professional now.
And another benefit that you are going to get when you get in touch with a professional residential-looking company is that they are not going to damage your property.
There is no damage cost that you have to face, and there is no additional money that is going to go into repair, especially when you are getting your roof replacement done by my professional company.
3. Warranty
You never know when things can go wrong, then that is why you need to make sure that the service that you are getting is covered by a warranty. The warranty ensures your residential roofing cost remains under the budget.
Usually, every service covers the roofing work under warranty. Before taking the services, always go through the warranty papers' terms and conditions. And ask about the extension policies of the terms and conditions.
A professional residential roofing company is always going to provide you with a warranty that you can claim, and they are going to make sure that they will go the extra mile to provide you with the quality materials and the quality roofing that they are installing in your home.
4. Safety
Then it's the benefit of working with a professional company, they're going to get the job used securely, and there is no risk. You cannot get this job done by yourself because it is a dangerous thing to do, especially when a ladder is involved.
Working with professional residential roofing companies is always going to be a breeze because there are going to be no accidents involved.
Breakable residential roofing is causing serious trouble for homeowners. Through residential roofing, you can minimize the chances of any sudden coming accidents.
5. Upgrade The Roof Quality
Residential roofing is more like a new warranty on your roof. Even if you want a new roof makeover, this will also be a great choice. Your residential roofing will save the roof of your house and give your roof a stunning makeover.
Often the roof areas are getting destroyed due to heavy rainfall or snowfall. So the best way to recover the roof's health is to call professional residential roofing services, and that’s all.
Your roof quality, along with the look both getting upgraded. Your residential roofing is going to enhance the quality of your roof along with the outstanding look. So if you want to upgrade the look of your house, this will be a pretty smart shortcut process.
Wrapping Up:
Residential roofing and commercial roofing are different. Residential roofing requires minor touch-ups as regular residential places do not have any protective layer. But the residential places require top-to-bottom roofing constructions to protect the area from snowfalls and rain.
Additional:
5 Myths about Roofing Services to Avoid
Roofing Painting Contractor Leads: Ask Before Hiring One
The Top 4 Health Benefits That You Can Get From Wall Soundproofing!
Everything You Need To Know About Metal Roofing: Pros, Cons, And Costs
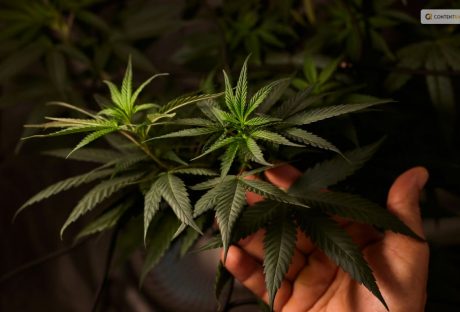
If there is one thing that most people try to know after searching for the legalities of growing weed, it is about “how to harvest weed?”
If this is something that you are searching for, I have you covered!
You see, weed, or marijuana, is a controversial plant to talk about. You might want to grow it for medicinal and recreational purposes. But the “What if people...” thoughts might put you off! This is because harvesting or growing weed is not like harvesting potatoes. There are several other things associated with the same. So, having someone like Stoned Genie can always come in handy!
But don’t you worry, my friend! If you are trying to search for the best ways to harvest weed, both indoors and outdoors, you need to look no further! Keep on reading this blog till the end to learn more...
Is Growing Marijuana Legal?
Marijuana, also known as cannabis, weed, pot, or ganja, is a plant that contains several psychoactive compounds. It can alter one's mood, cognition, and perception. Marijuana has been used for several reasons and purposes for thousands of years, ranging from medicinal to spiritual.
But its legal status has been a matter of debate and controversy in many countries. So, is growing marijuana legal?
The answer depends on where you live, how much you grow, and what you use it for. In some countries, such as Canada, Uruguay, and South Africa, growing marijuana for personal use is legal or decriminalized as long as you follow certain rules and regulations.
In other countries, such as the United States, Australia, and the Netherlands, growing marijuana is legal or tolerated in some states or regions but illegal or restricted in others. In many countries, such as China, India, and Saudi Arabia, growing marijuana is illegal and punishable by harsh penalties, regardless of the amount or purpose.
Various factors, such as the potential benefits and harms of marijuana use, the social and cultural attitudes towards marijuana, the economic and political interests of different groups, and the international treaties and agreements on drug control influence the legal status of marijuana.
The legal status of growing marijuana is also subject to change as new laws and policies are enacted or revised and further research and evidence are presented.
Growing marijuana is a complex and controversial issue that has no simple or universal answer. The best way to find out if growing marijuana is legal in your area is to consult the relevant authorities and sources, and to be aware of the risks and consequences of your actions. Remember, just because something is legal, does not mean it is safe, ethical, or advisable.
When Should You Plant Weed?
Spring is here, and you know what that means: it's time to get your marijuana seeds ready for planting outdoors.
This is the most important crop of the year because you can get the biggest harvest of all.
Some old-timers like to plant their seeds on the first full moon of March. They say this way, the seeds get some light at night and don't grow too tall too fast.
But sometimes, it's still too chilly in March, and not everywhere has the same weather. If you live in a colder place, your plants will grow slower and suffer from the cold and the wind. They will be weaker and more likely to get bugs and diseases
So, what should you do in this case?
Well, you can wait a month or two longer. A seed that sprouts in a nice climate from April onwards will grow bigger and better than one that sprouts in March in the same place
But growing plants for so long is not easy.
You must watch out for all kinds of things: bugs, diseases, nutrients, transplanting, pruning, training... It's a six-month-long job requiring constant attention
Things to Keep in Mind
If you want a good quality and quantity of weed there are several things that you need to keep in mind. Want to know what they might be? I have you covered! Here are some of the things that you'll need:
Fertilizers for growth and flowering: You can choose whatever fertilizers you like, organic or chemical. Organic ones, like humus, guano, and flower boosters, will give you a tasty and aromatic weed, but less of it. Chemical ones, like those from specific brands, will give you more buds, but less flavor.
Insecticides for insects like whiteflies, mites, or thrips: It's better to use them as a prevention, so you don't get any nasty surprises.
An anti-fungal product that works well against powdery mildew: Propolix or other chemical products are good, but you have to use them from the beginning.
Bacillus Thuringiensis: This is for caterpillars and other worms. Use it as soon as the flowers start to show, which is when these critters start to show up. Around May/June.
Stakes or wires to support the branches during the flowering stage.
Soil and Other Conditions to Grow Weed or Marijuana
It's obvious that this is the most common grow medium, probably because it's easy to find and has some nutrients already in it. Weed grown in soil is also more delicious and fragrant. And, no, it's not hard to grow in soil – just plant your (favorite) strain in the soil, and you're good to go.
That's it. Of course, there are different kinds of soil, and some are better than others. High-quality potting soil will make your life easier and faster. You might also want to add some extra nutrients to make your weed grow better.
Or you can make your own super soil. If you decide to buy soil, we suggest you go for the best brands, or at least those with a good soil mix. They should have things like earthworm castings, alfalfa meal, humic acid, etc.
Can You Grow Weed Without Soil?
Want to try something different? Go soilless. You'll see some quicker growth (and bigger harvests). And, conveniently, growing weed in soilless mediums is pretty similar to growing it in soil. The only difference is that you'll have to give the nutrients yourself because soilless mediums don't have any. Some examples of soilless mediums are coco coir, vermiculite, perlite, etc.
What About Hydroponic Grows? Is it Complicated?
No, hydroponic growth is not complicated. It's as easy as picking your setup (hydroponic system), getting your nutrients, and sprouting your seeds. And you'll get some amazing benefits: super-fast growth, huge yields, and super-strong weed.
Sounds good, right? Don't believe everything you hear because some information can mess up your growth. But with the right setup and care, you can be sure of a plentiful harvest.
What It Needs to Survive and Thrive: How to Grow Weed Plant?
If you want to grow the best weed possible, you need to know your plant well. Here are some of the main things that a weed plant needs to thrive, and how it works.
Light
Light is the fuel that drives photosynthesis and growth in a weed plant. The fan leaves are like solar panels that absorb light. The more light you give your plants, the more buds they will produce.
But be careful not to give them too much light. If you grow indoors, keep your lights at a safe distance from your plants, or you might burn them and ruin your nugs. And if your plants get too hot, they will dry out faster and need more water and attention.
Weed plants usually need at least six hours of sunlight a day when they grow outdoors. This is called “full sun”. When they grow indoors, they usually get between 12 and 18 hours of artificial light a day, depending on their stage of growth.
Weed is a photoperiod plant, which means that the amount of light it gets every day affects when it flowers and makes buds. Outdoors, this happens when the days get shorter in the fall. Indoors, you can make this happen by changing the light cycle from 18 to 12 hours a day.
Water
Water is essential for all plants, including weed. Water provides hydrogen for photosynthesis, and also carries nutrients from the soil to the plant through the roots, and throughout the whole plant.
Water also helps the plant stay firm and flexible, by creating pressure on the cell walls. This allows the plant to bend with the wind or reach for more light.
Plants also lose water through their leaves, like humans sweat, to cool down. This is called transpiration, and you can see it as droplets on the leaf tips.
This may sound obvious, but you only need to water the soil or the medium where your weed plant grows, not the leaves or the plant itself. We suggest that you water a lot, but not too often, rather than a little, but more frequently. This way, the roots can dry out a bit and get more oxygen from the soil.
Nutrients
A marijuana plant needs several nutrients to grow and flower. The main nutrients it needs are:
Nitrogen: Nitrogen helps a weed plant grow during the vegetative phase, when it makes more mass, stems, branches, and leaves. It is part of chlorophyll, the green pigment that helps the plant use light for photosynthesis.
Phosphorus: Phosphorus is important for storing and using energy, as well as for root growth and bud development. It helps the plant take up nutrients and build its structure.
Potassium: Potassium helps with many of the plant’s metabolic activities, such as respiration, transpiration, and enzyme activation. It also helps the plant fight off diseases and pests.
Calcium: Calcium is a minor nutrient, but it still plays a role in keeping the plant’s cell walls intact, and helping the plant absorb other nutrients.
Magnesium: Magnesium is part of chlorophyll, and helps the plant make glucose from photosynthesis. Without it, the plant can’t turn light into energy.
CO2
Plants breathe in CO2 through tiny holes in their leaves called stomata. During photosynthesis, plants turn CO2 into glucose, which they use to grow and flower.
Some indoor growers use a “CO2 burner”, which is a device that adds a little bit of CO2 to the air, to make the plants grow faster and bigger. But this is usually too much for home growers.
Wind/airflow
Wind or airflow is good for your plants, because it brings fresh air and CO2, which they need to grow.
Airflow also prevents mold and diseases, by removing moisture from the inside of the plant, so it doesn’t get too wet. You can also use a technique called scragging, which spreads out the branches and lets more air in.
Wind or airflow also makes your plant stronger and healthier, by making its stalks and branches thicker and sturdier. When a plant bends with the wind, it produces a hormone called auxin, which stimulates growth.
What to Keep in Mind While Harvesting Weed?
You probably know that different strains of weed need different amounts of time and sun to grow well. Sativas, which come from places near the equator, like a long and sunny summer to get fully ripe.
Indicas, which come from colder and harsher places, are usually faster to finish. But there are exceptions, of course. Some indicas are slow and some sativas are quick.
The best time of day to cut down your outdoor plants is in the morning, before the sun gets too strong. You don't want them to be wet from dew, but you also don't want them to be exposed to too much sunlight, which can ruin their flavor.
You can also harvest at night when it's cooler, but the morning is better because the plants are fresher and haven't been under the sun all day.
1. Watch the weather
As your buds get bigger and heavier and the season changes from summer to fall, the weather can change too. Depending on where you live, you might get some cold snaps or rainstorms.
These are not the end of the world, but you do need to pay attention to the weather and maybe decide on the spot when to harvest your plants, balancing their ripeness with the risk of losing them.
2. Harvesting in Lower Temperatures
According to sources, most weed plants can handle a light freeze—28-32°F for up to three hours—without any problem. But a hard freeze, anything lower or longer, can be a disaster.
Frost can make ice crystals form in the plant cells, hurting them. The leaves will look droopy and then turn dark and crunchy. The worse the frost, the more damage to the plant.
Remember that plants in pots are more sensitive to temperature changes than plants in the ground, so they are more likely to get frost damage.
3. Rainy Harvests
Rain is not a big deal by itself, but it depends on how long and how hard it rains. If it's going to stop soon and dry up fast, you can leave your almost ready plants outside. But if the rain is going to stay, mold is waiting—better to harvest sooner than later.
Covering your plants can help, but the air will still be humid. You can use some tall stakes and a tarp to cover them, but make sure to take them off when the rain or cold is over. In this way, the plants can warm up and breathe.
When to Harvest Weed Plant?
The type of plant growing determines when to harvest cannabis. Sativa, hybrid, and indica are the three primary kinds of cannabis seeds. Are you curious about the best time to harvest marijuana?
Let me break it down for you!
Sativa strain plants typically take longer to mature and give off a stronger cerebral height. However, Indica plants yield larger blooms and a more sedative, paralyzing high.
When an Indica and a Sativa are crossed, hybrids that enable flowers to have both traits are created. While Sativa cultivars blossom in 10 to 16 weeks (about three and a half months), Indica varieties flower in 8 to 10 weeks (about two and a half months) on average.
The cannabis plant can be found in hybrid form halfway between the two main species. It is important to understand that flowering times might vary based on environmental factors like temperature and duration of day.
Thus, the questions of when and how to harvest cannabis remain unanswered. Knowing what you want to achieve with your cannabis plants can help you decide when to harvest them.
Let's say you are growing cannabis for therapeutic purposes. Is there a unique method for harvesting cannabis in this case? If so, it is imperative to harvest the plant at the height of its cannabinoid content.
But if you are cultivating cannabis seeds for fun purposes, then it is best to harvest marijuana at its peak maturity.
How to Harvest Weed?
Once you've decided when to harvest your cannabis, it's critical to understand how to harvest cannabis plants correctly. It's simple to harvest cannabis; you just need to cut the stem off at the root. But it's best not to pull the branch out of the ground since this could damage it and reduce its yield.
It is crucial to properly dry the cannabis after harvesting it before stocking it. Hanging it upside down in a room with lots of ventilation and little light exposure is the best method to accomplish this, like a wardrobe. In order to efficiently dry cannabis, proper ventilation is necessary because it inhibits the growth of mold.
Before you proceed to store it, ensure that you let your cannabis rest for some time. This can range anywhere from three to seven days. This is a great way to ensure that the leaves are dried and ready for you to store.
Wrapping It Up!
In case you were searching for the best ways on how to harvest weed, I hope that this blog has been of help to you. If there are any other queries related to the same, please feel free to let me know. All that you need to do is scroll down till you reach the bottom of the page. Then leave your suggestions in the box below. And I will be there to answer them all for you!
More Resources:
Choosing a Medical Marijuana Dispensary
Marijuana Addiction Treatment: 5 Steps to Avoid Relapse
What Are Tarpenes? How Do They Work? – Cannabis Guide
Medical Marijuana Can Take New Dimensions in the Treatment of Pets
With organic fertilizers, you can make the earth stronger and healthier than any other method. They are good for the earth because they don't hurt it much and let plants grow naturally. This piece has a lot of information about how organic fertilizers can help soil stay healthy.
What Are Organic Fertilizers?
These natural materials from plants or animals help your plants grow better. They've got the good stuff like nitrogen, phosphorus, and potassium that plants love. People like them because they're eco-friendly and don't harm the environment.
How Do Organic Fertilizers Work?
Organic fertilizers are natural plant nutrients that enrich the soil and provide essential elements for healthy plant growth. They release nutrients slowly, feeding plants over time and improving soil structure. This gradual release helps prevent nutrient runoff and ensures plants receive a balanced diet for optimal development.
One key advantage of organic fertilizers is their eco-friendly nature. Since they're made from organic matter, they promote soil health by fostering beneficial microorganisms and earthworms. These tiny soil allies aid in nutrient absorption, making it easier for plants to access the necessary nourishment.
Organic fertilizers also contribute to long-term soil fertility, reducing the need for frequent applications and potentially harmful chemicals.
Organic Fertilizers Vs. Chemical Fertilizers
They have a friendly, Earth-loving vibe. In contrast, chemical fertilizers are made in a lab, which sounds more scientific. In terms of effectiveness, both types can make your plants happy, but they differ in how they do it.
Organic fertilizers release nutrients slowly and improve soil structure over time, like a gradual health boost. Chemical fertilizers, on the other hand, provide a quick nutrient fix, like giving your plants a shot of an energy drink.
Now, let's talk eco-friendliness. Organic fertilizers are environmentally kind, enriching the soil and reducing the risk of chemical runoff into waterways. Chemical fertilizers can sometimes be harsh on the environment, as they may lead to pollution if not used carefully.
Organic fertilizers are the "green" choice, slow and steady, while chemical fertilizers are the quick fix, but be cautious about potential downsides like environmental impact and short-term results.
The Different Types Of Organic Fertilizers
Organic fertilizers come from a variety of natural sources. These include the following:
Compost
Compost is a fantastic organic fertiliser from decomposed organic matter like kitchen scraps, leaves, and yard waste. It's rich in nutrients and improves soil structure, making it easier for plants to access vital elements. Composting at home is an eco-friendly way to recycle kitchen waste and create nutrient-rich soil additives for your garden.
Manure
Manure, typically from animals like cows, horses, or chickens, is an excellent source of organic nutrients. It's widely used in farming and gardening to enrich the soil with essential elements such as nitrogen, phosphorus, and potassium. Just make sure to compost or age manure before applying it to your garden to avoid potential issues with odor and pathogens.
Bone Meal
Bone meal come from grounded animal bones. It's an excellent source of phosphorus, which promotes root development and flowering in plants. Gardeners often use bone meal for bulbs, roses, and other flowering plants to encourage healthy growth and vibrant blooms.
Fish Emulsion
Fish emulsion is a liquid organic fertilizer derived from fish byproducts. It's rich in nitrogen and provides a quick nutrient boost to plants. It's easy to apply but be prepared for the fishy smell. Dilute it before use to reduce the odor and prevent burning your plants.
Seaweed and Kelp
Seaweed and kelp-based fertilizers are eco-friendly options that offer a wide range of nutrients, including trace minerals. They improve soil structure and enhance plant resistance to stress. These organic fertilizers are especially beneficial for vegetables and fruits.
Blood Meal
A blood meal is a high-nitrogen organic fertilizer made from dried animal blood. It's a potent nitrogen source, making it ideal for plants that require rapid growth. Be cautious not to overapply, as it can be strong and potentially harm plants if used excessively.
Coffee Grounds
Coffee grounds are an easily accessible organic fertilizer for your garden. They add nitrogen to the soil and help improve its water retention capacity. If you're a coffee lover, consider recycling your used coffee grounds to nourish your plants.
Worm Castings
Also known as vermicompost, are nutrient-rich excretions of earthworms. They enhance soil fertility and microbial activity while providing a slow-release source of nutrients to plants. Worm castings are gentle on plants and are often used for seedlings and potted plants.
Green Manure
Green manure crops are grown and then tilled back into the soil. In this way, they improve the structure and fertility of the soil by enriching it with organic matter and nutrients. Green manure is an excellent way to prepare your garden for future plantings while reducing the need for synthetic fertilizers.
Eggshells
Crushed eggshells are a natural source of calcium and can help prevent calcium deficiency in tomatoes and other plants. They also deter certain pests like snails and slugs. Save your eggshells, crush them, and sprinkle them around your garden to boost your plants' calcium.
Benefits of organic fertilizers
Aside from its eco-friendly nature, organic fertilizers offer numerous advantages for every farmer or gardener. These are the key benefits of using organic fertilizers:
Nutrient-Rich Soil
Organic fertilizers enrich the soil with various nutrients. This helps promote healthier plant growth.
Improved Soil Structure
Organic fertilizers enhance soil structure. This makes it better at retaining water and preventing erosion.
Enhanced Microbial Activity
Adding organic fertilizers to the soil promotes beneficial microorganisms. The soil is then able to absorb nutrients better.
Healthier Plants
Plants nourished with organic fertilizers often exhibit better resistance to pests and diseases. This contributes to the overall health of your farm or garden.
Choose organic!
Organic fertilizer is a green choice for promoting lush plants and nurturing the soil. It offers many great perks, making it a smart choice for the long haul. Choosing organic fertilizer ensures not just tasty produce but also those grown healthily!
Read Also:
From Dreams To Reality: A Comprehensive Beginner’s Guide On How To Buy A Farm
A Viable Alternative to Wild Fish: Can Salmon Farming Be Sustainable?
Here Are a Few Reasons Why You Should Use Real Estate Farming Postcards to Increase Visibility of Your Business