Keeping Your Pool Pristine: Expert Pool Cleaning In Knoxville, TN

by

11 August 2023

Home & Garden

Pool Cleaning

Having a pool in your backyard is a luxury that many homeowners in Knoxville, Tennessee, enjoy. It provides a refreshing oasis during the hot summer months and a place for friends and family to gather for fun and relaxation.

However, maintaining a pool’s cleanliness and hygiene can be daunting. That’s where professional pool cleaning services in Knoxville come to the rescue. This article will tell you the benefits of hiring expert professional companies specializing in cleaning swimming pools Knoxville TN, and how they can help you keep your pool pristine.

The Importance of Pool Cleaning

Proper pool cleaning is crucial to ensure the health and safety of swimmers. A dirty pool breeds harmful bacteria and algae, leading to waterborne diseases and infections. Debris, leaves, and other particles can accumulate over time, affecting the pool’s aesthetics and filtration system. This is where the expertise of professional pool cleaners comes into play.

Professional Knowledge and Experience

Professional pool cleaning companies

Professional pool cleaning companies in Knoxville possess the necessary knowledge and experience to maintain your pool’s cleanliness effectively. Their trained technicians understand the complex chemistry of balancing pool water, ensuring it remains crystal clear and safe for swimming. They are well-versed in using pool chemicals, such as chlorine and pH balancers, to maintain optimal water quality.

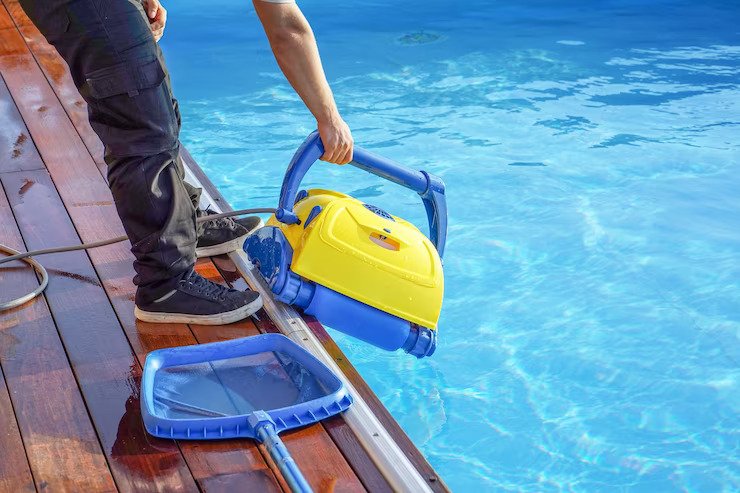
Comprehensive Pool Cleaning Services

One of the key advantages of hiring expert pool cleaners is their wide range of services. These include:

Skimming and Debris Removal

Professional pool cleaners will meticulously skim the pool’s surface, removing leaves, bugs, and other debris. They will also clean out the pool’s skimmer basket, preventing clogs and optimizing filtration.

Brushing and Vacuuming

To eliminate algae and stubborn dirt, cleaners brush the walls, steps, and floor. They will then vacuum the pool to remove any loose particles, ensuring a spotless surface.

Tile and Grout Cleaning

Tile and grout are prone to mineral deposits, dirt, and grime buildup. Professional pool cleaners will use specialized techniques to clean and restore the sparkle of your pool’s tiles, enhancing its visual appeal.

Filter Cleaning and Maintenance

Filters are the backbone of a pool’s filtration system. Expert pool cleaners will inspect and maintain your pool’s filter, ensuring optimal water circulation and efficient debris removal.

Water Testing and Chemical Balancing

Accurate water testing is vital to maintain proper chemical balance in your pool. Professional pool companies in Knoxville have advanced testing equipment and the expertise to analyze water samples. They will adjust the pool’s chemical levels accordingly, ensuring a safe and sanitized swimming environment.

Related: Top 5 Tips in Designing Your Swimming Pool

The Benefits of Hiring Local Professionals

When it comes to pool cleaning, hiring a local pool company offers several advantages. Firstly, their proximity allows for quick and convenient scheduling of cleaning sessions, ensuring minimal downtime for your pool enjoyment. Moreover, local pool cleaners possess in-depth knowledge of Knoxville’s specific climate, water conditions, and common pool-related challenges, enabling them to provide tailored cleaning solutions.

Maintaining a clean and well-functioning pool is essential for enjoying a safe and refreshing swimming experience. By entrusting your pool’s cleaning needs to professionals with expertise in cleaning swimming pools in Knoxville, TN, you can rest assured that your pool will remain pristine throughout the year. Their expertise, comprehensive services, and knowledge of the local area make them invaluable partners in preserving the beauty and hygiene of your pool.

Read Also:

Content Rally wrapped around an online publication where you can publish your own intellectuals. It is a publishing platform designed to make great stories by content creators. This is your era, your place to be online. So come forward share your views, thoughts and ideas via Content Rally.

View all posts

Leave a Reply

Your email address will not be published. Required fields are marked *

Related

how to clean evaporator coil without removing

How To Clean Evaporator Coil Without Removing?

If you want your air conditioner to perform well at all times, you will need to ensure that you maintain and clean the parts of the air conditioner on a regular basis. If you schedule your maintenance as per the requirement of the AC, then it is great. However, in some cases, people like to clean their AC themselves. If you are one of them, you might be interested to know how to clean evaporator coil without removing it when you have a dirty evaporator coil. In this article, we will basically talk about why you need to clean your AC's evaporator coil and how to clean evaporator coil without removing the coil from the AC. Before that, you will also know about what happens to the air conditioner when the evaporator gets dirty. What Happens When Your AC Coil Gets Dirty? Image Source: lirp.cdn-website.com If the evaporator coil of your AC is unclean, it puts your AC at risk. It compromises the safety and working efficiency of the AC in general. In the first, an unclean evaporator coil slows down the speed at which the air blows through the AC, as it blocks the flow of the air. If the evaporator coil contains other materials and particles like pollen and dust, it limits the efficiency of the flow of air. The following things happen when there is an unclean evaporator coil inside the air conditioner: 1. If the evaporator coil is dirty or clogged with particles, then it reduces the flow of air into your home. If there is a reduced flow of air inside your home, it will lead to a lowering of the efficiency of the cooling system of the AC. Your room takes a lot of time to cool than it normally takes, probably your evaporator coil needs cleaning. 2. There might be some cases where your room is not achieving a good level of cooling, despite running the AC for hours at a stretch. In such cases, the problem is probably more than a delay in the cooling performance of the AC. Basically, it is a negative effect on the AC's cooling capacity. 3. Another great issue that happens when the evaporator coil of your AC gets dirty is that the operating pressure increases. This increases the temperature level of the AC, as the unit is working at hotter levels. This is not good for the AC as it damages the components of the AC. 4. An unclean evaporator coil creates wear on the AC system. If one important part of the AC fails to work properly, the other parts follow suit. This is because there is more pressure on the other components of the AC. Hence, the other parts are more likely to get damaged due to the failure of one part. Therefore, you will end up with a damaged AC altogether, and repairing it will be quite expensive for you. 5. If your AC’s evaporator coil gets compromised and does not work properly, then it affects the performance of the other parts of the AC. Hence, your AC unit will have a shorter life. If you want your AC unit to perform well and serve your home for a long time, you will need to ensure that every part of your AC is clean, especially the evaporator coil. Why Do You Need Your Air Conditioner Coil Clean? Image Source: www.cleanairprotx.com You will not need to spend a lot on the repairs of the AC. Regular maintenance will keep out the issues from the AC that need repair. Before any problem turns into a bigger one, you can fix it with regular maintenance. Apart from that, if you keep your evaporator coil clean always, it will not accumulate dust and hence will perform better as a result. How To Clean AC Coils? – Things You Need? Image Source: phyxter.ai The first thing you will obviously need for your AC cleaning is an air conditioner coil cleaner. Apart from that, you will need a cotton cloth for cleaning the coil. For your own protection, wear protective goggles, and wear gloves on your hand for better protection. Furthermore, ensure that you are following the instructions properly while you are cleaning your AC’s evaporator coil. How To Clean Evaporator Coil Without Removing? Image Source: snyderac.com The evaporator coil basically captures all the heat present in your home to condition the air inside. Apart from the evaporator coil, there is a condenser coil in the AC, which removes the air from the AC to the outside of the house. This is the way in which the AC works in colling the house. Since an evaporator is an important part of your air conditioner, hence keeping it clean will enable you to keep your air conditioner always efficient. However, if your question is, “How to clean AC evaporator coils inside house?” then you need to read the next subsection of this article. Read More: Here’s What Makes Package Units Better than the Other ACs AC Coil Cleaners - How To Clean Evaporator Coil Without Removing? Image Source: img.fruugo.com The following are the ways in which you can clean the evaporator coil of your AC without removing it from the AC: Step 1: Turn down the power of the AC, and unplug the machine from the electric port. You will not need an electricity risk for yourself while cleaning. Step 2: Remove the access panel from the AC to see the evaporator coil clearly. Go over the manual of the AC, if required. The manual has instructions on where you can find the access panel. Step 3: Take the access panel off, and remove the screws from the AC. Keep the screws in a safe place. Step 4: To blow the unclean particles off, try using a compressed air canister. This will help you to easily loosen the dirt on the evaporator coil. Step 5: Put back the screws, as well as the access panel. Your evaporator coil is clean. Summing Up Hope the article helped you in knowing how to clean evaporator coil without removing it from the AC. Cleaning your AC is a part of the maintenance operation of the AC. If you maintain your AC on a regular basis, it will offer you a lot of benefits. There will be less hassle and issues on your AC as a result of regular maintenance and cleaning. If you clean the parts of your AC, your AC will look and perform as if it is fully new. Read Also: Best Paying Jobs In Electric Utilities Central How to Brew the Best Beer with an Electric Brew System 13 Ways to Maintain the Coolness of Your Air Condition Unit

READ MOREDetails
how to harvest dill

How to Harvest and Preserve Dill for Year-Round Use?

The tender, fern-like leaves of dill almost beg to be touched. If you want to cook them, trim the fresh dill foliage and gather the seeds for pickling. Or you can chop the feathery leaves and yellow umbels for attractive bouquets of homegrown flowers. In addition, black swallowtail caterpillars love to feed on it. Its tiny yellow blooms are great at drawing in a wide range of pollinators. Dill grows as an annual for summer harvests in USDA Hardiness Zones 2–8. In other parts, it may self-seed and is hardy in the winter in Zones 9–11. Here is everything you need to know about how to harvest dill. Keep reading for a comprehensive guide. How to Harvest Dill? Fresh dill clips easily, but it soon starts to droop. Sounds familiar to Cilantro, right? Its flower umbels may look lovely in a mixed bouquet, but after a few hours, don't be shocked if they start to wilt. When harvesting dill for recipes, use it as soon as possible because its flavor starts to fade after a few days. Cut off the flower stalks of dill after the yellow blooms have faded but before the seeds start to ripen and come away from the umbel. Cover the entire flower head with a small paper bag that has a few tiny holes for ventilation. Hang the plant upside down in a cool, dry place. Watch for the seeds to fall and collect them in the bag's bottom. The seeds should be kept in a cool, dry, and dark area in an airtight glass container. When and How to Plant Dill? Dill grows best outside and is simple to start from seed. Plant the seeds directly into the ground, 1/4 inch deep and spaced 1 to 2 inches apart, in the springtime following the last frost. If you want the dill plants to be able to self-sow, plant the seeds in tufts so the seeds can fall and sprout the following year. Or you can plant them in rows spaced about 6 inches apart. You might want to think about succession planting if you want a reliable supply of dill. During the growing season, start by planting a small number of seeds from the packet at a time and then a few more every week. Typically, seeds take 7 to 14 days to germinate. Also, dill can be grown from transplants grown in nurseries planted in the ground or in containers in spring. You can plant dill outside a few weeks before the last predicted spring frost because it can withstand light frost. To achieve lush growth and stop crowded seedlings from producing seed heads, which stops the production of foliage, thinning is essential. Every 12 to 24 inches, reduce the number of seedlings to just the strongest one once they reach 3 or 4 inches in height. As they get bigger, some start to flop. Plants can be kept upright by placing a stake or a sturdy twig in the ground close to the plant's base. To loosely secure the plant to the stake, use garden twine. You can start the dill seeds indoors four to six weeks prior to the last frost. And you can move the seedlings to the ground once the risk of frost has passed. Transplanting mature dill does not work well, so plant your seedlings where they will be able to grow and thrive. Where To Plant Dill? Dill should be planted in a spot with well-drained soil and at least 6 to 8 hours of daily full, direct sunlight. Particularly for cottage gardens, the delicate foliage gives garden beds and borders textural interest. Choose a location for your dill that will shield it from the wind if possible. Just like spinach, high winds can easily damage its stalks if you do not stake the dill. You can plant dill's fragrant foliage in perennial garden container plantings. Or you can plant them alongside other herbs or vegetables in a traditional kitchen garden. In an edible garden, cruciferous vegetables such as Brussels sprouts, collard greens, broccoli, and cabbage are good companion plants for dill. Dill draws beneficial insects like ladybugs and bees and drives away common brassica pests like loopers and cabbage worms. But avoid planting dill close to carrots. Carrots can be stunted by dill, and because they are closely related, dill can cross-pollinate with carrots to produce inferior hybrid plants. Planting dill close to tomatoes is also not recommended. Mature dill will probably stunt your tomatoes' growth, even though some studies have indicated that tomatoes and dill can be beneficial companions when they are young. How to Propagate Dill? Seed is the most effective method of dill propagation. Cuttings can also propagate Dill, though this isn't as dependable. Seed: Direct sow the dill seeds in early spring at a depth of 1/4 inch in a prepared garden bed. Dill does not tolerate transplanting well. Thin the seedlings so they are 12–24 inches apart when they are 3–4 inches tall. Cuttings: Using shears or scissors, cut off the stem with at least 3 to 4 inches of new growth to take a dill cutting. Place the cutting in a water-filled container, making sure to remove any leaves below the water's surface, and allow the roots to grow for two to three weeks. Fertilizer and rooting hormones are not required. Plant the dill in a container or on the ground once the roots are 2 to 3 inches long. Is Dill a Type of Weed? No, I am not talking about WEED weed (read: marijuana). Although dill isn't technically a weed, some individuals and spice companies call the plant dill weed, possibly due to its feathery leaves. Dill weed is a dried or fresh foliage plant. Flower umbels are yellow and used to make dill seeds. How Should Dill Be Stored for Optimal Quality? You can keep fresh dill in the fridge by wrapping its leaves in a moist paper towel. Or you can tuck its stems into a container of water. Fresh dill can be frozen by submerging it in water in ice cube trays. Place the cubes in cooked dishes that have enough moisture to withstand them. Dill seeds and leaves can also be easily dried for later use, though the flavor is a lot more muted. Water and Soil Sow dill in soil that is moist but well-drained. If there is a lot of clay in your soil, add organic matter to the top few inches to aid in drainage. If you have trouble with poor soil drainage, plant this herb in raised beds or containers. Growing dill requires proper irrigation. As the seeds germinate, keep the soil evenly moist. Dill plants require one to two inches of rain or extra water each week once they begin to grow. Humidity and Temperature Dill tolerates temperatures as low as 25ºF, but 70ºF is the ideal temperature for it. Dill often bolts, sending up flower stalks to set seeds when temperatures rise. This annual herb dies after it flowers and produces seeds. Get rid of the flowers to prolong the plant's growing season. Apply Fertilizer While most herbs, including dill, don't require extra fertilizer, you can give them once or twice during the growing season by applying a balanced 10-10-10 fertilizer. When planting, either mix a liquid fertilizer with water or etch a time-release fertilizer into the soil. Refer to the product label for instructions on how much to use. Trimming Dill should be pruned early in the growing season to prevent limb bending. Cut off the top leaves of the plant to promote more growth of the lower leaves. Food preparation and cooking can be done with anything that has been pruned. Repotting and Potting You can grow dill in pots on a sunny balcony or deck, even if you don't have an outdoor garden. Due to the deep taproot that dill plants have, choose a container that is at least 12 inches deep. Because clay and terracotta pots don't retain as much moisture as plastic or glazed ceramic pots. They are ideal for growing dill. Make sure the container you select has good drainage and is big enough to allow you to space your plants 12 to 24 inches apart. It is best to start over in a new, larger container. Especially if your dill plant outgrows its current one because it does not take well to transplant. If the temperature where you are planting is not too high, you can keep planting seeds into the summer. Types of Dill Dills can be of many types with each of their distinct looks and flavors. Here are the three different types of dill you can grow in your kitchen or backyard. Long Island Mammoth Also known as Long Island Mammoth this one is an old-time favorite. Its fern-like leaves can be dried and stored for a long time, or they can be harvested fresh. It produces big clusters of yellow flowers with flat tops. They turn into brown seed heads, and they can reach a height of five feet. Fernleaf Grown to a height of only 18 inches, Anethum graveolens, or Fernleaf, is a highly productive dwarf variety. It works well in container gardens or small in-ground beds. Its feathery, delicate foliage has a great flavor of dill. From midsummer into fall, it blossoms. Bouquet The 'Bouquet' cultivar produces plants up to thirty inches tall with fine bluish-green foliage. The enormous, six-inch-diameter yellow flower heads are ideal for drying, creating an enduring arrangement. Or you could chop them for fresh floral arrangements. How to Keep New Dill Fresh? Dill weed quickly wilts after harvesting and gradually loses its distinctive flavor and aroma. If you know how to store your freshly harvested dill, this shouldn't be a problem. Here are two straightforward techniques that you can use: Put It in the Crisper Drawer of the Refrigerator Loosely wrap the recently cut and cleaned leaves in damp kitchen towels before putting them in a container or sealed bag. Put the container in the crisper drawer of the refrigerator, which has a lower humidity than the other sections of the appliance. Utilize the herbs before they begin to wilt and dry out, which should happen in a few days. Put It in Water To make this method function, when harvesting the herb, you must cut off the entire stem. After gathering the stems, put them in a glass of water and seal the opening with a plastic bag. Every day, change the water. Unlike potatoes, dill leaves can remain fresh for up to a week when stored in this manner. How to Freeze Fresh Dill? Freezing is the best way to preserve extra dill for later use if you've harvested more than you can use at once or in a few days. Dill freezes most effectively when chopped into smaller pieces and added to ice cube trays with just enough water to cover the freshly minced dill. This allows the herbs to be kept for four months or longer. This will ensure you always have dill on hand for when a recipe calls for it. How to Dry Fresh Dill? Dried fresh dill is a popular method if you're searching for another way to store dill for a long time. The herb has many uses, even though it won't have as much flavor as when it's fresh or frozen. All year long, you can use it as a herb in cooked dishes or to make tea. Stick to hang-drying if you don't want much of the flavor to be lost. This is a very easy method to use. All you must do is gather a few dill leaves and then bind them with a string. Later, place them in an area with adequate ventilation upside down.  Place them in an airtight container once they're crumbling and dry. Even though fresh dill is always preferable, make sure to save some for later use. Particularly if you don't have a year-round indoor herb and spice garden. Wrapping Up Growing dill is a great way to add flavor to fish and seafood dishes. A little goes a long way because fresh dill leaves have a strong licorice flavor. It is best that you add dill toward the end of cooking, in salads, or as a garnish for soups. Because once cooked, it tends to lose its flavor. If you have thoughts to share or questions to ask about how to harvest dill, please leave a comment below. We would love to hear from you! Read Also: Asparagus 101: When, How, And How Often To Harvest? How To Harvest Sunflower Seeds: A Fun And Easy Activity For The Whole Family How TO Harvest Lemongrass: Tips AND Tricks FOR Growing AND Using This Versatile Herb

READ MOREDetails
Home Interior

10 Fabulous Ways to Update Your Home Interior Using Wallpaper

Wallpaper is a versatile material. Its use is not restricted to simply covering walls so that home interiors can look more presentable. Home interior can be made fabulous when you are using the interior wallpaper. In a young adult novel by Judy Blume, a character named Rachel Robinson presented a clever hack with wallpaper — she used it as a beautiful cover for her school notebooks. Indeed, similar to this example, there’s no shortage of ways to get creative with wallpaper. So, if you are looking for an affordable way to update the look of your home, provided below are 10 exciting ways wallpaper can help you achieve this. Different Ways Your Home Interior Can Make Things More Attractive   Multiple ways you can make your home interior look gorgeous is illustrated in this article broadly explained 1. Create an accent wall If you like the look of your painted walls, but you want one particular wall to draw attention, cover it with wallpaper or multiple designs of wallpaper. You can create a splash of color or bring in a luxurious texture just by using this stick-on wall cover, and you can even get this makeover project done in a day. 2. Create wall art Wallpaper comes in a wide range of designs, and you will find that some patterns look beautiful enough to be framed and displayed on a wall. Home Interior can be beautiful if the wall art makes sense with your requirement. If you feel like being extra creative in turning wallpaper into framed art, you can create a mosaic pattern by combining different designs. A clever Pinterest DIY-er even suggests using wallpaper on decorative plates, and it works. 3. Cover your tables If you like the look of continuity in the interior design of your home, how about using your wallpaper to cover the different tables throughout the house? This is a breeze to do. You just need to cut your preferred wallpaper to size and glue it on tabletops. If your tables have a glass top, you can just lay the wallpaper on the table and let the glass hold it in place. 4. Give drawers a fresh look Banged-up drawers can gain a fresh and more contemporary look if you cover them up with wallpaper. This is a popular trick you will find in Country Living, Martha Stewart, and other lifestyle magazines. Some people even like to use luxe fabric-like textured wallpaper; they are perfect not only as a cover-up but also for supporting the structural makeup of the drawers. 5. Replace old lampshades Again, if you want a look of a consistent or uniform theme in your home interior, use extra pieces of your wallpaper to decorate other home fixtures and features. Covering lampshades with wallpaper is another easy project that can elevate the appeal of your home further. 6. Jazz up your stairs If you have an eclectic style, consider creating funky stairs by covering the risers of your stairs with different designs of wallpaper. This is a quick and simple project that can instantly bring color and fun to your home interior. Another way to do this is by creating a stair runner using thick wallpaper with Afghan, baroque, and romantic designs. 7. Cover books on display Old hardbound books can look like new by merely covering them up with scraps of wallpaper. These make fancy decorative elements for offices and grand rooms. You can line them up on shelves, stack them to add height to vases and other decors, and even use these upgraded tomes to create floating shelves. 8. Decorate doors Give plain doors a more artistic and elegant vibe with wallpaper. Framed and panel doors, for example, can have a bit more personality or pizzazz if you lay wallpaper that’s been cut to size on the panels. Kamiseta Hotel in the Philippines decorated many of its doors this way, and it’s definitely one of the reasons why it’s been voted the prettiest boutique hotel in the country. 9. Create a new chair backrest Want to spruce up the design of an antique dining set? This is easy to do with a fresh coat of paint and wallpaper. You can wrap the slats of the backrest with wallpaper, or cut wallpaper to size to cover rectangular or circular backrests. 10. Line shelves and bookcases. Finally, if your shelves and book cabinets tend to blend into the background because of their color, you can turn them into complete eye-catchers by lining their interior with bright wallpaper. The impact is so charming and pretty. These wallpaper ideas are more than enough for your home design upgrade, but there are more than you can consider trying out. You truly are only limited by your imagination. So, keep a collection of your favorite wallpaper designs handy and, for sure, you will find new ways to use them for the improvement of your home interior. Read Also: 5 Health Benefits Of A Clutter-Free Home Find The Right Painters For Your Ann Arbor Home This Painting Season How To Choose LED Lights For Every Room In Your Home

READ MOREDetails