Landscape Edging in Sandy/Beach Areas

Published on: 24 April 2018 Last Updated on: 29 May 2021
Landscape Edging

Landscape edging can further add to the beauty and utility of your beach home. You might think that with a yard made of sand instead of grass you’re stuck with no options. Forget that train of thought because you had a multitude of possibilities with your sandy landscape and plenty of reasons to edge your yard.

Benefits of Landscape Edging :

Regardless of the soil or grasses composition of your yard, landscape edging provides many benefits, including:

  • a crisp, manicured appearance to your yard and home
  • increases curb appeal
  • adds value to your yard and home economically
  • creates a root barrier to stop the spread of invasive grasses and reeds
  • helps prevent erosion
  • provides a contrast to the yard and your home

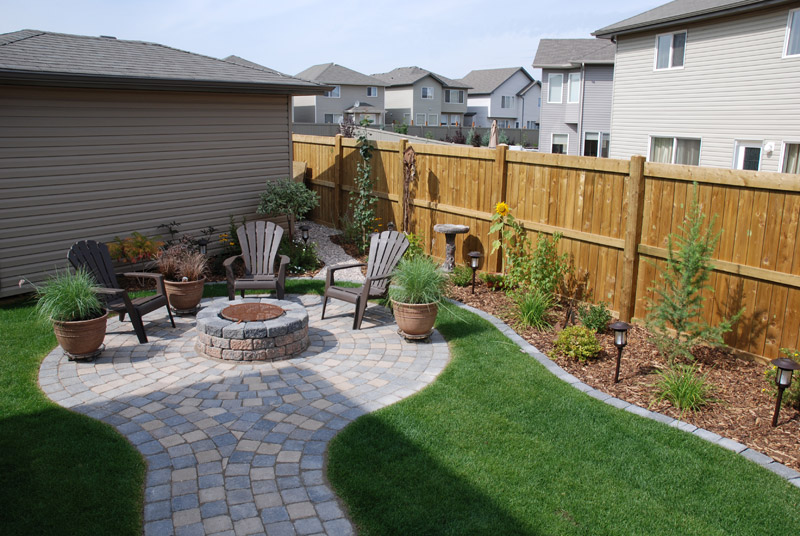
Edging can help create paths, direct traffic flow in the yard, and set aside yard areas for special uses. You can create planting areas or a patio area with a combination of small hard materials for the main area and larger materials for the edging.

Design Materials :

The main advantage of sand is its neutral color goes with everything. Whether black, cream, or white sand, it works with any color contrast you choose.

That leaves you open to a number of design materials including brick, fencing, glass, pavers, plastic, potted plants, stone, tile, wattle, or wood.

Your choice depends on the look you want to achieve. Separating the yard from beach sand dunes with slat wood fencing provides a traditional look. Most wood edging lasts about ten years before needing touch-ups or replacement.

Concrete comes performed or you can create a custom form and pour your own design. This lets you create a look no other yard has. Creating your own forms lets you add materials to dress up the concrete pavers. Add small river stones, seashells, sand dollars, beads, or small tiles.

You can lay or stack large stone or brick. This forms either a low curb edge or a low wall.

Plastic or resin dividers come in many designs from faux stones to fencing. Choose wisely and in-person to check the plastic’s quality. The cheaper plastic edging looks just that.

To achieve an organic look with sturdy materials, create a wattle fence. Wattle consists of weaving the saplings of pliable trees together. Dogwood and willow make popular choices.

Another choice that mixes organic and inorganic materials, potted plants, delineate lawn areas while adding life to a sand-covered lawn. Try potted seagrasses, potted palms, or potted palmetto trees. Both the pots and plants add color.

You can get numerous other ideas on websites like Pinterest. You’ll also find installation ideas.

Installation Tips :

Set the edging in place firmly. You may need to dig a shallow space for each. Fit it inside the shallow, then re-pack the dirt around it.

Installation varies based on use. Use the following a depth/height guide:

  • lawn or garden divider – use a trenched edge or ditch with a V-shape;
  • mowing strip – use flat, wide materials level with the ground so lawn mower wheels can easily skim over them
  • capture mulch – keep mulch in place using a solid material that extends four inches below ground and two inches above
  • beautification – use any height that provides the desired aesthetic.

You can create an attractive lawn with sandy soil as the base. Create interest and divide space using landscape edging.

Read Also :

Kylie :

Outside of writing for EverythingBackyard, I love to spend all the time I can outdoors and find every excuse to leave my house. I write about everything from backyard DIY projects to gardening. If you can’t get a hold of me I am probably on a trail or a boat.

Abdul Aziz Mondol is a professional blogger who is having a colossal interest in writing blogs and other jones of calligraphies. In terms of his professional commitments, he loves to share content related to business, finance, technology, and the gaming niche.

View all posts

Leave a Reply

Your email address will not be published. Required fields are marked *

Related

Artificial Grass

What Do Artificial Grass Recyclers Do?

Artificial grass has many benefits compared to classic lawns with natural sod. One of the main advantages is the possibility of recycling, which is especially important for environmentally conscious customers. Also, it does not need watering and fertilizers, which is another way it contributes to the Earth's well-being. By looking at the financial side of installing an artificial lawn, you can conclude it is a profitable investment. Namely, synthetic turf is very long-lasting. With minimal maintenance, it can stay in good condition for more than 20 years. In high-traffic areas, this lifespan is shorter. So eventually, it has to be replaced at some point. Now the question is what to do with the old grass. A few years ago, you had probably first thought of taking it to the landfill. And now that you know artificial turf can be recycled, you know what to do. You can run into companies that buy old turf as raw materials and find it a new purpose. Which Parts of Artificial Turf Are Recycled? Until a few years ago, artificial turf was not recycled. The main reason was the lack of adequate equipment for that. Today, thanks to innovative technologies, it is possible to sort recyclable materials from synthetic turf and send them to further processing. This modern equipment separates the plastic from the synthetic blades and removes the infill materials. These are mostly natural materials that certainly do not harm the environment, such as different types of sand, artificial turf, and even natural sod. So, it is perfectly safe to dispose of them. Considering the volume and complexity of work that recycling machines do, they are quite expensive. And it is clear why only a small number of companies recycle artificial grass. So, when you look for companies that recycle synthetic grass, you will not have to wander around. Just perform good research to find reputable and reliable ones. Recycling Process Companies like Artificial Grass Recyclers are in the business of giving synthetic grass a new purpose. They realized the potential of recycling, so they invested heavily in the right equipment and people trained to operate these machines. The recycling process itself is quite streamlined. As already said, these companies collect all the synthetic grass that home and business owners no longer want in their yards and facilities. Depending on the amounts, they usually transport it to recycling plants, where the already-mentioned separation is done. Infill materials are disposed of, while recyclable components go into further processing. Polyurethane, polypropylene, and latex undergo re-pelletizing. It means that these pieces of plastic are cut, melted, and flattened into thin pellets. These are like raw materials for new products, among other things, pads for different settings. What Are New Uses of Recycled Artificial Grass Recycled grass can get a new life in many different ways. For starters, it can once again become a lawn for residential settings. Apart from being made from recycled materials, this turf is no different from 'regular' synthetic grass. The only 'problem' can be if the new turf is made from recycled pitches from sports fields. Then it is most likely necessary to paint these surfaces. Besides houses and buildings, recycled turf can be an excellent flooring for terraces, porches, and outdoor settings like playgrounds, animal shelters, dog parks, etc. That is where the recycled rubber infill also comes in handy. Apart from being reused as turf infill, this material can be used for roads, as a construction material, and for industrial purposes. Recycled artificial grass can be an efficient energy source. Pieces of pellets obtained by processing synthetic turf can emit a significant amount of energy. However, this use is not exactly ecological due to the by-products of burning plastic. So, it is always better to consider other, more eco-friendly ways of use. Benefits of Reusing Artificial Grass Using synthetic grass instead of natural grass has many advantages. And if you continue using it after it has been given new life by recycling, you will enjoy even more benefits. For starters, it is a significant saving in your landscaping budget, considering that recycled turf costs less than new one. Here you can find a handy buying guide. Besides, you drop your carbon footprint. In addition to decreasing the amount of plastic waste in nature, you contribute to reducing pollution. That is because artificial turf, even when second-hand, does not require watering, chemicals, and fertilizers. Finally, we should not forget the various possibilities when it comes to the design of your yard. Throughout the year, you will have a lush, eye-catching lawn that looks brand new. No one would ever suspect it is second-hand. Once the time comes to install or replace turf, one alternative to consider is recycled synthetic turf. It has many benefits, and it will also be easy on your wallet. Plus, it will look good all year round, even with minimal maintenance. Read Al The Best Riding Lawnmowers: These Lawnmowers are for You How To Prepare Your Lawn For Fall How to select a weed wacker

READ MOREDetails
Value Of Your Home

How To Increase The Value Of Your Home

Raising the value of your home can seem like an impossible task at first, particularly if you are working with a restrictive budget. However, it is not impossible. In this article, we will be looking into some of the simple ways that you can increase the value of your home with ease. Replace The Doors And Windows When looking to put your home on the market you want it to look its best. As a result, you may want to consider replacing the doors and windows, particularly if you are dealing with a draft of any kind. This will not only improve the curb appeal of your home, but it can also help to improve the energy usage of your home making it more appealing for those looking to purchase. Makeover The Kitchen And Living Room As the central hub of the home, the kitchen and the living room re the first two areas that you should consider modernizing. One of the easiest ways to do this is to paint the walls a neutral color. This will make the home more appealing to those hoping for a blank canvas, in addition to this, it is likely to brighten up the room as a whole. The living room can also be modernized and transformed by incorporating a custom-designed canvas using a next day canvas prints service for your home. Improve The Look Of Your Garden If you are lucky enough to have garden space, this needs to look the best that it can be at all times. By improving the front garden with flowers and taking care of the tress you are then making it seem more appealing to the buyer when they have a first impression. It is then time to consider the back garden. By mowing the lawn, tending to the flowerbeds, and removing any unwanted weeds in the patio, you can improve the curb appeal as well as the value of your home over time. Though this will take some man-hours, this will make it look more appealing to the listing. Create A Driveway The final way that you can boost the curb appeal for your home is to generate a driveway. If you have a vast amount of space outside the front of the house, sprucing up your driveway will make the home more appealing for those that have multiple cars or a family. Whether this is gated or just left open, this can help to limit on the road parking and raise the value of your home. IF you already have a driveway, it is recommended that you remove the weeds and clean the bricks or concrete to make it looks its best. Whether you are in the process of selling, or you are considering it in the near future, some of these small little tips can help you to raise the property value of your home and sell it for the full amount that you would like. Read Also: Top Home Cleaning Tips How To Pick The Perfect Flooring For Your New Home

READ MOREDetails
Pack For Temporary Storage

More Motivation, Less Distraction: How To Pack For Temporary Storage

You’re among one of the thousands of Americans who find themselves faced with packing for temporary storage. You're not alone... Maybe you're staging your home for a quicker sale, making room for a home office or a temporary classroom amid the Pandemic, or desire the peace of mind that comes from a space that is free of clutter. With so many changes in the worldwide landscape, self-storage has become an asset to homeowners and apartment dwellers. Temporary storage offers flexibility while creating room in your home and free space in your mind. All of those distractions not only lead to lower productivity but also lead to feelings of overwhelm that disempower us from reaching our goals. Feeling encumbered by stuff is a growing trend since so many of us are faced with how many things we actually have during a shelter in place! The good news is that by utilizing temporary storage, you don't have to wait for a bigger home to create that spacious feeling. Whether you're packing for temporary storage due to a transition in your personal life, or just want to free up some space in your home in you home, it can feel overwhelming to do the research necessary to begin the process. How To Pack For Temporary Storage? Here is a full-step guide to pack for temporary storage. read the points below to know everything about it in detail. Clearing some space in your home would also help you concentrate on doing something meaningful to your life. Step 1: Assess the space you have Create a flow in your home.  Your things should fit neatly into the space you have. Although it may be tough to decide what you need, storing things offsite means that your stuff is not gone forever! Get Rid of the clutter! Clutter can be overwhelming to deal with when starting to pack your belongings for storage. Once it's out of the way, it makes the packing process so much easier. Even a few hours of decluttering can make things run a lot smoother. Try getting the family involved, and make it a game! Read Also: Moving home checklist: What you need to know Step 2: Categorize & Inventory Making lists as you categorize your items for temporary storage will make it easier for you to find them as you need them. As you gather items from each category, make a list, or take a photo of what you pack in each box. Label your boxes with a number, and mark your photograph or list with the same number for a visual index. Having a list and documentation is also an asset in the event that an unfortunate or unexpected event should occur and you need to file an insurance claim. Things you use seasonally Your surfboard, your kid's inflatable pool, or your Bermuda shorts won't be of much use when it's snowing outside! Group all seasonal items by season, including decorations, clothing, and footwear together. When these items are packed together, and labeled, it's so simple to swap out a few boxes at the change of season. Sentimental Items You Don't Need Right Away High School Yearbooks, Stacks of your kid's artwork, and other items that have value but are rarely used in daily life can be prepared for temporary storage, so you can access them when you need them! Things You Need, Just Not Right Now Heirloom furniture, boxes of books, or clothes -you're saving for the next baby can all be stored off-site! Step 3: Gather Materials and Pack Following your inventory, pack items of each category together following these instructions for the safekeeping of your items. When packing, it is important to consider that life changes quickly, and although you are packing for temporary storage, you may enjoy the spaciousness this brings and decide to keep your items packed away longer than 3-4 months! Packing items to be stored indefinitely not only safeguards your items but can offer you peace of mind in the event that plans change. Since things often take longer than expected, you can rest assured knowing that your valuable items are safe. Be sure to use sturdy boxes, and always, always make sure the bottom is taped securely shut! Don’t overpack boxes, and make sure boxes can be comfortably lifted and moved. Pack lighter items on the top so they do not crush the contents beneath them. Fill any empty space in the box so it does not collapse. Furniture Clean each piece of furniture, removing any dust, debris, or food remnants. Condition any wood or leather items, and be sure to vacuum all upholstery. Disassemble any furniture. Often the assembly instructions are long gone, so it is helpful to take photos of each step along the way, documenting hardware as you go. When it comes time to reassemble, you can review your photos in reverse, making reassembly a breeze! Use a drop cloth, or moving blankets, wrap your items carefully for transport and storage. While bubble wrap is useful for protecting mirrors and glass, avoid using plastic coverings directly on your furniture. Plastic can trap moisture, which can cause wood to warp and upholstery to mold or mildew. Use only white drop cloths to cover wood or upholstery, as the dyes can bleed in humid environments leading to discoloration of your furniture. Electronics Remove any dust or debris from the item using a dry cloth. If you are storing an electronic device that stores data, be sure to back up any important information before packing it away. Secure packing of electronics is so important! In the event of any bumps or drops, you can be at ease knowing your electronics are secure in their packaging. Remove all cords, and wind them into a circle, securing with a tie. If possible, pack electronic items in their original packaging. If that is long gone, use a box slightly larger than your item, and create a shock-absorbing buffer firmly around the item using packing peanuts or styrofoam. Avoid using any plastics that will trap moisture, and be sure to include several silica packs to absorb any humidity. Always keep your electronics upright. Mark an arrow on the box with the correct direction to ensure that your item is stored and transported safely. Once your device is placed securely in the box, you can place the corresponding cords on top of the packing, and tape your box closed securely. Clothing & Specialty Worn Items Books, Papers, and Photographs Since mold is a common issue when storing books, and papers, it's recommended to ensure they are totally dry. If you live in a humid climate. Paper objects can be stored in smaller, opaque plastic totes to ensure they are kept free from moisture and light, and rodents. Pack larger books lying flat, and store smaller books upright, as you would on your bookshelf. Never store a book on its spine, as it can cause damage to the structural integrity of the book and damage it. Protect your photographs by storing them in an archival album before storing to ensure your photos will be around for generations. To store larger photographs, carefully place them between layers of cardboard, and lie flat. Instruments, Art, and Other Delicate Objects To properly store delicate objects, it is important to have a facility tha is climate controlled, even for temporary storage. Make sure all packing is secure, keeping packing materials out of direct contact with any painted areas, wood accents, or delicate features. You May Also Like: Small Kitchen Storage Ideas Step 4: Finding A Storage Space It can be difficult to conceptualize how much storage space you actually need. Many self-storage websites offer guides that can help you visualize how your things will fit in the space. Some storage units are multi-level, so be sure to ask about accessibility if you need a space that is on the ground level. If you are storing any sensitive items like instruments, electronics, or antiques, be sure to rent a climate-controlled unit. When people think of storage, the image that comes to mind is often a traditional storage facility. While traditional storage is an excellent option for many, there are alternatives that can offer some flexibility, convenience, or some sizable savings. Maybe you have a spare vehicle that never gets used sitting in your garage. Consider storing your vehicle, renting extra space from someone in your neighborhood, or asking a family member or friend to store belongings for you.

READ MOREDetails