The Best Multi-Tools For Woodworkers -Top Awesome Inventions

Published on: 25 February 2017 Last Updated on: 11 September 2024
Best Multi-Tools for Woodworkers

Being a woodworker can be rewarding work for a man or woman who enjoys this kind of hobby. It doesn’t have to be just a hobby either as it can be turned into something that can bring another income into your life. Although woodworkers like working with their hands, they have multi-tools and awesome inventions to help ensure the person doing the woodworking can get the job done right, the first time, every time.

How can Multi-Tools Help Woodworkers? 

Multi-tools are useful for woodworkers who want to have a variety of tools at their disposal without compromising on quality, convenience, or performance. They can help woodworkers complete their projects faster, easier, and better.

Multi-tools are versatile devices that can perform multiple functions in a single unit. They can help woodworkers in various ways, such as:

  • Saving space and weight: Multi tools can reduce the need for carrying or storing multiple tools for different tasks. They can fit in a pocket, a belt holster, or a small pouch, making them easy to access and transport.
  • Saving time and effort: Multi tools can simplify the workflow of woodworkers by allowing them to switch between different tools quickly and easily. They can also handle tasks that would otherwise require specialized tools or equipment, such as cutting, drilling, sanding, or scraping.
  • Enhancing creativity and flexibility: Multi tools can enable woodworkers to tackle a wide range of projects, from simple repairs to complex designs. They can also adapt to different materials, shapes, and sizes of wood, as well as other materials such as metal, plastic, or leather.

 Some Common Examples  

Some examples of multi-tools for woodworkers are:

  • Pocket hole jigs: These devices help woodworkers create pocket hole joinery, which is a fast and easy way of joining pieces of wood together using pocket screws.
  • 1-2-3 setup blocks: These metallic blocks help woodworkers take quick and accurate measurements for setting up and aligning blades, fences, bits, and other cutters¹.
  • Multi-mark tool: This tool can be used for squaring, leveling, and transferring measurements from one workpiece to another.
  • Folding plier multi-tools: These tools feature a pair of pliers as the main tool, along with other tools such as knives, screwdrivers, scissors, saws, files, and wire cutters.
  • Scissor-style multi-tools: These are tools that feature a pair of scissors as the main tool, along with other tools such as knives, screwdrivers, tweezers, bottle openers, and nail files.

Here are the best multi-tools for woodworkers, and the top awesome inventions for woodworking:

1. Cordless Drills

Cordless drills are hand drills that are powered by a battery. Because of the battery power, this multi-tool can be used anywhere a person needs it. This even includes a small, upside-down space that other tools may not be able to reach. Not only this, but cordless drills also come with a variety of different drill bits that can be used on anything. This is why this is a great multi-tool for woodworkers.

2. Wood Router

Wood Router

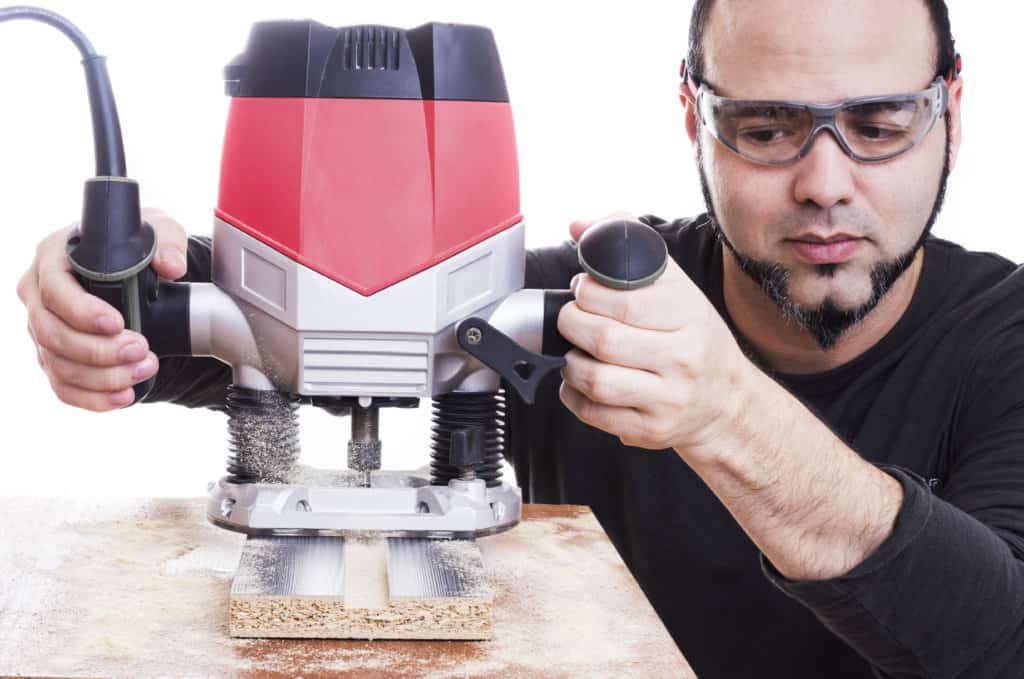
The possibilities of getting the job done with a wood router are endless for woodworkers. Check out Here for some of the best wood routers. Almost every woodworker knows they can get just about anything done with this awesome invention. This invention is light enough to be used in small and tight spaces. It also has an electrical version for ease of use. Not only this, but you can mount it on a table to get more accurate work done. The variety of bits for this tool comes in three different sizes.

They include the helical style which can be used for drilling, trimming, and shaping. The second style is the profile style which can be used for many different things including shaping the rounded edges to carving and you can also use it to round edges on corners or angles. Finally, the third style is called fluted bits and they can be used for cutting or shaping the edges or even trimming them. To select the best wood router to have to really decide whether you want to go corded or cordless. See how much work you can get done with this awesome invention?

3. Wood Lathe

The wood lathe is actually two centuries old and keeps improving over the years. The woodworker can use this multi-tool to spin the wood and shape and trim it any way they want to. Although this tool is over two hundred years old, it now comes in a variety of sizes. This tool is great because it can hold the largest piece of wood to the smallest piece of wood.

4. Chisels

Chisels are great woodworking tools that are used by the woodworker’s hand to shape and trim the wood to any size the person wants it. They come in tempered steel with a variety of shaped ends. They mainly have wooden handles on them and can be used to hold the wood by one area while hitting it with a hammer or a wooden mallet to shape or trim the wood. However, there is one common use for this tool and that is to finish joint holes. Although the woodworker uses the router for making the shape, they come back with a chisel to make the exact cut they need.

Chisels are also used for hand carving wood. When you want to carve wood into a different shape, chisels are the best tool to use.

5. Oscillating Tool

If you are a beginner woodworker, you won’t want to start out using this tool until you get used to all of the other tools. This is because it is more powerful than any of the other woodworking tools used today. If you are a woodworker, you will need to learn to use the oscillating tool before you try it. Asking someone who is more experienced with it is a good idea. However, the woodworker will not regret taking the time to use this tool because it has so many uses.

With the oscillating tool, it is so different that the blades move back and forth instead of around or up and down. With this tool, there are five different types of blades for the different uses it.

Oscillating Tool

One type of blade for the oscillating tool is that it can remove the wood molding that was put into place. Another type of blade can be cut through nails or wood without a problem. There are also a few different types of blades that cut through a variety of different wood and can also make a specific corner cut for the wood.

There are also blades for this tool that can make square cuts through the wood as well as blades to grind areas of wood down.

Final Thoughts

There are many different types of tools a woodworker can explore, try, and use when they are woodworking. Trying the different tools and exploring different things that can be done with these tools can be enjoyable and make the imagination run wild. Remember, this doesn’t just have to be a hobby. If you enjoy woodworking, why not make some money with it too? There are many different ways to make money with a woodworking job. One great way is to make different wooden furniture that can be sold to the public. The person enjoying this type of job can even open their own store to sell these items.

Although there are many different ways to use these tools for woodworking, it is always up to the woodworker to try the different tools and make the best use out of them. Letting their imagination run wild when playing and working with different wood can bring joy to the woodworker and money as well.

Read More:

  1. Home Hacks: Stuff You Can Clean In One Hour Or Less
  2. Hardwood Timber Flooring: Gives A Classic Look To Your Home
  3. What Species Of Wood Is Right For Your Wine Cellar Furniture?

Mashum Mollah is the feature writer of Search Engine Magazine and an SEO Analyst at Real Wealth Business. Over the last 3 years, He has successfully developed and implemented online marketing, SEO, and conversion campaigns for 50+ businesses of all sizes. He is the co-founder of Social Media Magazine.

View all posts

Leave a Reply

Your email address will not be published. Required fields are marked *

Related

Screened Porch

How to Make Your Screened Porch as Comfortable as Possible?

Outdoor living is in, especially during the sweltering summer months. Turn a staid, screened-in porch into a tranquil oasis with some comfortable furnishings and ambient decor. These are our favorite tips for creating a screened space you'll want to live in all year long. Treat It as Your Home: Don't be tempted to skimp on furniture for your screened-in porch. Many homeowners rely on basic patio furniture rather than adding comfortable cushioned couches and chairs that create an inviting space. Outdoor poufs are a versatile choice that does triple duty as extra seating, a footrest, or a convenient side table. Choose options with weatherproof fabric that provides easy maintenance and care. The cozier you are on the screened-in porch, the more likely that you (and your guests) will want to spend time there. Think of this area as a natural extension of your home. When choosing furniture, picture how you want to use the space. If you plan to entertain, are you envisioning cocktail parties or boisterous family dinners? Pick your pieces accordingly. Add Accessories: Those little details are a major part of making the patio feel like an extension of your indoor space. Think colorful throw pillows, durable rugs, side tables for snacks and beverages, and accent lighting. Choose colors that coordinate with your indoor palette for a seamless transition from inside to out. Pillows and throws in various textures will add visual and tactile interest. Potted plants add more life to space while emphasizing its natural elements. Keep It Cool: For a three-season porch, you can use from spring to fall, consider screened-in, porch-cooling options to see you through the hottest days of August. Ceiling fans are more effective than a window AC unit, and they create a cooling breeze that will provide relief. Evaporative coolers lower the temperature by using humidity. With these units, cold air is blown over water droplets that chill the air as they evaporate. You can also install shades that can be pulled down to keep the cool air in during the summer and to block the cold air out on chillier nights. Look for transparent versions that will preserve the outdoor feel of the porch. Promote Relaxation: Both real and battery-powered candles create a romantic light that enhances the porch's appeal. String lights provide a similar function. If your home is in a suburban or an urban area that tends to get noisy, consider outdoor speakers through which you can play relaxing ambient noise, such as ocean sounds or birds chirping. You can also plant a row of trees or shrubs to dampen the noise, provided it doesn't block your view. Consider adding a fireplace to your screened-in porch, which has the added benefit of allowing you to enjoy the space when the weather cools. By incorporating these design ideas to add life to your screened-in porch, you're expanding the usable square footage of your home and increasing its value. Best of all, you'll have a space your entire family can enjoy together for years to come. Read Also: 7 Ways To Add Character And Style To Your Home 7 Unexpected Ways To Use Glass And Wood For Your Home 5 Things You Should Know About Heating And Cooling Tiny Homes  

READ MOREDetails
how to harvest dill

How to Harvest and Preserve Dill for Year-Round Use?

The tender, fern-like leaves of dill almost beg to be touched. If you want to cook them, trim the fresh dill foliage and gather the seeds for pickling. Or you can chop the feathery leaves and yellow umbels for attractive bouquets of homegrown flowers. In addition, black swallowtail caterpillars love to feed on it. Its tiny yellow blooms are great at drawing in a wide range of pollinators. Dill grows as an annual for summer harvests in USDA Hardiness Zones 2–8. In other parts, it may self-seed and is hardy in the winter in Zones 9–11. Here is everything you need to know about how to harvest dill. Keep reading for a comprehensive guide. How to Harvest Dill? Fresh dill clips easily, but it soon starts to droop. Sounds familiar to Cilantro, right? Its flower umbels may look lovely in a mixed bouquet, but after a few hours, don't be shocked if they start to wilt. When harvesting dill for recipes, use it as soon as possible because its flavor starts to fade after a few days. Cut off the flower stalks of dill after the yellow blooms have faded but before the seeds start to ripen and come away from the umbel. Cover the entire flower head with a small paper bag that has a few tiny holes for ventilation. Hang the plant upside down in a cool, dry place. Watch for the seeds to fall and collect them in the bag's bottom. The seeds should be kept in a cool, dry, and dark area in an airtight glass container. When and How to Plant Dill? Dill grows best outside and is simple to start from seed. Plant the seeds directly into the ground, 1/4 inch deep and spaced 1 to 2 inches apart, in the springtime following the last frost. If you want the dill plants to be able to self-sow, plant the seeds in tufts so the seeds can fall and sprout the following year. Or you can plant them in rows spaced about 6 inches apart. You might want to think about succession planting if you want a reliable supply of dill. During the growing season, start by planting a small number of seeds from the packet at a time and then a few more every week. Typically, seeds take 7 to 14 days to germinate. Also, dill can be grown from transplants grown in nurseries planted in the ground or in containers in spring. You can plant dill outside a few weeks before the last predicted spring frost because it can withstand light frost. To achieve lush growth and stop crowded seedlings from producing seed heads, which stops the production of foliage, thinning is essential. Every 12 to 24 inches, reduce the number of seedlings to just the strongest one once they reach 3 or 4 inches in height. As they get bigger, some start to flop. Plants can be kept upright by placing a stake or a sturdy twig in the ground close to the plant's base. To loosely secure the plant to the stake, use garden twine. You can start the dill seeds indoors four to six weeks prior to the last frost. And you can move the seedlings to the ground once the risk of frost has passed. Transplanting mature dill does not work well, so plant your seedlings where they will be able to grow and thrive. Where To Plant Dill? Dill should be planted in a spot with well-drained soil and at least 6 to 8 hours of daily full, direct sunlight. Particularly for cottage gardens, the delicate foliage gives garden beds and borders textural interest. Choose a location for your dill that will shield it from the wind if possible. Just like spinach, high winds can easily damage its stalks if you do not stake the dill. You can plant dill's fragrant foliage in perennial garden container plantings. Or you can plant them alongside other herbs or vegetables in a traditional kitchen garden. In an edible garden, cruciferous vegetables such as Brussels sprouts, collard greens, broccoli, and cabbage are good companion plants for dill. Dill draws beneficial insects like ladybugs and bees and drives away common brassica pests like loopers and cabbage worms. But avoid planting dill close to carrots. Carrots can be stunted by dill, and because they are closely related, dill can cross-pollinate with carrots to produce inferior hybrid plants. Planting dill close to tomatoes is also not recommended. Mature dill will probably stunt your tomatoes' growth, even though some studies have indicated that tomatoes and dill can be beneficial companions when they are young. How to Propagate Dill? Seed is the most effective method of dill propagation. Cuttings can also propagate Dill, though this isn't as dependable. Seed: Direct sow the dill seeds in early spring at a depth of 1/4 inch in a prepared garden bed. Dill does not tolerate transplanting well. Thin the seedlings so they are 12–24 inches apart when they are 3–4 inches tall. Cuttings: Using shears or scissors, cut off the stem with at least 3 to 4 inches of new growth to take a dill cutting. Place the cutting in a water-filled container, making sure to remove any leaves below the water's surface, and allow the roots to grow for two to three weeks. Fertilizer and rooting hormones are not required. Plant the dill in a container or on the ground once the roots are 2 to 3 inches long. Is Dill a Type of Weed? No, I am not talking about WEED weed (read: marijuana). Although dill isn't technically a weed, some individuals and spice companies call the plant dill weed, possibly due to its feathery leaves. Dill weed is a dried or fresh foliage plant. Flower umbels are yellow and used to make dill seeds. How Should Dill Be Stored for Optimal Quality? You can keep fresh dill in the fridge by wrapping its leaves in a moist paper towel. Or you can tuck its stems into a container of water. Fresh dill can be frozen by submerging it in water in ice cube trays. Place the cubes in cooked dishes that have enough moisture to withstand them. Dill seeds and leaves can also be easily dried for later use, though the flavor is a lot more muted. Water and Soil Sow dill in soil that is moist but well-drained. If there is a lot of clay in your soil, add organic matter to the top few inches to aid in drainage. If you have trouble with poor soil drainage, plant this herb in raised beds or containers. Growing dill requires proper irrigation. As the seeds germinate, keep the soil evenly moist. Dill plants require one to two inches of rain or extra water each week once they begin to grow. Humidity and Temperature Dill tolerates temperatures as low as 25ºF, but 70ºF is the ideal temperature for it. Dill often bolts, sending up flower stalks to set seeds when temperatures rise. This annual herb dies after it flowers and produces seeds. Get rid of the flowers to prolong the plant's growing season. Apply Fertilizer While most herbs, including dill, don't require extra fertilizer, you can give them once or twice during the growing season by applying a balanced 10-10-10 fertilizer. When planting, either mix a liquid fertilizer with water or etch a time-release fertilizer into the soil. Refer to the product label for instructions on how much to use. Trimming Dill should be pruned early in the growing season to prevent limb bending. Cut off the top leaves of the plant to promote more growth of the lower leaves. Food preparation and cooking can be done with anything that has been pruned. Repotting and Potting You can grow dill in pots on a sunny balcony or deck, even if you don't have an outdoor garden. Due to the deep taproot that dill plants have, choose a container that is at least 12 inches deep. Because clay and terracotta pots don't retain as much moisture as plastic or glazed ceramic pots. They are ideal for growing dill. Make sure the container you select has good drainage and is big enough to allow you to space your plants 12 to 24 inches apart. It is best to start over in a new, larger container. Especially if your dill plant outgrows its current one because it does not take well to transplant. If the temperature where you are planting is not too high, you can keep planting seeds into the summer. Types of Dill Dills can be of many types with each of their distinct looks and flavors. Here are the three different types of dill you can grow in your kitchen or backyard. Long Island Mammoth Also known as Long Island Mammoth this one is an old-time favorite. Its fern-like leaves can be dried and stored for a long time, or they can be harvested fresh. It produces big clusters of yellow flowers with flat tops. They turn into brown seed heads, and they can reach a height of five feet. Fernleaf Grown to a height of only 18 inches, Anethum graveolens, or Fernleaf, is a highly productive dwarf variety. It works well in container gardens or small in-ground beds. Its feathery, delicate foliage has a great flavor of dill. From midsummer into fall, it blossoms. Bouquet The 'Bouquet' cultivar produces plants up to thirty inches tall with fine bluish-green foliage. The enormous, six-inch-diameter yellow flower heads are ideal for drying, creating an enduring arrangement. Or you could chop them for fresh floral arrangements. How to Keep New Dill Fresh? Dill weed quickly wilts after harvesting and gradually loses its distinctive flavor and aroma. If you know how to store your freshly harvested dill, this shouldn't be a problem. Here are two straightforward techniques that you can use: Put It in the Crisper Drawer of the Refrigerator Loosely wrap the recently cut and cleaned leaves in damp kitchen towels before putting them in a container or sealed bag. Put the container in the crisper drawer of the refrigerator, which has a lower humidity than the other sections of the appliance. Utilize the herbs before they begin to wilt and dry out, which should happen in a few days. Put It in Water To make this method function, when harvesting the herb, you must cut off the entire stem. After gathering the stems, put them in a glass of water and seal the opening with a plastic bag. Every day, change the water. Unlike potatoes, dill leaves can remain fresh for up to a week when stored in this manner. How to Freeze Fresh Dill? Freezing is the best way to preserve extra dill for later use if you've harvested more than you can use at once or in a few days. Dill freezes most effectively when chopped into smaller pieces and added to ice cube trays with just enough water to cover the freshly minced dill. This allows the herbs to be kept for four months or longer. This will ensure you always have dill on hand for when a recipe calls for it. How to Dry Fresh Dill? Dried fresh dill is a popular method if you're searching for another way to store dill for a long time. The herb has many uses, even though it won't have as much flavor as when it's fresh or frozen. All year long, you can use it as a herb in cooked dishes or to make tea. Stick to hang-drying if you don't want much of the flavor to be lost. This is a very easy method to use. All you must do is gather a few dill leaves and then bind them with a string. Later, place them in an area with adequate ventilation upside down.  Place them in an airtight container once they're crumbling and dry. Even though fresh dill is always preferable, make sure to save some for later use. Particularly if you don't have a year-round indoor herb and spice garden. Wrapping Up Growing dill is a great way to add flavor to fish and seafood dishes. A little goes a long way because fresh dill leaves have a strong licorice flavor. It is best that you add dill toward the end of cooking, in salads, or as a garnish for soups. Because once cooked, it tends to lose its flavor. If you have thoughts to share or questions to ask about how to harvest dill, please leave a comment below. We would love to hear from you! Read Also: Asparagus 101: When, How, And How Often To Harvest? How To Harvest Sunflower Seeds: A Fun And Easy Activity For The Whole Family How TO Harvest Lemongrass: Tips AND Tricks FOR Growing AND Using This Versatile Herb

READ MOREDetails
Duplex House

Why Renting a Duplex House May Be Right for You

Are you pondering on renting a duplex apartment? You are close to making a great choice for as duplex houses come with a number of advantages. It’s no wonder they are becoming ever so popular especially with families of all sizes. You can actually use a duplex complex to bring together a large extended family under one roof. Sounds awesome, right? There are several positives to it. Let’s delve right into some of the advantages if renting a duplex. Affordability: Financial choices are drivers of the options we have in our hands. Duplex complexes are relatively affordable and you will find them in neighborhoods where property prices are not going through the roof. Consider, for instance, duplexes for rent in Oak Cliff, TX. By all standards, this is one area that demonstrates why it is a good choice to rent a duplex. Renting out the extra space: Nothing beats the idea of becoming a landlord. The real estate market is so dynamic that you will be on a very good standing if you are able to sublet the extra space for some income. Duplexes are like twin houses and you can comfortably occupy one with a family large enough while other tenants pay you for space right next…or right up. Make it a family affair: The idea of taking an elderly member of the family in a nursing home is not always a very friendly choice. A duplex complex solves the problem in a big way. While you will have enough space for yourself, they too will have adequate space around while allowing you to check on them regularly with less constraint. At the same time, you can use a duplex complex to consolidate a family, while still allowing independence. Think, for instance about sharing space with siblings or close relatives Make an office out of a duplex complex: This has become one of the top reasons why duplexes have gained popularity. As more and more people go for out-of-office working arrangements, duplexes are offering them better choices. They can work where they live and vice versa. Utilizing one end of the duplex complex for family affairs and the other for office work is easy because there are few structural adjustments required. Probably a different set of furniture is all you need. This will save you time and finances as well. You can easily find such duplexes on Rentberry. Privacy: The mere size of a duplex complex gives you ultimate privacy, whether you decide to use it all alone or share it out with someone else. Duplexes houses, even when they do not stand alone entirely as private homes still offer you enough comfort of space that is not overcrowded. In contrast, multi-story apartments will normally host several tenants and you end up sharing some amenities. It's simply crowded. At the same time, a duplex house may offer you the opportunity to set up a flower bed in front of a small garden yard behind. This flexibility makes them a great option for family entities. Full Responsibility on the property: Even if you have to share space with a tenant or relatives, the property is entirely in your hands, which is a good thing because you set out the rules. This is a shift from an arrangement where management is left to an agent who has several other properties to keep an eye on. Usually, your queries take long to be processed. However, renting a duplex gives you room to make adjustments, as long as they are within the agreement signed. Final word: Take your time to evaluate your options, but you can hardly go wrong by renting a duplex apartment. If you are keen on subletting the other half, pick your tenants wisely. Vet them. This also applies to use the extra space for as a job. You must consider what effects it might have on other residents of the apartment. For instance, if you expect visitors to the office frequently, you should be able to keep it private especially if there is a family living around. Nonetheless, there are evidently several agreeable points highlighting the usefulness of duplexes in modern living and it really isn’t a bad idea to give it a try. Read Also: 7 Reasons To Buy A Condo Over A House Moving House? Here’s The Ultimate Checklist

READ MOREDetails