FilmoraPro review

Published on: 26 January 2019 Last Updated on: 25 January 2020
FilmoraPro

Have you ever wondered how professionals bring out those beautiful videos despite initiating shootouts in chaos and so much noise?  The Color contrast, HD quality and everything just perfect require a subtle video editing tool. Henceforth, Wondershare Technology has finally given a solution by launching an amazing tool called FilmoraPro.

Why choose FilmoraPro?

Professionals who wish to give extra quality to the shot videos can choose the wondrous video editing program that is designed for better control, productivity, and flexibility.

FilmoraPro is a perfect option for professional YouTubers, filmmakers, videographers and you.

After being compared with a lot many video editing tools, FilmoraPro came out as one of the finest and user-friendly software that takes your video editing skills to the next level. You don’t have to initiate those monotonous and lengthy editing steps to do the needful. Using FilmoraPro – Filmora’s video editor for pro, you can build up various interesting stories and express things better.

Primary features of FilmoraPro includes-

Dynamic editing

Dynamic editing

You can alter unlimited tracks with advanced editing mode that lets you initiate splits, range markers, and group time clips. The exceptional editing features of the application make flawless clips for more enjoyable moments. FilmoraPro – Filmora’s pro video editor offers vectorscope, parade, color histogram and waveform for making consistent changes and highlighting certain portions.

Powered audio editing

Dynamic editing

Do you wish to get a perfect audio sound with noise reduction and transitions?

Choose FilmoraPro – Filmora’s pro video editing software for the perfect audio sync.

If you want, you can separately record the video and synchronize it properly with the video. One of the most unwanted parts of video recording includes unexpected high and low pitch. The unbeatable video Editor can equalize the high and low pitch of the audios to normalize everything in a subtle way. You can also get away from unwanted background noise and cut down the level so that nothing feels annoying. The background noise can be evaluated by using a good quality microphone.

Motion graphics keyframing

you can generate animations for text and graphics besides replicating and adding ease to real-life motion.

Impeccable color selection

color selection

choose among sophisticated color tuning for controlling shadows, highlight and mid-tones of the clips.

Hollywood style effect

style effect

Chroma key, lens flare, and customizable visual effects are only possible in the Hollywood style editing option. FilmoraPro – Filmora’s video editor for pro has access to a large library of customizable Hollywood style effects.

FilmoraPro can help you to raise your standards

If you have always kept wondering what makes perfected video clips, FilmoraPro can give a permanent answer to all your questions. You can raise your standards by using ordinary editing features it has. Refining video footage and increasing the audio level gives better clarity to the video.

Furthermore, you can experience detailed color corrections and high quality presets for interesting output. The more editing tools you use for a video, the more interesting it becomes. Even if you do not have a very good story in the video, the editing skills can make the overall video quite capturing

Customizable animation options literally add life to the videos. You can establish your signature style and set keyframes for regulating effects and choosing your own animation style.

Alter video duration

You can change the overall speed and duration of the animations for generating fluid motion. Certain parts of the videos that require more attention of the viewers can be slowed down. The customizable text effect and Motion Graphics for the more and taglines to particular areas of the videos so that everything is clearly comprehensive.

Add that oomph to your videos with Hollywood effect

The movie magic effect feature in FilmoraPro – Filmora’s pro video editor shall always meet up your imagination.

In other words, you can create Hollywood style visual effects by blurring and highlighting certain areas. The magnanimous feature allows the audience to focus upon the important part instead of getting plunged into the unnecessary details of the video.

Different features embedded in FilmoraPro make it one of the highly competitive and versatile video editing tools out there in the market. It can even give a cut-throat competition to the professional video editing tools like Adobe Photoshop.

How to edit videos using FilmoraPro

Once you install FilmoraPro – Filmora’s pro video editing software on your laptop or computer, it is time to create well-organized videos that hold everything interestingly. The editing tool allows you to trim the live preview section and import all the audio and video files for better management.

Steps for editing videos using FilmoraPro-

  • Drag the files from the media section and eventually drop it in the timeline editor.
  • Select the options that include stretch, cut, slips, rate and so on.
  • Unlimited undo and redo options help you to edit the video without feeling worried about anything else.
  • Edit a part of the video that you think is important.
  • You can move back and forth towards the particular part that needs to be edited. Identify different parts of the video and label them correctly.
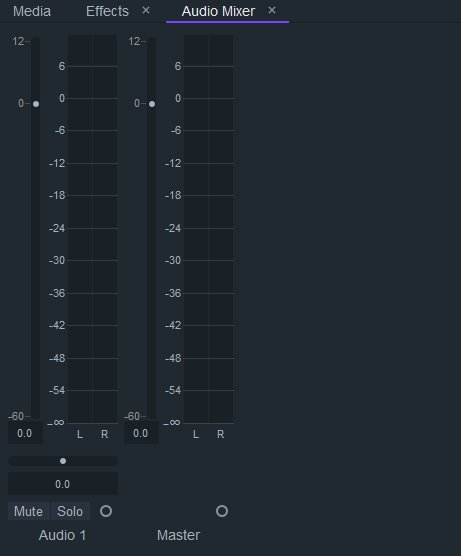
  • Access audio mixer and add an effect for enhancing the overall quality of sound in the video clip.
  • As soon as you are finished with the trimming and editing of the video, choose a customizable animation option and add it in between the videos.
  • You can set keyframes and change the speed and duration of the animations for better quality. Customizable motion graphic and text effect give proper detail to the videos and make it much impressive.
  • Finally, choose the view section and you are done with the editing needed to create a flawless video.

Final words

FilmoraPro is a good choice for video editing veteran and novice users. It is an amazing software that is geared for better performance and outputs. It has everything to create the best quality videos. The advanced features of the software allow you to have better control on your project so that you can work better. You can finish up with video editing within just a few minutes using the great tool.

Choose the preprogrammed theme or music and analyze your clips for generating a video. Using FilmoraPro – Filmora’s pro video editor to edit your storyboard and timeline in a pro way is also a good idea. With unlimited editing tracks, Filmora Pro (or filmora login or filmora sign in) outcomes in unbeatable video editing results that grab appreciation from all.

Read Also:

Content Rally wrapped around an online publication where you can publish your own intellectuals. It is a publishing platform designed to make great stories by content creators. This is your era, your place to be online. So come forward share your views, thoughts and ideas via Content Rally.

View all posts

Leave a Reply

Your email address will not be published. Required fields are marked *

Related

com.android.phone has stopped

How To Fix Com.Android.Phone Has Stopped Error In Your Phone?

We all have a mobile phone, and it almost runs smoothly until and unless there some glitches or issues happen. And com.android.phone has stopped is one of them. Are you also facing these issues? Are you looking for ways to fix it? Here, in this article, I will guide you with some easy and simple steps that you can try at home really quickly for fixing this issue. Generally, at the time of receiving a call, this com.android.phone has stopped issue occurs and shows an error message “unfortunately the process com.android.phone has stopped.” Fix Com.Android.Phone Has Stopped Error In Your Phone Here, I will tell you the easy steps to fix the com.android.phone has stopped the issue. You can try all these techniques on any android phone, including Samsung, Xiaomi, and many more. So, let’s get started with the fixes.  1. Reboot Your Phone When you are sending a text message or making calls, or opening any app, this com.android.phone has stopped eros happens. In case you are facing this issue for the first time, you can try restarting your device. After you have done rebooting your phone, check whether the eros is still there or not. In case the error still persists, do not worry; I have some more options to fix this error. So, let’s look into other available options.  2. Clear App Data And Cache Clearing your cache and data for the phone app can help you in fixing the com.android.phone has stopped error. Follow the steps to perform this solution. To open the apps list, click on the Menu option. Select the Settings icon from the list. Go to the Devices section. Search and tap on Apps, or App Manager, or Application Manager.  Now select the app for which you want to clear data from the App window. Once the Storage section opens, tap on the option names Clear Data. Tap on the Clear Cache button under the Cache section. Reboot your phone. Check if the issue is solved or not. If the issue is still there, go on to the next option. 3. Clear Data And Cache Of The SIM Toolkit If you are facing com.android.phone has stopped error, you can try to fix the issue by clearing the cache and data of the SIM toolkit. Follow the below-mentioned steps to do this. Go to the Settings menu. Select Apps. Tap on SIM Toolkit. Tap on Clear Data and also on Clear Cache. Reboot your phone. Now check if the issue is fixed or not. In case you are still facing the issues, try the next option. 4. Stop Automatic Updates Some users also state that stopping the automatic date option has solved the com.android.phone has stopped error. In order to do that, follow the below-mentioned steps. Tap on Play Store. Now tap on the Menu icon. Tap on the Settings option. Now tap on Auto-update apps. Choose the option of Do not auto-update apps. Reboot your phone. Once your phone turns on, check whether the issue is still there or not. If the error continues to show, try the following option to fix it. 5. Wipe The Cache Partition Wiping the cache partition also has helped many users to fix com.android.phone has stopped error. Sometimes, if caches get corrupted, but the system keeps using them continuously, some issues like this happen.  As you can not delete the cache one by one, you need to delete the entire directory in order to solve this issue. And for doing that, you need to follow the steps that I have mentioned here. Power off your phone. Now, press and hold the Home and Volume Up keys. Now press and hold the Power key. Now release the Power key but keep holding the Home and Volume Up keys.  Now release both the buttons and wait for around 30 seconds to 60 seconds until the Android logo shows. Using the Volume Down key select the option Wipe cache partition.  Now press the power key for selecting the option. Now using the Volume Down key go to the Yes option and again press the power button to select it. Now, wait till the time wiping your cache partition finishes. After it completes, no go to the Reboot system now, and for selecting it, press the power button. It will take longer to reboot your phone. Once your phone reboots, check if the problem is fixed or not. If the issue is still there, here is another option for you to try.  6. A Factory Reset If you have tried all the fixing options that I have mentioned till now and still you are facing com.android.phone has stopped error, there is one last option for you. You can factory reset your phone to fix this error.  In case you do not know the process of factory reset your phone, follow the steps below. First, you need to power off your android phone. Now press and hold the Home key, Volume Down button, and Power button at the same time. Your phone will boot into recovery mode. Now use the Volume Up and Volume Down button to scroll through the entire menu. Go to the option, Wipe Data or Factory Reset. To select it, press the Power button. For confirming the reset, go to the option Yes and select it.  Once the reset process is complete, and the same recovery mode menu screen will open. Select the Reboot system now option. I believe this will fix the com.android.phone has stopped error.  Final Tips If you are facing com.android.phone has stopped error in your phone, try all the fixing options that I have mentioned here in this article. Any one of these 6 options will surely fix the issue you are facing, and your phone will be back again into proper functioning. Make sure you are backing up all the necessary data before starting with all these steps.   FAQ( Frequently Asked Questions)  How do you can cast from Firefox to Chrome cast?  If you want to enable the casting you can connect to the Wifi on the Chromecast. You can connect to the cast Icon of the video. Choose the device to cast too. How do you can cast Firefox on your TV?  All you need to do is to send the Cast to play button on the device Icon to play the playback controls on the URL. Where is the Cast button on Firefox?    There are certain steps you have to follow for playing the video to view the control buttons. First, you need to start the videos and you need to view the cast or the control button. Click on the top of the screen tap on the cast button. From the menu option select the fire TV device. The video will start playing on the Fire TV.   More Resources:- Best iPhone Spy Apps Without Jailbreaking. 8 Incredible Tricks That You Didn’t Know Your iPhone Can Perform. How To Use Chromecast From Firefox – Step By Step Guide In 2021

READ MOREDetails
Camera Gimbal

6 Tips to Shoot Hyperlapses Quickly and Easily Using a Camera Gimbal

Hyperlapses are generally eye-catching. Traditionally, shooting a Hyperlapse video required you to attach your camera to a tripod as you carefully marked the ground distance. The ground was supposed to be an even one. However, this approach was slower and tiresome. Today, you don’t need a tripod. All you need is a DSLR camera gimbal or any handheld stabilizer that will work with your camera. The gimbal will allow you to shoot the Hyperlapses fast and easily. To achieve this, you need to observe the following 6 tips. 1. Set Your Camera Right: You start by fitting the camera firmly on the gimbal. This will enable you to shoot the Hyperlapses in a stable way. Then, you should adjust the digital camera to shoot either 4K videos or short-interval shots. Thee 4K setting is better since it allows you to add the ramping speed afterward. Lastly, If the footages are not stable, erase the tracking points. 2. Walk Cautiously When Shooting: Shooting with a gimbal doesn’t give you the freedom to walk unsteadily and fast during the production. You need to walk uniformly and slowly to ensure that the quality of the Hyperlapses is not compromised. Once you press record, you should walk towards your target with the gimbal level well-maintained. A handheld gimbal will deliver stable Hyperlapses provided that you don’t hurry the shots. 3. Shoot Longer than Necessary: For the sake of post-production editing, it’s important to shoot the Hyperlapses longer. You have to remember that Hyperlapses are often unpredictable. With longer footages, it becomes easy to omit the unstable parts and keep the stable ones. Moreover, the editing is fast-achieved. 4. Always Focus on a Fixed Point: You can do this by switching to the lock mode. The mode allows you to shoot the Hyperlapses easily and not to lose the focus. You shouldn’t lose your target as this may cause the gimbal to fail you. You just need to prioritize on achieving a better view during the entire shooting path. 5. Enhance Motion Blur with ND Filters: People in motion and blinking cars may interfere with your Hyperlapses by limiting your exposure. To enjoy longer exposures during a daytime shooting, you should enhance the motion blur. The best way to do it is to use the ND filters. While encouraging longer exposures, the filters enable you to shoot amazing still images that are good in quality and balanced. 6. Create Parallax By adjusting the Gimbal Settings: Finally, it’s important to create parallax if you want a different motion dimension in your shots. To create parallax, you should: Open the gimbal assistant software to access the control panel feature. Click on it and adjust the shutter speed to the lowest value possible (one second). Once you are done, you can press record and start to shoot. Put simply, a handheld gimbal can help you shoot quality and stable footages. The experience is enjoyable but you have to do it right. With the above 6 top tips, you can be able to shoot Hyperlapses comfortably with the stabilizer. This ensures that the post-production is also done seamlessly. Read Also: How To Pick The Best Trail Camera 2019 “Best Guide For The Users” What Is A CMOS Camera?

READ MOREDetails
Visual Regression Testing

Best Practices For Visual Regression Testing On Cloud

Visual regression testing is the software testing process that is used to test your software application by visually finding any error or malfunctioning in the user experience. Visual regression testing ensures that an application or website maintains its intended look and behavior. It confirms the absence of any unplanned alterations to its visual design or functionality. This procedure entails comparing a reference version of the application or website and its current version, aiming to identify any visual disparities. Visual regression testing in a Cloud-based platform is the latest trend in the field of software testing and automation testing. It has various advantages, such as it increases the testing scope, costs less, and it increases testing flexibility. In this article, you will see the concepts of visual regression testing on the cloud, best practices for it, and many such things. What is Visual Regression Testing Visual regression testing evaluates the impact of code changes on the user experience by comparing screenshots before and after execution. It's also recognized as visual snapshot tests or visual testing, and its primary objective is to uphold visual consistency following updates. The Function Of The Visual Regression Testing Visual testing validates the suitability of an application's user interface in terms of its visual attributes. This quality assurance process aims to confirm the accurate display of content and data on the application's front end.  In case you're not acquainted with the concept of Regression testing, its purpose is to ensure that any modifications made to the software do not disrupt any previously functioning elements. In the context of visuals, this testing guarantees that alterations to the software do not lead to style-related problems. The true capability of visual regression testing can be leveraged with Cloud-based AI-powered test orchestration and execution platforms like LambdaTest. It allows the running of visual testing across a large farm of 3000+ real device and OS combinations. This helps to ensure cross platforms compatibility on the visual appearance and interface of the software applications. Features Offered By The Cloud-Based Ai-Powered Test Orchestration And Execution Platform - Lambdatest For Robust Visual Regression Testing Are As Follows: This section discusses the features which are offered by the test orchestration and the execution platform.  Execute Selenium and Cypress tests across a range of programming languages, such as Java, NodeJS, C#, Python, and StoryBook. This empowers the delivery of flawlessly designed applications across almost any browser or device. Employ Mis-match Ignore feature of SmartUI's Status Bar so that you can tackle the complexities of visual differentiations. This capability allows testers to crop the status bar out from the screenshots. Leveraging the high-end technique of image processing, it accurately detects and eliminates the status bar. This facilitates the analysis of essential UI components with due focus. Effortlessly install, set up, and execute the LambdaTest NPM package. This enables the direct implementation of the JS scriptsStorybook via our NPM CLI. Conduct regression testing, the visual ones for your mobile apps on genuine devices. Assure visual uniformity with precise pixel-to-pixel comparisons against your reference point, encompassing various screen sizes, resolutions, and layouts. Best Practices for Visual Regression Testing on Cloud Let us see the practices a tester must follow while performing visual regression testing on a cloud-based platform like LambdaTest. Following these practices during the test automation will make your software application visually more powerful and efficient. 1. Tool Selection: Choosing the appropriate tool to perform visual regression testing on the LambdaTest is one of the most important and essential steps in moving ahead of the testing process. Various parameters should be kept in mind during the tool selection for testing automation, such as the software type, compatibility aspects, resolution, etc. LambdaTest integrates with various tools like Selenium, Cypress, Playwright, and others, using which you can perform visual regression testing. 2. Consistent Environment: Never forget to create a conducive setup that will facilitate cloud-based visual regression testing. The interface provided by using these environments allows you to examine the visual outcomes and input received during the testing process. The testing team has the ability to pause the visual regression testing procedure and make the necessary corrections.  The team conducting the testing should also maintain resource isolation for the environment. It aids in preventing any type of intervention during automation testing, which increases the effectiveness and productivity of cloud-based visual regression testing. 3. Isolation And External Factors: Remember that the isolated environment should not be affected by any external factors. They include network latency or fluctuations, system updates, or background processes running on the testing machine. These factors may lead to visual error and malfunctioning of the software application. External influences can potentially introduce visual errors and cause malfunctions in the software application.  Ensuring a controlled environment by addressing the factors safeguards the accuracy of the testing results. All the screenshots and visual reports of the testing process will be saved in that specific folder. This will help to perform visual comparisons effectively. 4. Scriptless Test Cases Visual regression testing on the cloud platform using scriptless test cases is the best approach. Since numerous cloud-based AI tools are available, test automation can be utilized to develop test cases simultaneously. It is because the testing scope of a programmed test case is limited.  But using AI technologies offered by LambdaTest for test case design opens up possibilities for the testing team to consistently cover the testing scope. It will perform visual testing against some test cases, and again, it will recreate the test cases according to the previous result and analysis. This practice will bring the best visual result for your software application. 5. Documentation Of Visual Test Cases Documentation is a very effective and important practice in any software testing process. In visual regression testing, you need to test and verify the components visually, and here it is important to mark down your observations, bugs, and analysis and work on them accordingly.  For your visual regression tests performed in LambdaTest, you should create clear and succinct test cases and descriptions. You should also include comments or annotations to describe the aim and scope of your baselines and screenshots.  Additionally, you should preserve and maintain your screenshots and baselines using a version control system or a cloud-based service. Sharing and communicating with the client will help you understand their demand and make the best possible result. 6. Updating The Baseline Updating the baseline is a very crucial step in the visual regression testing process when performed in LambdaTest. It consists of the practice of taking the feedback result and analyzing them. If the result is considerable, you can approve this update in the baseline. And if you think that it is not worth consideration, you can simply reject them. But you need to mention all these in the baseline. It is because this will help you in the future because you can see all your testing logs in the baseline.  Mention the changes that were done intentionally, their reasons, and such things. It will also help all the team members have an overview of the changes that are going on in the software testing process. 6. Optimize Testing Coverage And Scope Always remember to prioritize the testing scope for each component, specifically when executing visual regression testing in cloud platforms like LambdaTest. The high-priority components must be paid more attention, and they should be executed with high precision. Use the concept of full-page and component-based screenshots to compare the changes visually by the testing team. Using this practice in visual regression testing will help achieve a better UI experience and enhance the testing results. You can use some advanced features like custom attributes.  These attributes help find the elements separately during visual regression testing. Also, you can use the trigger events and DOM concept. These will help to perform the screenshot comparison effectively. 7. Performing Parallel Testing Apart from this, you can leverage parallel test execution in performing visual regression testing in LambdaTest. Executing parallel testing is what makes visual regression testing productive and effective, though, along with those other factors. 8. Learn From Failure It is the final practice that all testers must follow to perform visual regression testing on the cloud and during test automation. Learn from your previous failure. Document the mistakes that you have made previously. Write down the tool feedback and in which specific tool you got some issues performing the testing process. And learn from these highlights.  Make your testing goal and work on your failures. This will bring the best result for your software application. Also, it will help in the overall development of the organization as well as the individual tester. You should follow These best practices while performing visual regression testing on the cloud. Conclusion Visual regression testing is mainly used to find any kind of visual malfunctioning and errors in the software. Visual inconsistency is one of the major reasons that lead to decreased number of users of a product.  Some of the best practices that every testing team should follow to perform visual regression testing using the cloud are the selection of appropriate tools, using documentation, using AI-based test cases, etc. Various tools can be used to automate testing and perform visual regression testing on the cloud, such as LambdaTest.  Hope you get an understanding of the best practices for visual regression testing using the cloud and their various aspects after reading this article.  Read Also: Benefits of Cloud-Based Quality Management Systems Mobile Testing With Appium On Lambdatest The Best WordPress Plugins For Marketers

READ MOREDetails