Floor Cutting Using Diamond Saw: What You Need To Know

Published on: 17 April 2016 Last Updated on: 29 May 2021
content rally

Concrete comes as the topmost choice when you are in need of durable, weather-proof, heat-proof and long-lasting flooring material. But there comes a time when you need to repair, remove or replace concrete floors and you need to look around for quality concrete cutting tools.

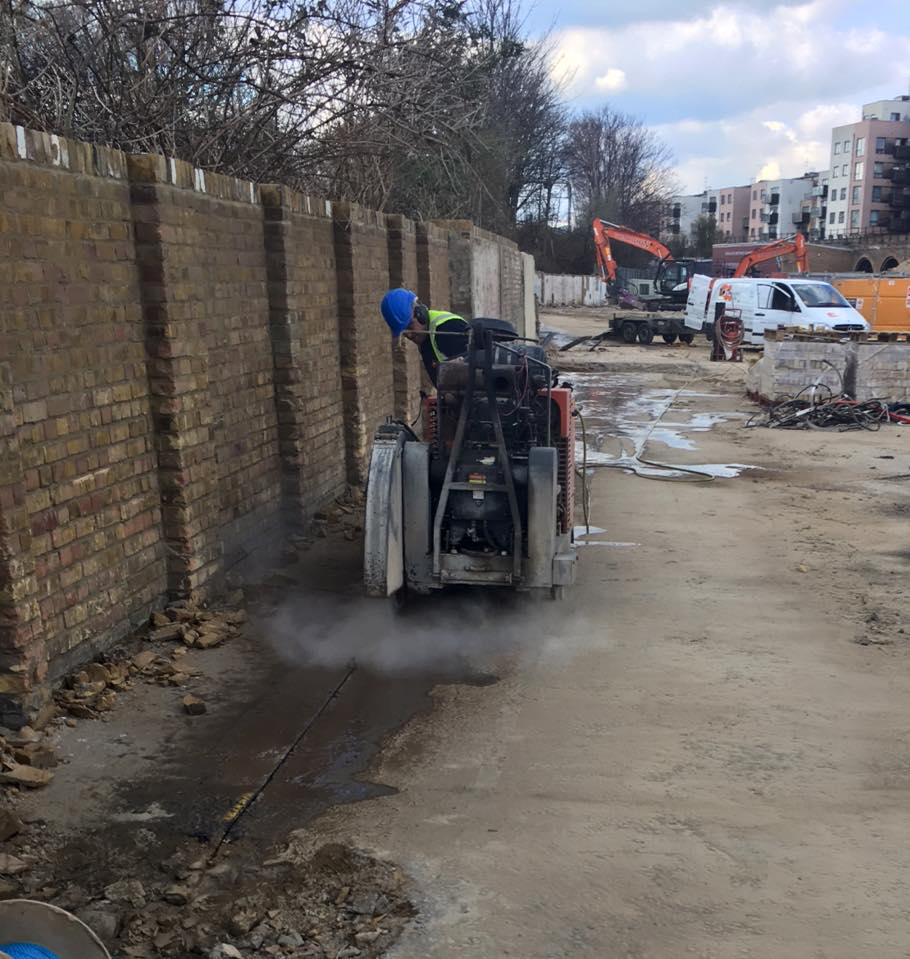
Diamond floor saws are the no.1 choice of professional concrete cutting contractors. Diamond floor sawing is extensively used to effectively cut through all types of materials including reinforced concrete, asphalt, slab and stone. The unique design of diamond sawing machines makes them more convenient for operators to carry out floor cutting as a one man job.

Floor sawing service helps you efficiently cut through concrete slabs, driveways, decorative concrete floors and many other structures in horizontal alignment. Diamond saws also let you cut through concrete roads overlaid with asphalt. Different floors demand different diamond blade and a different cutting procedure to be followed.

In this article, you will read some general tips and safety guidelines for cutting concrete floors using a diamond saw.

Tips You Need To Consider While Floor Cutting With A Diamond Saw

Never think of playing loose with heavy diamond cutting machines. When deciding to use the diamond saw for concrete cutting, give top priority to safety. You must ensure that you have selected the right diamond sawing blade which is perfect for the kind of material you need to cut through.

Make sure the floor saw and diamond blades you use are in most up-to-date condition. Check if there is no loose connection in the machine. If you are using wet cutting method for floor cutting, make sure you have arranged a source with an ample volume of water at the worksite. Supplying water to diamond blades during the operation will help prevent blades from overheating.

Use of water as a coolant and lubricant help floor sawing London contractors get quality cuts. It also helps extend the lifespan of the blade. You need to wear protective gears to safeguard your body parts from any kind of physical injury while operating the machine.

Manage to have ear, eye and head protection. Never wear loose clothing. And make sure you wear safety boots and a respirator mask to avoid inhaling silica from the dust particles produced during floor cutting.

When cutting the floor using a diamond saw, never increase the pressure on the saw to boost speed. And remember, the diamond floor sawing machine always make straight cuts, you can’t steer it to cut curves. When you hold cutting, make sure you lock the machine or turn the power off properly. You need to be extra cautious when sawing on a steep surface.

If you want to cut green concrete using diamond floor saw, do it within 24 hours of being poured. The selection of the diamond blade in the floor saw may vary based on the thickness and aggregate of the concrete structure that needs to be cut. For deep floor cutting, you will need to make multiple passes to obtain the desired depth.

The thought of performing floor cutting on own doesn’t make sense unless you have the required skills and knowledge to accomplish the job with the best of industry-standard and safety guidelines. But you can always depend on a professional diamond floor sawing contractor in the town!

Read More: 

  1. How To Salvage Your Furniture After A Flood
  2. List Of Most Durable Kitchen Flooring
  3. Hardwood Timber Flooring: Gives A Classic Look To Your Home

Abdul Aziz Mondol is a professional blogger who is having a colossal interest in writing blogs and other jones of calligraphies. In terms of his professional commitments, he loves to share content related to business, finance, technology, and the gaming niche.

View all posts

Leave a Reply

Your email address will not be published. Required fields are marked *

Related

Brass Range Hood

How To Choose the Right Brass Range Hood for Your Kitchen

If you’ve been shopping for range hoods, you’ve noticed that brass hoods are beautiful and come in a range of styles and types. You may have a good idea of what you want your hood to look like in your kitchen but have no idea how to actually choose the right one. You should consider what kind of ventilation and exhaust you will need, where you plan to place your hood, and what added figures would simplify your life. Here are a few ways to narrow down the list to the right brass range hoods for your kitchen: Top 4 Ways of Selecting The Right Brass Range Hood For Kitchen: 1. Ranges Hoods for Homes with Ducts The ultimate function of a range hood is to ventilate the smoke and particulates that come from cooking. You’ll want to consider whether you need ventilation in the unit or hook up the unit to your existing ventilation. Many homes have full external venting. A fan will push air and smoke up through ductwork and into the attic or outside of the house. Unless you are building your home or fully remodeling your kitchen, you probably already have this setup. You will need to decide if you want an integrated or remote blower on your brass range hood. An integrated blower will be located in the range hood itself. A remote blower will be located in the attic or somewhere along with the ductwork. A remote blower is generally quieter, as long as you have a space to set it up. 2. Range Hoods for Homes without Ducts If you don’t have a duct system in your house, you can choose a brass range hood and install a ductless fan kit. A ductless fan will filter and recirculate the air to clean and deodorize it before releasing it back into the room. Under-cabinet hoods use this type of ventilation, but you can also purchase the island and wall-mounted units with this type of fan. For ductless units, it’s important to decide what kind of filter you will use. Charcoal, fiber, or ribbed plastic filters are common types. Aluminum mesh filters are washable, have fibers to remove contamination, and are more expensive in the short term but reusable and more cost-effective in the long term. Charcoal filters are the most common but have to be replaced about twice a year. Related: Design your Kitchen According to Your Budget and Work in an Organized Manner 3. Consider Added Features In addition to choosing your favorite style, your brass range hood might also serve as an additional light in the kitchen. A large range hood will cast a shadow over your cooking space, so you’ll want to install LED, fluorescent, or other bright light bulbs. You can also add a pot rail on some units to hold your pans. 4. Purchase a Brass Range Hood for Function, Love It for Design Now that you know how to choose the functional components of your brass range hood, you can shop online and order one with your favorite style and finish. The simple process takes a few clicks and some custom measurements. In no time, you’ll have the perfect range hood for your kitchen. Additionals: Small Kitchen Storage Ideas5 Types Of Kitchen CabinetsRemodeling Tips for New Homeowners8 Campfire Cooking Essentials For a Camp Kitchen That Crackles

READ MOREDetails
Amplifier

Factors To Consider Before Purchasing An Amplifier

Amplifiers are a great device to power up the volume of your house or car music system. With today’s technical advancements, amplifier manufacturers are coming up with more and more complex amplifiers packed with several confusing features. Keeping all the additional features aside, make sure that your evaluation of the following aspects before making a purchase: Different Factors To Consider Before Purchasing The Amplifier     There ate multiple factors you must consider before purchasing the amplifier of your choice. You need to understand the facts before considering the solutions. 1. CONNECTIONS/PORT: Make sure that that the amplifier has sufficient input ports to plug in all your devices. Since every device has a different connecting structure like USB for laptops and 3.5mm for iPods, the amplifier should have sufficient inputs to provide the best performance. 2. WATTAGE: Where do you plan to install the amplifier?  The living room? In a hall? Whichever the area you wish to place it, remember the amp should be able to provide up to twice the speaker’s program power rating. But too high wattage might land you in a position where you have to spend more than just the cost of the amplifier, like in sound-proofing instruments and attenuators. So be practical and opt for a 10W amplifier. The volume would be enough for you to enjoy the music in most applications. 3. CHANNELS: Depending on the number of speakers you need to power, you can select from a mono, i.e., single channel, stereo, i.e., two channels or multi, i.e., 4 or more channels. 4. LIMITERS: To prevent the amplifier from clipping and the sound from distorting, a speaker must have a limiter. It acts as a protection circuit and prevents distortion by preventing a signal from going above a maximum signal level. 5. SIGNAL HANDLING CAPACITY: Amplifier handling capacity can be determined by the three modes in which they operate: 6. STEREO MODE: Stereo mode powers a pair of speakers and each channel receives a signal independent of the other. 7. PARALLEL MODE: A single input signal is sent to both channels in a parallel mode, and it is generally used to power an odd number of speakers. 8. BRIDGE MODE: This is used to send a signal to a subwoofer, and it combines the power of both channels, providing more power to the single output. 9. HEADROOM: The quantity by which the signal-handling capabilities of an audio system exceeds a designated nominal level is referred to as headroom. Having headroom helps to avoid clipping of the sound, which ultimately prevents speakers from getting damaged by the distortion produced by a sudden increase in volume. Headroom also mitigates the possibility of heat and distortion in the signal path, preventing the system from sudden shutdown or meltdown. 10. SIGNAL TO NOISE RATIO: Purchase amplifiers with high signal to noise ratio. A higher number means a better elimination of the background noise, and you will get to enjoy more music and hear less of the noise. 11. TOTAL HARMONIC DISTORTION: Aside from your listening preference, carefully select an amplifier that has a lower sum of total harmonic distortion and noise. A smaller sum means the output of the sound will sound more like the recording voice. You can purchase various pro audio video products online such as AV over IP solutions, amplifiers, digital signage that boast of impressive and technically advanced features at an affordable price. Final Take Away Hence, these are some of the facts that you have to take care of while you want to develop your buying power using the amplifier. Work out the plans that can help you to achieve your goals in the best possible ways. Read Also :  Advantages Of Buying An Underseat Subwoofer Paper Authority: Basic Tips In Purchasing A Printer

READ MOREDetails
Organized After A Move

Tips To Unpack, Stay Organized After A Move

So you have finally moved into the house of your dreams. What next? Once your belongings are unloaded, you must figure out how to get organized after a move. This includes unpacking and organizing all of that stuff! Of course, this whole process can be a little too overwhelming. But Austin maid service has some organizing tips that might come in handy. Tips for Organizing a Move Before moving in, make sure the new home is completely spruced up to welcome its new members. This includes wiping down shelves, countertops, cabinets, and floors. The bathroom and kitchen should be completely clean and smell good. Once you have stepped into your new home, it’s time to unbox the essentials first. Forget everything else and unpack the essentials box that carries important stuff that you cannot do without. Little steps first Of course, you want to organize your new home right away. After all, it is your dream house and you wish to start enjoying your stay quickly. But it can be quite messy initially. If you try to start by organizing all rooms together, you may end up making no significant progress at the end of the day. So what next? Well, you must start with one room first and unpack your stuff accordingly. For a family of small kids, you may start with unpacking the nursery. Try to maintain a sense of normalcy so kids do not find moving overwhelming. Setup their rooms first and you can easily create a safe haven for them, where they can play and rest while you organize the rest of the space. After the kid’s room, you can start with the kitchen and your bedroom. Other rooms can still wait. Give rooms a purpose In order to stay organized after a move, the next step is to plan how to store your belongings. In this regard, you can assign different purposes for each room, including the pantry, basement, garage, hallway, and bathroom. Now start unpacking things and assign everything a new home. Start with larger items Bulky stuff takes up a lot of space. So start with arranging larger items. You do not want to hit a bed or dressing table every now and trip and fall. Move dining tables, beds, dressers, and solid pieces of furniture to their respective rooms. This should clear up space and make you feel a little relaxed. It’s absolutely fine to delay organizing the smaller stuff. Take some rest and then unpack smaller items, including books, clothes, utensils, and accessories. Install all larger kitchen appliances first. This includes the fridge, dishwasher, stove, food processor, washer, and dryer. Tackle the kitchen When looking for tips to organize home after a move, your priority should be to unpack the kitchen stuff. What is the most essential cookware? What else is most commonly used in the kitchen? You want to organize the essentials first. Organize those in easily accessible drawers. This includes pots and pans, coffee mugs, cereal bowls, and plates. Keep all dishwashing soaps and sponges handy. Do not forget the kitchen cleaning supplies as well. Unpack remaining rooms Once your most important rooms are in order, it’s time to organize the remaining space. Tackle one room at a time and then move to the next. It is a good idea to keep the task of organizing storage areas for last. Since home organizing after the move is a huge task that may take days, this will ensure you have a clean uncluttered space for dining and resting. The storage space can still wait. Don’t forget the entryway Organize this space once you are done with the cleaning aspect of all major rooms. If you continue to ignore this area, it might turn into a complete mess with a pile of stuff that you have been delaying organizing. So when you wish to get organized after a move, place a small basket by the door. This should collect all of the mail that reaches your new home. Bring some hooks to organize items that can be easily lost. This includes keys and dog leashes.  When installing hooks at the entryway, keep a few points for coats, jackets, and umbrellas. You don’t want this type of stuff to crowd your chairs and sofas. Place a shoe rack at the entryway. You do not want any viruses to enter your new abode with shoes, right? In these coronavirus times, it becomes even more important to drop your shoes at the door. Place a rug or mat at the entryway to avoid bringing dirt, snow, and slush into your abode. These tips for organizing after a move can make life a little easier for you and your family. You can always rely on dependable professional services for the job if the task seems a little overwhelming. Read Also: 10 Steps to Move in Your New House Moving home checklist: What you need to know Factors To Consider While Preparing For A Move

READ MOREDetails