Hardwood Timber Flooring: Gives a Classic Look to Your Home

Published on: 16 March 2016 Last Updated on: 10 September 2024
Hardwood Timber Flooring: Gives a Classic Look to Your Home

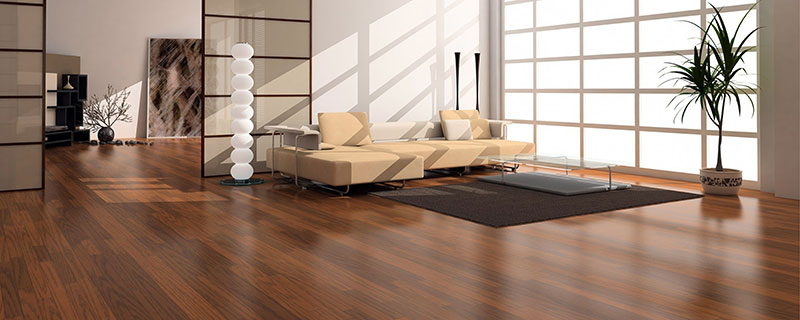
Solid hardwood flooring is known for imparting an impressive look. Customers tend to prefer hardwood flooring since decades because it gives not only a unique but a classic look to the room. Hardwoods are usually used for construction purposes such as boat, furniture, flooring, and instrument construction. The hardwood variety is usually obtained from oak, maple, cherry, hickory or pecan trees. Thus, the hardwood timber flooring is known for imparting a sense of beauty to the room and also displays the sign of high status.

Styles of Hardwood flooring

The most popular hardwood flooring includes

  • Solid hardwood flooring
  • Engineered wood flooring
  • Long strip engineered wood floors

Each type of hardwood flooring is different from the others in regards to the advantages, durability, look and pattern. The solid hardwood adds charm, cordiality and value to the room, while the engineered hardwood flooring does not shrink easily and is more durable. The long strip engineered wood floors are known for their unique features, they are designed for the floating installation. The hardwood timber flooring is a magnificent product that can last for generations. However, proper care and regular maintenance are the two most important things that need to be considered when talking about timber flooring.

How to increase the performance of the hardwood timber flooring? 

  • Refrain from using hot water as it may cause serious damage to the floor.
  • Use a damp mop by wringing out the extra moisture as this can hamper the flooring and wet patches can develop on the floor surface.
  • Always mop in the direction of the wood grain to remove the entrenched dust more swiftly.
  • Refrain from using harsh chemicals, detergents or floor cleanser; instead, look for cleansers that are mild and are meant for this type of flooring to remove stains.
  • Use gentle nonscratch microfiber mops for cleaning the hardwood timber flooring.
  • Sweep the floor regularly with a soft-bristle broom or vacuum cleaner. 

Some more facts about hardwood timber flooring

  • The furniture and the other appliances should be placed after 48 hours from the last coat of varnish on the hardwood timber flooring.
  • The furniture and the other appliances should have protective pads to prevent marks on the floor.
  • The rugs or the carpet can be placed at least after 2 weeks from the last coat of varnish on the hardwood timber flooring.
  • Guard the floor against direct sunlight by using window curtains or by using rugs and carpets. This prevents the hardwood timber flooring from getting discolored.
  • Maintain a normal temperature to prevent gaps and cupping.
  • Ensure that no one uses pencil heel shoes or sharp-pointed heel shoes on the floor as it may create a dent on the floor surface.
  • Trim the nails of the pets in the house to prevent scratches on the hardwood timber flooring.

Advantages of hardwood timber flooring

  • Selecting a good quality hardwood timber flooring can last for several years in fact through generations. The hardwood timber flooring is easier to clean and is highly cost-effective.
  • The hardwood timber flooring increases the resale value of the home.
  • Good quality hardwood timber flooring keeps the room warm and cozy and is more hygienic compared to other flooring materials.

How to choose hardwood timber flooring? 

When choosing the hardwood timber flooring for your home,

  • Check the color and pattern to match the décor of the room.
  • Check the timber wood based on select, standard and feature grade.
  • Check for the coating that can be used based on oil or satin finish.

Thus, the hardwood timber flooring is ideal for imparting a classic look to the room.

Read More:

  1. Additional Ways To Keep Your Home Warm
  2. Home Hacks: Stuff You Can Clean In One Hour Or Less
  3. How To Make Your Home Look Like A Splendid Hotel?
  4. Best 5 Designer Secrets To Make The Most Of Small Spaces

Abdul Aziz Mondol is a professional blogger who is having a colossal interest in writing blogs and other jones of calligraphies. In terms of his professional commitments, he loves to share content related to business, finance, technology, and the gaming niche.

View all posts

Leave a Reply

Your email address will not be published. Required fields are marked *

Related

how to harvest dill

How to Harvest and Preserve Dill for Year-Round Use?

The tender, fern-like leaves of dill almost beg to be touched. If you want to cook them, trim the fresh dill foliage and gather the seeds for pickling. Or you can chop the feathery leaves and yellow umbels for attractive bouquets of homegrown flowers. In addition, black swallowtail caterpillars love to feed on it. Its tiny yellow blooms are great at drawing in a wide range of pollinators. Dill grows as an annual for summer harvests in USDA Hardiness Zones 2–8. In other parts, it may self-seed and is hardy in the winter in Zones 9–11. Here is everything you need to know about how to harvest dill. Keep reading for a comprehensive guide. How to Harvest Dill? Fresh dill clips easily, but it soon starts to droop. Sounds familiar to Cilantro, right? Its flower umbels may look lovely in a mixed bouquet, but after a few hours, don't be shocked if they start to wilt. When harvesting dill for recipes, use it as soon as possible because its flavor starts to fade after a few days. Cut off the flower stalks of dill after the yellow blooms have faded but before the seeds start to ripen and come away from the umbel. Cover the entire flower head with a small paper bag that has a few tiny holes for ventilation. Hang the plant upside down in a cool, dry place. Watch for the seeds to fall and collect them in the bag's bottom. The seeds should be kept in a cool, dry, and dark area in an airtight glass container. When and How to Plant Dill? Dill grows best outside and is simple to start from seed. Plant the seeds directly into the ground, 1/4 inch deep and spaced 1 to 2 inches apart, in the springtime following the last frost. If you want the dill plants to be able to self-sow, plant the seeds in tufts so the seeds can fall and sprout the following year. Or you can plant them in rows spaced about 6 inches apart. You might want to think about succession planting if you want a reliable supply of dill. During the growing season, start by planting a small number of seeds from the packet at a time and then a few more every week. Typically, seeds take 7 to 14 days to germinate. Also, dill can be grown from transplants grown in nurseries planted in the ground or in containers in spring. You can plant dill outside a few weeks before the last predicted spring frost because it can withstand light frost. To achieve lush growth and stop crowded seedlings from producing seed heads, which stops the production of foliage, thinning is essential. Every 12 to 24 inches, reduce the number of seedlings to just the strongest one once they reach 3 or 4 inches in height. As they get bigger, some start to flop. Plants can be kept upright by placing a stake or a sturdy twig in the ground close to the plant's base. To loosely secure the plant to the stake, use garden twine. You can start the dill seeds indoors four to six weeks prior to the last frost. And you can move the seedlings to the ground once the risk of frost has passed. Transplanting mature dill does not work well, so plant your seedlings where they will be able to grow and thrive. Where To Plant Dill? Dill should be planted in a spot with well-drained soil and at least 6 to 8 hours of daily full, direct sunlight. Particularly for cottage gardens, the delicate foliage gives garden beds and borders textural interest. Choose a location for your dill that will shield it from the wind if possible. Just like spinach, high winds can easily damage its stalks if you do not stake the dill. You can plant dill's fragrant foliage in perennial garden container plantings. Or you can plant them alongside other herbs or vegetables in a traditional kitchen garden. In an edible garden, cruciferous vegetables such as Brussels sprouts, collard greens, broccoli, and cabbage are good companion plants for dill. Dill draws beneficial insects like ladybugs and bees and drives away common brassica pests like loopers and cabbage worms. But avoid planting dill close to carrots. Carrots can be stunted by dill, and because they are closely related, dill can cross-pollinate with carrots to produce inferior hybrid plants. Planting dill close to tomatoes is also not recommended. Mature dill will probably stunt your tomatoes' growth, even though some studies have indicated that tomatoes and dill can be beneficial companions when they are young. How to Propagate Dill? Seed is the most effective method of dill propagation. Cuttings can also propagate Dill, though this isn't as dependable. Seed: Direct sow the dill seeds in early spring at a depth of 1/4 inch in a prepared garden bed. Dill does not tolerate transplanting well. Thin the seedlings so they are 12–24 inches apart when they are 3–4 inches tall. Cuttings: Using shears or scissors, cut off the stem with at least 3 to 4 inches of new growth to take a dill cutting. Place the cutting in a water-filled container, making sure to remove any leaves below the water's surface, and allow the roots to grow for two to three weeks. Fertilizer and rooting hormones are not required. Plant the dill in a container or on the ground once the roots are 2 to 3 inches long. Is Dill a Type of Weed? No, I am not talking about WEED weed (read: marijuana). Although dill isn't technically a weed, some individuals and spice companies call the plant dill weed, possibly due to its feathery leaves. Dill weed is a dried or fresh foliage plant. Flower umbels are yellow and used to make dill seeds. How Should Dill Be Stored for Optimal Quality? You can keep fresh dill in the fridge by wrapping its leaves in a moist paper towel. Or you can tuck its stems into a container of water. Fresh dill can be frozen by submerging it in water in ice cube trays. Place the cubes in cooked dishes that have enough moisture to withstand them. Dill seeds and leaves can also be easily dried for later use, though the flavor is a lot more muted. Water and Soil Sow dill in soil that is moist but well-drained. If there is a lot of clay in your soil, add organic matter to the top few inches to aid in drainage. If you have trouble with poor soil drainage, plant this herb in raised beds or containers. Growing dill requires proper irrigation. As the seeds germinate, keep the soil evenly moist. Dill plants require one to two inches of rain or extra water each week once they begin to grow. Humidity and Temperature Dill tolerates temperatures as low as 25ºF, but 70ºF is the ideal temperature for it. Dill often bolts, sending up flower stalks to set seeds when temperatures rise. This annual herb dies after it flowers and produces seeds. Get rid of the flowers to prolong the plant's growing season. Apply Fertilizer While most herbs, including dill, don't require extra fertilizer, you can give them once or twice during the growing season by applying a balanced 10-10-10 fertilizer. When planting, either mix a liquid fertilizer with water or etch a time-release fertilizer into the soil. Refer to the product label for instructions on how much to use. Trimming Dill should be pruned early in the growing season to prevent limb bending. Cut off the top leaves of the plant to promote more growth of the lower leaves. Food preparation and cooking can be done with anything that has been pruned. Repotting and Potting You can grow dill in pots on a sunny balcony or deck, even if you don't have an outdoor garden. Due to the deep taproot that dill plants have, choose a container that is at least 12 inches deep. Because clay and terracotta pots don't retain as much moisture as plastic or glazed ceramic pots. They are ideal for growing dill. Make sure the container you select has good drainage and is big enough to allow you to space your plants 12 to 24 inches apart. It is best to start over in a new, larger container. Especially if your dill plant outgrows its current one because it does not take well to transplant. If the temperature where you are planting is not too high, you can keep planting seeds into the summer. Types of Dill Dills can be of many types with each of their distinct looks and flavors. Here are the three different types of dill you can grow in your kitchen or backyard. Long Island Mammoth Also known as Long Island Mammoth this one is an old-time favorite. Its fern-like leaves can be dried and stored for a long time, or they can be harvested fresh. It produces big clusters of yellow flowers with flat tops. They turn into brown seed heads, and they can reach a height of five feet. Fernleaf Grown to a height of only 18 inches, Anethum graveolens, or Fernleaf, is a highly productive dwarf variety. It works well in container gardens or small in-ground beds. Its feathery, delicate foliage has a great flavor of dill. From midsummer into fall, it blossoms. Bouquet The 'Bouquet' cultivar produces plants up to thirty inches tall with fine bluish-green foliage. The enormous, six-inch-diameter yellow flower heads are ideal for drying, creating an enduring arrangement. Or you could chop them for fresh floral arrangements. How to Keep New Dill Fresh? Dill weed quickly wilts after harvesting and gradually loses its distinctive flavor and aroma. If you know how to store your freshly harvested dill, this shouldn't be a problem. Here are two straightforward techniques that you can use: Put It in the Crisper Drawer of the Refrigerator Loosely wrap the recently cut and cleaned leaves in damp kitchen towels before putting them in a container or sealed bag. Put the container in the crisper drawer of the refrigerator, which has a lower humidity than the other sections of the appliance. Utilize the herbs before they begin to wilt and dry out, which should happen in a few days. Put It in Water To make this method function, when harvesting the herb, you must cut off the entire stem. After gathering the stems, put them in a glass of water and seal the opening with a plastic bag. Every day, change the water. Unlike potatoes, dill leaves can remain fresh for up to a week when stored in this manner. How to Freeze Fresh Dill? Freezing is the best way to preserve extra dill for later use if you've harvested more than you can use at once or in a few days. Dill freezes most effectively when chopped into smaller pieces and added to ice cube trays with just enough water to cover the freshly minced dill. This allows the herbs to be kept for four months or longer. This will ensure you always have dill on hand for when a recipe calls for it. How to Dry Fresh Dill? Dried fresh dill is a popular method if you're searching for another way to store dill for a long time. The herb has many uses, even though it won't have as much flavor as when it's fresh or frozen. All year long, you can use it as a herb in cooked dishes or to make tea. Stick to hang-drying if you don't want much of the flavor to be lost. This is a very easy method to use. All you must do is gather a few dill leaves and then bind them with a string. Later, place them in an area with adequate ventilation upside down.  Place them in an airtight container once they're crumbling and dry. Even though fresh dill is always preferable, make sure to save some for later use. Particularly if you don't have a year-round indoor herb and spice garden. Wrapping Up Growing dill is a great way to add flavor to fish and seafood dishes. A little goes a long way because fresh dill leaves have a strong licorice flavor. It is best that you add dill toward the end of cooking, in salads, or as a garnish for soups. Because once cooked, it tends to lose its flavor. If you have thoughts to share or questions to ask about how to harvest dill, please leave a comment below. We would love to hear from you! Read Also: Asparagus 101: When, How, And How Often To Harvest? How To Harvest Sunflower Seeds: A Fun And Easy Activity For The Whole Family How TO Harvest Lemongrass: Tips AND Tricks FOR Growing AND Using This Versatile Herb

READ MOREDetails
Pest Infestation

9 Signs You Have a Pest Infestation in Your House (And What to Do About It)

The average American home has dozens or even hundreds of different kinds of insects living inside it. However, the vast majority of those tiny, unseen roommates aren't pests. Many insects and other small creatures can live peacefully near humans without causing problems. But others are pests that can infest your home, breeding in huge numbers and turning up everywhere you don't want them. From mice to cockroaches, these pests can leave all sorts of different signs. Humans have been doing pest control for thousands of years. But if you don't know what to look for, you won't know how to take the steps you need to control a pest infestation. In this guide, we'll show you exactly which signs of a pest infestation to look for. Once you recognize the problem, you can start taking the steps to fix it. Keep reading for what you need to know! 1. Damaged Wires or Furniture Big pests, like mice, often chew on furniture or through cords. If you see damaged wires or bite marks on your furniture, you probably have a pest problem that's not just insects. Rodents need to chew on things because their teeth constantly grow and need to be worn down. You'll see the marks of this activity down low, near the floor. You might also find signs that mice have been eating the food in your pantry. This damage will probably leave you asking, "What is the best way to get rid of mice?" However, the answer to this is the same as the answer to getting rid of any pests: you should always call a professional. DIY solutions are rarely completely effective. 2. Signs of Nesting Rodents also like to build nests, and you might see the signs during a thorough check of your home. They'll use any available materials to build their nests. You'll need to check all the small, hidden areas of your home where they might have started nesting. Common signs include shredded paper and cardboard. 3. Droppings Droppings are definitely one of the most unpleasant signs of a pest infestation you can come across. You can often figure out the type of pest you're working with by looking closely at the droppings. If it's a rodent, you'll find long, solid droppings that are sometimes shaped like cones. These droppings tend to be small, and won't have a strong scent. While that's a good thing, it also makes them difficult to spot. Insects droppings are different. You might find exoskeletons that have been shed, or wings, legs, and other parts of the insect body. A different sign of insect pests can be spider webs. Although spiders themselves aren't usually pests, their webs signal that they might be trying to catch the insects that have infested your home. 4. History of Pest Infestation Not sure if you're seeing sure signs of a pest infestation? Your house or apartment's history might hold some clues. Try to contact previous owners or tenants and see if they've experienced infestations before. You can also ask your neighbors if they've had any infestation issues. Where pests have been, they'll often come back, especially if measures to prevent their return aren't taken. 5. Dirt and Grime This is one of the more subtle signs of an infestation. Sometimes, what looks like a simple buildup of dirt can actually show that you're dealing with an infestation. One reason everyone hates pests is that they make a mess wherever they go. In places where insects, rodents, and other pests hang out, you might find crumbs, dirt smudges, and other bad signs. Rodents often take the same routes back and forth, so they'll leave streaks of dirt or grease along the paths they've taken. If there's dust on the floor, you may also see a trail where pests have walked. These signs may start out small, but they'll build as time goes on. The sooner you can catch them, the better. 6. Plant Damage Many insects feed on plants. If your house plants show signs of gnawing around the edges, and you don't have a pet that might have done it, it's likely due to a pest in the house. 7. Unpleasant Smells Sometimes, you'll smell a pest infestation before you see it. If you're dealing with insects that carry food, like ants, the smell could be that of rotting food they've dropped or stashed somewhere. You might also smell the pests that have died somewhere in your home, where you can't see them. They often hide in the walls or under floorboards. If you start to notice an unusual, unpleasant scent in one part of your house, make sure to carefully check it out. You might find an infestation you weren't expecting. 8. Live Pests The most obvious sign of an infestation is visually seeing live pests. However, sometimes it's easy to dismiss the problem if you see just one. Keep in mind that if one pest made itself visible, there are probably many more where it came from. These creatures tend to be great at hiding. If you catch them, you probably already have a problem -- it's not just a single creature in your home. 9. Strange Noises Almost all of your senses are useful when it comes to detecting a pest problem. Sometimes, they make unusual sounds that can be quiet and hard to catch. Pay close attention to the sounds in your home late at night, when everything's quiet. You can also put your ear up to the wall, floor, or anywhere the pests might be hiding. The sounds you hear can confirm the other signs you've found. What to Do About a Pest Infestation Now that you've spotted the signs of a pest infestation, what should you do about it? As mentioned above, your first step should always be to call professional help. If you try to fix the problem yourself, it can grow much bigger before you can stop it. Need to protect the outside of your home too? Check out our guide to keeping pests away from your garden here. Read Also: 10 Pest Control Tips To Keep Pests Away This Summer What You Should Expect From A Pest Control Visit

READ MOREDetails
buying locally-made furniture

Furniture In Utica: Benefits Of Buying Locally-Made Products

In recent days, globalization has allowed the world to become everyone’s marketplace. Goods and services can move around easier. People from any country can enjoy products manufactured from halfway around the world. E-commerce has its advantages and disadvantages but sometimes the global competition hurts local manufacturers. These days, anyone can purchase pieces of furniture from different parts of the world at a very competitive rate. This trend can be a challenge for local furniture makers and can result in inferior quality or shipping damages so it’s important to entertain the idea of buying locally. Here are some benefits to buying locally-made furniture pieces: 1. Local commerce and economy thrives: One of the best ways to support and encourage local business is to patronize local brands. If their companies are growing because of local consumer patronage, then they are likely to expand their businesses. Others who have an entrepreneurial mindset who haven’t started their venture yet will get an additional drive to start a business locally. Aside from that, the money that you earn revolves locally as you purchase local products. The members of a society are interconnected with each other. The effect of buying products made by your fellow resident would affect the earning and purchasing power of those that they employ. Family-run businesses do not answer to outside big corporations. Their profit is at their own disposal thus giving them a choice to provide better compensation to their employees. If this sounds like something you’d support, click here to buy from a family-owned furniture business in Utica. Your local products showcase your community and culture, and patronizing them would help support their production.  If more people in the community engage with business, then it entails availability of variations of products and services to choose from. Also, supporting local products is way more than supporting the business itself; it means you are helping to sustain the identity of the actual products produced in your town or city. 2. Localized and personalized service: The people behind the pieces of furniture in your house have faces and names that you are familiar with. Some may even be your friends and relatives. If any issues arise with your purchase, you can contact them without going through a lot of hassle. From the delivery to the installation of your furniture, you are confident and comfortable because you know the people and you know how they work. You can rest assured that you’ll be getting the best pieces of furniture with quality service. 3. Local engagement: The more you buy locally, the more you get to engage with your community. You help each other leverage the products made by your community and can find ways to work with each other to achieve common goals. There is no better place than a community where everyone helps each other out. 4. Guilt-free purchase: Safeguarding the environment is a top priority because of the climate change issues that affect all of us. Buying a local product gives you the confidence that the materials are obtained legally and, in many cases, sustainably. You can take solace in the fact that the locally-made furniture was created within the bounds of environmental laws. You can assume that the logs weren’t illegally cut for your beautiful furniture piece. To add to that, you may be surprised to find that your locally-made chair, bed frame, or table was made with materials sourced from your community or region, which entails less contribution to carbon emissions because there was minimal transportation involved. 5. Labor laws upheld: It’s a great feeling when you know that you sit on a sofa made by artistic folks who are also well taken care of. They are well-compensated for the beautiful pieces they crafted and have medical insurance to keep them doing what they are doing best. Buying locally-made products oftentimes means enhanced transparency when it comes to the treatment of the workers. As local owners generally uphold labor laws, safety and security of workers are also guaranteed. They don’t follow laws because they are forced by legislation. They follow them because the people working in their furniture shops belong to the community that they are also a member of. That sense of responsibility comes with the fact that within a tight-knit community, everyone’s welfare is being looked out for by each other. Conclusion: It can be tempting to buy imported products for various reasons ranging from affordability to the appeal of owning furniture from another country. Whatever your reason is, give it a thought or two as you decide whether to get your pieces of furniture from a store that sells locally-crafted pieces or those from abroad. Consider the benefits you and your community will reap. Read Also: Unique Furniture To Transform Your Home How To Salvage Your Furniture After A Flood

READ MOREDetails