Published on: 30 March 2021
Last Updated on: 22 November 2024
Drywalls are those construction materials that are used to create walls and ceilings in your home. Not all that, but drywalls also come in handy if you want to create design features like eaves, arches, or any mind-blowing architectural requirements!!!
Do you know the best part about drywalls?
These are super easy to install, highly durable, and only require simple repairs when damaged.
So, drywall is a flat component composed of calcium sulfate dihydrate, typically between thick sheets of backer paper, and facer, used to construct interior ceilings.
Let’s talk about the ceiling textures and the drywall options you can choose for your home!!!
The Ceiling Textures And Your Drywall Options
Decorating your home can be a real challenge for many !!!
Therefore, choosing the right drywall finish or texture can prove to be a hard nut to crack.
And it’s very natural to get in a state of indecision if you are handpicking it for your new home or renovation project. There are so many options that it feels like you are “searching for a pearl in an ocean.”
Making up your mind about whether or not to go texturing your ceiling can be a tough job. And even if you choose to texture your ceilings, there are chances you’ll be confused about which one to go for!!!! And remember, getting the drywall right is the first step of tiling projects?”.
But No Need to Worry!!
This article will guide you in choosing the perfect texture and drywall option for your ceilings to look more elegant than ever!!
1. Sheetrock Texture: Old Is Gold
Sheetrock ceiling texture is a drywall ceiling texture that has been famous since 1917. The reason this drywall texture is so awesomely renowned is because of the artistic look that it gives to your ceiling
And the best part is you don’t need to use any sort of spray paint in this case. You can achieve this texture by using your artistic hand technique and without using any special brushes.
This texture is perfect for any room. There are no restrictions on the use of this ceiling texture.
2. Stipple Brush Texture: A Test Of Your Skill
This texture is not as easy as it seems. You need skills to create this texture.
To create this texture, you need a roller and slap brush.
The fascinating fact about this texture is it can cover the bumps and holes on your ceiling. And if you have the skills, then this texture can surely make your ceiling look gorgeous than ever!!
3. Swirl Texture: Creativity Taken To A New Level
To achieve this texture, you need either a roller or sprayer.
You can also do this by using a technique called “the basic swirl” method.
But one thing that you need to keep in mind is while creating this texture, you’ll need a lot of patience to get the best result.
And the difficult part is you need to create the pattern before the mud dries. So, make sure to have a helping hand by your side.
Overall, the texture can really give that awesome look on your ceilings if you do it in the right way!!!
4. Orange Peel Texture: A Color Of Choice
The name suggests all the colors of orange skin, but sometimes it’s also called “an eggshell” ceiling texture.
If you really love this color, then this can be on the top of your favorite lists.
To create this texture, you need to apply thin mud to the ceiling using a spray gun set at very high pressure.
The more artistic mind you have, the more artistic look it has got!!!!
5. Smooth Textures: Choice Of Many
If you are someone who wants the best at a cheap cost, then this texture is just the right choice for you. Moreover, you don’t need to have many skills to create this texture design.
The look of this texture is just mind-blowing, and if you are someone who likes things to be consistently gorgeous, then this is the texture you can have for your ceiling.
This texture is effortless to remove and is also perfectly suited for any room.
6. Tree Bark Texture: Beauty Of Nature
If you are someone who loves nature and wants to bring the reflection of nature inside your home, then this textured style is just the option you can have.
This ceiling has the look of a tree. You can create this texture just by using a heavy roller. The texture might look simply, but it’s very artistic and can surely catch the eyes of many.
If you have a farmhouse, then this texture will double the beauty!!!!!
7. Slap Brush Texture: Slap The Beauty Out
Artistic, gorgeous, beautiful, and elegant are the nicknames you can give to this texture. A complete package of beauty!!!!
To get this texture, you’ll need a brush with very stiff bristles and thin mud.
Firstly, you have to cover your ceiling with mud using a roller, then take the brush and slap the ceiling from the edge.
This can be a hard nut to crack because if you don’t get it right on the first shot, the whole ceiling might end up looking messy.
8. Popcorn Texture: Cottage Cheese
This texture, also known as the “cottage cheese” or “acoustic” ceiling texture, is probably one of the most famous ceiling textures ever!!!
If you look closely, you’ll see it’s kind of a look-alike of “popcorn.” That’s why it’s called “popcorn texture.”
To achieve the correct texture, you need to use a sprayer to apply to your ceiling. This contains Styrofoam with mud which gives that puffy effect.
But it will require you to have a lot of skill to achieve this effect. That’s because the “popcorn texture” is both challenging to apply and remove.
I hope this article will help you to know about the needs of ceiling textures and drywall options. And now I believe you’ll be able to get yourself the perfect texture for your ceilings.
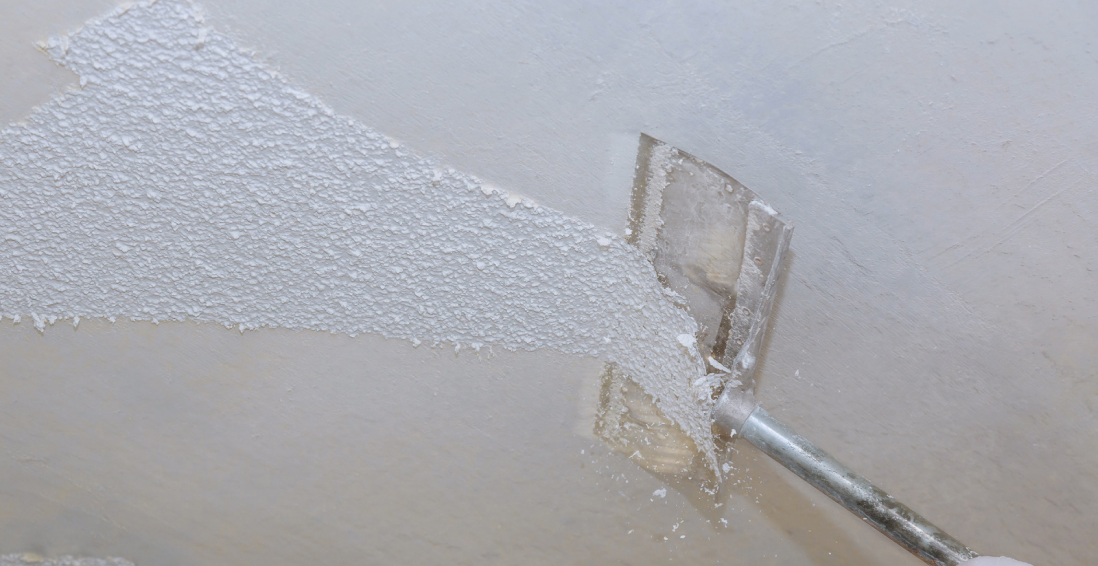
How Can I Remove Old Ceiling Textures Safely?
Removing old ceiling textures can be a big job, but it doesn’t have to be intimidating! If you want to update your ceiling and get rid of that outdated texture, I’m here to help.
No matter if you have popcorn, stipple, or another type of texture, this process takes a little bit of care, but don’t worry!
Here’s a step-by-step guide on how to remove an old ceiling texture without breaking your back or the bank.
Step 1: Test For Asbestos
Before you get out any tools…safety first! Remember, many older ceilings (especially those with popcorn texture installed prior to 1980) contain asbestos. Before doing anything else, have your ceiling tested for asbestos.
You can hire a pro to test the ceiling or buy a self-test kit.
If asbestos is present, halt all work and consult pros immediately. Asbestos removal is not a do-it-yourself job because it poses serious health risks if mishandled.
Step 2: Clear The Room
If there’s no asbestos present, it’s time to get the room ready. Cover all the furniture. You’d be amazed at how far a fine mist of water, compound, and paint can travel!
Also, plastic should be removed from the floors, and tape should be around any ceiling fans or lights that are not being removed. I can personally tell you we didn’t do this.
We found dried white dust on our bedspread when we were stripping the wallpaper in our bedroom, and we had to clean up all the residual dust a little too late. It was wild!
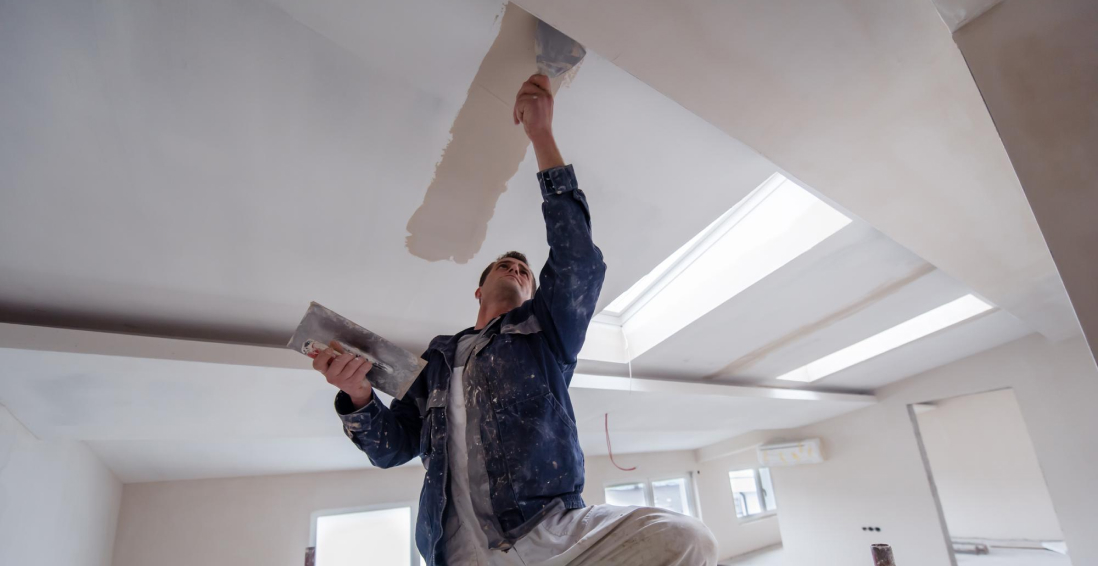
Step 3: Soften The Texture For Better Finish
Here’s where the fun starts! To make that texture easier to remove, you’ll need to soften it.
Fill a spray bottle with warm water and mist the ceiling. You don’t want to drench it. If you put too much water on the ceiling, it could end up damaging the drywall underneath.
Allow the water to sit for about 15–20 minutes or so, giving it time to penetrate and loosen up that texture material. Don’t rush this step. It’ll only cause more work for you in the long run.
Step 4: Clean Your Work
Grab a wide putty knife or scraper and start scraping off the texture. Do small sections at a time, and scrape at a shallow angle so that you don’t gouge the drywall underneath.
If it’s not coming off well, spray some more with the water bottle and let it sit for a little longer.
This step can be kind of messy and time-consuming, but have patience because, in the end, you will have a nice smooth ceiling.
Step 5: Patch & Sand
Once the texture is gone, you may notice a few dings or dents in the ceiling.
Don’t worry! Just fill them with some joint compound, sand it smooth, wipe away any dust and you’re ready for a new ceiling.
And that’s it!
A fresh, smooth ceiling in no time!
Read Also:
A passionate writer and an avid reader, Soumava is academically inclined and loves writing on topics requiring deep research. Having 3+ years of experience, Soumava also loves writing blogs in other domains, including digital marketing, business, technology, travel, and sports.
In small bedroom house plans, a one-bedroom house plan is for individuals who want to live alone due to some reasons. Small bedroom plans can be done according to the couple’s interests and their preferences on behalf of the limited space. Get useful inspirations about one-bedroom house plans, which have great importance for small families or couples.
In small home planning, normally guest houses, accessory dwelling units, and retirement home ideas are best. Living in all-bedroom house plans normally represents budget-friendly ideas that require less maintenance. There are several reasons to choose the small house plans.
Why Are People Driving To One Bedroom House Plans?
Choices of the different options for perfect bedroom house plans depend upon the personal interests of the people and their preferences to proceed with standards approaching styles. Every time the big space in your bedroom designs plans is not necessarily.
Modern people, especially those leading a fast life, are more likely to choose a small cozy, well-ventilated, balanced interior room as their bedroom.
Here are some advantages of the small one-bedroom house plan for the modern fast-forwarding people.
The less square footage planning can be done with the help of experienced and well-acknowledging experts who know planning very well.
Some people live alone due to their job purpose, so they need small bedroom house plans instead of large spaces. So buying small house plans and design small living houses can be cost-effective for such people who want to live alone and take an interest in living in a peaceful environment.
Less maintenance and fewer expenses are required for modern 1 bedroom house floor plans to meet your objectives as well as to live with peace.
You do not need to waste money on the decorations of unused home areas. Because the small house plans can cover the empathy space and match your interest’s levels, the compact house plans are minimizing the cost of unused decorative items.
Planning of a single person or living with your spouse can be a cost-effective and wise decision-making plan to achieve your objectives and to approach with smart choices to get the best and verified response at the time of your needs.
One Bedroom Design Is Always Meet Up the Objectives
One-bedroom homes are considered more effective and safer as compared to multiple-story homes. Due to having lots of expensive materials, bigger home plans are not considered the best and perfect as small homes.
Bigger homes are for the luxury life, and more space means more time for maintenance. And fewer working professionals have extra time during your working age. This is the main reason working professionals and students always keep voting for the one-bedroom house plans.
Here are the points which make the one-bedroom house plans the most robust one.
1 The bedroom house plan is an instant and reliable source for interested communities to meet their objectives and then proceed with easy and simple approaching plans.
Get some help from professional house planners who have the experience to design small homes. Getting started with small house plans with efficient house design can be cost-effective and a nice plan to proceed with smart choices.
One-bedroom home ideas need less space but proper planning to design homes according to the interests and trust levels of the interested people.
Style of 1 bedroom house plans can always impress its residents to meet with their objectives and then proceed through fast and easily accessible resources.
You have to know how to get satisfied and how to match up with your innovative interior interests. The straightforward strategies are always the most effective way to improve your modern small bedroom house plans.
Conclusion:
From the modern-day aspects, the small is beautiful. This is the reason the tiny house and one-bedroom house concepts are introduced. Good ventilation, well Insulated, Thermal Windows, and Airtight Construction can play a vital role in meeting your objectives.
There is a massive range of ideas and valuable inspirations that can proceed to approach the intelligent feature small bedroom house plans and make sure how to get satisfied from the practical, inspiring feature plans.
Read Also:
Five Bedroom Rug Ideas – Area Rugs and Decorating Ideas
3 Tips on How To Plan The Best Cheap and Fabulous DIY Bedroom Makeover
Seven Simple Ways for Achieving Cozy Bedroom Environment
When it comes to bathroom design, new trends emerge year after year. If these are always followed, however, this can become quite expensive in the long run.
Those who don't want to invest a lot of money in redesigning their bathroom after just a short time are therefore much better off with a timeless style in the bathroom. But what interior design tips should actually be considered for this and what options are basically available? The following article shows.
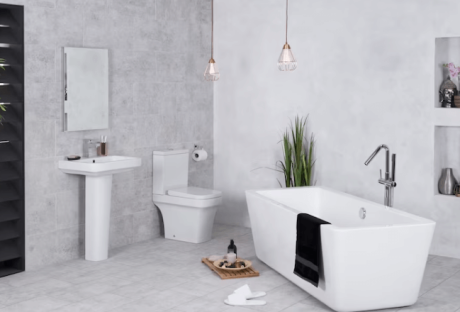
Timeless bathroom design - the basics
With regard to a timeless bathroom design, some principles can be identified. These include the fact that the focus should be on basic colors. In addition, the functionality of the interior should be given the highest possible priority.
Another valuable tip is to follow the well-known motto "less is more" when designing the bathroom. Despite a high level of functionality, however, aesthetics should not be neglected - after all, you should be able to feel good all around in the bathroom.
Use basic colors
In timeless bathrooms, people hardly ever go for shades like a bright turquoise or a gaudy red. Such splashes of color are only suitable for accessories and bathroom accessories, such as towels - after all, if necessary, these can be replaced in no time at all.
Much more suitable are basic colors, such as black, gray, cream, sand, or white. Such muted colors will still be considered modern and contemporary in 20 years. In addition, brown tones also provide a high feel-good factor and a cozy ambiance, whether in the area of furniture or tiles. You can discover marble look tiles on this website.
The tiles, by the way, play an extremely important role when it comes to the timeless design of the bathroom. Accordingly, basic colors should be used here as well. In addition, modern tiles have meanwhile been showing themselves as large-format for several years.
Less is more
A timeless bathroom is hardly characterized by the fact that the design always immediately catches the eye as soon as the room is entered. Current trends can be completely out again in just a few months. To prevent the design of the bathroom from soon being judged as a tasteful misstep, it is therefore much more advisable to prefer more inconspicuous and restrained designs.
If the essentials are placed in the focus of the interior, the chances are good to be satisfied with the bathroom design for many years.
Choose tried and tested classics
There can be a very fine line between modern and antiquated - this is true not only in the world of fashion but also in bathroom design. When it comes to putting together new bathroom furnishings, it is therefore essential to proceed with caution.
Many furnishings can be identified that have already proven themselves over many years. The chosen products should still give pleasure when entering the bathroom in ten years.
Functionality in focus
A timeless interior means, above all, that it will be enjoyed for a long time. However, if the functionality in the bathroom is neglected, this is quickly tarnished - a beautiful appearance is hardly enough in this room.
Thus, awkward-to-use faucets, a too-small sink, or slippery floor tiles are taboo. A bathroom can only be truly timeless if its usability is guaranteed for many years. It also makes sense to address the issue of accessibility in the bathroom at an early stage.
Additional:
Bathroom Remodeling Tips and Ideas
How to Keep Your Bathroom Clean All the Time
Considerations When Choosing the Ceramic Bathroom Tile
5 Hotel Housekeeping Tricks You Need To Clean Your Bathroom
When the summer heat starts kicking in, doesn’t it feel good to jump into the pool?
Spending hours in the soothing water, swimming, and having a relaxing time takes all the summer heat away.
And if you have a pool in your backyard, you can go swimming anytime you want, right?
The only problem is, keeping the pool clean and hygienic to swim. If you are getting inside the water, it’s essential to make sure the water won’t harm your skin or hair.
Pool cleaning and maintenance are almost as important as taking a bath every day.
The easiest way is to follow a certain procedure and regular practices to keep the water clean. You might also want to buy some cleaning chemicals.
While pool cleaning can get a bit costlier, there are some easy-to-use and cheap online pool supplies available to save your day.
Here is how you can maintain the pool and enjoy a swim round anytime in a day.
Pool Maintenance Basics -
Maintaining a pool is a three-step process and is pretty easy once you get used to it.
Step 1: Water Circulation
As much as the water keeps circulating, the pool is going to stay healthy. The water will carry any invisible dirt and debris towards the filters to keep itself clean and harmless.
Ideally, the pool filters and pumps should keep the water running all the time. But considering the electricity situation, that might not be possible.
It will be cheaper if you follow a certain timetable to keep the water running. The best solution would be to turn on filters and pumps during the night hours till the morning.
A good 8-hour routine would be enough for water circulation.
Step 2: Cleaning The Pool and Equipment
The circulating water will carry and trap any debris into the pump baskets and filters.
To maintain those tools functioning, clean all the pump baskets and filters.
You might have sand filters or cartridge filters. Cleaning both the filters is easy and doesn’t need a lot of work.
There are some automatic, robotic vacuum cleaners and filters that can do the cleaning themselves so that you can invest in that as well.
Now, to clean the pool, first, pick up the skimmer and get all the visible debris out.
Then brush and clean the walls, steps, ladders to get rid of any collected dirt that might harm the water. Brushing on alternate days would be a good idea.
Cleaning can never be enough, be more generous in this step. Shine the pool and the water.
Step 3: Pool Chemistry
Pool Chemistry might sound tricky and complex to understand for beginners. But it isn’t.
A couple of sanitizers and chemicals are going to help you maintain the pH of the water.
Ideally, the pH of the pool water should be between 7.2 to 7.6, and the alkalinity range should be 100-150 ppm.
Get some pool test strips to test these ranges and use the chemicals accordingly.
Have pool chlorine and dispensers in handy all the time. If you have a saltwater pool, then you can get salt supplies at a cheaper rate online at Watson’s.
Test the water every other day to make sure it’s safe to enter.
Final Words:
Pool cleaning and maintenance activity is actually as fun as swimming. Once you understand and sync into the whole process, it’s quite easy to do it at least once a week.
Get into the cleaning mode, and your pool will stay functional for a longer time. Next time you host a party, your pool will be shining with crystal clear water.
Read Also:
Top 5 Tips in Designing Your Swimming Pool
Renting a villa in Malta with a private pool
5 Hotel Housekeeping Tricks You Need To Clean Your Bathroom