Turn your attic into a living space

Published on: 26 March 2018 Last Updated on: 01 August 2024
attic room

When purchasing a home, people have some projection of the future. However, it is hard to predict everything. This is why we like getting a place with the room for improvement and expansion. The attic is probably one of the first choices for home expansion of growing families. It often seems miraculous the way an empty, or a storage room turns into a comfortable living space.

The purpose :

The purpose of your loft-conversion is an important element of project planning. Some of the most convenient and usual purposes are a playroom, an office, an entertainment room, or a bedroom. Decide the most convenient purpose depending on what you lack space for. Perhaps this can give your children enough space to play when they are indoors, or finally give you the master bedroom you’ve always wanted. The purpose will determine the layout, the amenities, and the type of access.

The access :

Perhaps you are used to using the attic ladder, however, when this becomes a room you use every day, the ladder is no longer acceptable. First of all, consider the space you have. Is there anything on the floor below which will make fitting a staircase difficult? Perhaps in certain scenarios, it could block one of the doors into one of the rooms. Hire a professional to make a plan for the stairs, unless you are a professional, or truly experienced. Safety should be your priority. Also if your loft is meant to be a playroom, you should definitely get a banister and safety get at the top and the bottom.
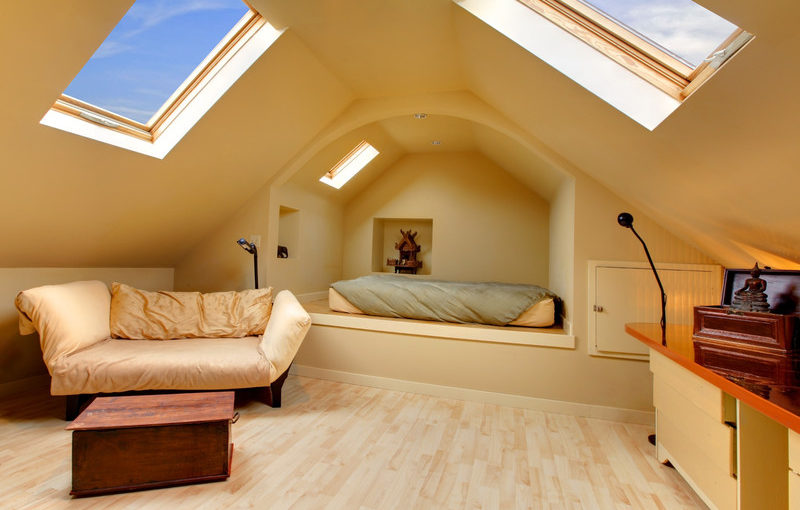
The style :

Does your attic currently have enough space for your purpose? Is the ceiling high enough? Do you have enough windows? Check your local regulations, get the required licenses and choose the style of the conversion. There are three common styles of the loft conversion, mansard, dormer, and roof light. The roof light is probably the most convenient one as it does not require major alterations to your roof. This is the reason why there is usually no need for planning permits.  The other two styles, however, involve creating more space and offer a better choice of windows. You can get more daylight and a possibility of installing shutters and other window treatments greater energy-efficiency.

Electricity/Plumbing/HVAC :

Hire a licensed electrician to establish whether your current system can handle the increase in the electrical load required for the new room. Let them do the wiring. Look for the main stack and plan your bathroom in that area. A professional plumber should have no trouble setting it up. Finally, the last contractor you will need for this type of project is an HVAC specialist. They will tell you if the current system can support another room and set it up.

Insulation :

Insulation is another essential part of the conversion. Perhaps even the most important one. Without it, the room would be impossible to live in due to extreme temperatures. It protects a room from the weather elements and increasing energy efficiency. Hang drywall once you are done insulating.

Flooring :

The floor insulation is not so much for the sake of warmth, but for the sake of noise. Installing floorboards requires an excellent subfloor to reduce the squeakiness. Also, a carpet may be a good choice as it absorbs a lot of noise. While you are at it, carpet tiles are excellent for a playroom. They are not slippery, they absorb sound and they are easily removed and replaced.

The room now fulfills all standards to be lived in. All you are now left with are the finishing touches. You need to select the colors, the furniture, and decor.  Do so according to the purpose of the room and your taste.

Bio: David Koller is a freelance blogger passionately interested in minor house fixes and home décor.

Read More :

Content Rally wrapped around an online publication where you can publish your own intellectuals. It is a publishing platform designed to make great stories by content creators. This is your era, your place to be online. So come forward share your views, thoughts and ideas via Content Rally.

View all posts

Leave a Reply

Your email address will not be published. Required fields are marked *

Related

framed wall art

Artistry Beyond Canvas: Discovering Framed Wall Art

The world of art is vast and diverse, with countless mediums and forms explored and celebrated throughout history. While traditional canvas paintings have long held a special place in the hearts of art enthusiasts, a realm of artistic expression goes beyond the canvas and is found in framed wall art. This article delves into the fascinating world of framed wall art, exploring its unique characteristics, diverse styles, and how it can elevate any living space's aesthetic. A Unique Medium As the name suggests, framed wall art is enclosed within a frame. This medium offers a departure from conventional canvas painting by adding an extra layer of dimension and sophistication to the artwork. The frame becomes an integral part of the composition, enhancing the overall visual impact of the piece. These frames come in various materials, including wood, metal, and acrylic, allowing for a wide range of styles and aesthetics to be explored. Diverse Styles and Themes One of the most captivating aspects of wall art is the sheer diversity of styles and themes available. Whether looking for a penchant for classic art, contemporary design, or something unique, one will find framed art that resonates with your taste. The possibilities are endless, from abstract expressions of color and form to realistic portrayals of nature and culture. In-Home Decor Framed art has emerged as a favored choice for interior decorators and homeowners looking to infuse their living spaces with artistry and personality. Its versatility is a critical factor in its popularity. Art on the wall can suit your vision, whether to create a focal point in a room, add a subtle touch of elegance, or convey a particular theme. Choosing the Right Piece Selecting the right framed artistic pieces for your space is an art form. Consider your room's existing color palette and decor style to ensure that the artwork complements the ambiance. Additionally, consider the wall's size and the piece's desired impact. A large, bold framed artwork can become a captivating centerpiece, while smaller pieces can be grouped to create a gallery-like atmosphere. The Impact This art form can transform a room, evoking emotions, sparking conversations, and leaving a lasting impression on anyone who enters. It can reflect your personality, tell a story, or add a touch of beauty to your surroundings. The beauty of this art lies in its ability to engage and inspire, making it a valuable addition to any space. How To Beautify A Space Using A Walled Art Frame? Be it your home decor or getting a gallery ready, beautifying a space with a walled art frame is a lot of work. Easy, it may sound, but it requires a certain level of expertise to decorate your space using intricate art piece/s. A blank wall acts as a canvas; it is a missed opportunity for decor. A bare wall is a perfect canvas for sharing stories and revealing your identity through wall art.  If the above tips weren't enough, we're bringing ideas to elevate your wall decor and be the talking point for your dinner parties.  1. Be sure to make the art reflect who you are We all have interests and hobbies that reflect that we are more than just our professional selves. There is more to our personalities than what we share at work! When you decide to put up an art piece on your wall, you show a piece of your personality. A part of you is inviting guests to speak more on it, taking the conversation forward for the rest of your party.  It's not as complicated as it sounds, but choosing pieces that convey your love for some place or a thing is quite simple. You may deeply love an artist such as Monet or Picasso. Or you may be a superfan of a comic company such as Marvel or DC (the best is obviously....this one's an unsettled debate, let it stay that way.)  Let the art piece show your love for a quirky fashion item, sense of humor, latest trends, or the classics. Find art that is an accurate representation of your personality.  2. Make a wall centerpiece that mixes art pieces. Need help figuring out where to start? Try to coordinate a few colors to contrast with the wall color. Or choose something that has a common theme, creating one big art piece. You can experiment with the theme and create a piece that catches people's eyes. Don't just stick to canvases or paintings; reach out for quirky designs, vintage art pieces, or photographs. The point is to let your mind create something that genuinely feels like you.  3. Aim for a vibe. Consider using the spare wall to fill up the space and add a dimension to your room. For example, if you have to decorate the wall space in your yoga room, you may consider adding oil on a canvas of white lilies/lilies. This would bring a sense of calm to the room. Similarly, change the wall art in your room and create an immaculate vibe.  4. Create your art! What's better than adding a completely unique art piece with your personal touch as well? Art is not meant to be perfect, so don't worry if you are no Picasso! Even Picasso wasn't "Picasso" until the people recognized his work! No famous artist was "The one" until people showed their work with appreciation.  So pick a blank canvas, sit with your thoughts for a while, and channel the thoughts with every brushstroke.  These were all the additional tips to make your boring walls interesting, giving an elegant touch to your space.  Conclusion In artistry, framed wall art is a testament to the endless possibilities of creative expression. Its unique blend of form and function and its ability to adapt to various styles and themes make it a captivating choice for art enthusiasts and home decorators. Whether seeking to enhance the aesthetic of your living space or appreciate the beauty of art in all its forms, wall art offers a captivating journey of discovery and expression. Read Also: Home Improvement Hacks to Add to Your Space Ideas for Modern Flooring Designs for Home Improvement Plans Home Decoration At Its Best: 7 Key Ideas To Recreate Your Home

READ MOREDetails
wineracknew

What Species of Wood is Right for Your Wine Cellar Furniture?

Most of the vintage wines which you now have in your cellar are a lot more than just proper storage and preservation. Wine cellars are often called the entertainment center of an abode and today you can find all kinds of custom-built wine cellar furniture. These furnitures run the whole gamut right from customized chairs and tables to lighting to tableware and other artistic works. You can equip your cellar with just about any type of wooden wine furniture that will enhance the aesthetic appeal of your home and provide cozy culinary service. If you really prefer timber for your wine cellar furniture, make sure you pick a durable one that will not decay or be affected with mildew in the humid environment of your cellar. Or else what you can do is create a separate room next to your wine cellar for entertaining your guests in order to get rid of the humid environment. Now that you have the option to select from a wide variety of wood types from top providers, picking your wood species to meet your personal preference is no exception. Undoubtedly, the 4 most popular wood species used these days while building wine cellar furniture are given below: Pine- Pine, the most common and least expensive of all the popular wood types is used for manufacturing wine storage rack. It is best known for its durability and strength. This wood species is available in faded colors that assist in making it blend well with any interior decoration. The major benefit of pine is that has attractive and consistent grain patterns that can be stained to match the aesthetics of the rest parts of the wine cellar. Cedar- A durable and light-weighted type of hardwood, slightly pinkish-gold toned cedar is able to resist rotting away of the woodwork. Its grain patterns are more consistent that other wood species and are released easily by sanding the wood. This kind of wood is ideal for giving a simple aesthetic appeal to an abode. Redwood- Best known for its resiliency and sturdiness, redwood is a beautiful reddish wood species that grows in hot and humid places. Hence, redwood is an ideal choice for wine cellar furniture within the cellar since it contains natural wood preservatives within it that aid in resisting the humid conditions. There are 2 types of redwood and they are: Premium Redwood- It is the least expensive and has much more variations and color in the wood than All Heart Redwood. All-Heart Redwood- Its wood is much darker and consistent than Premium Redwood. Mahogany- The most durable and appealing of all the 4 wood species commonly used in wine cellar doors is mahogany, a reddish-brown color redwood. Neither does it swelled up nor twisted out of shape over time. Apart from that, it is resistant to decay, making it perfect for the higher humidity levels usually found in wine cellars with climate-controlled systems. Those people who want that “furniture-grade look”, mahogany is undoubtedly the perfect choice as it is ideal for both lacquer and stain applications. Each of them is unique in its own way. Moreover, to help preserve the quality of wines, it is better to avoid using any other wine rack material types rather than the above mentioned wooden wine racks. Author Bio - Gary Wise, who has decided to go full time to wine writing this year, has recently written a wine article on wine cellar furniture where he shared about how beautifully wine cellar doors displayed his wines in his wine cellar.

READ MOREDetails
How To Clean Up Blood Stains

Know This: Tips On How To Clean Up Blood Stains on Workplace Accidents

Comply with OSHA Standards : Employers are required to comply with OSHA guidelines and specifically to the Bloodborne Pathogen Standard. Employers must also create Exposure Control Plans. This is the case for any workplaces where employees are in contact directly with blood or other infectious body fluids while on the job. Employees and workers that work in financial institutions and banks do not perform jobs where they have reason to believe they will come in contact with blood. In the event of an accident, these workers must know how to handle cleaning up blood properly. Workers must learn how to use precautions and treat any blood or bodily fluids as if they are contaminated. They must treat them as though they have pathogens or are infected with HBV or HIV. Hepatitis B vaccines should be made available within 10 days of exposure on the job to pathogens. As an employer, you have an obligation to follow the guidelines set forth by OSHA regarding biohazard waste. To be a good citizen, you must comply with all government regulations and make the health and safety of others your priority. What You Need to Clean Minor Spills : Before starting the process of cleaning up blood, be sure you have: Protective equipment for all personnel A registered disinfectant with the ability to clean broad-spectrum pathogens Biohazard bags and labels Brush and dustpan Forceps and tongs Leak-proof sharps containers Disinfectant wipes To clean a blood spill from a surface: Equip Yourself Properly : Use gloves, masks, gowns, and eyewear to protect yourself from splashes. Make sure that your protective gear fits comfortably and has no holes in it. You do not want pathogens to come into contact with your body. Remove : With your brush and dustpan or your forceps and tongs, remove any shards of broken glass from the area. You want to avoid ripping your protective clothing. Put each piece in the leak-proof sharps container. Do not remove them by hand once they are inside. First Cleaning : Use cloth towels to cover the blood spill and let them absorb as much as possible. The disinfectant will not work if blood is on the surface. Once covered and cleaned toss the towels in a bag designed for biohazards. Second Cleaning : Go on to the second cleaning only after the room has been properly ventilated. Pour the disinfectant on the surface and let it stay there for 10 minutes. Then, scrub from the outside to the center using cloth towels. Toss these towels in the biohazard bag after doing the second cleaning. Third Cleaning : Use more towels and disinfectant on the surface. Put these in a biohazard bag when you are through. Leave the surface to dry. Disposal : Dispose of any protective gear and equipment the same way you did the towels. Put them in a biohazard bag. Seal it and place into a second container. Be sure to label the container clearly and call the local health department for instructions on how to dispose of things correctly.  Decontaminate : After doing this, use the registered disinfectant to decontaminate any brooms, buckets, dustpans or other items you can use again. Scrub the tools thoroughly and then rinse with water. Check : Do a final check to make sure no area of your body has been contaminated. Make sure no blood has splashed on your feet or on your shirt. Wash Your Hands : Wash hands thoroughly with water and disinfectant soap.  Disinfectant wipes can also be used if you are not near a sink. Report Incident : This is crucial. Fill out the incident report clearly as soon as the cleanup is complete. File it as instructed, and be sure It is important that you and your employees know how to clean up the blood in your workplace. Get help if you need it from a blood cleanup company. Keep your workers healthy and safe with the instructions in this guide.

READ MOREDetails