How To Pleasantly Design A Dining Room

Published on: 26 April 2023 Last Updated on: 29 July 2024
Dining Room

Are you planning to design a dining room in your home, but don’t know where to start? You’ve come to the right place! Designing a dining room is a fun and rewarding experience that can enhance both the look and atmosphere of any house.

There are many elements that go into making an impressive dining space; from choosing the right shape and size of the table to selecting comfortable seating, there are many factors to take into account.

This post will walk you through each step of creating a beautiful and functional space for entertaining loved ones or just relaxing with family at mealtime. So let’s get started on your new dream dining room!

Choose the right shape and size of table for your space

One of the most important decisions when designing a dining room is choosing the right size and shape of the table. Consider the shape and size of the room, the number of people you plan on hosting, and the atmosphere you want to create.

Round tables are great for intimate gatherings, while rectangular tables offer more space for seating. Keep in mind that the size of the table should be proportionate with the size of the room to avoid overcrowding or undersized furniture.

Decide on a style

Stylish dining

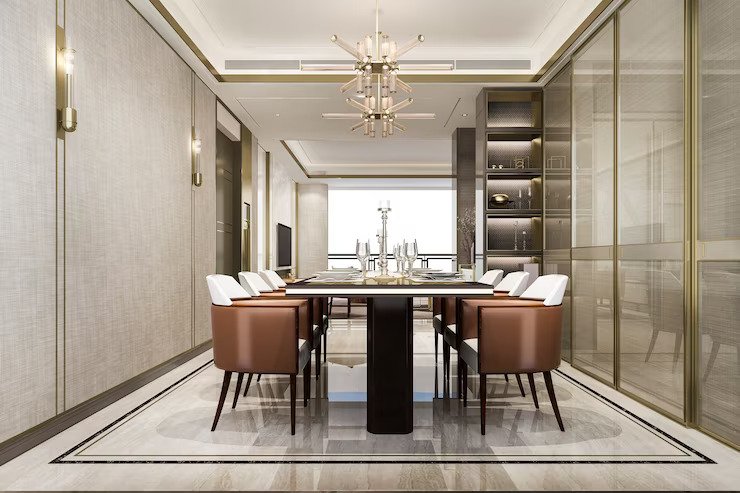
The style you choose for your dining room will set the tone and ambiance of the space. Whether modern, traditional, or rustic, it is important to choose a style that is consistent with the look and feel of the rest of your home.

You can match your style with your favorite furniture pieces, color scheme, or personal taste.
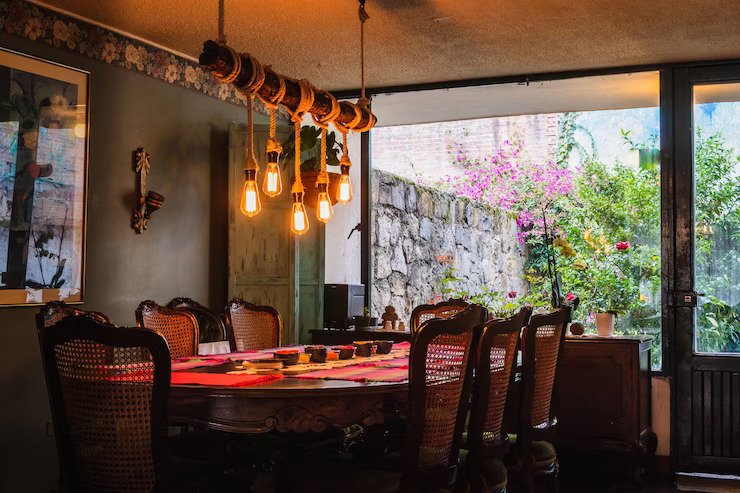
Consider textures

Textures in your dining room can add depth and character to the space. Consider using different mediums such as wood, fabric, and metal to create contrast and interest.

You can upgrade your dining room with an elm dining table as a wooden table can bring a natural, rough texture while a plushy rug can soften the look. A metallic vase or wall decor can add a glamorous touch. Experiment with textures until you find the combination that best suits your style.

Select comfortable seating

Select comfortable seating

The seating in your dining room is crucial to the enjoyment of your guests. It is important to choose seating that is not only comfortable but also aesthetically pleasing. Consider using a mix of chairs, benches, and stools to vary the look and add interest to your space.

Upholstered seating is great for long dinners, while stools are perfect for more casual gatherings. The key is to ensure that your guests are comfortable and able to enjoy their meals.

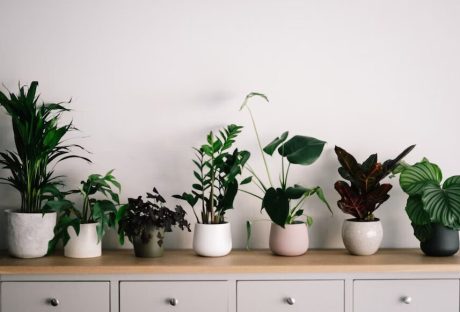
Accessorize with table linens and plants

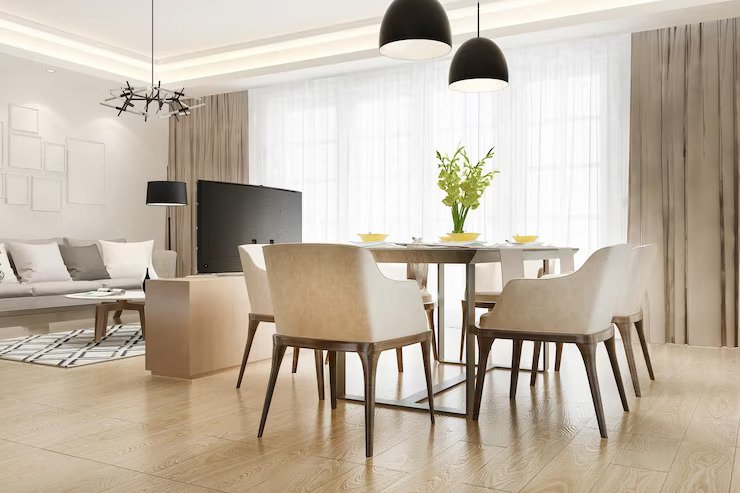
Table linens and plants can bring a fresh and inviting feel to your dining room. Experiment with tablecloths, table runners, and placemats to add pops of color and texture. Don’t forget to add greenery!

Plants and flowers can add life and character to your space. A vase of fresh flowers or a potted plant can be the perfect finishing touch to your dining room.

Hang artwork or wall décor to add character to the room

Artwork and wall décor can add personality and character to your dining room. Consider hanging a statement piece above the table or a gallery wall on the opposite wall.

Framed artwork or prints can add color and interest to the space. Don’t be afraid to mix different styles and mediums for a unique and eclectic look.

Read Also:

Arnab is a professional blogger, having an enormous interest in writing blogs and other jones of calligraphies. In terms of his professional commitments, He carries out sharing sentient blogs.

View all posts

Leave a Reply

Your email address will not be published. Required fields are marked *

Related

Painting Interior Doors

Tips for Painting Interior Doors

Freshly painted doors can enhance the makeover of any house. You can paint your doors on your own or hire a professional painter to do it for you. Many people prefer painting their doors themselves as they want to enjoy painting them on their own. However, if you don’t have any experience or want high-quality paintwork, you should always hire professionals for complete painting service. If you choose to paint or spray paint your interior doors, you need to know some tips and skills to do the job right. Let us explore some tips by professional painters that you can use to paint your doors. Remove or cover the door handles: Paint can stain the door handles and locks. So, it is better to remove them or cover them with painter’s tape to prevent them from getting stained. You will need a screwdriver with multiple heads to remove the handles and locks. Call a locksmith to remove the inbuilt lock systems as they are difficult to remove. Removing these things will make it easy to clean, sand and then paint the doors. Fill the cracks and holes: If there are any holes or cracks in your doors, you can fill them with a wood filler, gypsum plaster, or a filling compound. Put a small amount of wood filler or filling compound on a putty knife and put it into the hole or crack uniformly. Place it as uniformly as possible and leave it to dry for at least two hours. Check the filling the next day, and it requires more filling, add the required amount of filling compound to fill the space completely. Sand the surfaces: The old paint gets worn and imperfections develop with time on the door surfaces. That is the reason why homeowners want to repaint their doors. Sanding removes the worn paint and imperfections easily and prepares the surfaces for a clean and uniform finish. Start painting with a Roller: If you have already chosen the paint color, mix several cans in a bucket so that you can have the same shade on every door. Sometimes, the shade in different cars can vary a little, although not noticeable in the interiors in low light. Use a 4-inch roller to apply a thin layer of paint on the door starting from an edge. If you want to paint the trim first, you can use a 2-inch brush. To remove any lines, move the lightly loaded brush or roller from bottom to top. Using this technique will help you paint quickly and uniformly while leaving a wet edge. Painting a paneled door: Many homes have paneled doors and the technique to paint them is different from painting a flat door. Paint every panel beginning from the upper left side downwards in a sequence. Always use a brush of appropriate width to paint a paneled door. Don’t worry if you paint a bit outside the edges of a panel. Once the edges are painted, use a small roller to paint the space between the panels. If the rollers of appropriate size are not available, use a 2-to-4-inch brush to paint the center of the panels. Minimize the drying time: Paint in light and uniform coats to minimize the drying time. Thick coats of paint take a bit longer to dry and may look nonuniform after drying. If you are using a brush, you should dip its bristles halfway in the paint and tap the brush against the container edge slightly to remove the excess paint. If you plan to use a roller, place it in a pan and use the back-and-forth strokes to paint uniformly without soaking it. Let the paint dry before installing knobs and locks: Let the paint dry completely before installing the doorknobs and locks. Also, tell your kids and family members not to touch the doors until they dry completely. Once they dry up completely, you can install the accessories and start using the doors as you use them normally. Final Words: Painting the doors is not difficult, even if you are painting them for the first time. All you need to do is to follow the correct sequence of steps, use the right size of tools and prepare the surfaces before grabbing a brush or roller. Following these tips can help you to paint your interior doors easily and conveniently. Read Also: 10 Pro Tips To Minimize Commercial Door Repair & Maintenance Cost All About Commercial Fire Doors Why Should you Consider Security Doors for Your House?  

READ MOREDetails
Bathroom Remodel

How To Plan A DIY Bathroom Remodel

A bathroom remodel can be a big project, but it can also be a fun and rewarding DIY project. If you're looking to update your bathroom, there are a few things you need to consider before getting started. In this article, we'll go over the steps you need to take to plan a successful DIY bathroom remodel, including what bathroom supplies you'll need and how to budget for your project. Determine Your Needs and Wants Before you start buying bathroom supplies and tearing apart your bathroom, take some time to determine what you actually need and want in your new bathroom. Do you need more storage space? Do you want a spa-like shower? Do you need to add a bathroom for guests? Write down a list of what you want and need in your new bathroom to help guide your decision-making process. Measure Your Space Before you can start buying bathroom supplies and figuring out what you need, you need to know the dimensions of your bathroom. Measure the length and width of your bathroom, as well as the height of your ceiling. You'll need this information to determine how much tile, paint, or other bathroom supplies you'll need. Create a Budget Budgeting is one of the most important parts of any DIY project, and a bathroom remodels is no exception. Make a list of everything you want to include in your new bathroom and estimate the cost of each item. Keep in mind that you'll also need to factor in the cost of labor, as well as any unexpected expenses that may come up during the project. Decide on a Design Once you have a list of what you want and need in your new bathroom, as well as a budget, you can start deciding on a design. Look at bathroom remodel ideas online and in magazines to get an idea of what you like and what you don't like. You can also consider hiring a designer to help you create a bathroom design that meets your needs and fits your budget. Choose Your Bathroom Supplies Once you have a design in place, you can start choosing your bathroom supplies. You'll need to choose a vanity, a sink, a toilet, a shower or bathtub, and any other items you want to include in your bathroom. Make sure you choose bathroom supplies that fit your budget and the design you've chosen for your bathroom. Plan Your Timeline Once you've chosen your bathroom supplies, it's time to plan your timeline. Decide how long you want to take to complete your bathroom remodel and create a schedule that fits your timeline. Make sure you factor in time for unexpected events, such as rain or illness, that may delay your project. Start Your Remodel Now that you have a plan in place, it's time to start your DIY bathroom remodel. Start by removing any old bathroom fixtures and preparing the space for your new bathroom supplies. Make sure you have all the tools you need and take your time to ensure a successful outcome. A DIY bathroom remodel can be a big project, but with a little planning, you can create a beautiful new bathroom that fits your needs and budget. By following these steps, you'll be on your way to a successful DIY bathroom remodel in no time. In conclusion, planning a DIY bathroom remodel requires careful consideration and preparation. From determining your budget and creating a design plan to obtaining necessary permits and selecting materials, each step of the process is crucial to ensuring a successful outcome. By following these tips, you can create a beautiful and functional bathroom space that meets your needs and exceeds your expectations. With careful planning and attention to detail, you can complete a DIY bathroom remodel with confidence and ease. Additional: Bathroom Remodeling Tips and Ideas Bathroom Upgrades You Should Consider Using Feng Shui in Your Bathroom Design Mirror Decorating Ideas To Style Your Bathroom

READ MOREDetails
Toilet Flush Button

Toilet Flush Button: Understanding The Nuts And Bolts

Though our bathrooms play a critical role in daily life, they're often forgotten until a problem arises. Of all its components, one that stands out is the toilet flush button's use - and understanding. This article looks closely at its workings, maintenance needs and replacement considerations. The Fundamentals Of The Toilet Flush Button What Exactly Is A Toilet Flush Button? A toilet flush button is the mechanism responsible for initiating the flushing process in your toilet system. Situated on the tank's exterior, we press or push this component when using our toilet to flush out its contents into the sewage system. By activating this flush button, we begin an action chain within our bathroom that sends water from its tank into our bowl to flush away its contents into sewer lines. How Does The Flush Button Work? The magic of the toilet flush button lies in its ability to control a more complicated mechanism. Pressing it lifts a lever connected to a chain inside the tank; that chain connects to a flapper (or flush valve seal), covering up drain holes at the bottom. When the flapper is raised, water stored in the tank begins rushing from its source into the bowl through its drain hole and siphon tube into the sewage system. As soon as this process completes, however, the flapper falls back down, sealing off its drain hole once more - and replenishing its supply in readiness for another flush cycle. Maintenance Of The Toilet Flush Button Regular Cleaning Regular cleaning of your toilet flush button is vital to its optimal operation, as dirt can clog the switch and make it less responsive, leading to inconvenient situations for users. A non-abrasive cleaner and soft cloth should be used for exterior cleaning; internal components should be checked regularly to avoid build-up and potential mechanical problems. Checking For Wear And Tear Given how often flush buttons are used, wear and tear are inevitable. Look for signs of damage, such as cracks or looseness. If the control becomes less responsive when pressed or sticks down without returning up when released, this may indicate internal components need to be reviewed for potential problems. Troubleshooting Common Problems Is The Button Hard To Press, Or Is It Sticking A toilet flush button that is difficult to press or sticks down often points to a problem with the connected lever or chain inside the tank. It could be that the chain is too tight or too slack, or the lever needs to be aligned or fixed. A careful inspection and adjustment of these components usually solve the issue. The Button Doesn't Activate The Flush If the button doesn't activate the flush, the issue could be that the switch is no longer effectively connected to the lever, or the flapper isn't lifting. A look inside the tank should reveal the issue. The button, lever, or flapper may need to be replaced. Replacing The Toilet Flush Button When Should You Replace The Button? As with any mechanical component, toilet flush buttons have a finite lifespan. Over time and through regular use, their controller may wear out or become damaged, requiring replacement. Signs to replace it include physical damage to its housing and sticky buttons or ones that no longer activate flushing actions. Looking for a portable toilet rental might also be necessary if you need to fix your toilet for a couple of days. Toilet Flush Buttons: More Than Meets The Eye Though seemingly simple, toilet flush buttons are critical in maintaining sanitation in homes and public spaces. Understanding their inner workings helps us better appreciate their importance, maintain them properly, and effectively troubleshoot any potential issues with them. So next time you press one, remember its critical function while giving it some love and consideration. Conclusion: Understanding how a toilet flush button works may initially seem complicated, but understanding its mechanics is crucial to efficient bathroom operations and sanitation practices. Knowing their inner workings could save us from future inconvenience or repair costs. Maintaining the toilet flush button regularly is vital to prolonging its lifespan and guaranteeing reliable performance within a plumbing system, thus streamlining home maintenance. By periodically inspecting it for signs of wear and tear, individuals can identify and address potential issues early on and prevent more significant ones from developing into larger problems later. By taking proactive measures like this one, individuals save both time and money on costly repairs and ensure an effortless toilet operation experience. Maintaining a flush button is an accessible DIY project for anyone, provided they possess basic knowledge and the appropriate tools. Even if it eventually succumbs to wear or damage despite regular maintenance efforts, replacing the button remains straightforward, making this an achievable DIY project for homeowners. Read Also : Mirror Decorating Ideas To Style Your Bathroom Using Feng Shui In Your Bathroom Design The Different Kinds Of Toilets

READ MOREDetails