Removing Air Conditioner Filters: A Guide

by

27 November 2019

Home Improvement

Air Conditioner Filters

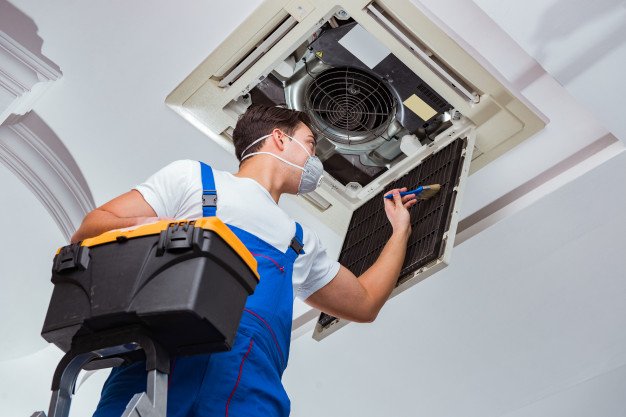
Air conditioner removal can be difficult at first. While they look like simple appliances, they are complex and can be difficult to repair on your own. Most of the time, you’ll need professional assistance to ensure that it’s installed the right way. If you do not install or change a mechanism in the right way, it may lead to serious impairment and might destroy the product forever.

Air conditioning units can be expensive, but provide cool air and comfort to your home. Since they can get destroyed quickly, it’s your job to ensure that your A/C’s filters are maintained. And we’ll show you how to replace them in this guide. It is also important to note that you will not be able to ask an expert to come to your home at all times. Besides the routine servicing, which stretches to three or four times, you might need to so some of the regular maintenance work. In this article, we will help you discuss some of the basics of taking care of your air conditioner.

Should I Buy or Rent an Air Conditioner:

The most important decision you can make before buying an A/C unit is either renting and buying it. Some individuals prefer the hassle-free benefit of renting. While more established homeowners would rather own their air conditioners and don’t mind the costs or accountability associated with it.

If you are someone who is shifting to a new location just for a few months, it is ideal for you to rent an air conditioner. Many professionals who work in short stints as consultants or on projects for different MNCs. They are often stationed somewhere for not more than a year. Once the project is over, they pack their bags and leave for a new location. For such individuals renting an air conditioner makes much more sense than buying a new unit altogether.

Renting Buying
You can get government main-in rebates without the upfront costs. There are some promotions available when you buy your cooling equipment.
Renting means you don’t have to worry about your family’s comfort. Like rentals, you can get government incentives and mail-in rebates.
This convenient, hassle-free option can give you a piece of mind Buying is a great option for homeowners. If you’re thinking about buying an air conditioner, here’s something you should think about: While the A/C unit has a higher upfront cost, you’ll have complete ownership over your equipment.
The only cost you need to worry about is the monthly rent. You can purchase a protection plan to pay for unexpected repair and maintenance costs.


How Can I Replace My Air Conditioner Filter:

Air Conditioner Filter

It is important that you take care of your air conditioner, not only for increasing the longevity of the machine but also for your own comfort and convenience. Changing the filters of the air conditioner from time to time will ensure its long life as well as help you get the comfort of perfect cooling at all times. In the following section, we will discuss how you can efficiently change the filter if your air conditioner.

Here are some ways you can replace your A/C filtration:

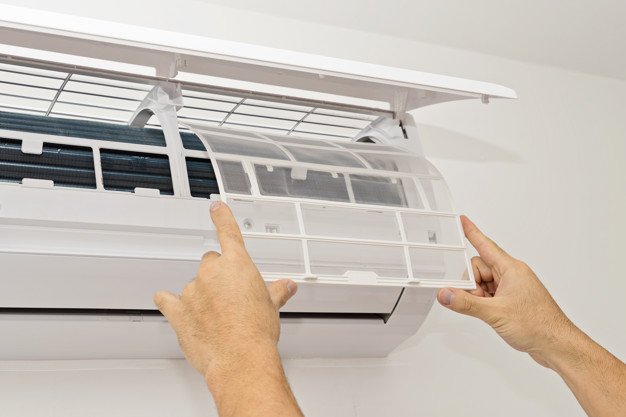
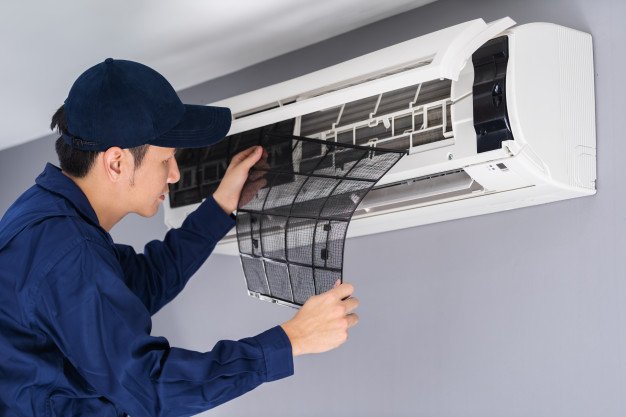
  1. First, locate your old filter. In other cases, it might be located behind the furnace. Make sure to turn off the unit before turning off the filter. If you are not careful, you might end up hurting yourself badly. Ensuring that you are safe while handling heavy and electrical equipment is necessary.
  2. Find out what type or size you need. The old filter will have its size printed on it. Make this size with the size of your replacement filter. When looking for the right filter for your home, find how what air filtration you will need and find out how long each filter will last. Always ensure that you get the right size. If you do not do that, you might end up destroying the machine and its effectiveness. Do not try to force a size if it does not fit.
  3. Install the new filter – place your new filter into the housing, fasten the cover, and then snap it in place. Place the filter in the right direction. It has an arrow pointing the way in which it needs to be inserted. If you have trouble, it is important that you go through the manual repeatedly. Once you do it a couple of times, you will start doing it the right way.

How Often Should I Clean My A/C Unit?

The frequency on which you should replace your A/C filter depends on a few factors in your home. The number of pets, the number of people, and if anyone in your house is suffering from allergies, it impacts how often you should change your indoor filters. If you are living in a dusty environment, you would need to change it more often. If you are living in a clean mountainous region, you can change it after extended periods. Likewise, it also depends on the use. An air conditioning unit in a guest bedroom, which is used twice or thrice a month might not need regular changes of filters. However, one that is in your own bedroom and used almost every single day might need to be changed often enough.

As a rule of thumb, you should change your A/C unit every 30-60 days for the best air quality. If you suffer severe allergies or have pets in your home, you should replace your air filters more often.

Conclusion:

To conclude, using air conditioner removal techniques will help you enhance the lifespan of your unit. By taking out the filter, you’ll keep your air conditioner running without having issues with the air distribution. When in doubt, seek professional services to ensure that your air conditioner continues to work during the summer. However, if you feel that there are some other problems that regular filter change cannot address, please do not hesitate to take help from a qualified professional.

Read Also:

Content Rally wrapped around an online publication where you can publish your own intellectuals. It is a publishing platform designed to make great stories by content creators. This is your era, your place to be online. So come forward share your views, thoughts and ideas via Content Rally.

View all posts

Leave a Reply

Your email address will not be published. Required fields are marked *

Related

Painting Interior Doors

Tips for Painting Interior Doors

Freshly painted doors can enhance the makeover of any house. You can paint your doors on your own or hire a professional painter to do it for you. Many people prefer painting their doors themselves as they want to enjoy painting them on their own. However, if you don’t have any experience or want high-quality paintwork, you should always hire professionals for complete painting service. If you choose to paint or spray paint your interior doors, you need to know some tips and skills to do the job right. Let us explore some tips by professional painters that you can use to paint your doors. Remove or cover the door handles: Paint can stain the door handles and locks. So, it is better to remove them or cover them with painter’s tape to prevent them from getting stained. You will need a screwdriver with multiple heads to remove the handles and locks. Call a locksmith to remove the inbuilt lock systems as they are difficult to remove. Removing these things will make it easy to clean, sand and then paint the doors. Fill the cracks and holes: If there are any holes or cracks in your doors, you can fill them with a wood filler, gypsum plaster, or a filling compound. Put a small amount of wood filler or filling compound on a putty knife and put it into the hole or crack uniformly. Place it as uniformly as possible and leave it to dry for at least two hours. Check the filling the next day, and it requires more filling, add the required amount of filling compound to fill the space completely. Sand the surfaces: The old paint gets worn and imperfections develop with time on the door surfaces. That is the reason why homeowners want to repaint their doors. Sanding removes the worn paint and imperfections easily and prepares the surfaces for a clean and uniform finish. Start painting with a Roller: If you have already chosen the paint color, mix several cans in a bucket so that you can have the same shade on every door. Sometimes, the shade in different cars can vary a little, although not noticeable in the interiors in low light. Use a 4-inch roller to apply a thin layer of paint on the door starting from an edge. If you want to paint the trim first, you can use a 2-inch brush. To remove any lines, move the lightly loaded brush or roller from bottom to top. Using this technique will help you paint quickly and uniformly while leaving a wet edge. Painting a paneled door: Many homes have paneled doors and the technique to paint them is different from painting a flat door. Paint every panel beginning from the upper left side downwards in a sequence. Always use a brush of appropriate width to paint a paneled door. Don’t worry if you paint a bit outside the edges of a panel. Once the edges are painted, use a small roller to paint the space between the panels. If the rollers of appropriate size are not available, use a 2-to-4-inch brush to paint the center of the panels. Minimize the drying time: Paint in light and uniform coats to minimize the drying time. Thick coats of paint take a bit longer to dry and may look nonuniform after drying. If you are using a brush, you should dip its bristles halfway in the paint and tap the brush against the container edge slightly to remove the excess paint. If you plan to use a roller, place it in a pan and use the back-and-forth strokes to paint uniformly without soaking it. Let the paint dry before installing knobs and locks: Let the paint dry completely before installing the doorknobs and locks. Also, tell your kids and family members not to touch the doors until they dry completely. Once they dry up completely, you can install the accessories and start using the doors as you use them normally. Final Words: Painting the doors is not difficult, even if you are painting them for the first time. All you need to do is to follow the correct sequence of steps, use the right size of tools and prepare the surfaces before grabbing a brush or roller. Following these tips can help you to paint your interior doors easily and conveniently. Read Also: 10 Pro Tips To Minimize Commercial Door Repair & Maintenance Cost All About Commercial Fire Doors Why Should you Consider Security Doors for Your House?  

READ MOREDetails
sunroom

How Quickly Can I Install a Sunroom?

With fall already here, and winter fast approaching, there’s a certain urgency in the air to get any sunroom installation project booked, planned, paid for, and complete as soon as possible. Fortunately, a fall installation in Calgary is a relatively quick process, with your beautiful install sunroom being completed somewhere between 4 and 10 days once the plans have been finalized and approved. The actual speed of the project will depend on the results of the multiple decisions you have to make, which include the following: Different Ways You Can Quickly Install  Sunroom 3 or 4 season sunroom - this is the big factor in how long your project will take to install, and how much it will cost you in the long run. A 3 season room will be cheaper and quicker as there are less insulation, thinner windows, and the frame is usually made from aluminum. A 4 season room requires the room to be able to handle the Calgary winter conditions, so the walls have to be thicker, the windows double-paned and a heating option has to be built in and vented. You can install sunroom in your home. Wall thickness – the thickness of your walls is coupled with the number of seasons, but also how you plan on heating the room. Thinner walls with no insulation will rely on the sun on and thicker windows to keep your room warm, while thicker walls will take longer to install sunroom but provide room for internal insulation options. A number of windows – it’s possible to build a sunroom that has almost solid glass walls and the visual effect of these rooms are incredible. However, they take a much longer time to install as each piece has to be put into place manually and there’s no scope for external pre-fabrication. In this decision, you’ll also need to think about the number and shape of your skylights, and a general rule of thumb is that the more you have, the longer the installation process. Roof shape – there are two choices here; a studio roof, which is flat and literally sits across the top of your sunroom, or a gabled A-frame roof. The latter requires more time to install as the roofers will need to construct the A-frame, attach it to the walls and then add your chosen shingles or cladding to the roof structure. A studio roof often comes as one or two pieces that can be installed in under a day. You have to install sunroom in a better way. Kick plates – the final decision that has a bearing on the length of time for your sunroom installation project is whether to have kick plates at the bottom. The general industry recommendation is that if the room is more than 24 inches above the ground, then kick plates will provide the cover you need. Otherwise, a solid bottom will do the job and is much less costly. Install sunroom in your home for a better experience. Final Take Away  When you make these decisions, you will want to consider the impact they will have on the amount of time it will take for the construction, but also how they will impact the look and feel of your new sunroom. Read Also: How To Set Up Your Baby’s Room 5 Innovative Ideas To Lend Your Bedroom With More Space

READ MOREDetails
house painting

5 Interior House Painting Tips

Owning a house which you can modify according to your personal desire, is always something permanent and something incredibly profound. A home with well-painted walls and beams should tell the story of who you are and what you love. New paint with vibrant colors can change your mood, and make your home your favorite place to live in. Interior house painting can be a very intimidating and challenging task if you decide to take it upon yourself. You have two options, to either do it by yourself or hire a professional painting company to look over the project. If you opt with the first choice, these tips and techniques will help you to paint your own home, according to your likings, within a very friendly budget. When you want to paint your Boynton Beach home, be sure to give Gustafson Painting a call. The following steps are a guide on how to paint a house to meet your expectations: 1. Self Choosing Colors: The critical step, to begin with, is to choose a color which you like. Or at least you should have a good idea of what color combination suits your home, i.e. which colors you would like to paint to your rooms and which colors to paint washrooms, kitchen, etc. Select the color palettes and plan out which color combination gives your rooms the vibrant energy. Every color has its functions, e.g. Blue, green and purple are all relaxing colors. Moreover, other deep and shocking colors such as red, pink and yellow can be used in rooms which are mostly in use during the day, giving your rooms a lively, gaudy look. 2. Gathering Tools and Equipment: After this, you have to pick all the tools and equipment which are needed for painting the house; which includes sanding and scraping tools, wire brush, respirator, paint rollers, plastic sheets to cover the carpets and your valuable stuff, work gloves, drop cloth, ladder and scotch tape. This will ensure you are ready and won't have to leave your task in between, to search for something. 3. Repairing Damaged Parts: Once you have organized everything, the next step is to remove any dirt and dust buildups from the walls by using a pressure washer. After this, you can apply epoxy filler to cracks and fractures by using a putty knife. Allow it to let it dry. Once this is done, fill the gap around windows, doors, and ceilings to ensure a better coat of paint. When this is dried up, then feel the wall with your hand to ensure if there are any uneven spots left behind. Then, apply the primer to prepare the walls for paint when all damaged parts are repaired. 4. Brush the Walls: Before painting the walls with a roller, you should brush the walls. To brush the walls, mean to paint the corner of walls, ceilings, and trims. You can choose from paintbrushes which come in many shapes and sizes. The traditional method to paint the walls through brush is by the use of metal cans, which can be very difficult for you to carry along with the brush and can result in poor results. But nowadays, there are proper paint pails which will make the whole task a lot easier for you. 5. Ready to Paint Ahead! Finally, you are ready to paint with the rollers. But wait, before this you should mix a primer with paint to give a fresh and everlasting look. If you paint without using a primer, then the paint would peel off. For this, you have to scrap all the paint away, clean the surface before applying the first coat and after that, apply the second coat of your own choice. This is one way when you do not use a primer. But if you are using a primer with paint, then it will not cause any problem even if the first coat is not applied. And the most important order of painting as suggested by the experts of house painters in San Diego is that you should paint the trim first, then ceilings, and then walls. It will provide better adhesion throughout and will enhance the ability of the topcoat. Another pro tip is that don’t forget to open the windows and doors of your house during painting, as it provides better ventilation and the paint dries off quickly and efficiently. At the end of the painting, do the cleanup. Wash all the brushes and other stuff which you have used in the process. At last, give your house a final touch by placing all of the favorite furniture in place, to give your dream house a new look! With these interior house painting tips from the most experienced of the San Diego painting company, you will get pro results for your residence! Read Also: Find The Right Painters For Your Ann Arbor Home This Painting Season 5 Factors To Consider In Choosing The Right Floor Colors Roofing Painting Contractor Leads: Four Questions To Ask Before Hiring One

READ MOREDetails