How to Solve the Biggest Problems in Blocked Drains

Published on: 20 June 2019 Last Updated on: 13 September 2024
Blocked Drains

Many things can clog a drain in a tub or sink by blocking nooks and crannies in its plumbing system. The big benefit is that there are easy ways to eliminate different clogs, and you can achieve practical results by using the solutions in this guide.

Bent Hanger

A hanger can extract hair and goo that blocks a drain in a tub or sink. To use a hanger, you’ll need to take it apart so that its hook can travel down the drain. When wiggling the hook around, ensure that it doesn’t push the debris down the pipe. You can avoid this problem by maneuvering the hook around in a circle before pulling it up. The rotation will help you grab debris that’s lodged against the walls in the drain. Once you’ve removed most of the debris, eliminate the lingering particles by running the hot water.

Baking Soda and Vinegar

A baking soda and vinegar solution can get rid of a general clog. To make the solution, mix 1/3 cup of vinegar with 1/3 cup of baking soda. When the mixture fizzes, pour it down the drain so that the bubbles can dissolve sticky grime that’s causing the clog. If possible, let the solution set in the drain for 24 hours. Then, flush the drain thoroughly with hot tap water.

When a drain has a heavy clog, pour the baking soda down the drain first. Then, gradually pour the vinegar into the drain. This strategy will give the solution an opportunity to activate the source of the clog.

Vacuum

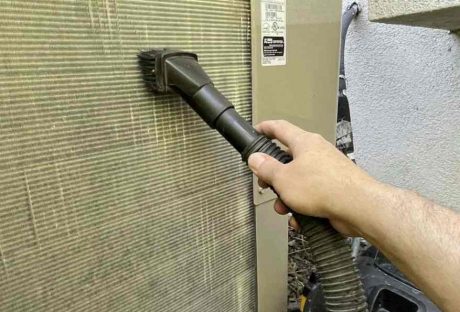
A wet and dry vacuum can pull up the is that’s stuck in the upper portion of a drain. The suction power is very important as it can impact how effectively a vac extracts debris, to ensure that your vacuum has an efficient motor. To use a vacuum, adjust it to the highest setting. Then, place the hose over the drain. If the debris isn’t too dry or stiff, the vacuum will remove it.

Tumbling Water

When your plumbing system has a clog that’s tough to access, you can remove it by pouring boiling water down a drain. If you have a kettle, you can use it to bring the water to a boil, or you can boil water in the microwave.

While the water is boiling, pour it slowly down the drain in stages, and wait a few seconds between each pour. To avoid burn injuries, hover the kettle or pot close to the drain so that the water doesn’t splash.

Caustic Soda

Caustic soda contains sodium hydroxide, which is a risky substance that can produce chemical burns. As a result, you must wear dense rubber gloves and protective goggles when using caustic soda.

Because caustic soda is strong, you’ll need to combine it with ¾ gallons of cold tap water. For a general clog, you’ll only need three cups of soda. To mix the soda, stir it around in the water with a wooden spoon. The mixture will begin to fizz as it heats up during this process. At this point, pour the solution down the drain, and let it sit there for about half an hour. Then, use boiling water to flush the drain.

Pipe Maintenance

General maintenance is an easy way to unclog a drain underneath a sink. Begin by placing a bucket below the trap. The bucket will capture water that spills after the trap is removed. To remove the trap pipe, gradually loosen it with a plumber’s wrench. While the trap is detached, lift the housing, and rotate it until the trap is upside down. The source of the clog should drop on the ground. If nothing drops, use a tool to fish out the debris.

Salt and Baking Soda

Thick blockages will break down when they’re treated with strong chemicals. The easiest way to create a chemical reaction that’s powerful enough to destroy heavy grime is by mixing ½ cup of baking soda with ½ cup of salt in a drain. After the solution sets for about 20 minutes, rinse it down the drain with boiling water.

Dish Detergent

Dish detergent can eliminate clogs in a toilet bowl if it’s mixed with hot water. The soapy suds are effective because they strategically break down dry debris. For an average clog, you’ll only need to mix ½ cup of dish soap and a cup of hot water in the bowl.

Vinegar and Baking Soda

Tubs have the toughest clogs since a lot of dirt and grime travels through the drains each day. To get rid of thick debris, you’ll need to loosen the goo, and the best solution for this task is made with a combination of baking soda and vinegar. To treat a clog, pour the solution down the drain. Then, cover the drain with a stopper. At this point, let the solution set for about 45 minutes, and pull the stopper off the drain. As the water exits the tub, the pressure will get rid of the blockage that was weakened by the vinegar and baking soda.

Plunger

Plungers can get rid of a clog in the toilet bowl. When using a plunger, totally submerge it underwater. The rubber portion of the bell should touch the housing in a sink or toilet. Once you have a good grip, push and pull the handle rapidly for about 20 seconds. Then, lift the plunger, and let the water escape out of the drain.

Whenever the process of unclogging a fixture is too complicated, seek help from a professional plumber. If you want great service options, considering working with Canberra Blocked Drains Definitive Plumbing.

Read Also:

Content Rally wrapped around an online publication where you can publish your own intellectuals. It is a publishing platform designed to make great stories by content creators. This is your era, your place to be online. So come forward share your views, thoughts and ideas via Content Rally.

View all posts

Leave a Reply

Your email address will not be published. Required fields are marked *

Related

how to clean evaporator coil without removing

How To Clean Evaporator Coil Without Removing?

If you want your air conditioner to perform well at all times, you will need to ensure that you maintain and clean the parts of the air conditioner on a regular basis. If you schedule your maintenance as per the requirement of the AC, then it is great. However, in some cases, people like to clean their AC themselves. If you are one of them, you might be interested to know how to clean evaporator coil without removing it when you have a dirty evaporator coil. In this article, we will basically talk about why you need to clean your AC's evaporator coil and how to clean evaporator coil without removing the coil from the AC. Before that, you will also know about what happens to the air conditioner when the evaporator gets dirty. What Happens When Your AC Coil Gets Dirty? Image Source: lirp.cdn-website.com If the evaporator coil of your AC is unclean, it puts your AC at risk. It compromises the safety and working efficiency of the AC in general. In the first, an unclean evaporator coil slows down the speed at which the air blows through the AC, as it blocks the flow of the air. If the evaporator coil contains other materials and particles like pollen and dust, it limits the efficiency of the flow of air. The following things happen when there is an unclean evaporator coil inside the air conditioner: 1. If the evaporator coil is dirty or clogged with particles, then it reduces the flow of air into your home. If there is a reduced flow of air inside your home, it will lead to a lowering of the efficiency of the cooling system of the AC. Your room takes a lot of time to cool than it normally takes, probably your evaporator coil needs cleaning. 2. There might be some cases where your room is not achieving a good level of cooling, despite running the AC for hours at a stretch. In such cases, the problem is probably more than a delay in the cooling performance of the AC. Basically, it is a negative effect on the AC's cooling capacity. 3. Another great issue that happens when the evaporator coil of your AC gets dirty is that the operating pressure increases. This increases the temperature level of the AC, as the unit is working at hotter levels. This is not good for the AC as it damages the components of the AC. 4. An unclean evaporator coil creates wear on the AC system. If one important part of the AC fails to work properly, the other parts follow suit. This is because there is more pressure on the other components of the AC. Hence, the other parts are more likely to get damaged due to the failure of one part. Therefore, you will end up with a damaged AC altogether, and repairing it will be quite expensive for you. 5. If your AC’s evaporator coil gets compromised and does not work properly, then it affects the performance of the other parts of the AC. Hence, your AC unit will have a shorter life. If you want your AC unit to perform well and serve your home for a long time, you will need to ensure that every part of your AC is clean, especially the evaporator coil. Why Do You Need Your Air Conditioner Coil Clean? Image Source: www.cleanairprotx.com You will not need to spend a lot on the repairs of the AC. Regular maintenance will keep out the issues from the AC that need repair. Before any problem turns into a bigger one, you can fix it with regular maintenance. Apart from that, if you keep your evaporator coil clean always, it will not accumulate dust and hence will perform better as a result. How To Clean AC Coils? – Things You Need? Image Source: phyxter.ai The first thing you will obviously need for your AC cleaning is an air conditioner coil cleaner. Apart from that, you will need a cotton cloth for cleaning the coil. For your own protection, wear protective goggles, and wear gloves on your hand for better protection. Furthermore, ensure that you are following the instructions properly while you are cleaning your AC’s evaporator coil. How To Clean Evaporator Coil Without Removing? Image Source: snyderac.com The evaporator coil basically captures all the heat present in your home to condition the air inside. Apart from the evaporator coil, there is a condenser coil in the AC, which removes the air from the AC to the outside of the house. This is the way in which the AC works in colling the house. Since an evaporator is an important part of your air conditioner, hence keeping it clean will enable you to keep your air conditioner always efficient. However, if your question is, “How to clean AC evaporator coils inside house?” then you need to read the next subsection of this article. Read More: Here’s What Makes Package Units Better than the Other ACs AC Coil Cleaners - How To Clean Evaporator Coil Without Removing? Image Source: img.fruugo.com The following are the ways in which you can clean the evaporator coil of your AC without removing it from the AC: Step 1: Turn down the power of the AC, and unplug the machine from the electric port. You will not need an electricity risk for yourself while cleaning. Step 2: Remove the access panel from the AC to see the evaporator coil clearly. Go over the manual of the AC, if required. The manual has instructions on where you can find the access panel. Step 3: Take the access panel off, and remove the screws from the AC. Keep the screws in a safe place. Step 4: To blow the unclean particles off, try using a compressed air canister. This will help you to easily loosen the dirt on the evaporator coil. Step 5: Put back the screws, as well as the access panel. Your evaporator coil is clean. Summing Up Hope the article helped you in knowing how to clean evaporator coil without removing it from the AC. Cleaning your AC is a part of the maintenance operation of the AC. If you maintain your AC on a regular basis, it will offer you a lot of benefits. There will be less hassle and issues on your AC as a result of regular maintenance and cleaning. If you clean the parts of your AC, your AC will look and perform as if it is fully new. Read Also: Best Paying Jobs In Electric Utilities Central How to Brew the Best Beer with an Electric Brew System 13 Ways to Maintain the Coolness of Your Air Condition Unit

READ MOREDetails
Garden During Winter

How to Maintain a Bright and Beautiful Garden During Winter

Throughout the year our gardens are constantly changing from season to season, which creates a fresh and exciting feel every month. From beautiful blooms in the spring to crisp, frosty layers during the winter, our gardens always provide a captivating aesthetic to enjoy. When it comes to the winter months, many people neglect their gardens and wait until the warmer days arrive again, but this shouldn’t be the case. There are lots of ways to keep your garden looking its best throughout the winter, including adding a deer fence to protect your garden and property from animals and wildlife, and here’s other tips… Invest in a Greenhouse Greenhouses are a must for anyone keen to continue gardening during the winter months and maintain a beautiful garden aesthetic. From the moment you introduce a greenhouse, you open up your gardening options, giving you the chance to work on all kinds of wonderful projects. You’ll also find that a greenhouse helps to bring character to the garden, adding to the overall look of your outdoor space. A greenhouse also enables you to work on projects that may need a little encouragement in a warm environment, before adding them back to your garden to help brighten the area and enhance the aesthetic. Take a look at Two West’s wide selection of greenhouses here to find the right fit for your garden. Embrace Winter Colour Keep your garden looking bright and colorful by adding a selection of winter-blooming plants to your pots and beds. From winter-blooming daphne to pansies and cyclamen, you can bring an assortment of gorgeous winter colors to really bring life to your garden. Whether you opt to plant these bloomed plants during the winter for instant color, or you decide to plant your seeds earlier in the year for winter blooms, you can create a stunning aesthetic and add a trendy feel to your garden. Find the perfect winter blooms here available at Dobies to bring a seasonal touch to your garden. Install Outdoor Lighting Having a display of outdoor lighting can really help to illuminate your exterior, not only adding to the overall aesthetic but also enhancing your home's security. There are lots of different ways to introduce lighting, from subtle lights positioned neatly along the outskirts of your lawn or along the path, to brighter lights that stand tall and brighten the whole space. Do a little research into different types of outdoor lighting to see which would work best with your home's style and layout and invest in the best style for you. It’ll be much easier to enjoy your garden on those darker evenings once you have your outdoor lighting fitted. Visit Lights.co.uk here to find inspiration for outdoor lighting to introduce to your home and garden. Frequently Sweep Up Leaves   Many people see sweeping up the leaves in the garden to be a pointless task, as sooner or later they’ll be back to sweep up again. This may be the case, but by sweeping up the leaves you are able to keep your garden looking its best, even during the winter. Leaves and generic debris can create a very messy, untidy look for the garden so it’s always beneficial to keep on top of sweeping them off to the side or removing them from flower beds and your lawn area. You’ll be amazed how much of a difference this small but practical task will make! Read Also: How to Maintain Your Garden Railings? Grow these flowering plants in your home garden 5 Best Vegetables You Should Try Growing In Your Garden Looking for a Gardener: 8 Questions to Ask Before Hiring a Professional

READ MOREDetails
Landscape Edging

Landscape Edging in Sandy/Beach Areas

Landscape edging can further add to the beauty and utility of your beach home. You might think that with a yard made of sand instead of grass you're stuck with no options. Forget that train of thought because you had a multitude of possibilities with your sandy landscape and plenty of reasons to edge your yard. Benefits of Landscape Edging : Regardless of the soil or grasses composition of your yard, landscape edging provides many benefits, including: a crisp, manicured appearance to your yard and home increases curb appeal adds value to your yard and home economically creates a root barrier to stop the spread of invasive grasses and reeds helps prevent erosion provides a contrast to the yard and your home Edging can help create paths, direct traffic flow in the yard, and set aside yard areas for special uses. You can create planting areas or a patio area with a combination of small hard materials for the main area and larger materials for the edging. Design Materials : The main advantage of sand is its neutral color goes with everything. Whether black, cream, or white sand, it works with any color contrast you choose. That leaves you open to a number of design materials including brick, fencing, glass, pavers, plastic, potted plants, stone, tile, wattle, or wood. Your choice depends on the look you want to achieve. Separating the yard from beach sand dunes with slat wood fencing provides a traditional look. Most wood edging lasts about ten years before needing touch-ups or replacement. Concrete comes performed or you can create a custom form and pour your own design. This lets you create a look no other yard has. Creating your own forms lets you add materials to dress up the concrete pavers. Add small river stones, seashells, sand dollars, beads, or small tiles. You can lay or stack large stone or brick. This forms either a low curb edge or a low wall. Plastic or resin dividers come in many designs from faux stones to fencing. Choose wisely and in-person to check the plastic's quality. The cheaper plastic edging looks just that. To achieve an organic look with sturdy materials, create a wattle fence. Wattle consists of weaving the saplings of pliable trees together. Dogwood and willow make popular choices. Another choice that mixes organic and inorganic materials, potted plants, delineate lawn areas while adding life to a sand-covered lawn. Try potted seagrasses, potted palms, or potted palmetto trees. Both the pots and plants add color. You can get numerous other ideas on websites like Pinterest. You'll also find installation ideas. Installation Tips : Set the edging in place firmly. You may need to dig a shallow space for each. Fit it inside the shallow, then re-pack the dirt around it. Installation varies based on use. Use the following a depth/height guide: lawn or garden divider - use a trenched edge or ditch with a V-shape; mowing strip - use flat, wide materials level with the ground so lawn mower wheels can easily skim over them capture mulch - keep mulch in place using a solid material that extends four inches below ground and two inches above beautification - use any height that provides the desired aesthetic. You can create an attractive lawn with sandy soil as the base. Create interest and divide space using landscape edging. Read Also : Natural Ways To Get Rid Of Flea In Your Lawn Ten Tips To Make Most Out Of Your Outdoor Space Grow These Flowering Plants In Your Home Garden To Remove Vastu Related Problems Kylie : Outside of writing for EverythingBackyard, I love to spend all the time I can outdoors and find every excuse to leave my house. I write about everything from backyard DIY projects to gardening. If you can't get a hold of me I am probably on a trail or a boat.

READ MOREDetails