How To Troubleshoot Steam Disk Write Error? [Fixed]

Published on: 20 February 2021 Last Updated on: 26 December 2024
steam disk write error

Steam is a well-known name in the video gaming industry. It is a social gaming website, which allows you to play, buy, and discuss games. If you are using steam for some time, then there is a lot to know about it. Have you ever faced the Steam disk write error?

Are you looking for the solution to Steam disk write error windows 10? Are you unable to solve the issue? This article will help you with multiple solutions in order to remove the error. Go through the steps and enjoy an interruption-free gaming experience.       

What Is The Steam Disk Write Error?

While you are updating or downloading any game you bought from the Steam Platform, you may face the Steam disk write error. At the time you are attempting to download or install a new game, this message can appear on the screen. You also can face the same issue when you are trying to update a game that you have installed earlier. In case your game needs an update, at the time of launching the game, the screen will show this error.

Reason For Steam Disk Write Error?

Whenever Steam is not able to download and save the data of the game to the storage drive of your computer during a new installation or an update. One of the messages mentioned below will appear on the screen,

  • Any error occurred at the time of updating the  game_title
  • Any error occurred at the time of installing game_title

The steam disk write error can happen, when

  • There are no defects on the hard drive.
  • The Steam folder or drive is write-protected.
  • There are outdated or steam corrupt disk files in the Steam directory.
  • Your firewall or antivirus is blocking Steam from saving and downloading data. 

Fixing Steam Disk Write Error

If you have encountered the steam error while downloading, error while installing, updating, or launching the Steam game and want to know the ways of fixing disk write error steam, here are the answers

#1. Restart The Steam

Restart The Steam

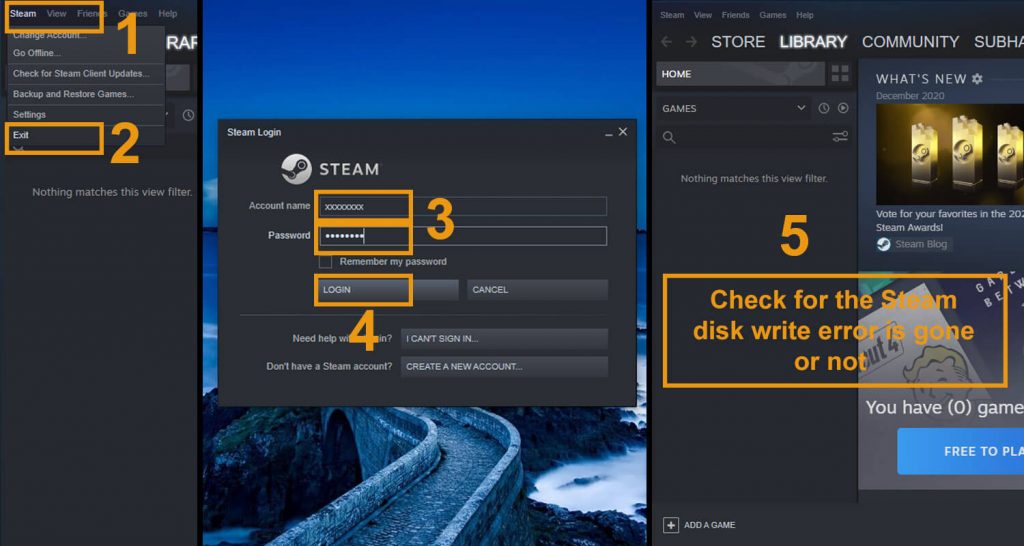
  • Open the Steam window
  • Click the word “Steam” on the top-left corner
  • The Dropdown menu will open
  • For Windows, click on “Exit,” and for Mac, click on “Quit Steam.”
  • Again open Steam.
  • In case you have been logged out, log in another time
  • Check for the Steam disk write error is gone or not

#2. Restart Your PC

Restart Your PC

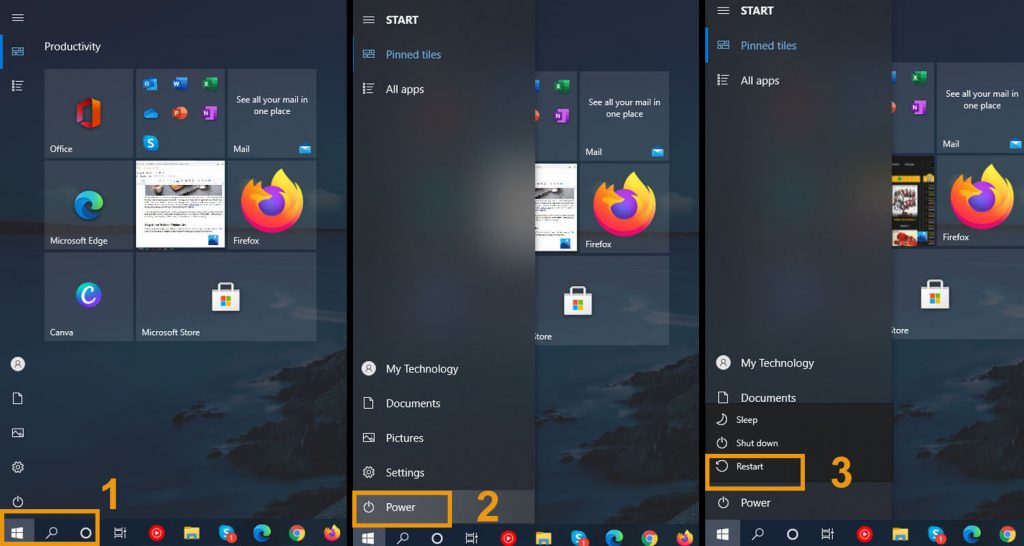
  • Click on the start icon
  • Power Icon
  • Restart

#3. Clear All Download Cache
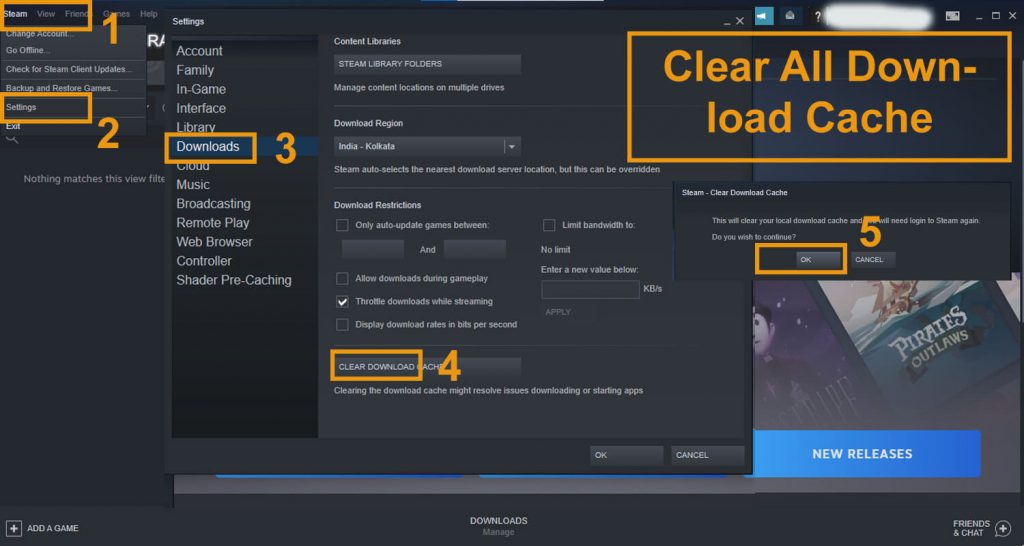
Clear All Download Cache

  • Open steam
  • Go to “settings.”
  • Click on “downloads.”
  • Select the option “clear download cache.”
  • Reopen and check if it is working or not

#4. Repair All The Steam Disk Bad Sectors

Repair All The Steam Disk Bad Sectors

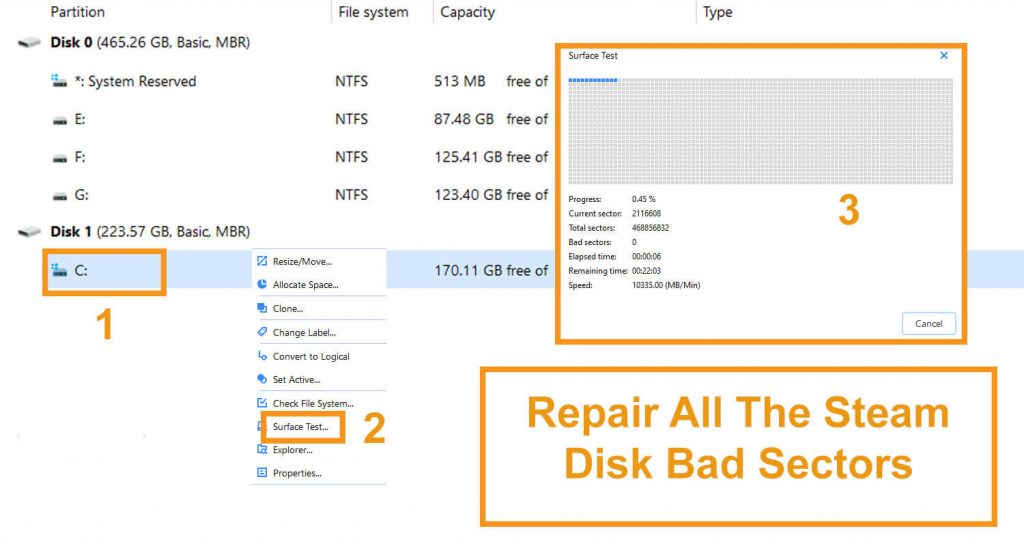
  • EaseUS Partition Master to check bad sector
  • Install it
  • Click on the disk which you want to check
  • Click “surface test.”
  • It will red mark the bad sectors.

In case of any error, it is a good idea to replace the drive or clone it to another HDD apart from the steam disk write error SSD. You can take help from EaseUS Partition Master to replace the failing disk.

  • After opening the EaseUS Partition Master, select the disk, which you want to clone.
  • Click on “Clone”
  • Select your destination or SSD/HDD whenever you want to clone it
  • Click on “Next”
  • Click on “Continue” to wipe out all data. If you have any valuable data, take a backup of it.
  • Click on “Autofit the desk” or “Edit disk layout” or “Clone as the source.”
  • Click on “Execute the operation.”
  • Click on “Apply” to solve the steam disk write error

#5. Run As Administrator

Run As Administrator

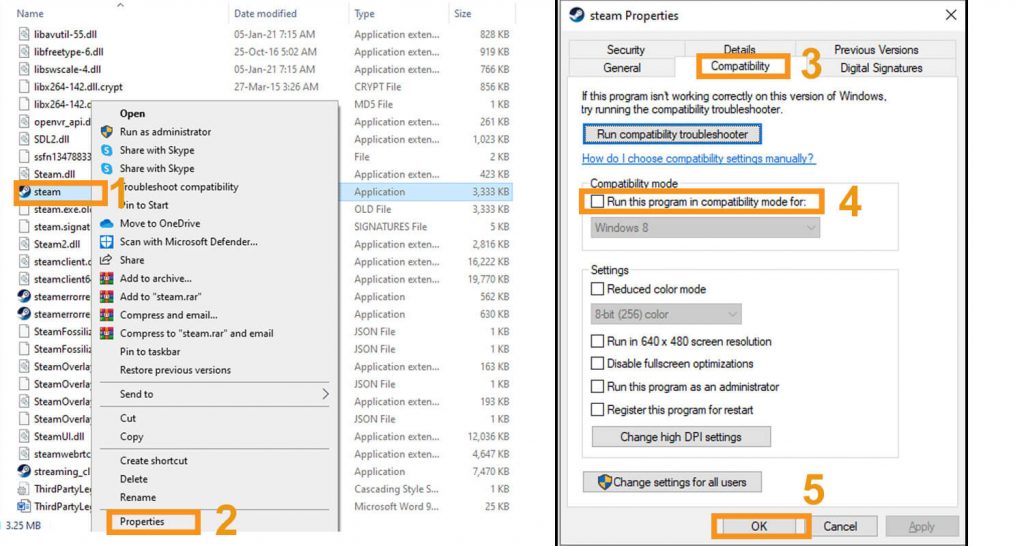
  • Go to your Steam folder
  • Right-click on “Steam.exe”
  • Click on “Properties”
  • Select the tab named “Compatibility.”
  • Click in “Run this program as an administrator.”
  • Click on “Apply” then “OK.”
  • See whether the Steam disk write error is solved or not

#6. Move The Game Folder

Sometimes transferring the game to a healthy drive can solve the issue. But here, manual transferring will not work. You can use EaseUS Todo PCTrans for transferring the file. 

  • Connect your computer with the destination drive
  • Select the games that you want to transfer
  • Now transfer them to the destination drive

#7. Confirm Integrity For Steam Game Files 

  • Reboot the system
  • Launch Steam
  • Click on the “Library” tab
  • Right-click on the game that is causing the error
  • Select “Properties”
  • Click on the “Local Files” tab
  • Click on the “Verify Integrity Of Game Files…..” button
  • It will take some time to verify the game files
  • Once the verification is done, try to install the updates and see if the Steam disk write error is showing or not. 

#8. Remove The Write Protection From The Steam Drive For Steam Disk Write Error
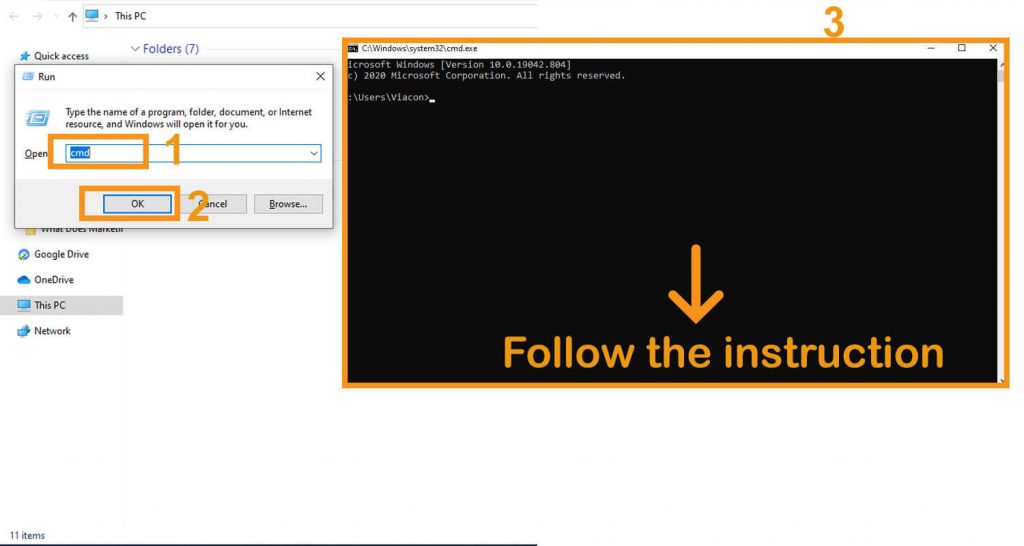
Remove The Write Protection From The Steam Drive For Steam Disk Write Error

  • Press “Win + R.”
  • Type cmd
  • Command Prompt will open.
  • Type “disk part” there
  • Press “Enter”
  • Type “list disk.”
  • Press “Enter”
  • Type “select disk 0.”
  • Press “Enter”
  • Type “attribute disk clear read-only.”
  • Press “Enter”
  • After the write protection process is done, type “Exit.” 
  • Press “Enter”
  • The disk part window will close. 

#9. Some Other Fixes Of Steam Disk Write Error

Apart from all the steps mentioned earlier or techniques, there are two more ways to eliminate the Steam disk write error. You can uninstall Steam and reinstall it. In order to uninstall 

  • Go to “Control panel.”
  • Open “Add or Remove programs.”
  • Search for Steam and select it
  • Click on the “Remove”
  • After selecting the automatic option, click on “Next.”
  • Click “Finish”

Once the uninstallation is completed, you can install it again. For installing Steam, follow the below steps.

  • Visit https://store.steampowered.com/about/
  • Click on “Install Steam”
  • After the download is completed, click on “Open” or “Run.”
  • Follow the on-screen instruction to install Steam.
  • Open steam and log in.

Final Talk

Though you have tried and everything to resolve the issue, it is not working. You can seek help from Steam’s official support. Opt for the Steam support team. You also can visit the community forum of Steam for any further or additional help. Apart from the above-mentioned nine solutions of steam disk write error, if you know any other practical solution, do let us know.  

More Resources:
  • The Complete Guide To Choosing VPS Hosting
  • Best Server Management Tips for Startups
  • Best Bulk Sd Cards Of 2020 – Review And Buying Guide

Mashum Mollah is the feature writer of Search Engine Magazine and an SEO Analyst at Real Wealth Business. Over the last 3 years, He has successfully developed and implemented online marketing, SEO, and conversion campaigns for 50+ businesses of all sizes. He is the co-founder of Social Media Magazine.

View all posts

Leave a Reply

Your email address will not be published. Required fields are marked *

Related

Visual Regression Testing

Best Practices For Visual Regression Testing On Cloud

Visual regression testing is the software testing process that is used to test your software application by visually finding any error or malfunctioning in the user experience. Visual regression testing ensures that an application or website maintains its intended look and behavior. It confirms the absence of any unplanned alterations to its visual design or functionality. This procedure entails comparing a reference version of the application or website and its current version, aiming to identify any visual disparities. Visual regression testing in a Cloud-based platform is the latest trend in the field of software testing and automation testing. It has various advantages, such as it increases the testing scope, costs less, and it increases testing flexibility. In this article, you will see the concepts of visual regression testing on the cloud, best practices for it, and many such things. What is Visual Regression Testing Visual regression testing evaluates the impact of code changes on the user experience by comparing screenshots before and after execution. It's also recognized as visual snapshot tests or visual testing, and its primary objective is to uphold visual consistency following updates. The Function Of The Visual Regression Testing Visual testing validates the suitability of an application's user interface in terms of its visual attributes. This quality assurance process aims to confirm the accurate display of content and data on the application's front end.  In case you're not acquainted with the concept of Regression testing, its purpose is to ensure that any modifications made to the software do not disrupt any previously functioning elements. In the context of visuals, this testing guarantees that alterations to the software do not lead to style-related problems. The true capability of visual regression testing can be leveraged with Cloud-based AI-powered test orchestration and execution platforms like LambdaTest. It allows the running of visual testing across a large farm of 3000+ real device and OS combinations. This helps to ensure cross platforms compatibility on the visual appearance and interface of the software applications. Features Offered By The Cloud-Based Ai-Powered Test Orchestration And Execution Platform - Lambdatest For Robust Visual Regression Testing Are As Follows: This section discusses the features which are offered by the test orchestration and the execution platform.  Execute Selenium and Cypress tests across a range of programming languages, such as Java, NodeJS, C#, Python, and StoryBook. This empowers the delivery of flawlessly designed applications across almost any browser or device. Employ Mis-match Ignore feature of SmartUI's Status Bar so that you can tackle the complexities of visual differentiations. This capability allows testers to crop the status bar out from the screenshots. Leveraging the high-end technique of image processing, it accurately detects and eliminates the status bar. This facilitates the analysis of essential UI components with due focus. Effortlessly install, set up, and execute the LambdaTest NPM package. This enables the direct implementation of the JS scriptsStorybook via our NPM CLI. Conduct regression testing, the visual ones for your mobile apps on genuine devices. Assure visual uniformity with precise pixel-to-pixel comparisons against your reference point, encompassing various screen sizes, resolutions, and layouts. Best Practices for Visual Regression Testing on Cloud Let us see the practices a tester must follow while performing visual regression testing on a cloud-based platform like LambdaTest. Following these practices during the test automation will make your software application visually more powerful and efficient. 1. Tool Selection: Choosing the appropriate tool to perform visual regression testing on the LambdaTest is one of the most important and essential steps in moving ahead of the testing process. Various parameters should be kept in mind during the tool selection for testing automation, such as the software type, compatibility aspects, resolution, etc. LambdaTest integrates with various tools like Selenium, Cypress, Playwright, and others, using which you can perform visual regression testing. 2. Consistent Environment: Never forget to create a conducive setup that will facilitate cloud-based visual regression testing. The interface provided by using these environments allows you to examine the visual outcomes and input received during the testing process. The testing team has the ability to pause the visual regression testing procedure and make the necessary corrections.  The team conducting the testing should also maintain resource isolation for the environment. It aids in preventing any type of intervention during automation testing, which increases the effectiveness and productivity of cloud-based visual regression testing. 3. Isolation And External Factors: Remember that the isolated environment should not be affected by any external factors. They include network latency or fluctuations, system updates, or background processes running on the testing machine. These factors may lead to visual error and malfunctioning of the software application. External influences can potentially introduce visual errors and cause malfunctions in the software application.  Ensuring a controlled environment by addressing the factors safeguards the accuracy of the testing results. All the screenshots and visual reports of the testing process will be saved in that specific folder. This will help to perform visual comparisons effectively. 4. Scriptless Test Cases Visual regression testing on the cloud platform using scriptless test cases is the best approach. Since numerous cloud-based AI tools are available, test automation can be utilized to develop test cases simultaneously. It is because the testing scope of a programmed test case is limited.  But using AI technologies offered by LambdaTest for test case design opens up possibilities for the testing team to consistently cover the testing scope. It will perform visual testing against some test cases, and again, it will recreate the test cases according to the previous result and analysis. This practice will bring the best visual result for your software application. 5. Documentation Of Visual Test Cases Documentation is a very effective and important practice in any software testing process. In visual regression testing, you need to test and verify the components visually, and here it is important to mark down your observations, bugs, and analysis and work on them accordingly.  For your visual regression tests performed in LambdaTest, you should create clear and succinct test cases and descriptions. You should also include comments or annotations to describe the aim and scope of your baselines and screenshots.  Additionally, you should preserve and maintain your screenshots and baselines using a version control system or a cloud-based service. Sharing and communicating with the client will help you understand their demand and make the best possible result. 6. Updating The Baseline Updating the baseline is a very crucial step in the visual regression testing process when performed in LambdaTest. It consists of the practice of taking the feedback result and analyzing them. If the result is considerable, you can approve this update in the baseline. And if you think that it is not worth consideration, you can simply reject them. But you need to mention all these in the baseline. It is because this will help you in the future because you can see all your testing logs in the baseline.  Mention the changes that were done intentionally, their reasons, and such things. It will also help all the team members have an overview of the changes that are going on in the software testing process. 6. Optimize Testing Coverage And Scope Always remember to prioritize the testing scope for each component, specifically when executing visual regression testing in cloud platforms like LambdaTest. The high-priority components must be paid more attention, and they should be executed with high precision. Use the concept of full-page and component-based screenshots to compare the changes visually by the testing team. Using this practice in visual regression testing will help achieve a better UI experience and enhance the testing results. You can use some advanced features like custom attributes.  These attributes help find the elements separately during visual regression testing. Also, you can use the trigger events and DOM concept. These will help to perform the screenshot comparison effectively. 7. Performing Parallel Testing Apart from this, you can leverage parallel test execution in performing visual regression testing in LambdaTest. Executing parallel testing is what makes visual regression testing productive and effective, though, along with those other factors. 8. Learn From Failure It is the final practice that all testers must follow to perform visual regression testing on the cloud and during test automation. Learn from your previous failure. Document the mistakes that you have made previously. Write down the tool feedback and in which specific tool you got some issues performing the testing process. And learn from these highlights.  Make your testing goal and work on your failures. This will bring the best result for your software application. Also, it will help in the overall development of the organization as well as the individual tester. You should follow These best practices while performing visual regression testing on the cloud. Conclusion Visual regression testing is mainly used to find any kind of visual malfunctioning and errors in the software. Visual inconsistency is one of the major reasons that lead to decreased number of users of a product.  Some of the best practices that every testing team should follow to perform visual regression testing using the cloud are the selection of appropriate tools, using documentation, using AI-based test cases, etc. Various tools can be used to automate testing and perform visual regression testing on the cloud, such as LambdaTest.  Hope you get an understanding of the best practices for visual regression testing using the cloud and their various aspects after reading this article.  Read Also: Benefits of Cloud-Based Quality Management Systems Mobile Testing With Appium On Lambdatest The Best WordPress Plugins For Marketers

READ MOREDetails
Leverage EDI to Supercharge Data Exchange

Leverage EDI to Supercharge Data Exchange

In the present digital era, data exchange has a lot to do in turning a business triumphant and self-sufficient. The faster this process is, the better the outcome will be. The data exchange model underpins your company’s success. It encompasses a framework that enables business users to exchange information across multiple business ecosystems. For example, a manufacturing enterprise exchanges large volumes of data between distributors as well as supply chain ecosystems. In order to drive data exchange, enterprises must securely share data at the speed of business. In doing so, they must rely on electronic data exchange (EDI) technology. Not only it empowers business users to amplify data usage but also streamlines and accelerates communication. Nevertheless, a lot of companies still rely on legacy systems to kickstart B2B transactions that involve an exchange of important documents such as sales orders, purchase orders (PO), functional acknowledgment, or invoices. These systems, owing to their manual nature, can put a lot of burden on the IT teams. Further, they can slow down the processes, turning them error-prone and costly. In the end, companies become difficult to do business with. Next-gen EDI tools can be of great value here. Not only these solutions help drive data residing in the system but also those that are remotely positioned. EDI for Faster Data Exchange: Electronic data exchange platforms can help companies exchange data across the trading partner ecosystem in an automated manner. They maximize operational efficiency and enable business users to make successful business decisions. The importance of these platforms has grown in the current digital transformation age wherein, secure data exchange is deemed essential. Companies must have access to robust remote data exchange platforms to drive the exchange of data from remote collection points. By enabling secure remote exchange across their trading partner network, companies can maintain the security of data without much operational overhead. Value of EDI Integration: A lot of enterprises are choosing EDI to simplify their B2B transactions and exchange processes without sacrificing speed or complexity. But, to do so, one must have a deeper sense of understanding about the technology. Let’s explore how EDI integration works to dive deeper. EDI enables business users to take an integrated approach to deliver operational visibility, faster workflows, and improved customer service. Here are steps that play a crucial role. Step 1:   The sender transfers the document such as the purchase order. The transfer happens from an in-house system or application.  Step 2:  The purchase order is then converted into the required EDI format with aid of techniques like mapping, data transformation, and more. Step 3:  The EDI document is then allowed to run via a processor for structural accuracy. Step 4:  The data is transmitted to a VAN with the help of protocols like SFTP, HTTPS, or AS2. Step 5:  Ultimately, EDI is directed over AS2 and this allows companies to establish a connection with their trading partner ecosystem.  As the file reaches the receiver finally, it undergoes verification and authentication followed by data ingestion. In the end, the receiver transmits information and acknowledges the delivery. How Does it Help Business Drive Forward? EDI integration empowers business users drive remote data exchange and B2B transactions without complexity. It has a lot to offer, from ensuring faster business data exchange to facilitating information accuracy. Here are some of the benefits. Better Efficiency through Automation: It simplifies operations and allows secure exchange of documents residing in the system and remote data collection points using automation. Not only it increases the speed of operations but also decreases errors with ease. Better Speed:  It helps in cutting down the processing time, increasing the company’s time-to-value. Order-to-shipment cycles turn faster by 60%, and hence data exchange accelerates. Better Accuracy:  Errors in data trigger disturbances in data flow and management. EDI integration automates B2B processes, making organizations easier to do business with. When companies rely on manual methods to do so, mistakes are bound to occur. Modern solutions turn these processes more accurate, eliminating risks of errors through manual intervention. Better Security:  EDI is way faster and safer than legacy systems. It only authorizes selected personnel to access data, making processes secure than ever.  Simply put, Companies can rapidly exchange data across various business ecosystems using a next-gen EDI integration solution. Read Also: Is A Time Card App Really Necessary? Data Points To Yes! Tips to Keep Your Photos and Data Save on Your Mobile Phone Is Big Data Capable Of Predicting The Next Best-Selling Book And Author: An Analysis

READ MOREDetails
Paper Shredding

Paper Shredding is Nothing Like in Hollywood Movies

How many times in Hollywood movies have you seen somebody frantically feeding papers into a shredder before the authorities arrive on the scene? It may be a common trope, but this doesn’t resemble how people use professional shredders today. Everybody has sensitive documents which could cause a devastating data breach if they got into the wrong hands. Having such information is an inevitable part of being a citizen — it doesn’t mean you have something to hide. Please keep reading to learn more about how professional shredding works in the real world. Home Shredding: Every day people are targeted by scammers who try to piece together whatever personal information about strangers they can get their hands on. People hire a paper shredding company every day to ensure that their home is free of data liabilities that could come back to bite them later. Here are a few of the items professional shredders commonly need to destroy: Tax documents Banking information Contracts Pages with passwords and usernames Especially with more people than ever working remotely, having sensitive information at home is more common than ever. If you have these or other such documents at home, the safest thing to do is get them professionally shredded. Commercial Shredding: It’s impossible to do business for any length of time without generating paperwork. From the smallest business to the largest corporation, there’ll be an endless procession of things like receipts, HR documents, contracts and agreements, and other paper documents which corporate saboteurs or identity thieves would love to possess. Just as with home shredding, professional shredders can destroy your sensitive documents on-site or remotely. For example, if you are located in California, you can look for shredding services in San Francisco to dispose of your documents securely. Even if they aren’t connected to the internet, electronics are a common source of data leaks, and these devices need to be eliminated with the same thoroughness as paper documents. Professional shredders will destroy the microchips on the device, so it’s impossible for a data thief to retrieve information. Do you have old phones, computers, or other electronics that you used for work? Obsolete technology might not be useful in your day-to-day life, but a corporate saboteur would love to find it! Call a professional shredder to get rid of electronics that are no longer useful safely. While some such devices like computers and phones are an obvious vector for identity theft, other devices that you may not think of also contain very sensitive information. If your office or home office contains an old photocopier or printer memory card, calling a professional shredder to eliminate it is the safest course of action you can take. People in all walks of life need to be careful that their personal and professional information doesn’t fall into the wrong hands. While the most prominent victims of identity theft get the bulk of the news coverage, it’s an issue that can affect anyone. Call professionals to help you steer clear of all risks associated with data theft. Read Also: High Technology Devices for Better Life Get The Best Assistive Technology: A Telecare Equipment

READ MOREDetails