Supplies That Are Needed For Welding Projects

by

04 May 2023

Home Improvement

Welding Projects

Welding is a fulfilling and challenging job, requiring expert knowledge, a steady hand, and, most importantly, the right tools.

If you’re starting up a welding business or just want to make sure you’re kitted out for your at-home welding projects, you’ll need to ensure you’ve got the right supplies and tools from a store similar to weldingsuppliesfromioc.com.

We’ll provide you with the essential shortlist of supplies you’ll need for your next welding project.
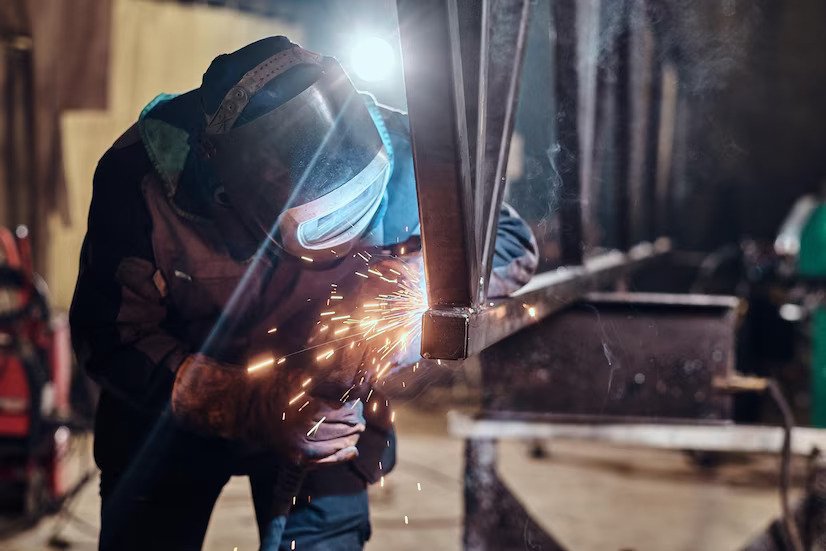
A Welding Machine

Welding Machine

Of course, you need a welder to do any welding. A welder is, in essence, a piece of machinery that uses heat to combine two or more metal parts. There are a variety of welding machines out there that use different combination methods to get the job done.

One may be preferable over another, depending on the welding project you are doing. Stick welders, MIG welders, and TIG welders are just a few examples, each with its own unique methodology.

No welding machine kit is complete without a welding electrode, torch, filler material, and shielding gas. These are all essential to the function of a welder and imperative for safety while operating the equipment.

Always ensure that your welding equipment is high-quality before you start projects, either for work or for a hobby. Welding is dangerous, and choosing a welder you’re unfamiliar with can be downright dangerous.

Soldering Helmet

The most recognizable tool of any welder, the helmet keeps your face, especially your eyes, safe while you weld. It also helps to keep your skin protected from the intense heat.

Soldering without a helmet is foolhardy and incurs a much greater risk of injury, so this essential piece of equipment should always be in your workshop. Shop around to find a helmet that fits you comfortably and lets you see what you’re working on.

Welding Jacket

Welding Jacket

The jacket does for your body what the helmet does for your face; these are made from fire-resistant materials to protect welders from the extreme heat that a welding torch generates. The last thing you want is a piece of molten metal landing on your arm, so choose a suitably high-quality jacket to protect your skin.

Protective Gloves

The last of the holy trinity of heat protection, the welding gloves serve to protect your hands from injury while you work. As you weld, you’re working closely with hot metal and a dangerous welding tool, regardless of what type of welding you’re using.

Heavy welding gloves, in particular, allow you to pick up hot metal objects for a few seconds without being burned, which can be helpful for beginners getting started in MIG welding. On the other hand, thinner gloves allow more precise control over welding. Precision is paramount in some types of welding—TIG welding, for example, which relies on meticulous lines to create a clean, finished look. Choose a glove that represents your experience level, but always prioritize safety.

Reinforced Boots

Reinforced Boots for Welding

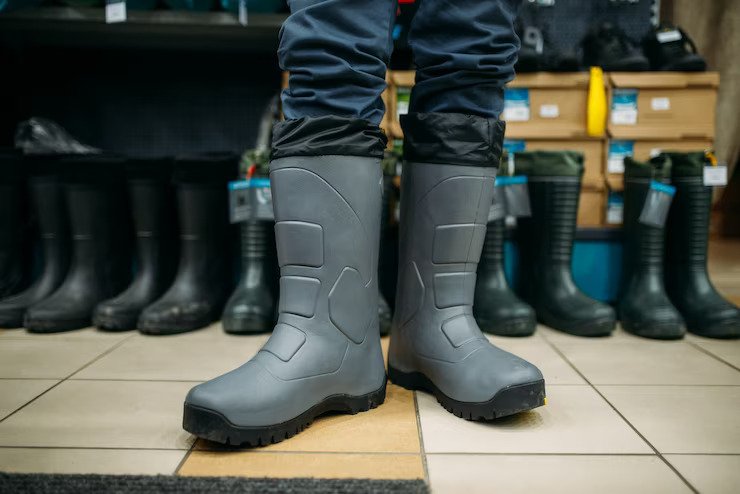
Your feet are susceptible to injury as you weld, and it’s better not to tempt fate by playing hopscotch with raining molten metal. Welding boots should be tough and durable, with thick leather and steel-reinforced toes. These will give you some staunch protection against wayward molten metal and some degree of protection against other heavy objects that could otherwise fall and crush your feet.

An Apron

A welding apron protects your lower body from the sparks and heat welding produces. Generally, they feature adjustable straps so that you can tighten them to your comfort. Welding aprons are made from the same material as a welding jacket, providing additional protection for the legs and underlying clothing.

Magnets

Next, you’ll want to put some consideration into workplace efficiency. One underutilized but valuable tool you can use is a welding magnet. These helpful magnets allow you to pin components in place, rotate them, and secure your workpiece. You can get different welding magnets for different sizes of projects, but the bottom line is that it allows you a much easier time working with hot metal confidently and efficiently.

Welding Cart

Another essential item for welding projects is a cart. Just as with any project that requires heavy and cumbersome equipment, welding tends to require lots of clothing, tools, and components.

A welding cart offers a lightweight solution to this problem, giving you space to store your welder and welding accessories regardless of where you work. If you’re on the go with your welding projects, then this is definitely an item you’ll want to invest in for your long-term success.

Workstation Table

Every welder needs a surface to work on, and, as you might guess, not just any table will do. A welding table is a customized workbench made from metal or other heat-resistant materials. These tables feature built-in holes that you can use to clamp down a workpiece and hold metal parts in place while you are in the process of welding.

Chipping Hammer

A chipping hammer is a specialty tool welders use to remove impurities from the surface of the welded metal, often called slag. The hammer contains a sharp, chisel-like tip that can knock off slag from the surface of a workpiece.

Angle Grinder

Angle Grinder

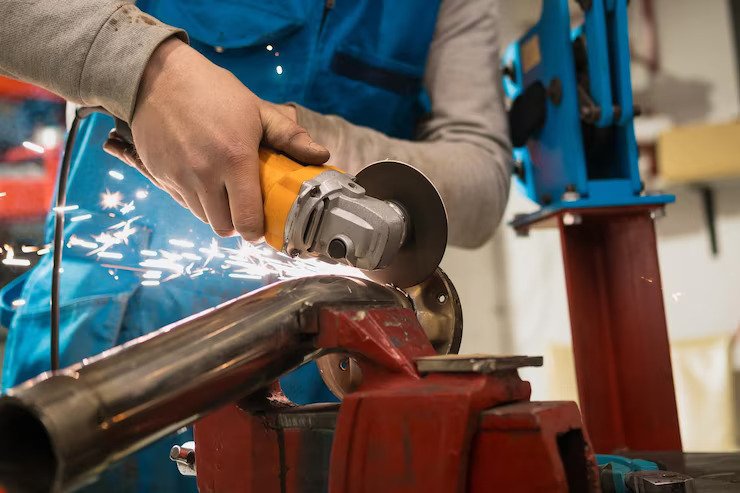
An angle grinder is a tool for preparing the metal surface for welding using abrasive force. The rotating disc smooths the surface, removing imperfections that may contaminate the workpiece and giving the welder a clean surface to work on.

Wire Brush

A wire brush also helps clean the surface of the metal before welding. They come in different shapes and sizes depending on the size of your workpiece, some with long handles for access to crevices and others with shorter handles for easier control. The bristles need to be abrasive to clean the surface of the metal effectively.

The Bottom Line

Every welder needs these essential tools before they start working. Some of these supplies are necessary to begin welding in the first place, while others are important for human safety or for work efficiency. Kit yourself out with these essentials, and you’ll be all set to tackle beginner welding projects immediately.

Read Also:

Arnab is a professional blogger, having an enormous interest in writing blogs and other jones of calligraphies. In terms of his professional commitments, He carries out sharing sentient blogs.

View all posts

Leave a Reply

Your email address will not be published. Required fields are marked *

Related

Wood-burning Stove

5 Great Reasons Your Home Needs a Wood-burning Stove

When autumn begins to fade into winter, the temperature starts to reduce and gets even colder. The need to keep the house warm also arises. You definitely have some other form of heating your home since this won’t be your first winter. But your being here means that you are considering an alternative heating method. The efficiency of wood-burning stoves is one of the many reasons one should be the alternative on your mind. But there are also so many other reasons and they would all be discussed in this article. But first, what are wood-burning stoves? What Are Wood-burning Stoves? Wood-burning stoves are home appliances that are made of metals like steel or cast iron and are used for heating the house. As the name implies, wood is the fuel for the stove and it is burnt inside a fire chamber that is usually enclosed. The gases and fumes they produce have to be taken out of the room either through a flue or a chimney just like a traditional fireplace. Although these stoves have existed for a long time, they only just rose in popularity. And this is because more people have begun to appreciate their benefits. But what are these benefits? Let’s find out below. Reasons You Should Get a Wood-burning Stove The following are the major reasons a wood-burning stove is a great heating system for the home… 1. Efficiency The heat that this heating system produces is very impressive. Your home gets to enjoy a great form of heat output with one of these burner stoves. This means that the house will get warm effectively and a lot more quickly. They come in various sizes and energy levels, this way you can select one that will adequately suit your home’s size 2. Stylish and Decorative They not only get your house adequately warm, but they also provide aesthetics as they look so great. When one is placed in a room in the home, it is sure to become a new point of attraction by adding style and character to the room. There are a lot of styles to choose from like contemporary or classic and so much more. You simply need to be deliberate when you shop for the burner and ensure you get one that will match the home’s décor. 3. Gives Your House a Homely Ambiance When the weather is chilly and bent on making everyone miserable, one way to beat the weather is to get cozy at home. And a wood burner is sure to provide that homely ambiance that is much needed during this time. The cozy heat from the burner and the roaring flames inside the fire chamber provide a calm and soothing visual impact that will leave you comfortable in no time. Visit https://apnews.com/article/a53e297b6fbc4481a0c917dc41c3842f to find out other ways you can stay comfortable during the cold season. You can sit in front of the fire with a cup of coffee while watching the flames dance. 4. Good for the Environment We are in an age where eco-awareness is at its peak and a lot of people are trying their bests to do right for their environments. One way to contribute towards this goal of a better environment is a wood burner. How is this burner environmentally friendly you may ask. Well, it is because wood which is the fuel of this type of burner is carbon neutral even though it releases carbon dioxide. The amount of carbon dioxide that is produced equals the amount that is consumed by trees which takes the carbon dioxide and then releases oxygen. This way, the burners do not impact the carbon dioxide level in the environment. 5. Cost-Efficient Energy price is constantly going up and people are beginning to find it more expensive heating up their homes with electrical and gas means. Wood burners on the other hand are very energy efficient and thus help you save money that would otherwise have been used on the energy required by other home heating systems. You will surely find this heating method a lot more economical as you will notice an obvious reduction in your heating bill. The heating bill is reduced and not cut off because you may still have to make use of the central heating where you haven’t placed a wood stove. The initial cost of getting the burner bought and installed may be on the high side compared to other heating systems. But, we assure you that it would only be a matter of years for this cost to be gotten back through the energy-saving nature of the burner. If you need to learn about more of its benefits, you can check here. Conclusion Getting a wood-burning stove may very well be the best decision you may make when it concerns heating your home. This article discusses 5 great reasons why this heating system is great for your home. Read Also: 5 Things You Should Know About Heating and Cooling Tiny Homes Advantages Of Using A Water Heater At Home

READ MOREDetails
Iron Clothes

How to Use Iron Clothes With Steam

Believe it or not, the amount of people that don’t know how to iron clothes is amazing. There’s no shame on it since most of us were thrown into society without really practicing skills that would definitely help us fight back as we become independent. These skills include things like cooking a proper meal before going to work, knowing what groceries to buy without spending all our money on unnecessary things, being able to pay bills accordingly without becoming a mess, cleaning the house every now and then, and of course, knowing how to use steam irons and what to do to properly iron our clothes to not look like folded toilet paper. Don’t worry though! In this guide, I’m going to teach you the essentials of how to iron, and how to deal with different types of fabric. To be honest, ironing is not something as complicated as many think. It’s all about knowing what to do, which is what most people lack. The process may require a little preparation and patience, though, so be prepared to practice with different pieces of clothing to get the main idea. One thing is sure, though. You have to be careful when using an iron because they can be harmful if dealt with without precautions! How to Prepare for It The first thing you’ll need is a flat surface where you can prepare your clothes to be ironed. Try to have everything neatly organized to avoid possible accidents, and if you can, try to do it on an ironing board. Some clothing is too delicate for the heat produced by the heated metal of the device, so have a piece of fabric to protect these. Read more: A Complete Guide on Using IRON on Transfer Paper Connect the Iron Irons can take some time before they are ready to be used. They usually show a sign that they are ready, so be sure to be attentive about them while you take care of the next step. Never try to do it before its ready, since it’ll lead to a slower and far less efficient process. Know the Differences Between Materials, and Sort Them Beforehand Depending on the type of fabric you are dealing with, you might want to change your approach while ironing. You can’t deal with a silk piece the same way you would deal with a cotton one, for example. Some pieces of clothing will require you to use the lowest setting of heat possible, while others may require even more heat. Separate silk, wool, rayon, and acetate to be dealt with the lowest settings. Wool clothes may require the protection of another piece of fabric that was previously dampened, so take that in mind! For polyester, go with the medium heat setting, and for cotton, you can go either medium and high heat setting. Both of them should be dampened to be protected from the heat. Before the iron is ready to go, you should have them sorted out. How to Iron Clothes When you deal with shirts with a collar, you should start with it. You can start with a pattern that follows the inside part of the collar, starting from the center of it, until you reach the edges. Then, fall back to the center, and keep moving between both sides. Once you’ve finished with it, you can work the outside. Lay down the shirt in a way that you can flatten it with the iron with simple movements. After that, you have to work your way down, slowly moving the shirt. Then, work the sleeves then the cuffs. Pants are much easier than shirts with a collar. You just have yo lay them down in a way that you can work both legs at the same time. Start with the waist, gently work with the pockets, and go your way down. Repeat the process until you are satisfied with the results, but make sure to be gentle and careful with the heat and the ironing. Considering that there are way too many types of clothing to teach all of the proper methods and techniques to iron them accordingly, you should check this guide on how to do it without fail. Safety Recommendations Ironing can be a pretty dangerous process if you are not attentive while you do it. If you don’t take safety measures, you might harm yourself or others, so make sure to pay attention to this part of the guide. The very first thing you should always make sure is that the iron is unreachable for children. Children can be curious and do things without knowing, so you will be the one to blame if you allow them to get closer while they are heated up. This is important even after you’ve finished ironing. These devices tend to remain heated up even after disconnecting them, so you should still be attentive to any possible situation. I recommend you to wait at least 10 minutes before taking your guard off. Remember to check just in case. While it rests, don’t leave it face down. You might burn something or damage the iron if you do. If an accident happens and you burn yourself or someone else gets burned, treat the burn with cool water for as much time as you can. 20 minutes should be more than enough. Don’t use things like butter or oil, since it might infect the injury. if the burn is too big, you should check yourself with a doctor. Read Also: How To Choose A Washing Machine? How to Pack Clothing Properly for Shipping Choose The Latest Collection Of Women Clothing For a Stylish Look 6 Benefits Of Buying Clothes Online – Why People trust online shopping

READ MOREDetails
Vanity Size On Bathroom Design

The Impact Of Vanity Size On Bathroom Design And Functionality

Today, clothing sizes often lead people to believe they are smaller than their actual size. This is called “vanity sizing”. For instance, "a size 8 dress today is nearly the equivalent of a size 16 dress in 1958," according to a report.  Because clothing can create the illusion of a slimmer appearance, many people now desire larger bathrooms as well. The trend of vanity sizing is influencing the design and functionality of bathrooms. From wider toilet stalls to more spacious showers, bathrooms are being changed to match people's distorted self-image. What is Vanity Sizing For Bathrooms? Vanity sizing is when something is made bigger than normal to make people feel better about themselves. Just like size 6 jeans that actually fit someone who usually wears size 8 jeans. In bathrooms, vanity sizing means making the room and fixtures bigger than what works for real bodies. Such as extra-wide shower stalls, two-person bathtubs, or oversized sinks. They make us feel skinnier, but take up a lot of space! Factors To Consider When Choosing Vanity Size The main thing you should consider when choosing your vanity is the size of your bathroom which is a major factor in changing the look and feel of your bathroom. So, carefully review common bathroom vanity sizes and measurements before selecting. Look at the data below that shows the common vanity width that fits the bathroom sizes:  Data Source: Forbes 1. Consider Floor Space Will counters, cabinets, and toilets still squeeze in if you supersize your bathroom? Make sure giant fixtures don't crowd out other necessary stuff! 2. Watch Door Openings Too That cool two-person tub won't do you any good if it gets stuck trying to fit through the bathroom doorway! Double-check entrances. 3. Check Plumbing Locations Expanding your bathroom means dealing with pipes inside walls too. Make sure water lines still reach sinks or toilets when they move. 4. Price For Extreme Upgrades Going big in bathrooms means spending big bucks too! Make sure your wallet can handle all that bonus tile, lighting, high-tech toilets, and other swanky stuff before pulling the trigger.   5. Future Homeowners Too What seems huge and perfect for your family now may scare off buyers down the road. Keep future practicality for the next folks in mind. 6. Consider Resale Value Even if you adore your 47 jet massaging tub, will someone else want to pay big money for your over-the-top bathroom later when you sell? 7. Extra Cleaning Responsibilities The bigger the bathroom, the longer the cleaning day takes! Make sure you want to put in elbow grease for giant showers and his ‘and her everything.   8. Watch Wet Floor Safety Oversized sinks and tubs mean leaks or splashes cover larger areas. Pay attention to slip-proof surfaces so no one goes crashing down.   9. Visiting Guest Comfort Even if space permits, older relatives may feel uneasy navigating a huge bathroom with their walkers or canes. Consider all who will use it. 10. Separate Private Toilet Room Rather than one giant open space, smaller vanity bathrooms with a separate water closet for the toilet allow privacy. Choosing The Right Vanity Size For Your Bathroom’s Look The dimensions of your bathroom vanity change how open, crowded, or balanced your space appears. An overgrown vanity makes small rooms feel stuffed. But one too tiny turns your bathroom into a messy pile-up of products without enough organizer drawers or counter area. Here’s how to get vanity sizing just right for your ideal bathroom design style:   In Itsy Bitsy Bathrooms When dealing with snug powder rooms or half baths, keep your vanity narrow in the 24 to 30-inch range so it doesn’t hog up the entire floor. Any wider starts making moving around impossible! Select wall-mounted styles instead of boxy cabinets to save precious inches. Or opt for floating vanities that have air rather than chunky boxes below to give the illusion you have more breathing room.  Another decorating trick for a petite bathroom is going big with mirrors or using reflective tiles and chrome finishes. When tiny rooms sparkle and shine, they seem to double in size instantly! Just avoid dark paint shades, clutter, and heavy fabrics that make small salons feel even more closed in.   For Middle-of-the-Road Bathroom Sizes   If your washroom dimensions fall somewhere in that just-right not-too-big, not-too-small middle zone, standard vanity widths from 30 to 48 inches tend to fit nicely without limiting movement. This gives your average family plenty of surface space to spread out self-care must-haves each morning and store all those lotions and potions in handy drawers below.   When organizing your cabinet and counter goods, be sure to keep at least 9 to 12 inches of space around the vanity perimeter. You’ll still need elbow room to get in there for clean-ups without bonking walls, doorway frames, or light switches! Beyond functional inches, defining your vanity area with cool lighting designs or eye-catching tile shapes helps contain the space in a neat square for a balanced, soothing aesthetic.   When You’ve Got Room to Spare Lucky enough to be working with a big old bathroom complete with soaring ceilings and a giant footprint? Then you’ve got options to install his and her double-wide vanities ranging from 60 to a whopping 72 inches. This creates the dramatic appearance of dual stations without the need for significant construction to physically divide your spacious room into two separate spaces. FAQs:- Q1. What is the standard width of a bathroom vanity? Ans: The standard width for a single-sink bathroom vanity is 24 to 48 inches. For a double sink vanity, it’s 60 to 72 inches. Q2. How do I choose the right vanity size for my bathroom?  Ans: Consider your existing bathroom size, number of users, and required storage space when selecting the ideal vanity. Allow proper clearance between the vanity and walls.  3. What are some common mistakes to avoid when choosing a bathroom vanity size? Ans: Avoid sizing too small and creating limited functionality or choosing an oversized vanity that makes the bathroom feel confined. Failing to measure properly and allowing adequate wall clearance are also common mistakes. Conclusion Vanity dimensions significantly influence the visual enhancement and practical use of any bathroom. By factoring in room size, user needs, and required storage, you can achieve an optimally designed and functional space that suits your lifestyle beautifully. By paying attention to critical measurements and clearances, you can avoid common mistakes. With some planning and foresight, you’ll love your new bathroom for years to come. Additional Reading: 3 Best Indoor Plants For The Dining Room Stunning Bathroom Vanities For An Instant Makeover Storage Units Your Ultimate Guide To Organized Living

READ MOREDetails