Which Edible is Right for You?

by

26 August 2021

Food

Edible

Besides searching for the best way to consume CBD, if you ever have searched for marijuana edibles, you’ve probably received more results than you can possibly ever go through. There are cookies, brownies, candy, beers, coffees, and sodas, among many other foods.

There is even cannabis-infused flour, butter, sugar, and honey for you to cook with if you want to add a little THC to your own meals or baked goods. However, if you’ve never tried edibles, you might not know which is right for you. Here’s a rundown of the most popular types of edibles and how they differ from each other.

Candy Edibles

Candy Edibles

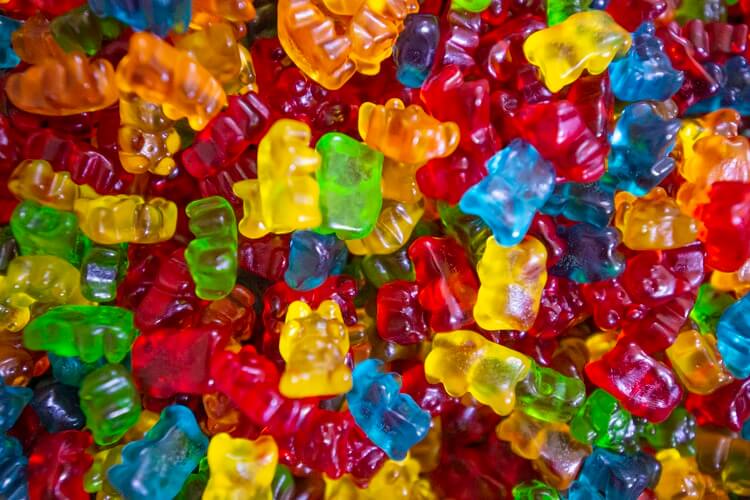
Candy, and gummy candy, in particular, is the most popular way to consume marijuana in food. Chocolate bars, truffles, and bonbons are also favorites, but the point is that no matter what flavor you’re looking for, you’re bound to find a candy you’ll like. Many people choose candy edibles because they can mask the sometimes bitter flavor of cannabis.

Another reason candy is popular is that it is usually small in size and can be consumed discreetly. Take a gummy, for instance. You can easily put several gummies in a bag and carry them in your purse or backpack, and when you eat one, no one would ever know it contains marijuana.

Mints, which fall under the candy category, are even more discreet to carry and easier to consume without calling attention to what you’re eating.
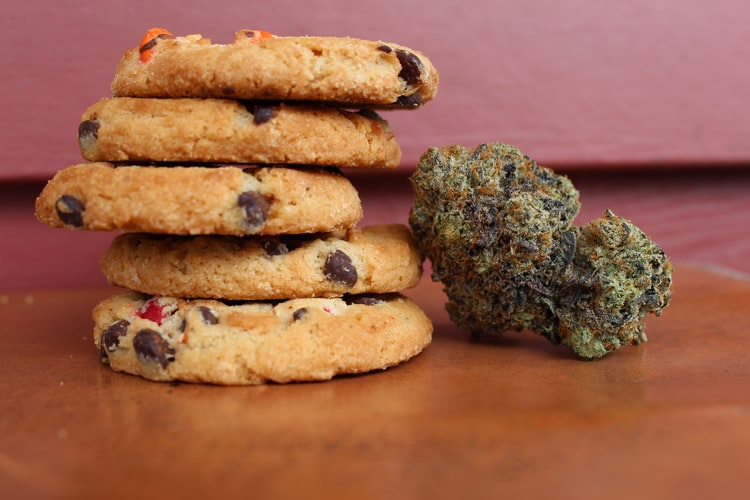
Baked Goods

Baked Goods

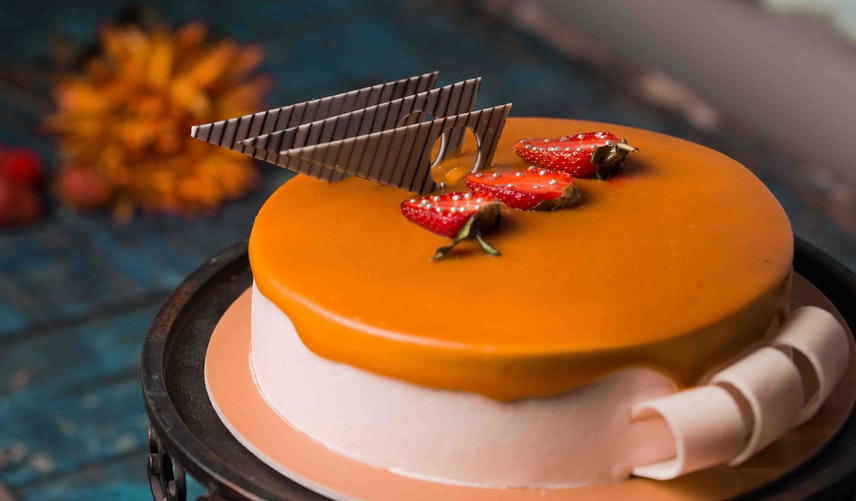
Pot brownies are the stereotypical edible that always seems to be associated with marijuana. However, there are numerous types of baked goods that contain THC these days. From cookies to bread to cakes to macarons, you can find a baked item that fits your needs.

These tend to be more conspicuous than marijuana candy, but that all depends on how it’s packaged. If your cookie or brownie is in a plain container, it’s likely no one will be the wiser when you eat it.

Keep in mind that it can be harder to control your dose with a baked good than with candy. Once you have a single piece of candy, you’ll know exactly how consuming one piece of that candy will affect you in the future. With a pot cookie or brownie, though, the amount of THC you consume may differ with each bite.

For this reason, eat only a small portion of your baked goods, to begin with until you know how it’s affecting you.

Soda

Soda

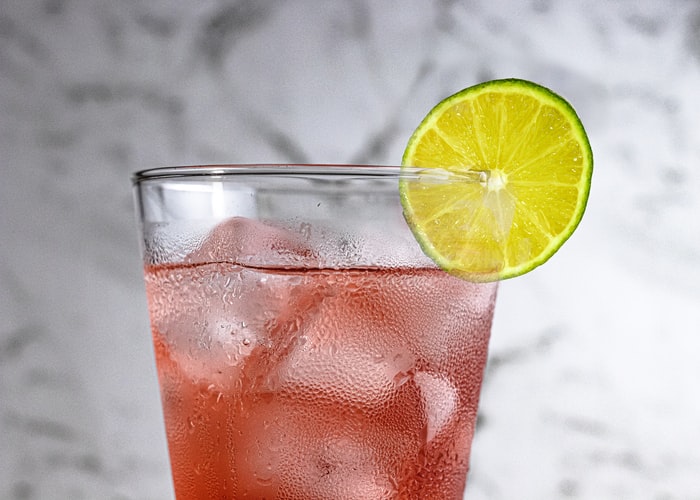
Cannabis-infused sodas are harder to find than candy and baked goods, but they are gaining in popularity and becoming more prevalent in states where recreational marijuana is legal(considering its pros and cons).

The main factor in its growth is that soda is digested more quickly than solid food, so the buzz happens more quickly when you drink a THC-infused product rather than eat candy or cookies. Sometimes, it can take an hour or better before you feel anything from candy or brownie edible, but you’ll feel the effects much faster with a soda.

Tea

Tea

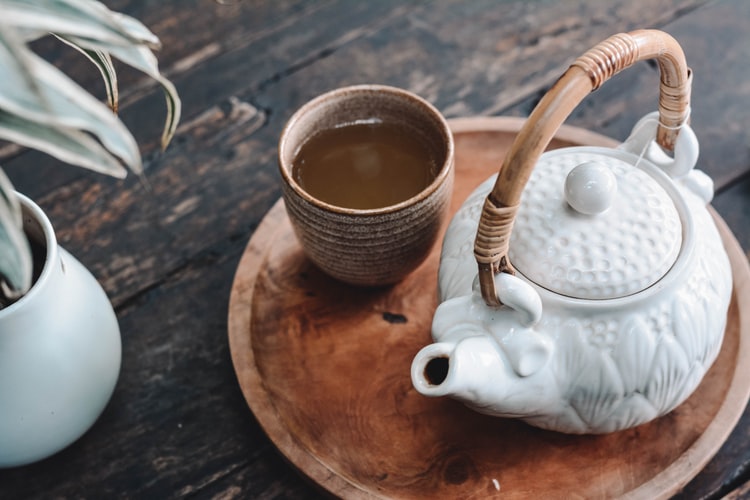
Many edible consumers prefer to get their THC from a cup of hot tea. This is a favorite method because most tea bags only contain minimal amounts of THC so you can get some of the effects of marijuana without being entirely incapacitated, especially if you’re sensitive to the drug.

Of course, you can find tea bags with significantly more THC than others, so make sure you pay attention to the brand you get and how much THC you’ll be consuming with a single tea bag.

You can also use canna honey or cannabis-infused sugar in your tea as an alternative to getting the THC from the tea bag itself. Since you’ll most likely make the canna honey or cannabis-infused sugar yourself, you’ll be more aware of how much marijuana you’re using each time you put some in your tea.

There are many recipes for honey and sugar infused with cannabis on the Internet to help you make your own edibles.

Conclusion

No matter how you decide to consume marijuana, it’s important to understand the dose you’re putting into your body. For instance, a soda usually is meant for two separate servings, so don’t down the entire bottle if you haven’t ever tried one before. Take it slow and pay attention to your response to the edible to make sure you’re using it safely. Before long, you’ll find the edible that’s perfect for you!

Read Also:

I enjoy writing and I write quality guest posts on topics of my interest and passion. I have been doing this since my college days. My special interests are in health, fitness, food and following the latest trends in these areas. I am an editor at Content Rally.

View all posts

Leave a Reply

Your email address will not be published. Required fields are marked *

Related

How to harvest potato

How to Harvest Potatoes: A Complete Guide from Planting to Storage 

If there is something that I have learned in life, it is about gardening. Well, almost everything if not all. And if there is one thing that took me some time to master, it was knowing how to harvest potatoes at home! Potatoes are one of the most versatile and popular vegetables in the world. They can be cooked in many different ways, such as boiled, baked, fried, mashed, or roasted. Moreover, they are also rich in carbohydrates, fiber, vitamin C, potassium, and antioxidants.But how do you grow and harvest your own potatoes at home? You see, potatoes are not like cilantro or other plants. These are tubers. In this article, I will show you everything you need to know about how to harvest potatoes, from planting to storage.So, if that is something that you are interested in knowing, then I have you covered! Keep on reading this blog till the end to learn more... How to Plant Potato Seeds or Tubers? The first step in how to harvest potatoes is to plant them. You can start with either potato seeds or tubers. Potato seeds are small, round, and black, and they are usually sold in packets.Potato tubers are the actual potatoes that you eat, and they have eyes or buds that can sprout new plants.You can buy certified seed potatoes from a nursery or garden center, or use organic potatoes from the grocery store. Here are some if the steps that you must take to plant them: Planting Potato Seeds To plant potato seeds, you need to sow them indoors in pots or trays filled with moist potting soil.Place them in a sunny spot and keep the soil moist but not soggy.The seeds will germinate in about two weeks and produce small green shoots.When the shoots are about 3 inches tall, you can transplant them outdoors in your garden or in containers. Planting Potato Tubers To plant potato tubers, you need to cut them into pieces, each with at least one eye.You can do this a few days before planting to let the cut surfaces heal and prevent rotting. Alternatively, you can plant whole small potatoes with several eyes.To prepare the soil, you need to loosen it and add some organic matter, such as compost or manure.  You also need to make sure the soil is well-drained and slightly acidic, with a pH of 5.0 to 6.0.You can use a soil test kit to check the pH level and adjust it with lime or sulfur if needed. Planting Potato Pieces To plant the potato pieces, you need to dig a trench about 4 inches deep and 12 inches wide.Place the pieces about 12 inches apart, with the eyes facing up.Cover them with 3 inches of soil and water well.As the plants grow, you need to hill up the soil around them to cover the lower stems and prevent the tubers from being exposed to sunlight, which can turn them green and bitter.You can also mulch the soil with straw, leaves, or grass clippings to retain moisture and suppress weeds. How to Care for Your Potato Plants? The second step in how to harvest potatoes is to care for your potato plants. You need to water them regularly, especially during dry spells, to keep the soil moist but not waterlogged. You also need to fertilize them every two weeks with a balanced organic fertilizer, such as fish emulsion or seaweed extract. Also, you can add some wood ash or bone meal to provide extra potassium and phosphorus, which are essential for tuber formation. You also need to protect your potato plants from pests and diseases, which can reduce your yield and quality. Some of the common potato pests are: Colorado potato beetles, which are yellow and black striped insects that feed on the leaves and can defoliate the plants. You can handpick them and drop them in a bucket of soapy water, or use an organic insecticide, such as neem oil or pyrethrin. Potato leafhoppers, which are small, green, winged insects that suck the sap from the leaves and cause them to curl and yellow. You can spray them with a strong jet of water, or use an organic insecticide, such as garlic or hot pepper spray. Wireworms, which are thin, brown, worm-like larvae that bore into the tubers and cause holes and tunnels. You can trap them with pieces of carrot or potato buried in the soil, or use beneficial nematodes, which are microscopic worms that parasitize and kill the wireworms. Common Potato Diseases One of the most common reasons why a potato cannot grow or survive is the diseases. If you were wondering what some of these can be and how to deal with them, I have you covered! Some of the common potato diseases are: Late Blight: It is a fungal disease that causes brown spots on the leaves and stems, and black or brown lesions on the tubers. It can spread rapidly and destroy the entire crop. You can prevent it by planting resistant varieties, avoiding overhead watering, and removing any infected plants and tubers. You can also use a fungicide, such as copper or sulfur, as a preventive measure. Scab: This is a bacterial disease that causes rough, corky patches on the tubers. It does not affect the taste or edibility of the potatoes, but it reduces their appearance and storage quality. You can prevent it by planting resistant varieties, maintaining a slightly acidic soil pH, and avoiding excessive nitrogen fertilization. Potato Virus Y: Lastly, this is a viral disease that causes mosaic patterns, mottling, or yellowing on the leaves, and misshapen or knobby tubers. It can reduce the yield and quality of the potatoes, and it can be transmitted by aphids or infected seed potatoes. You can prevent it by planting certified virus-free seed potatoes, controlling aphids, and removing any infected plants and tubers. How to Determine When Your Potatoes Are Ready to Harvest? The third step in how to harvest potatoes is to determine when they are ready to harvest. This depends on the type and variety of potatoes you planted, and the size and maturity you want.There are two main types of potatoes: early and late.Early potatoes are ready to harvest in about 10 to 12 weeks (about 3 months) after planting, and they produce small to medium-sized tubers that are tender and thin-skinned. They are best for boiling, steaming, or roasting. Late potatoes are ready to harvest in about 15 to 20 weeks (about 4 and a half months) after planting, and they produce large, starchy tubers that are firm and thick-skinned. They are best for baking, mashing, or frying. Early Harvesting To harvest early potatoes, you can start digging them up when the plants begin to flower, or when the lower leaves start to yellow.You can use a garden fork or a spade to gently lift the plants and tubers from the soil, or you can use your hands to feel for the tubers under the soil.You can harvest as many or as few potatoes as you need, and leave the rest in the ground until you are ready to use them.You can also harvest some of the young, tender leaves and stems, which are edible and nutritious. Late Harvesting To harvest late potatoes, you need to wait until the plants have died back completely, or until the first frost.This allows the tubers to develop a thicker skin, which helps them store better.You can use a garden fork or a spade to dig up the entire row of plants and tubers, or you can use a potato digger, which is a special tool that lifts and separates the tubers from the soil.You need to be careful not to damage or bruise the tubers, as this can cause rotting or spoilage. How to Dig Up, Cure, and Store Your Potatoes? The final step in how to harvest potatoes is to dig up, cure, and store your potatoes. This is important to preserve the quality and shelf life of your potatoes, and to prevent them from sprouting, rotting, or shrinking. Here are the steps to follow: Digging Up After digging up your potatoes, you need to brush off any excess soil and remove any damaged, diseased, or green tubers.Do not wash your potatoes, as this can remove the protective skin and invite bacteria and fungi. You can wash them just before cooking or eating them. Curing You need to cure your potatoes for about two weeks in a cool, dark, and well-ventilated place, such as a basement, garage, or shed.This allows the skin to harden and heal any minor cuts or bruises and enhances the flavor and texture of the potatoes.The ideal temperature for curing is between 50°F and 60°F, and the ideal humidity is between 80% and 90%.You can spread your potatoes in a single layer on a newspaper, cardboard, or wooden crate, and avoid exposing them to light, which can turn them green and bitter. Storing You need to store your potatoes in a cool, dark, and dry place, such as a cellar, pantry, or closet. The ideal temperature for storage is between 40°F and 50°F, and the ideal humidity is between 65% and 70%.You can store your potatoes in paper bags, cardboard boxes, mesh bags, or wooden crates, and check them regularly for any signs of sprouting, rotting, or shriveling.You can also store your potatoes in a root cellar, which is an underground or partially underground structure that maintains a constant temperature and humidity.Additionally, you can also store your potatoes in a clamp, which is a mound of straw, hay, or leaves covered with soil, that insulates and protects the potatoes from frost and rodents. Wrapping It Up! If you want to know about how to harvest potatoes, I hope that this blog has been of help to you. However, if there are any other queries related to the same, please feel free to let me know.All that you need to do is scroll down till you reach the bottom of the page. Then leave your comments and suggestions in the box below. And I will be there to answer them all for you!Read Also:How to Harvest Lettuce: A Step-by-Step Guide for Fresh and Crispy SaladsEverything You Need To Know About Harvesting Basil!Asparagus 101: When, How, And How Often To Harvest?

READ MOREDetails
Baked Chicken Thighs Recipe

Garlic Butter Baked Chicken Thighs Recipe

These days, all the love goes to boneless skinless chicken breasts. Maybe because they cook quickly, they are healthy and they are cheap. Baked Chicken Thigh Recipe is very delicious. How about making a case for skin-on bone-in chicken thighs, because honestly, they are all-around better. Thighs are better because they contain more fat and as you know fatter means more flavor. Skin-on together with dark meat is a bit more extra fat, which makes a huge difference in the flavor. Is there really any delicacy more delicious than a crispy chicken skin?Chicken thighs are not difficult in cooking, but compared to chicken breasts, they need a little more style especially if you want to bake them. Just follow the below simple rules and you will never have to sit through a single boring chicken dinner. Baked Chicken Thigh Recipe Procedure You Need To Follow  Pat the chicken thighs dry: This easy procedure makes a big difference when going through a garlic butter baked chicken thigh recipe because while baking, moisture forms steam that will provide you pale, flabby skin rather than delicious golden skin. Pick up a couple of paper towels and dab the thighs on each side. Let the chicken thighs come to room temperature: Placing out your chicken thighs to reach room temperature delivers huge things as the end result. Basically, if you bake your chicken cold, the outside cooks quicker than the inside which is colder, and the outside will be overcooked by the time the piece at the center reaches up to room temperature. Basically, it is simple to overcook chicken thighs when they are cold, therefore forming dry meat. The process does not take long, so you do not need to worry. Chicken thighs are quite tiny, so they will only take about thirty minutes to arrive at room temp. If you take them out at a similar same time as you preheat the oven, you will be good to go! Generously season the thighs: In a baked chicken thigh recipe, the thighs are better when seasoned generously. Season each side using salt and remember to not season the inside. While the thigh cooks, the salt will dissolve its way inside it, thus entirely flavoring every piece. Salt assists the meat in maintaining its moisture, making the thighs more juicy and plumper. Garlic Butter Baked Chicken Thigh RecipeIngredientsOne unsalted butter maintained at room temperature One lemon zest Ground black pepper Five minced cloves garlic Kosher salt One tablespoon freshly chopped parsley, for garnish One tablespoon fresh thyme leaves One lb. quartered baby potatoes Three lb. bone-in, skin-on chicken thighs One lemon, slit into roundsGarlic Butter Baked Chicken Thigh RecipeDirections:Preheat your oven up to 425 degrees and pat the chicken thighs dry using a paper towel. Season the meat using pepper and salt. Stir thyme, lemon zest, garlic, and butter together inside a medium bowl. Rub the butter mixture on the chicken thighs. Put chicken thighs, potatoes and lemon rounds inside a 9"-x-13" baking dish. Bake the thighs until it registers 160°F on an instant-read thermometer, about thirty-five minutes.Read Also:7 Surprising Benefits Of Alkaline Foods 6 Tips To Improve Your Cooking Overnight 10 Best Protein Shake Recipes For Weight Loss

READ MOREDetails
Caviar

What Spoon To Use For Caviar?

When preparing starters, salads, and other dishes using delicacies, it is necessary to remember the taste qualities and the rules of serving and etiquette.The rules of the caviar club https://bestercaviarstore.com/pages/caviar-club state that it is crucial to choose the right spoon so as not to spoil the taste of the exquisite dish.It is necessary to take into account the material of the tableware. For example, metal items have a characteristic flavor that spoils the delicacy. Bester Caviar experts will recommend the best caviar spoon material, considering all the features.Why avoid using a metal spoon to eat caviar?It is better to refuse such utensils because they will interfere with the taste of caviar. Especially when it comes to a device made of one material.There are often spoons with a high concentration of the following metals:nickel;silver;bronze;aluminum.All of them are not suitable for specialty products. For example, cookware made of alloys will not affect the taste. However, there are more suitable materials for such products. The main problem with caviar metal spoons is oxidation.As a result, there is a change in the structure of the product on a chemical level. A delicacy is a very sensitive ingredient. Such transformations will have a negative impact not only on the taste but also on the structure. That is why tasters never use silverware.Types of Caviar Spoons to UseEven the most expensive silverware is not suitable for tasting. Furthermore, using such utensils when serving delicacies is considered a violation of etiquette.Therefore, it is better to opt for appropriate kitchen utensils:The turtle shell is an exclusive material that is considered very scarce. It cannot be bought in a regular cookware store. In many countries, the sale of such items is considered a violation of the law. However, such utensils were used by monarchs in the organization of receptions. Many manufacturers make analogs, creating with the help of plastic and biomaterials something similar to a tortoise shell;bullhorn is another option, inspired by the traditions of past times. It was very often used for serving the festive table, on which many delicacies appeared. The material has a discreet color has maximum durability. It is distinguished by its environmental friendliness and is considered an excellent analog of mother-of-pearl utensils;wood is a less popular option for aesthetic reasons. Wood makes the delicacies visually cheaper but does not affect their taste. Such products quickly absorb moisture. The wood is stained beforehand. Before serving the dish, it is better to oil the cutlery in caviar oil;glass – the aesthetics of this material has always attracted the attention of gourmets with its smoothness and fragility. The structure is excessively delicate, which is more of a disadvantage than an advantage. Many people are deterred from this option by the transparency of the glass;Gold is the only metal that is used when serving delicacies. This serving will allow the host to emphasize his status. Caviar will color the spoon’s surface green, indicating the original origin of the precious metal.However, there are other options.A. Mother-of-pearlSuch kitchen utensils appear on the table in movies and TV shows when a table with caviar appears in the scene. It is an original material that combines two opposites – organic and inorganic. Pearl spoon caviar is made from clam shells. The creation of a vivid contrast is another unique feature. The spoon shimmers when the grainy delicacy appears on it. Despite its smoothness, the product is characterized by maximum durability and reliability. Such cutlery will not affect the taste of the treat.B. PlasticThis option may seem too cheap to many people, especially in the context of serving with caviar. However, disposable plastic spoons are used quite often, not only in everyday life but also in expensive restaurants.First, plastic utensils are very cheap, and it is possible to give each visitor a separate spoon. After use, they are disposed of, which is quite hygienic. Secondly, plastic in no way affects the taste of the delicacy.ConclusionCaviar dishes are interesting not only for their gastronomic properties. The popularity of this delicacy testifies to the continuity of generations and respect for traditions. But, of course, everyone wants to plunge into luxury. The exquisite dish will help, but only if the table is laid correctly. Unfortunately, metal cutlery demonstrates bad taste when serving a delicacy.Read Also:Tools to Turn Unruly Seafood Into DinnerWhat dressings Are Good For Vegans – Mimi’s Laphet5 Best Vegetables You Should Try Growing In Your Garden

READ MOREDetails