









4 Essential Ways Of How To Make Your Feet Stronger

Published on: 08 June 2021 Last Updated on: 21 December 2024
Feet Stronger

The human feet are a masterpiece of engineering and a work of art that enables you to stand for long hours, walk for long distances, hop, skip and jump and follow the activities that your heart wants to follow.

Just like a sound foundation ensures that a building stands upright forever; having strong feet ensure a longer, happier, and healthier life.

However, we often tend to take our feet for granted.  Even the best of athletes focus upon building muscles legs, arms, calves, abs, and the rest of the body; but hardly anyone pays attention to the feet.

We seem to forget the fact that our feet are involved in almost every activity we do. They provide us the support and balance in almost all our bodily movements. Lack of strength in our feet is therefore bound to compromise our ability to do any physical activity; be it walking, running, jump, high-intensity sporting event, or even standing!

The Science Behind the Structure of the Feet

Before we embark upon knowing the ways about how to ensure that your feet stronger, it is important to understand the three most important aspects that dictate how strong or weak your feet are. These are -

1.The Soles 

Most of us who wear shoes all day long have very soft and tender feet soles. You would have noticed that those who spend time barefooted, have thicker soles. This makes them stronger and firmer and they are able to withstand superficial injuries as well as normal wear and tear quite easily.

2. The Joints, Muscles, And Tendrils Of The Feet 

The human foot is a very complex structure. It is made of 33 joints, 26 bones, and almost 100 ligaments! They all are designed to function in a manner that the foot can take the weight of the entire body and spread it evenly to maintain balance in all types of movement.

Strong feet not only help an efficient movement but also help in improving the posture. They also help in avoiding spinal injuries by efficiently maintaining our balance, thus cushioning the effect of any jerks.

3. Arches in the Feet 

The arches in our feet help in an efficient rolling action, which maintains the balance during movement. Sometimes the arches are not well developed, giving rise to a situation commonly known as flat feet. When someone is flat-footed, it is difficult to maintain good rolling action which in turn leads to a lower range of action consequently lowering strength as well as speed.

How to Make Your Feet Stronger

Most of us are blessed with well-shaped feet that can take the rigors of our daily life and all the activities we undertake, but often we tend to neglect our feet and suffer the consequences by way of loss of strength as well as suffer from early aging symptoms. It is but natural that if the feet are weak, a person's mobility will be restricted and he will do fewer activities. This would have an adverse effect on overall health. On the other hand, if a person is active,  some of the drawbacks of being flat-footed can be overcome.

Here are some of the ways of how to make your feet stronger -

Exercises

image003

By consciously spending some time doing the following specific exercises is the best way to make your feet stronger –

  1. Caterpillar Type Movement – (Benefit- Strengthens the arches)

Lie down on your back, draw your knees and place the feet flat on the floor about 8 inches away from each other. Then lift the arches of both the feet and simultaneously pull your toes backward toward the heels. Keep this position for a few seconds and bring back the arches and toe to their original position. Then do the reverse- arches up and heels toward the toes. Repeat this set three to five times.

  1. Windshield Wiper Movement – (Benefit- Strengthens the entire foot and improves ankle stability)

In continuation with the caterpillar type movement exercise listed above, lift the toes, keeping the feet flexed while only the heels are touching the floor. Then slowly roll your feet to the ground and lift the heels keeping only your toes are on the ground. Repeat 8-10 times.

  1. Wing and Sickle Movement - (Benefit - Strengthens the ankles and promotes correct posture)

Continue lying down as above and roll your feet inward along the inner edge in line with the toe, then roll outwards in line with a small finger. Do this 3-5 times.

  1. The Round Knot Movement - (Benefit - Stretches the ligaments and aids foot alignment)

Sit upright on the floor and extend your legs in front. Bend the left knee towards yourself and interlace the fingertips of the right hand with the left toes. Inch them forward and backward giving the foot a stretch. Repeat 6-8 times. Then do the same with the other foot.

Toughening up Your Feet

There are many other ways of how to make your feet stronger.

  • Stand More Often Our daily life is mostly based on sitting. Be it office or home, we spend the day sitting. Consciously standing more often would help strengthen and stretch the muscles of the feet.
  • Jogging/Walking on the Sand If you have access to a sandy beach, try walking or running gently on the sand. This would increase the flexibility and strength in your feet and exercise the arch.
    Read also: Why Jumping on Trampolines is More Beneficial than Running or Jogging?
  • Walking Barefoot Crazy as it may appear, walking on smooth rocks can do wonders for your feet' strength. Walking barefoot on grass is equally effective as it toughens up the feet soles and makes the feet stronger.

Using Shoes With Insoles
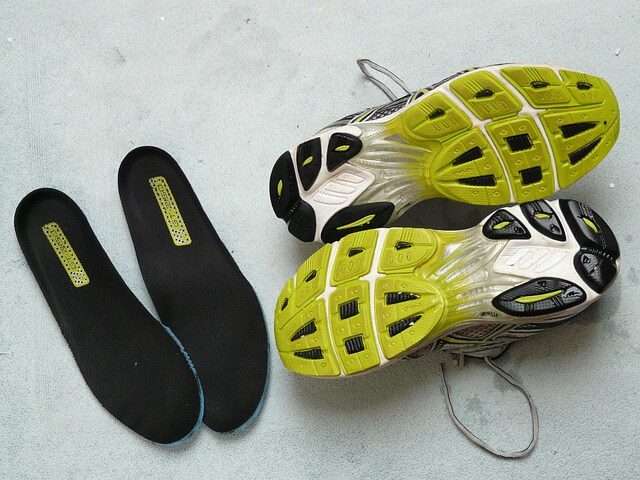
image004

Insoles were traditionally used for making short people appear taller. These days however they are scientifically designed for multiple functions and assist in skiing, biking, golf, etc.

Using best insoles for flat feet ensures not only physical comfort but also improves efficiency and performance in all your multifarious activities.

Even those who suffer from other ailments like Morton’s Neuroma and plantar fasciitis can benefit by using the best insoles for flat feet and carry out all activities normally.

Go On, Focus On Your Feet!

If you want to enhance your control, balance, and power, it is important to start focusing on strengthening your feet.

It will also make you agile with better control of movement. Following these simple tips in your daily routine can put you on the way to balanced, more powerful, and stronger feet in a matter of a few days!

Read also: Get up and Workout! Things to Consider


Abdul Aziz Mondol is a professional blogger who is having a colossal interest in writing blogs and other jones of calligraphies. In terms of his professional commitments, he loves to share content related to business, finance, technology, and the gaming niche.

View all posts

Leave a Reply

Your email address will not be published. Required fields are marked *

Related

Migraine

4 Pillars Of Relief: Canadian Migraine Medication Insights

Migraines are debilitating headaches that affect millions of Canadians, significantly impacting their daily lives. These intense headaches can be accompanied by nausea, vomiting, and sensitivity to light and sound, making it difficult to function normally. Luckily, various migraine medications are available in Canada, offering hope for relief and improved quality of life. 1. Acute Migraine Relief The primary goal of acute migraine medication is to stop the headache in its tracks and alleviate associated symptoms as quickly as possible. Here are some commonly used options in Canada: Nonsteroidal Anti-Inflammatory Drugs (NSAIDs): Over-the-counter pain relievers like ibuprofen and naproxen are often the first defense against mild to moderate migraines. They work by reducing inflammation and pain. Triptans: These prescription medications are specifically designed for migraine relief and target various mechanisms involved in migraine attacks. They are highly effective but have potential side effects like dizziness and nausea. DHE (Dihydroergotamine): Another prescription medication, DHE, constricts blood vessels and reduces inflammation, relieving moderate to severe migraines. However, it comes with stricter usage guidelines and potential side effects. 2. Preventive Migraine Medication For individuals experiencing frequent or severe migraines, preventive medication can be a game-changer. These medications aim to reduce the frequency, intensity, and duration of migraine attacks. Here are some common options: Beta-blockers: Primarily used for blood pressure control, beta-blockers can also be an effective medicine to prevent migraines. They work by regulating heart rate and blood vessel activity. Antidepressants: Low doses of certain antidepressants can be helpful in preventing migraines, although the exact mechanism of action remains unclear. Calcium channel blockers: These medications, primarily used for treating high blood pressure and heart disease, can also be used for migraine prevention by affecting blood vessel function. CGRP (calcitonin gene-related peptide) monoclonal antibodies: These new and innovative medications target CGRP, a molecule in migraine pain pathways. They are highly effective for chronic migraines but come with a higher cost and require injection or infusion. 3. Complementary and Alternative Therapies (CAM) While not a substitute for conventional medication, some complementary and alternative therapies might offer additional support in managing migraines. These include: Acupuncture: The conventional Chinese medicine practice or acupuncture includes inserting very thin needles into some parts of the body. Studies suggest acupuncture might be effective in reducing migraine frequency. Massage therapy: Massage therapy can help relieve muscle tension, which can trigger some migraines. Biofeedback: This therapy teaches individuals to control their physiological responses, including stress and others, which might contribute to migraines. Dietary changes: Identifying and avoiding food triggers like cheese, chocolate, and alcohol can be helpful for some migraine sufferers. 4. Self-Management Strategies Beyond medication and alternative therapies, individuals can play a crucial role in managing their migraines by practicing self-management strategies. These include: Identifying and avoiding triggers: Recognizing and avoiding factors that trigger migraines, such as stress, certain foods, lack of sleep, or hormonal changes, can significantly reduce their occurrence. Maintaining a healthy lifestyle: Regular exercise, a balanced diet, and adequate sleep are essential for overall health and can reduce migraine frequency and severity. Relaxation techniques: Practicing relaxation techniques like meditation, deep breathing exercises, and yoga can help manage stress and tension, which can trigger migraines. Keeping a headache diary: Recording details about migraine attacks, including triggers, symptoms, and medications, can help identify patterns and inform treatment decisions. Navigating Migraine Medication in Canada: What You Need to Know Finding the right migraine medication is an individual journey, and it's essential to consult with a healthcare professional to discuss your specific needs and medical history. Here are some additional points to remember: Prescription vs. Over-the-counter: While some medications are available over-the-counter, others require a prescription from a doctor. Side effects: All medications have potential side effects, and it's crucial to understand these and discuss them with your doctor before starting any medication. Drug interactions: Certain medications can interact, potentially causing adverse effects. Ensure your doctor knows all medications you are taking, including over-the-counter drugs and supplements. Cost considerations: The cost of medication can vary significantly, and some insurance plans may not cover all costs. Discuss this with your doctor and explore potential cost-saving options. Seeking Support and Building a Management Plan Managing migraines effectively requires exploring medication options and building a comprehensive management plan with external support. Here are key steps to empower yourself: 1. Seek Professional Guidance: Consult your doctor: They are your primary resource for diagnosis, treatment recommendations, and progress monitoring. Consider a neurologist: For complex or chronic migraines, consulting a neurologist specializing in headaches can provide additional expertise and treatment options. Join a support group: Connecting with others who understand the challenges of migraines can offer valuable emotional and practical support. 2. Develop a Personalized Plan: Work with your doctor: Collaborate to create a treatment plan that addresses your specific needs, considering medication options, lifestyle modifications, and complementary therapies. Track your progress: Keep a headache diary to record details of your migraines, including triggers, symptoms, and medications used. This information can be vital in identifying patterns and adjusting your plan as needed. Set realistic goals: Focus on achievable goals, such as reducing migraine frequency or managing daily activities effectively. Celebrating small successes can boost motivation and maintain a positive outlook. 3. Prioritize Self-Care: Manage stress: Practice relaxation techniques like meditation, deep breathing, or yoga to combat stress, a common migraine trigger. Maintain a healthy lifestyle: Prioritize regular exercise, a balanced diet of fruits, vegetables, whole grains, and adequate sleep. These lifestyle factors contribute significantly to overall well-being and can help manage migraines. Build resilience: Focus on activities that bring you joy and a sense of purpose. Maintaining a positive outlook and prioritizing self-care can improve your overall well-being and resilience in managing migraines. Conclusion: Building a Brighter Future with Migraine Management Living with migraines can be challenging, but with the right approach and support, individuals can effectively manage their condition and reclaim their quality of life. Remember, you are not alone on this journey. Visit their website. They offer a variety of evidence-based and Health Canada-approved products, including Pascoe Migraine Relief, which can be a valuable addition to your migraine management plan. It's crucial to remember that finding effective migraine management is a collaborative effort. By working closely with your doctor, exploring various treatment options, and implementing self-management strategies, you can build a personalized plan that empowers you to live a life less limited by migraines. Together, we can turn the tide on migraines and build a brighter future for individuals living with this condition. Read Also: Fast-Track Recovery: Exploring The Healing Powers Of IV Drip Hydration When You Need To Go To A Chiropractor: Here’s What Experts Say Enhancing Your Smile With Cosmetic Dentistry In London

READ MOREDetails
Investing in Dexcom G6

Investing In Dexcom G6: Financial Considerations For Caregivers

Caring for a loved one with diabetes is a significant responsibility that comes with various challenges, including managing the financial aspects of their healthcare. The Dexcom G6 continuous glucose monitoring system offers an advanced solution for diabetes management, but caregivers need to carefully consider the associated costs. In this article, we will explore the financial considerations that caregivers should take into account when contemplating the use of the Dexcom G6 system. Understanding The Dexcom G6 System The Dexcom G6 is a revolutionary device that provides continuous glucose monitoring for individuals with diabetes. It offers real-time information about blood sugar levels, allowing for better management and timely interventions. This technology not only improves the quality of life for those with diabetes but also brings significant peace of mind to caregivers. Initial Costs And Essential Components When considering the Dexcom G6 system, caregivers need to factor in the initial costs. These costs include acquiring the transmitter, receiver, or compatible smartphone, as well as the sensors that attach to the skin to measure glucose levels. While the upfront expense might seem substantial, it's crucial to view it as an investment in better diabetes management and long-term health outcomes. Ongoing Sensor Expenses One of the ongoing costs associated with the Dexcom G6 system is the need for sensor replacement every 10 days. This regular replacement cycle ensures accurate and reliable glucose monitoring. Caregivers should be prepared for these recurring costs and budget accordingly. Insurance Coverage And Reimbursement Many insurance plans provide coverage for medical devices like the Dexcom G6 system. Caregivers should thoroughly review the loved one's insurance policy to understand the extent of coverage and the reimbursement process. Engaging in discussions with insurance providers and healthcare professionals can help clarify the financial aspect and ensure optimal coverage. Exploring Financial Assistance Programs Caregivers should be aware that there are financial assistance programs available to help manage the costs of the Dexcom G6 system. Research and inquire about organizations, foundations, and patient assistance programs that offer support to individuals with diabetes. These programs can provide much-needed relief from the financial burden. Weighing Long-Term Benefits And Short-Term Costs While the financial considerations of using the Dexcom G6 system are significant, caregivers must also evaluate the long-term benefits. Improved glucose management can lead to fewer hospitalizations, reduced complications, and enhanced overall well-being for loved ones with diabetes. Caregivers should approach the costs as an investment in long-term health outcomes. Open Communication And Financial Planning Transparent communication with healthcare providers is crucial for caregivers. Discussing financial concerns, insurance coverage, and available assistance programs can offer valuable insights and guidance. Healthcare professionals can help caregivers effectively integrate the Dexcom G6 system into their loved one's diabetes management plan while taking the financial aspect into account. Conclusion Choosing to invest in the Dexcom G6 system involves more than just considering the financial implications; it's about investing in the health and well-being of a loved one with diabetes. While the costs associated with the system are a legitimate concern, the potential benefits in terms of improved glucose management and enhanced quality of life cannot be overlooked. By carefully considering the Dexcom G6 cost and exploring financial assistance options, caregivers can make informed decisions that prioritize their loved one's health and provide peace of mind for both themselves and their loved ones. Read Also : Unhealthy And Healthy Solutions For Coping With Stress 8 Fitness Hacks That Will Make Your Life Better

READ MOREDetails
wall pilates free

An Ultimate Wall Pilates Free Workout Plan for Beginners

To start your Pilates workout, all you need is a wall. With wall Pilates free workout, you can blend traditional Pilates with home exercise. This workout can be helpful for you whether you are a beginner in Pilates or have been practicing Pilates for a few years. Consider starting out with wall Pilates if you want to transform your fitness journey. In this article, you will get a Wall Pilates workout plan. Apart from that, you will also get a general overview of what a wall Pilates exercise is as well as its benefits. Moreover, this article will also set a Wall Pilates free workout plan. Finally, you will also get essential tips to perform this exercise. Hence, to learn more, read on to the end of the article. What is Wall Pilates? Wall Pilates is a form of Pilates training. It is a low-impact exercise where you have to use a wall for support and resistance. Basically, the wall provides support for your back, shoulder, and hips. Hence, you can use it as a resistance to perform exercise. Generally, when you perform traditional Pilates, you have to exercise on a mat or a reformer machine. Here, you use your body weight or the machine for resistance. However, with wall Pilates, you press your body and its parts against a wall. You make movements by exerting force on the wall and by using it as a support. Actually, in this exercise, you have to do the same repetitive movements that you practice during a mat. Some examples of wall Pilates are single-leg stretch, criss-cross, the hundred, etc. Benefits of Wall Pilates Free Hand Exercises The following are some of the major benefits of Wall Pilates that you must: By performing wall Pilates daily, you can strengthen your core muscles. As a result, this will help you prevent injuries and maintain a good posture. With time, you will improve your flexibility with wall Pilates. Additionally, it also helps you to improve your coordination and balance. As you are using a wall for your support, the stable surface can help you maintain the right form. Thereby, with time, you will get a better spinal alignment, which will ensure a lower risk of injury. With wall Pilates, you engage your full body for the exercise. This way, you can target all muscle areas of the body. Moreover, Wall Pilates free hand exercises are also effective in reducing blood pressure. Hence, if you do it regularly, you lower your risk of heart attacks and strokes. Wall Pilates also involves mindful movement, which can help you work on your mental health. People of all ages and fitness levels can perform wall pilates. This is because it is a low-impact exercise. Apart from all these benefits, one of the biggest factors to consider Wall Pilates is that it is a budget-friendly exercise. All you require here is a wall. Who is Wall Pilates Good for? Since Wall Pilates is a low-impact exercise, it will not be physically demanding and exhausting. Hence, this form of exercise is good for people of all ages and fitness levels. Moreover, this exercise is also good for pregnant and injured people. Furthermore, if you are someone who finds it difficult to lie on your back, you can even do Wall Pilates. Generally, traditional Pilates, like mat or reformer Pilates, are difficult to perform. This is especially true for people who have physiological issues or injuries. Hence, if you want to perform a light exercise to stay fit, Wall Pilates is one of the best options to consider. 15-Minute Wall Pilates Free Hand Workout To start a Wall Pilates workout, you need an open wall and a yoga mat. Here are the steps you must follow to perform your Wall Pilates workout: Start your warmup with a Cat-Cow pose and Thread-the-Needle stretch. Warm up for 2-3 minutes. Once you complete your warmup, start your wall Pilates exercise. Here, make sure to have consistency with the reps for each move. Once you complete the five Pilates exercises, repeat the circuit twice more. The next section consists of 5 back-to-back exercises that you must perform in each circuit. 5 Wall Pilates Free Hand Exercises Here are the Wall Pilates exercises you must perform to complete each circuit: 1. Single-Leg Knee Crunch The following are the steps to follow if you want to perform a single-leg knee crunch: Sit one foot away from the wall. Then, lie down on your back. After that, place your feet on the wall so that your legs look like a tabletop, horizontally. Stretch your left leg diagonally so that your toes are just touching the wall. Then, extend your arms over your head. Meanwhile, be sure to press your lower back into the floor. This way, you can engage your core. Pull your left knee toward your chest and curl your shoulders, hands, and your head towards your core. Then, slowly, go back to the initial position. Repeat these fifteen times to complete one set. 2. Wall Bridge and Calf Raise The following are the steps to follow if you want to perform the wall bridge and calf raise exercise: Sit one foot away from the wall. Then, lie down on your back. After that, place your feet on the wall so that your legs look like a tabletop, horizontally. Press your feet on the wall. This way, you can engage your glutes and your hamstring. Then, lift your hips off the floor. However, do not arch your back in the process. Moreover, when your body makes a straight line from the knees to the shoulder, lift your heels for a calf raise. This will balance out the movement. Then, return to the starting position to complete one rep. Repeat these fifteen times to complete one set. 3. Reach Backs The following are the steps to follow if you want to perform reach-backs: Start with a high plank by pressing your feet on the edge of the wall. Here, ensure to keep your feet apart by shoulder-width. Also, be sure to place your shoulders directly over your wrists. Moreover, your body must be in a straight line from your heels to your shoulder. Use it as your starting position. Then, lift your hips up. When you are lifting up, touch your left foot with your right hand. Then, come back to the starting position. Do the same with your left hand by touching your right foot. Again, come back to the starting position. Make sure to repeat this 10 times for one set. 4. Marching Bridge The following are the steps to follow if you want to perform a marching bridge: Sit one foot away from the wall. Then, lie down on your back. After that, place your feet on the wall so that your legs look like a tabletop, horizontally. Then, press your feet to lift your hips off the floor. Here, make sure to form a straight line from your knees to your shoulder. However, make sure not to arch your back. Consider this as your starting position. Then, lift your left foot and bring your knee toward your chest. Meanwhile, make sure to keep your hips still. Here, maintain the same bend in your knee and stop when your thigh is at a right angle to your torso. Then, come back to your starting position by reversing the movement. This is one rep. By performing 10 reps, you complete one set of the marching bridge. 5. Wall Sit and Calf Raise The following are the steps to follow if you want to perform the wall sit and calf raise exercise: Become a human chair: Stand with your back against a wall and take your feet about a foot forward. Then, lower your hips down to a position such that your knees are perpendicular to your hips. Also, make sure your ankle is perpendicular to your knees. Then, extend your arms horizontally so that it is perpendicular to your torso. This is your starting position. Hold the squat position to raise your arms, and reverse the movement to the starting position. Simultaneously, raise your heels to do a calf raise and reverse the movement. This is one rep. Perform 12 reps to complete one set of Wall Sit and Calf Raise. Tips for Effective Wall Pilates Practice Here are some useful tips if you want to perform Wall Pilates free hand exercises effectively: Don’t over-exert yourself with your exercises. Basically, start with simple exercises and gradually increase your intensity. Make sure to breathe steadily and have control of your breathing. Use good-quality mats to support your back and hips. There is no substitute for a professional instructor. Hence, consult with an instructor to perform your exercises correctly. Do you have more suggestions on how to perform Wall Pilates free hand exercises? Please share your experiences and opinions in the comments section below.

READ MOREDetails