Published on: 04 May 2020
Last Updated on: 23 January 2023
Whether you make cakes for friends and family or run a business supplying cakes for celebrations, you’ll know how much work goes into making each and every one of your creations. That’s why it’s so important to package your cakes in a way that keeps them in perfect condition, so they can be taken home by the customer or delivered to a venue without getting squashed or the decorations getting ruined. Here are some tips to help you properly pack your cakes.
Here are The Best Ways Cake Makers Can Pack Their Cakes:
1. Use cake boxes
Those who are serious about running a cake business should consider looking for wholesale cake boxes, which are a good way of packing up your treats. You need to ensure you get the right size box for the best results. A box that is too big will mean the cake can move around and get damaged, but you should leave a little extra space to be able to take the cake in and out of the box.
Also, consider the kind of products you’re selling and what type of box would work best. For example, you can buy boxes for cupcakes, individual slices, and even wedge-shaped boxes for bakeries that offer takeaways.
Presentation is key when it comes to cakes. If you’re selling cakes that are given as gifts, choose boxes with windows so the product can be seen, and consider using decorative touches such as bows.
2. Secure cakes for transport
It’s also important to make sure cakes are secure when you pack them, as they are likely to be transported in a car or carried around. You should use a cake board, which can be decorated nicely for a professional finish, as this will stop the cake from rattling round in the box.
3. Transport cakes carefully
If you are delivering the cake yourself, here are some ways you can keep it looking good:
Never stack a tiered cake before you put it in your car or van – put each tier in separate boxes then stack at the venue
Place the box on a flat surface, for example, in the boot of your car
Make sure there aren’t any other objects in the boot that could squash your cake
Use a non-slip surface such as a yoga mat underneath the cake box
Drive carefully and avoid sudden braking
4. Finish off the cake box with decorations
While a plain cake box is nice and neat and professional, you may also want to add some decorative touches, especially if you’re making themed seasonal cakes. For example, during the Christmas period, you could add a red bow or sprig of holly, or during the wedding season, you could add a trim of lace. This will just finish off the presentation and make sure it looks special.
When it comes to making cakes, presentation is everything, so it’s worth spending a little more to get high-quality boxes and ensuring things like cake boards are used, so when the cake arrives at the customer’s home, everything is perfect.
Mashum Mollah is the feature writer of Search Engine Magazine and an SEO Analyst at Real Wealth Business. Over the last 3 years, He has successfully developed and implemented online marketing, SEO, and conversion campaigns for 50+ businesses of all sizes. He is the co-founder of Social Media Magazine.
If there is something that I have learned in life, it is about gardening. Well, almost everything if not all. And if there is one thing that took me some time to master, it was knowing how to harvest potatoes at home!
Potatoes are one of the most versatile and popular vegetables in the world. They can be cooked in many different ways, such as boiled, baked, fried, mashed, or roasted. Moreover, they are also rich in carbohydrates, fiber, vitamin C, potassium, and antioxidants.
But how do you grow and harvest your own potatoes at home? You see, potatoes are not like cilantro or other plants. These are tubers.
In this article, I will show you everything you need to know about how to harvest potatoes, from planting to storage.
So, if that is something that you are interested in knowing, then I have you covered! Keep on reading this blog till the end to learn more...
How to Plant Potato Seeds or Tubers?
The first step in how to harvest potatoes is to plant them. You can start with either potato seeds or tubers. Potato seeds are small, round, and black, and they are usually sold in packets.
Potato tubers are the actual potatoes that you eat, and they have eyes or buds that can sprout new plants.
You can buy certified seed potatoes from a nursery or garden center, or use organic potatoes from the grocery store.
Here are some if the steps that you must take to plant them:
Planting Potato Seeds
To plant potato seeds, you need to sow them indoors in pots or trays filled with moist potting soil.
Place them in a sunny spot and keep the soil moist but not soggy.
The seeds will germinate in about two weeks and produce small green shoots.
When the shoots are about 3 inches tall, you can transplant them outdoors in your garden or in containers.
Planting Potato Tubers
To plant potato tubers, you need to cut them into pieces, each with at least one eye.
You can do this a few days before planting to let the cut surfaces heal and prevent rotting. Alternatively, you can plant whole small potatoes with several eyes.
To prepare the soil, you need to loosen it and add some organic matter, such as compost or manure.
You also need to make sure the soil is well-drained and slightly acidic, with a pH of 5.0 to 6.0.
You can use a soil test kit to check the pH level and adjust it with lime or sulfur if needed.
Planting Potato Pieces
To plant the potato pieces, you need to dig a trench about 4 inches deep and 12 inches wide.
Place the pieces about 12 inches apart, with the eyes facing up.
Cover them with 3 inches of soil and water well.
As the plants grow, you need to hill up the soil around them to cover the lower stems and prevent the tubers from being exposed to sunlight, which can turn them green and bitter.
You can also mulch the soil with straw, leaves, or grass clippings to retain moisture and suppress weeds.
How to Care for Your Potato Plants?
The second step in how to harvest potatoes is to care for your potato plants. You need to water them regularly, especially during dry spells, to keep the soil moist but not waterlogged. You also need to fertilize them every two weeks with a balanced organic fertilizer, such as fish emulsion or seaweed extract. Also, you can add some wood ash or bone meal to provide extra potassium and phosphorus, which are essential for tuber formation.
You also need to protect your potato plants from pests and diseases, which can reduce your yield and quality. Some of the common potato pests are:
Colorado potato beetles, which are yellow and black striped insects that feed on the leaves and can defoliate the plants. You can handpick them and drop them in a bucket of soapy water, or use an organic insecticide, such as neem oil or pyrethrin.
Potato leafhoppers, which are small, green, winged insects that suck the sap from the leaves and cause them to curl and yellow. You can spray them with a strong jet of water, or use an organic insecticide, such as garlic or hot pepper spray.
Wireworms, which are thin, brown, worm-like larvae that bore into the tubers and cause holes and tunnels. You can trap them with pieces of carrot or potato buried in the soil, or use beneficial nematodes, which are microscopic worms that parasitize and kill the wireworms.
Common Potato Diseases
One of the most common reasons why a potato cannot grow or survive is the diseases. If you were wondering what some of these can be and how to deal with them, I have you covered!
Some of the common potato diseases are:
Late Blight: It is a fungal disease that causes brown spots on the leaves and stems, and black or brown lesions on the tubers. It can spread rapidly and destroy the entire crop. You can prevent it by planting resistant varieties, avoiding overhead watering, and removing any infected plants and tubers. You can also use a fungicide, such as copper or sulfur, as a preventive measure.
Scab: This is a bacterial disease that causes rough, corky patches on the tubers. It does not affect the taste or edibility of the potatoes, but it reduces their appearance and storage quality. You can prevent it by planting resistant varieties, maintaining a slightly acidic soil pH, and avoiding excessive nitrogen fertilization.
Potato Virus Y: Lastly, this is a viral disease that causes mosaic patterns, mottling, or yellowing on the leaves, and misshapen or knobby tubers. It can reduce the yield and quality of the potatoes, and it can be transmitted by aphids or infected seed potatoes. You can prevent it by planting certified virus-free seed potatoes, controlling aphids, and removing any infected plants and tubers.
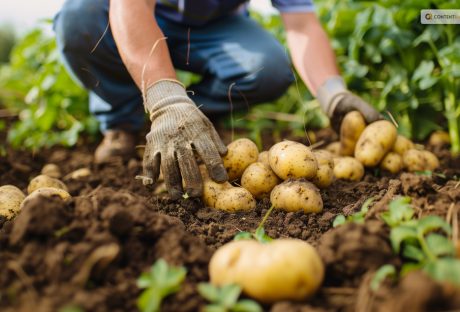
How to Determine When Your Potatoes Are Ready to Harvest?
The third step in how to harvest potatoes is to determine when they are ready to harvest. This depends on the type and variety of potatoes you planted, and the size and maturity you want.
There are two main types of potatoes: early and late.
Early potatoes are ready to harvest in about 10 to 12 weeks (about 3 months) after planting, and they produce small to medium-sized tubers that are tender and thin-skinned. They are best for boiling, steaming, or roasting.
Late potatoes are ready to harvest in about 15 to 20 weeks (about 4 and a half months) after planting, and they produce large, starchy tubers that are firm and thick-skinned. They are best for baking, mashing, or frying.
Early Harvesting
To harvest early potatoes, you can start digging them up when the plants begin to flower, or when the lower leaves start to yellow.
You can use a garden fork or a spade to gently lift the plants and tubers from the soil, or you can use your hands to feel for the tubers under the soil.
You can harvest as many or as few potatoes as you need, and leave the rest in the ground until you are ready to use them.
You can also harvest some of the young, tender leaves and stems, which are edible and nutritious.
Late Harvesting
To harvest late potatoes, you need to wait until the plants have died back completely, or until the first frost.
This allows the tubers to develop a thicker skin, which helps them store better.
You can use a garden fork or a spade to dig up the entire row of plants and tubers, or you can use a potato digger, which is a special tool that lifts and separates the tubers from the soil.
You need to be careful not to damage or bruise the tubers, as this can cause rotting or spoilage.
How to Dig Up, Cure, and Store Your Potatoes?
The final step in how to harvest potatoes is to dig up, cure, and store your potatoes. This is important to preserve the quality and shelf life of your potatoes, and to prevent them from sprouting, rotting, or shrinking. Here are the steps to follow:
Digging Up
After digging up your potatoes, you need to brush off any excess soil and remove any damaged, diseased, or green tubers.
Do not wash your potatoes, as this can remove the protective skin and invite bacteria and fungi. You can wash them just before cooking or eating them.
Curing
You need to cure your potatoes for about two weeks in a cool, dark, and well-ventilated place, such as a basement, garage, or shed.
This allows the skin to harden and heal any minor cuts or bruises and enhances the flavor and texture of the potatoes.
The ideal temperature for curing is between 50°F and 60°F, and the ideal humidity is between 80% and 90%.
You can spread your potatoes in a single layer on a newspaper, cardboard, or wooden crate, and avoid exposing them to light, which can turn them green and bitter.
Storing
You need to store your potatoes in a cool, dark, and dry place, such as a cellar, pantry, or closet. The ideal temperature for storage is between 40°F and 50°F, and the ideal humidity is between 65% and 70%.
You can store your potatoes in paper bags, cardboard boxes, mesh bags, or wooden crates, and check them regularly for any signs of sprouting, rotting, or shriveling.
You can also store your potatoes in a root cellar, which is an underground or partially underground structure that maintains a constant temperature and humidity.
Additionally, you can also store your potatoes in a clamp, which is a mound of straw, hay, or leaves covered with soil, that insulates and protects the potatoes from frost and rodents.
Wrapping It Up!
If you want to know about how to harvest potatoes, I hope that this blog has been of help to you. However, if there are any other queries related to the same, please feel free to let me know.
All that you need to do is scroll down till you reach the bottom of the page. Then leave your comments and suggestions in the box below. And I will be there to answer them all for you!
Read Also:
How to Harvest Lettuce: A Step-by-Step Guide for Fresh and Crispy Salads
Everything You Need To Know About Harvesting Basil!
When you are into bodybuilding, your primary goal is to build muscles through weightlifting and proper nutrition. Bulking is a part of the bodybuilding process. However, bulking requires proper nutrition along with weightlifting. You need to consume the best bulking foods to ensure the right nutrition.
In this article, you will learn about the best bulking foods. Here, this article will explain the key nutrients bulking nutrients and the best protein sources.
Apart from that, you will also learn about the best fat and carbohydrate sources useful for bulking. Finally, you will also get some tips for effective bulking. Hence, to learn more, read on to the end of the article.
Why Is Bulking Integral To Bodybuilding?
Generally, bodybuilding involves two phases: bulking and cutting. In the former, the goal is to gain weight and build muscles, while the latter consists in reducing body fat.
Basically, bulking is a dietary process where you consume excess calories for muscle growth and weight gain. In fact, it is a common approach that athletes and bodybuilders use to increase their strength and muscle mass.
Hence, bulking refers to an increase in calories that your body consumes when it is in the process of intense weight training.
It is the stage where you gain muscles in your body. Here, you have to consume more calories than your body needs. However, you do it for a set period of time (4-6 months).
The extra calories that you consume works as a necessary fuel for muscle growth. Moreover, it provides strength to your body through weight training.
Best Bulking Foods: A General Overview
In bulking, your focus should be to give your body more energy than it consumes, thus creating a calorie surplus.
Meanwhile, this surplus creates extra energy, with the help of which your body creates muscle mass. Moreover, this energy helps you repair damaged tissues and fuel intense workouts.
Actually, bulking is one of the most important aspects of muscle growth. This is because if you build muscles, you must provide your body with enough energy. This way, it can build and repair damaged muscle tissues after your workout.
However, just because you are bulking, it does not mean that you have to consume as much food as possible. In fact, you must choose the best bulking foods and count your macronutrients. This way, you can support your muscle growth and minimize fat gain.
Key Nutrients For Bulking
If you want to achieve a clean bulk, you have to make smart food choices. In fact, if your choice of food is poor, it will lead to “dirty bulking.” As a result, you will end up with a lot of accumulated fat and minimal muscle gain.
In fact, in healthy bulking, you must consume quality foods and minimize your fat gains. This is because your goal is to maximize your muscle gain and ensure proper metabolism.
When bulking, you must focus on protein, carbohydrates, and healthy fats. Here is a breakdown of each nutrient you need for muscle gain:
Proteins
The importance of protein in muscle growth and repair is the highest. This is because proteins are the building blocks of muscles. Hence, in your bulking phase, aim to have a higher protein intake.
Consume 1g of protein for each pound of your body weight. For example, if your body weight is 180 lbs, consume 180 grams of protein each day when you are bulking.
Some good sources of lean protein include lean meats, eggs, poultry, fish, dairy products, lentils, beans, etc.
Carbohydrates
Carbohydrates help you in providing energy for intense workouts. Also, it helps create a bulk in the muscles. Basically, carbs replenish the glycogen inside your muscles.
However, when you are bulking, take 1.5 grams of carbs for 1 lb of your weight. For example, if your body weight is 180 lbs, consume 250-270 grams of carbs daily when you are bulking.
When choosing carbs for bulking, focus on consuming complex carbohydrates. These include brown rice, whole grains, fruits, sweet potatoes, and vegetables.
Fats
Healthy fats are necessary for overall health and hormone production. Apart from that, it also helps in nutrient absorption. Hence, to consume healthy fats, you can include sources like nuts, seeds, avocados, olive oil, fatty fish, etc.
Best Protein Sources For Bulking
The following are some of the best protein sources when you are in your bulking phase:
Lean Meats: Some good sources of protein are chicken or turkey. This is because they have less saturated fat than red meat. For instance, you will get 18-25 grams of protein from 100 grams of chicken breast.
Dairy Products: Generally, Greek yogurt, cottage cheese, and milk have high protein and high calories. Hence, they help you to build muscles faster. Apart from that, cottage cheese helps you in muscle recovery and growth due to its slow and steady dissolution.
Fish and Seafood: Fishes like salmon, tuna, and shrimp are high in protein and healthy fat. Hence, you can consider consuming them from time to time.
Eggs: Eggs are a good and fast-acting source of lean protein. Also, it contains healthy cholesterol. However, do not consume the egg yolk (yellow part) more than 2 in a day as it will increase cholesterol in your body. Meanwhile, you can consume multiple egg whites of boiled eggs in a single day. In fact, this is a good source of lean protein.
Plant-Based Proteins: Plant-based proteins are lean and healthy at the same time. Some good sources of such protein are beans, lentils, tofu, and tempeh.
Protein Supplements: If you eat too much, you will feel bloated at the end of the day. Hence, you need protein supplements that will help you supplement the shortage of protein that you consume in a day. Some examples of protein supplements are whey protein, casein protein, and plant-based protein powders.
Best Carbohydrate Sources For Bulking
Here are some of the best bulking foods for carbohydrates that will help you during the bulking phase:
Sweet Potatoes: a great post-workout snack that contains nutrients and fibers. Also, it will help you restore glycogen levels in your body.
Fruits: Different types of fruits come with various nutrients and carbohydrates. Apart from that, fruits also add antioxidants to your body. For instance, a good fruit option to consume after a workout is a banana.
Whole Grains: You can find whole-grain bread and pasta helping you consume complex carbs. Generally, they contain more vitamins, fiber, and minerals. Apart from that, you can also choose brown rice to get good-quality carbs.
Legumes and Quinoa: Quinoa, beans, and lentils are excellent sources of carbohydrates.
Best Fat Sources For Bulking
Here are some of the best bulking foods for healthy fats that you can use during your bulking phase:
Nuts and Seeds: Some essential and healthy sources of fats are almonds, chia seeds, walnuts, and flaxseeds.
Oils: For instance, coconut oil, olive oil, and avocado oil are great additions when considering fat for your diet. Hence, try to use coconut oil and olive oil in your cooking. This way, you can increase healthy fats and additional calories.
Avocados: Avocadoes are rich in healthy fats and nutrients. Basically, they contain monounsaturated fatty acids that add healthy calories and fat to your diet. Also, it is a source of antioxidants and vitamin E.
Fatty Fish: Salmon, mackerel, and sardines are fatty fishes that help you remain healthy and achieve clean bulk. Also, a large dose of omega-3 fatty acids, can improve your joints and cardiovascular health.
Dairy: Full-fat yogurt and cheese help your muscle restore glycogen stores. This helps more in the muscle-building process.
Tips For Effective Bulking
The following are some of the major tips for effective bulking:
Meal Frequency: Eating multiple times a day is important to ensure a good flow of nutrients and faster metabolism. Hence, make sure to eat small multiple times throughout the day.
Caloric Surplus: Always count your calories and your nutrients. For instance, if you see a caloric surplus to support muscle growth, you will have more energy for intense workouts and repairing damaged tissues.
Hydration: Since you are working out and eating a lot, you must stay hydrated. This will support overall health and performance.
Consistency: When you are in your bulking phase, be consistent with your diet and workout. Moreover, make sure to adjust your Intake. For instance, you can tweak calorie and nutrient intake based on progress and goals.
Common Mistakes To Avoid
To ensure efficient bulking, here are some common mistakes you must avoid:
Do not eat too much quickly, as it will get difficult to cut later on.
Make sure there is not a big gap between the two meals.
Getting ample rest will not be helpful for your muscles. Basically, your muscles need to get rest for growth. Hence, it would help if you got enough sleep when you are working out regularly.
Do cardio at least once a week. This helps you increase your appetite and helps you break down your calories faster.
Summing Up
Now you know the best bulking foods to help you grow your muscles and gain muscle weight. However, your nutrient intake and workout must go hand in hand. Only then will you get your desired results.
Do you have more suggestions on the best bulking foods to consume? Please share your ideas and opinions in the comments section below.
Read Also:
From Gym To Workplace: A Complete Guide To Lead A Healthy Lifestyle
What Are the 5 Components of Fitness? – Let’s Find Out
8 Home Gym Systems You’ll Want To Try Out
Even though it is acceptable to consume whiskey neat or on the rocks, a whiskey cocktail is a delightful alternative for drinkers of any age, gender, or nationality. Everyone appears to enjoy the classic and contemporary cocktail concoctions that bars and nightclubs serve.
Well-known whiskey cocktail recipes, such as the Old Fashioned, Irish Coffee, and Manhattan will be a delight to recreate at home. And while the list of popular alcoholic beverages is constantly evolving and expanding, there are a few that every skilled bartender should know by heart.
These whiskey cocktail recipes highlight the versatility and quality of whiskey, which wine enthusiasts have enjoyed for several decades. This is the ideal starting point for a home bartender seeking to master whiskey cocktail recipes.
14 Whiskey Cocktail Recipes For Home Bartenders
1. The Old Fashioned
According to cocktail historian David Wondrich, the Old Fashioned is a descendant of the oldest cocktail. In 1806, it was created with a small amount of water, sugar, liquor, and a few dashes of bitters.
2. Whiskey Sours
The Whiskey Sour recipe is a traditional and excellent option. It is a classic because the fruity red wine and smoky-sweet bourbon are perfectly balanced. The sour lemon flavor will complement the whiskey and syrup's sweetness. It would be best to serve it chilled by shaking it with ice cubes. You can also add egg whites to your shaker to create a unique mouthfeel; you may skip it if it's not for you.
3. The Manhattan
In the world of whiskey, a Manhattan is a classic. It's made with a traditional blend of sweet Vermouth, rye whiskey, and bitters. It serves as the basis for many classic whiskey cocktails and is as vital to whiskey as the martini is to gin.
4. Irish Coffee
Original Irish coffee is a delicious way to spice up your coffee after dinner or on a cold winter night. This whiskey cocktail recipe demonstrates that great drinks require little effort and only high-quality ingredients. It's just coffee, Irish whiskey, and brown sugar with freshly whipped cream on top.
5. Vieux Carre
According to wine experts from an Edwards liquor store, the Vieux Carre is a sophisticated whiskey cocktail that combines cognac, sweet Vermouth, and Benedictine. Although it is a New Orleans classic, you do not have to be in the city to appreciate it. Additionally, stick to the recipe to ensure a refined flavor balance.
6. John Collins
This whiskey-based cocktail recipe is an excellent choice for happy hour, consisting of whiskey sour and club soda. After mastering this recipe, you can create any alcoholic beverage you desire.
7. High Ball
A highball is a two-ingredient cocktail that is both refreshing and delicious. Ginger ale pairs well with blended whiskeys, rye whiskeys, and bourbons. It is optional, but you can add club soda to lighten the flavor.
8. Mint Julep
The mint julep, a whiskey drink recipe classic, is one of the most refreshing drinks you will ever taste. It requires fresh mint, sugar, your preferred bourbon, and a muddler. This recipe is so popular that it has inspired numerous julep variations.
9. Whiskey Cobbler
What is the best way to dispose of the fruit in your refrigerator? Make a cobbler with whiskey. Use seasonal fruits to sweeten and garnish your whiskey, then add club soda. You can also choose to drink it straight.
10. Fancy Whiskey Cocktail
This rendition of a classic is delectable and refreshing. This sophisticated whiskey cocktail recipe with orange liqueur, sugar, and bitter is as good as any contemporary recipe and is ideal for mixing whiskey.
11. Algonquin Cocktail
The cocktail Algonquin is an excellent illustration of how whiskey and pineapple can coexist. The dry Vermouth in the tropical whiskey martini combines the two flavors. It is a wonderful way to enjoy summertime meals due to its complex flavor.
12. Whiskey Tonic
All types of soda water are used in simple whiskey cocktail recipes. Dry soda is an excellent choice, particularly when combined with Irish whiskey. On the other hand, tonic water is the most popular.
13. New York Sour
You can enjoy the New Your Sour with bourbon or rye whiskey. This cocktail mimics the whiskey sour by adding fresh lemon juice and simple syrup to the whiskey sour base. The floating red wine elevates the flavor and appearance of this cocktail.
14. Sazerac
Sazerac is a distinct flavor of rye whiskey. Simple ingredients such as sugar, bitters, and anise liquors such as absinthe complement the spiced rye.
Key Takeaway
These recipes can serve as building blocks that you can update, modify, and make your own as you hone your bartending skills at home. Since there is no specific version of any given cocktail, you're free to make a version of your own. Consider all the suggestions above and enjoy your concoctions in the comforts of your home.
Additional:
7 Daring Party Drinks to Try This Winter
Tips to Follow When Ordering Alcohol Online