Published on: 20 February 2020
Last Updated on: 18 February 2023
Who doesn’t like the taste and flavors of vape oil, but what about the cost of vaping? Well, there’s a little secret, the cost of concentrates used to prepare vape oil is nothing as compared to vape oils available in the market, and the best part is that you can easily turn concentrates into vape oil yourself.
What are Vape Concentrates?
Vape concentrates are vegetable-based and that’s why vape oil is also safe for you to use. Nicotine is added to the vape oils which you buy from the market but it’s not a necessary ingredient. The added benefit of preparing vape oil yourself is that you can keep it totally Nicotine free. Avoiding Nicotine can keep you safe from developing addiction and from the side effects as well.
What are the Different Types of Concentrates?
Concentrates are of different types but all of those are not that good to be turned into vape oil. Some of the ideas concentrate for making it are:
Shatter: Shatter is one of the most popular vape concentrates as it’s high in potency and is also flavor-rich. Moreover, it’s very easy to turn to shatter into vape oil.
Crumble: Crumble is also another great option for high-potency vape concentrates.
Wax: Wax is a comparatively low-potency concentrate recommended for beginners. Its price is also very low.
Budder: Budder is also a low-potency concentrate. It’s an ideal concentrate for those who like to have low potency but still want a greater taste.
How to Turn Concentrates into Vape Oil:
Things you’ll Need to Turn Concentrates into Vape Oil
Things you’ll need are:
Your choice concentrate (Shatter, Wax, Budder, Crumble, or BHO) – 1 gram
Wax liquidizer of your favorite flavor – 2 ml
Microwaveable glass container for mixing the concentrate
A syringe for measuring wax liquidizer and for filling the vape pen cartridge
Method of Turning Concentrates into Vape Oil
So let’s learn the secret formula for turning concentrates into vape oil:
Vape oil can be prepared by using a variety of concentrates. The best ones for this purpose are Shatter, Wax, Budder, Crumble, and BHO. So, first of all, decide on the one you’d like to use by comparing their properties.
Next, you should choose the flavor of wax liquidizer for preparing your favorite flavor of vape oil. You can get wax liquidizers in almost all the flavors of your choice. Bananas, pineapple, strawberries, and menthol are among a few all-time favorites.
Take just one gram of your favorite concentrate and put it in the microwaveable glass container which comes with the wax liquidizer for mixing it with the concentrates. Check terpenes for sale.
Now take a syringe to measure wax liquidizer and take only 2 ml of it for mixing in one gram of concentrate.
You should now put it in the microwave oven for just 10 seconds and not more than that.
After taking it out of the microwave, you need to stir the mixture well for preparing the perfect vape oil.
Now it’s time to fill this tasty, self-prepared, and economical vape oil into your vape pen cartridge and enjoy.
Is Vape Oil Safe to Use?
Vape Oil is a healthy alternative to smoking. If you love the flavors of vape but don’t want to risk your health for this taste, all you need to do is stay away from Nicotine based vapes. You must read the ingredients of vape oil carefully before buying it. And if you’re preparing one yourself using concentrates and wax liquidizers, then it’s the best. In this way, you’ll know each and every ingredient which you’re adding to your vape oil. Even Wax Liquidizers are prepared very thoughtfully and carefully using safe and great-quality ingredients. So there’s no risk in using vape oil if you know what your vape oil is made of.
So now if you’re thinking of trying this method to turn concentrates into vape oil yourself, you‘ll find it so much more cost-effective that you won’t believe it. Just with a small quantity of your choice concentrate and wax liquidizer you can fill many cartridges of vape oil that would have cost you 6 to 8 times more if you would have bought them from the market.
Read Also:
Use Floor Polishing for Keeping Your Flooring Looking New
Content Rally wrapped around an online publication where you can publish your own intellectuals. It is a publishing platform designed to make great stories by content creators. This is your era, your place to be online. So come forward share your views, thoughts and ideas via Content Rally.
Even though it is acceptable to consume whiskey neat or on the rocks, a whiskey cocktail is a delightful alternative for drinkers of any age, gender, or nationality. Everyone appears to enjoy the classic and contemporary cocktail concoctions that bars and nightclubs serve.
Well-known whiskey cocktail recipes, such as the Old Fashioned, Irish Coffee, and Manhattan will be a delight to recreate at home. And while the list of popular alcoholic beverages is constantly evolving and expanding, there are a few that every skilled bartender should know by heart.
These whiskey cocktail recipes highlight the versatility and quality of whiskey, which wine enthusiasts have enjoyed for several decades. This is the ideal starting point for a home bartender seeking to master whiskey cocktail recipes.
14 Whiskey Cocktail Recipes For Home Bartenders
1. The Old Fashioned
According to cocktail historian David Wondrich, the Old Fashioned is a descendant of the oldest cocktail. In 1806, it was created with a small amount of water, sugar, liquor, and a few dashes of bitters.
2. Whiskey Sours
The Whiskey Sour recipe is a traditional and excellent option. It is a classic because the fruity red wine and smoky-sweet bourbon are perfectly balanced. The sour lemon flavor will complement the whiskey and syrup's sweetness. It would be best to serve it chilled by shaking it with ice cubes. You can also add egg whites to your shaker to create a unique mouthfeel; you may skip it if it's not for you.
3. The Manhattan
In the world of whiskey, a Manhattan is a classic. It's made with a traditional blend of sweet Vermouth, rye whiskey, and bitters. It serves as the basis for many classic whiskey cocktails and is as vital to whiskey as the martini is to gin.
4. Irish Coffee
Original Irish coffee is a delicious way to spice up your coffee after dinner or on a cold winter night. This whiskey cocktail recipe demonstrates that great drinks require little effort and only high-quality ingredients. It's just coffee, Irish whiskey, and brown sugar with freshly whipped cream on top.
5. Vieux Carre
According to wine experts from an Edwards liquor store, the Vieux Carre is a sophisticated whiskey cocktail that combines cognac, sweet Vermouth, and Benedictine. Although it is a New Orleans classic, you do not have to be in the city to appreciate it. Additionally, stick to the recipe to ensure a refined flavor balance.
6. John Collins
This whiskey-based cocktail recipe is an excellent choice for happy hour, consisting of whiskey sour and club soda. After mastering this recipe, you can create any alcoholic beverage you desire.
7. High Ball
A highball is a two-ingredient cocktail that is both refreshing and delicious. Ginger ale pairs well with blended whiskeys, rye whiskeys, and bourbons. It is optional, but you can add club soda to lighten the flavor.
8. Mint Julep
The mint julep, a whiskey drink recipe classic, is one of the most refreshing drinks you will ever taste. It requires fresh mint, sugar, your preferred bourbon, and a muddler. This recipe is so popular that it has inspired numerous julep variations.
9. Whiskey Cobbler
What is the best way to dispose of the fruit in your refrigerator? Make a cobbler with whiskey. Use seasonal fruits to sweeten and garnish your whiskey, then add club soda. You can also choose to drink it straight.
10. Fancy Whiskey Cocktail
This rendition of a classic is delectable and refreshing. This sophisticated whiskey cocktail recipe with orange liqueur, sugar, and bitter is as good as any contemporary recipe and is ideal for mixing whiskey.
11. Algonquin Cocktail
The cocktail Algonquin is an excellent illustration of how whiskey and pineapple can coexist. The dry Vermouth in the tropical whiskey martini combines the two flavors. It is a wonderful way to enjoy summertime meals due to its complex flavor.
12. Whiskey Tonic
All types of soda water are used in simple whiskey cocktail recipes. Dry soda is an excellent choice, particularly when combined with Irish whiskey. On the other hand, tonic water is the most popular.
13. New York Sour
You can enjoy the New Your Sour with bourbon or rye whiskey. This cocktail mimics the whiskey sour by adding fresh lemon juice and simple syrup to the whiskey sour base. The floating red wine elevates the flavor and appearance of this cocktail.
14. Sazerac
Sazerac is a distinct flavor of rye whiskey. Simple ingredients such as sugar, bitters, and anise liquors such as absinthe complement the spiced rye.
Key Takeaway
These recipes can serve as building blocks that you can update, modify, and make your own as you hone your bartending skills at home. Since there is no specific version of any given cocktail, you're free to make a version of your own. Consider all the suggestions above and enjoy your concoctions in the comforts of your home.
Additional:
7 Daring Party Drinks to Try This Winter
Tips to Follow When Ordering Alcohol Online
When you are into bodybuilding, your primary goal is to build muscles through weightlifting and proper nutrition. Bulking is a part of the bodybuilding process. However, bulking requires proper nutrition along with weightlifting. You need to consume the best bulking foods to ensure the right nutrition.
In this article, you will learn about the best bulking foods. Here, this article will explain the key nutrients bulking nutrients and the best protein sources.
Apart from that, you will also learn about the best fat and carbohydrate sources useful for bulking. Finally, you will also get some tips for effective bulking. Hence, to learn more, read on to the end of the article.
Why Is Bulking Integral To Bodybuilding?
Generally, bodybuilding involves two phases: bulking and cutting. In the former, the goal is to gain weight and build muscles, while the latter consists in reducing body fat.
Basically, bulking is a dietary process where you consume excess calories for muscle growth and weight gain. In fact, it is a common approach that athletes and bodybuilders use to increase their strength and muscle mass.
Hence, bulking refers to an increase in calories that your body consumes when it is in the process of intense weight training.
It is the stage where you gain muscles in your body. Here, you have to consume more calories than your body needs. However, you do it for a set period of time (4-6 months).
The extra calories that you consume works as a necessary fuel for muscle growth. Moreover, it provides strength to your body through weight training.
Best Bulking Foods: A General Overview
In bulking, your focus should be to give your body more energy than it consumes, thus creating a calorie surplus.
Meanwhile, this surplus creates extra energy, with the help of which your body creates muscle mass. Moreover, this energy helps you repair damaged tissues and fuel intense workouts.
Actually, bulking is one of the most important aspects of muscle growth. This is because if you build muscles, you must provide your body with enough energy. This way, it can build and repair damaged muscle tissues after your workout.
However, just because you are bulking, it does not mean that you have to consume as much food as possible. In fact, you must choose the best bulking foods and count your macronutrients. This way, you can support your muscle growth and minimize fat gain.
Key Nutrients For Bulking
If you want to achieve a clean bulk, you have to make smart food choices. In fact, if your choice of food is poor, it will lead to “dirty bulking.” As a result, you will end up with a lot of accumulated fat and minimal muscle gain.
In fact, in healthy bulking, you must consume quality foods and minimize your fat gains. This is because your goal is to maximize your muscle gain and ensure proper metabolism.
When bulking, you must focus on protein, carbohydrates, and healthy fats. Here is a breakdown of each nutrient you need for muscle gain:
Proteins
The importance of protein in muscle growth and repair is the highest. This is because proteins are the building blocks of muscles. Hence, in your bulking phase, aim to have a higher protein intake.
Consume 1g of protein for each pound of your body weight. For example, if your body weight is 180 lbs, consume 180 grams of protein each day when you are bulking.
Some good sources of lean protein include lean meats, eggs, poultry, fish, dairy products, lentils, beans, etc.
Carbohydrates
Carbohydrates help you in providing energy for intense workouts. Also, it helps create a bulk in the muscles. Basically, carbs replenish the glycogen inside your muscles.
However, when you are bulking, take 1.5 grams of carbs for 1 lb of your weight. For example, if your body weight is 180 lbs, consume 250-270 grams of carbs daily when you are bulking.
When choosing carbs for bulking, focus on consuming complex carbohydrates. These include brown rice, whole grains, fruits, sweet potatoes, and vegetables.
Fats
Healthy fats are necessary for overall health and hormone production. Apart from that, it also helps in nutrient absorption. Hence, to consume healthy fats, you can include sources like nuts, seeds, avocados, olive oil, fatty fish, etc.
Best Protein Sources For Bulking
The following are some of the best protein sources when you are in your bulking phase:
Lean Meats: Some good sources of protein are chicken or turkey. This is because they have less saturated fat than red meat. For instance, you will get 18-25 grams of protein from 100 grams of chicken breast.
Dairy Products: Generally, Greek yogurt, cottage cheese, and milk have high protein and high calories. Hence, they help you to build muscles faster. Apart from that, cottage cheese helps you in muscle recovery and growth due to its slow and steady dissolution.
Fish and Seafood: Fishes like salmon, tuna, and shrimp are high in protein and healthy fat. Hence, you can consider consuming them from time to time.
Eggs: Eggs are a good and fast-acting source of lean protein. Also, it contains healthy cholesterol. However, do not consume the egg yolk (yellow part) more than 2 in a day as it will increase cholesterol in your body. Meanwhile, you can consume multiple egg whites of boiled eggs in a single day. In fact, this is a good source of lean protein.
Plant-Based Proteins: Plant-based proteins are lean and healthy at the same time. Some good sources of such protein are beans, lentils, tofu, and tempeh.
Protein Supplements: If you eat too much, you will feel bloated at the end of the day. Hence, you need protein supplements that will help you supplement the shortage of protein that you consume in a day. Some examples of protein supplements are whey protein, casein protein, and plant-based protein powders.
Best Carbohydrate Sources For Bulking
Here are some of the best bulking foods for carbohydrates that will help you during the bulking phase:
Sweet Potatoes: a great post-workout snack that contains nutrients and fibers. Also, it will help you restore glycogen levels in your body.
Fruits: Different types of fruits come with various nutrients and carbohydrates. Apart from that, fruits also add antioxidants to your body. For instance, a good fruit option to consume after a workout is a banana.
Whole Grains: You can find whole-grain bread and pasta helping you consume complex carbs. Generally, they contain more vitamins, fiber, and minerals. Apart from that, you can also choose brown rice to get good-quality carbs.
Legumes and Quinoa: Quinoa, beans, and lentils are excellent sources of carbohydrates.
Best Fat Sources For Bulking
Here are some of the best bulking foods for healthy fats that you can use during your bulking phase:
Nuts and Seeds: Some essential and healthy sources of fats are almonds, chia seeds, walnuts, and flaxseeds.
Oils: For instance, coconut oil, olive oil, and avocado oil are great additions when considering fat for your diet. Hence, try to use coconut oil and olive oil in your cooking. This way, you can increase healthy fats and additional calories.
Avocados: Avocadoes are rich in healthy fats and nutrients. Basically, they contain monounsaturated fatty acids that add healthy calories and fat to your diet. Also, it is a source of antioxidants and vitamin E.
Fatty Fish: Salmon, mackerel, and sardines are fatty fishes that help you remain healthy and achieve clean bulk. Also, a large dose of omega-3 fatty acids, can improve your joints and cardiovascular health.
Dairy: Full-fat yogurt and cheese help your muscle restore glycogen stores. This helps more in the muscle-building process.
Tips For Effective Bulking
The following are some of the major tips for effective bulking:
Meal Frequency: Eating multiple times a day is important to ensure a good flow of nutrients and faster metabolism. Hence, make sure to eat small multiple times throughout the day.
Caloric Surplus: Always count your calories and your nutrients. For instance, if you see a caloric surplus to support muscle growth, you will have more energy for intense workouts and repairing damaged tissues.
Hydration: Since you are working out and eating a lot, you must stay hydrated. This will support overall health and performance.
Consistency: When you are in your bulking phase, be consistent with your diet and workout. Moreover, make sure to adjust your Intake. For instance, you can tweak calorie and nutrient intake based on progress and goals.
Common Mistakes To Avoid
To ensure efficient bulking, here are some common mistakes you must avoid:
Do not eat too much quickly, as it will get difficult to cut later on.
Make sure there is not a big gap between the two meals.
Getting ample rest will not be helpful for your muscles. Basically, your muscles need to get rest for growth. Hence, it would help if you got enough sleep when you are working out regularly.
Do cardio at least once a week. This helps you increase your appetite and helps you break down your calories faster.
Summing Up
Now you know the best bulking foods to help you grow your muscles and gain muscle weight. However, your nutrient intake and workout must go hand in hand. Only then will you get your desired results.
Do you have more suggestions on the best bulking foods to consume? Please share your ideas and opinions in the comments section below.
Read Also:
From Gym To Workplace: A Complete Guide To Lead A Healthy Lifestyle
What Are the 5 Components of Fitness? – Let’s Find Out
8 Home Gym Systems You’ll Want To Try Out
Although mushrooms have been used in cooking and customs for over a millennia, their popularity has increased recently. Previously unfashionable and difficult to market, portobello mushrooms are now in high demand all across the world.
These big, meaty mushrooms taste fantastic when grilled, stuffed, or used as a meat substitute in burgers and sandwiches. They also have a delightfully rich flavor.
But do portobello mushrooms have any health benefits over other foods? What are the negative effects of portobello mushrooms? Here we will talk about different methods to incorporate portobello mushrooms into your diet and their positive and negative aspects.
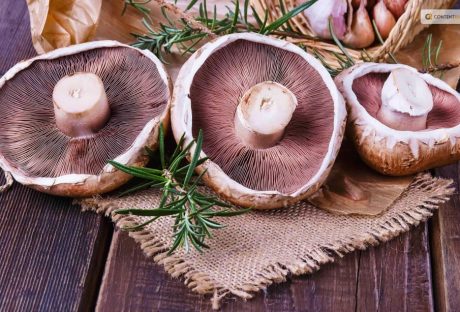
What Are Portobello Mushrooms?
Image Source: tastingtable.com
The delicious Agaricus bisporus fungus, which also produces cremini and button mushrooms, is the source of these large mushrooms. Actually, despite being in various stages of development, all of these mushrooms are the same. The biggest and darkest of the three mushrooms, portobellos are the most mature. They can occasionally reach a width of around 6 inches and have a deep brown color.
Large-scale portobello mushroom cultivation is famous all over the world. These mushrooms, however, are from the meadows of Eurasia and North America in the wild.
They have a less spongy texture than other mushrooms. These mushrooms have a meatier texture which makes them a good substitute in vegan and vegetarian meals.
Portobello mushrooms are generally thought to be a fantastic source of important nutrients that are good for your body. It is believed that portobello mushrooms are rich in beneficial plant-derived nutrients like B vitamins, selenium, potassium, copper, and selenium. If they are exposed to UV radiation while developing, they can also be a rich source of vitamin D.
Mushrooms were initially not acceptable to the general public and to persuade people to add them to their shopping baskets- voluntarily. In order to make that happen they were given the rather glitzy-sounding name Portabella in the 1980s.
Today, 90% of all mushrooms produced in the USA are portobello mushrooms. They are also a common addition to recipes by professional chefs at restaurants and for recipes cooked at home.
Next time you see these delectable mushrooms you're shopping and they're labeled portabella rather than portobello, don't worry—they're the same!
Many people think that mushrooms, in general, offer a number of health advantages. The same is true of portobello mushrooms, which are a rich source of protein, fiber, and important vitamins and minerals.
However, it is important to remember that there has been little research on the health advantages of portobello mushrooms. It cannot be suggested for consumption without necessary caution.
Benefits Of Portobello Mushrooms
Image Source: a-z-animals.com
Here are three positive health benefits of having portobello mushrooms based on popular research:
Portobello mushrooms are an excellent addition to any diet because they lower fat and calories, like all mushrooms. Portobello mushrooms have a low calorie and fat content of 22 per 100 grams. They also contain 2.11 and 1.3 grams of protein and fiber.
High concentrations of B vitamins riboflavin, niacin, and pantothenic acid enrich portobello mushrooms. They are essential for many bodily functions, like energy production and the metabolism of macronutrients.
According to research, portobello mushrooms are rich in potassium, which is essential for maintaining muscle health and strength. 128g of cooked portobello mushrooms contain 440mg of potassium. It is roughly 9% of the daily adult intake.
Negative Effects Of Portobello Mushrooms
Image Source: cdn.britannica.com
Like any meal, portobello mushrooms may not be suitable for everyone. The following are a few possible drawbacks of portobello mushrooms:
Allergic Reactions
Portobellos and other mushrooms may cause an allergic reaction in certain people. The degree of allergic reactions can vary. It can range from minor symptoms like irritation and hives to more serious ones like breathing difficulties or anaphylaxis. Consumption of portobello mushrooms can cause a severe reaction if you have a mushroom allergy.
Digestive Problems
Portobellos and other mushrooms contain chitin, a form of carbohydrate. Humans find chitin difficult to digest, and for some people, it can be uncomfortable. If ingested in large numbers or not cooked well, mushrooms can cause symptoms like bloating, gas, or upset stomach.
Risks Of Contamination
If you don't handle, preserve, and prepare portobello mushrooms correctly, they may become contaminated with bacteria, molds, and other hazardous germs. In this regard, they are much like other mushrooms. Food poisoning from eating contaminated mushrooms can cause symptoms like nausea, vomiting, diarrhea, and abdominal pain.
Medication Interactions
Portobello mushrooms, like several other foods, may have an effect on how some medicines work. For instance, they might impact how some medications and anticoagulants work. To be certain. There are no reported interactions. However, you can talk to a healthcare provider or pharmacist if you are taking drugs.
How To Cook Portobello Mushrooms?
Image Source: zardyplants.com
Portobello mushrooms are ideal veggies in a variety of ways, including grilled, stuffed, and fried. However, you can also serve them on their own. They are very popular in Italian recipes like spaghetti and even as toppings on pizza.
In a variety of vegetarian and vegan meals, including burgers and steaks, portobello mushrooms' are an ideal meat substitute. Here are a few of our favorite methods for preparing delicious portobello mushrooms:
You may substitute a grilled portobello mushroom for a traditional meat burger or eat it alone as a plant-based steak.
To prepare portobello mushrooms for pasta dishes and sauces, put them in a skillet and cook briefly until fork-tender.
Portobello mushroom stuffing is an all-time favorite! Load a generous amount of cheese into the mushroom's center before baking it in an oven until it turns golden.
Slice up a few of these chewy deliciousnesses. Put them on toast or toss them over for a savory stir fry!
How To Choose The Right Portobello Mushrooms?
Image Source: boomieskitchen.com
Pick fresh, firm portobello mushrooms when you're shopping. Avoid portobello mushrooms that have bruises, or that have soft patches, as they are not suitable for consumption. You must consume fresh mushrooms right away because they are bad for your health when old.
Fresh portobello mushrooms are best when in a paper bag or their original container in the refrigerator. These fresh mushrooms should be kept in an airtight container and kept at room temperature. It will prevent the formation of dangerous bacteria that could cause botulism.
To help avoid cross-contamination, wash your hands both before and after handling portobello mushrooms. Before preparing and eating, immediately wash mushrooms under running water. Other than water, there is nothing else you need to use to clean your mushrooms. Never pre-wash mushrooms since the dampness will hasten their deterioration.
Wrapping Up
So it appears that portobello mushrooms may be more than we originally thought! There are so many good reasons to include portobello mushrooms in your diet. The possible health advantages and their distinctive texture and flavor make them super palatable.
Remember that the negative consequences are not all-encompassing and might not be relevant for everyone. When included in a balanced diet, portobello mushrooms are a generally healthy and safe food option. However, it is advised to speak with a healthcare provider or allergist for specialized guidance if you have known allergies.
Learn More About:
7 Benefits Of Eating Protein Rich Snacks
5 Ways To Use Medicinal Mushroom Extracts
Great Health Benefits You Get From A Protein Coconut Bar