Transform Your Garage into a Home Office

Home Office

Working from home is becoming more and more popular and widely spread, and in the times of the global pandemic, for some, it is even becoming a necessity. If you live with your family – parents, partner, kids, pets – this can be a really challenging task, especially if you do not have a separate work and study room.

However, you can turn to alternative ways and make your own working space. Experts say it is important to have different spaces in which you sleep, eat and work, so even if you could have the privacy of your bedroom during the day, it is better for your mental health and efficiency to have a separate room which would serve as a home office. Transforming your garage could be a perfect solution for you, and here is how to do it, as suggested to us by experts at Dlouhy Garage Doors of San Diego.

Start from the Basics

In its original condition, your garage is probably not suitable for living or working, and in general spending a lot of time there, especially not during all seasons. That is why it’s important to adjust is well to the new purpose.

Start from the floor, which is in most cases bare concrete. Replace it with the wood floor or carpet tiles and make it warmer and more comfortable. Insulation might be one of the major issues, so make sure you focus on that. Walls and windows will need additional insulation so you can use your home office for the whole year.

Make It Cozy and Practical

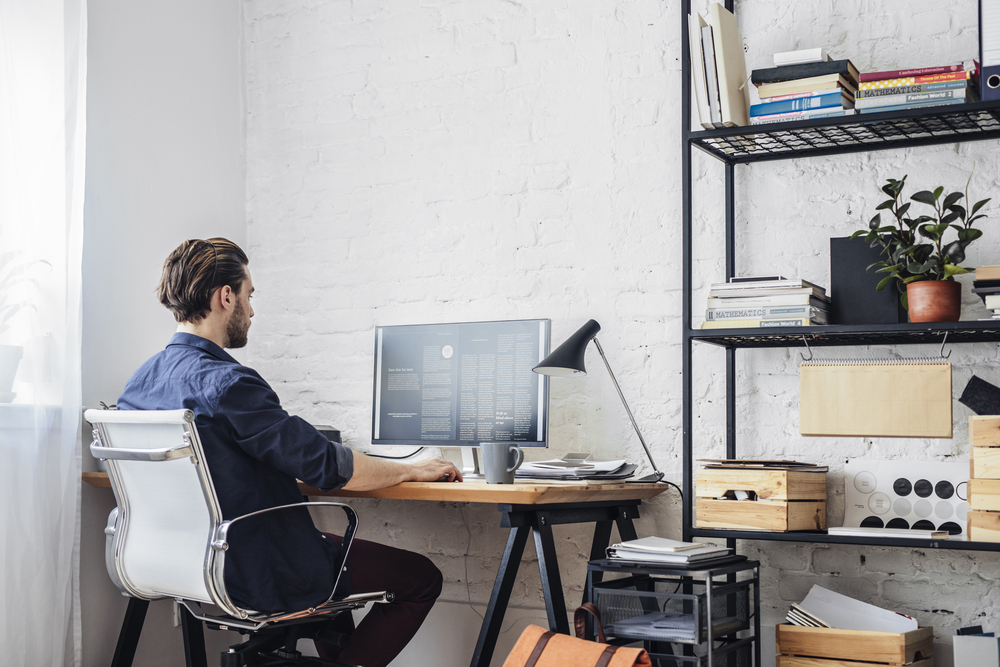
Once you’ve got your floor and walls settled, you can actually start thinking about the furniture and all the things you are going to need. Start with the desk and chair, as well as the shelves and other storage space you will need for your office.

Except for being practical, your new office should also be cozy and you should be comfortable working there. So, you might want to pay attention to the overall style of the place, as well as the colors you choose. It does not necessarily have to be all sleek and modern, you can also add some vintage style and add a touch of warmth to your new workplace. Go for the neutral colors and try not to clutter the office too much with decorations, but rather give it a neater and simpler look, as it will be easier for you to focus.

Another important point in this transformation process is the garage door. Chances are that your garage door is not suited to the new purpose, so you might want to call in garage door installers to replace it. Even if you stop using it as an office at some point, it can still be used as a space for hanging out, so why not make it livable for the long term.

Think of the Light and Safety

Replacing the garage door may have more than one dimension and purpose. It will certainly have an impact on insulation, as well as safety, and lighting, too. You can replace the old garage door with a set of glass panels and a regular door and thus ensure natural lighting for your workplace. It is really great to have it in the office and it’s much better for your eyesight as well as for your mood.

Of course, do not forget the artificial lights as well and make sure the place is overall well lit. You can also consider installing a glass slide door, and thus improve the overall ventilation in the room which is also very important.

However, if you prefer privacy, consider putting a regular door and sandblasted glass which will prevent anyone from seeing inside, and also prevent you from being distracted by the activities going on in front of your new office.

Read Also:

Content Rally wrapped around an online publication where you can publish your own intellectuals. It is a publishing platform designed to make great stories by content creators. This is your era, your place to be online. So come forward share your views, thoughts and ideas via Content Rally.

View all posts

Leave a Reply

Your email address will not be published. Required fields are marked *

Related

Foundation Moisture Maintenance

Foundation Moisture Maintenance: 6 Tips for Home Repair

Foundation maintenance is not something most homeowners plan for. It can be time-consuming, expensive, and complicated. It can also cause you great pain and aggravation if it is done incorrectly. Many homeowners make the mistake of trying to handle foundation repair on their own. You should also go towards the foundation maintenance services that help you to make your home safe and secure. Unfortunately, this can lead to even more problems than the original problems and can cost you much more money in the end. 1. Inspection: Foundation maintenance tips that include inspections are necessary because repairs can get costly if they are not done correctly the first time. This is because the damage could have been lessened if the repair was made properly. If you notice a crack that is slowly getting worse and appears to be getting worse, then you should call in an expert immediately. You should also make sure there are no other cracks that could be causing your home foundation damage. 2. Clay Soils: Another foundation maintenance tip involves inspecting your clay soils. Do you have clay soils in your yard? If so, you need to know what type of soil your foundation is built on and how to correct it. There are certain plants and trees that can actually damage your foundations and these should be avoided at all costs. 3. Repair Foundation Cracks: In addition to avoiding having your home foundation damaged, another way to avoid it is by repairing foundation cracks. There are different types of cracks including wooden cracks, concrete cracks, and more. Some homeowners prefer to repair their home foundation first and then worry about the type of cracks they have or the damages they may have incurred. It is important to repair any type of cracks that may be causing damage to your home. 4. Check Gutters and Sewage Systems: Along with foundation repairs, homeowners should also make sure their gutters, downspouts, and sewage systems are working properly. Gutters and downspouts should be checking on a regular basis to make sure they are not clogged with leaves, twigs, or other debris. Downspouts should be inspected for leaks that may cause damage to your home. There are many foundation maintenance tips for homeowners that include checking on the condition of these two vital components. 5. Hire Foundation Repairing Company: One of the most important foundation maintenance tips for homeowners is to hire foundation repair companies when it comes to checking for leaks around your home. Most of the time, leak detection can be completed without the help of an expert. One of the best ways to check for leaks around your home is to use an inexpensive non-intrusive infrared camera. If you find any areas around your home that appear to be leaking, this will be an excellent time to consult a foundation maintenance company. 6. Proper Drainage System: Homeowners should also make sure that they have a proper drainage system throughout their homes. Proper drainage allows materials such as liquids and grime to seep away from the foundation and stay away from being eroded by the soil. Many homeowners also underestimate the importance of proper drainage. Without the proper amount of drainage in place, there is a greater risk of foundation damage. A professional foundation moisture maintenance company will be able to determine if you do not have adequate drainage. Read Also: Improve Your Home With Concrete Lifting Services Why You Must Embrace Green Home Technologies? Safety Triangle: Three Things Your Soon-To-Be House Must Have

READ MOREDetails
sunroom

How Quickly Can I Install a Sunroom?

With fall already here, and winter fast approaching, there’s a certain urgency in the air to get any sunroom installation project booked, planned, paid for, and complete as soon as possible. Fortunately, a fall installation in Calgary is a relatively quick process, with your beautiful install sunroom being completed somewhere between 4 and 10 days once the plans have been finalized and approved. The actual speed of the project will depend on the results of the multiple decisions you have to make, which include the following: Different Ways You Can Quickly Install  Sunroom 3 or 4 season sunroom - this is the big factor in how long your project will take to install, and how much it will cost you in the long run. A 3 season room will be cheaper and quicker as there are less insulation, thinner windows, and the frame is usually made from aluminum. A 4 season room requires the room to be able to handle the Calgary winter conditions, so the walls have to be thicker, the windows double-paned and a heating option has to be built in and vented. You can install sunroom in your home. Wall thickness – the thickness of your walls is coupled with the number of seasons, but also how you plan on heating the room. Thinner walls with no insulation will rely on the sun on and thicker windows to keep your room warm, while thicker walls will take longer to install sunroom but provide room for internal insulation options. A number of windows – it’s possible to build a sunroom that has almost solid glass walls and the visual effect of these rooms are incredible. However, they take a much longer time to install as each piece has to be put into place manually and there’s no scope for external pre-fabrication. In this decision, you’ll also need to think about the number and shape of your skylights, and a general rule of thumb is that the more you have, the longer the installation process. Roof shape – there are two choices here; a studio roof, which is flat and literally sits across the top of your sunroom, or a gabled A-frame roof. The latter requires more time to install as the roofers will need to construct the A-frame, attach it to the walls and then add your chosen shingles or cladding to the roof structure. A studio roof often comes as one or two pieces that can be installed in under a day. You have to install sunroom in a better way. Kick plates – the final decision that has a bearing on the length of time for your sunroom installation project is whether to have kick plates at the bottom. The general industry recommendation is that if the room is more than 24 inches above the ground, then kick plates will provide the cover you need. Otherwise, a solid bottom will do the job and is much less costly. Install sunroom in your home for a better experience. Final Take Away  When you make these decisions, you will want to consider the impact they will have on the amount of time it will take for the construction, but also how they will impact the look and feel of your new sunroom. Read Also: How To Set Up Your Baby’s Room 5 Innovative Ideas To Lend Your Bedroom With More Space

READ MOREDetails
content rally

Floor Cutting Using Diamond Saw: What You Need To Know

Concrete comes as the topmost choice when you are in need of durable, weather-proof, heat-proof and long-lasting flooring material. But there comes a time when you need to repair, remove or replace concrete floors and you need to look around for quality concrete cutting tools. Diamond floor saws are the no.1 choice of professional concrete cutting contractors. Diamond floor sawing is extensively used to effectively cut through all types of materials including reinforced concrete, asphalt, slab and stone. The unique design of diamond sawing machines makes them more convenient for operators to carry out floor cutting as a one man job. Floor sawing service helps you efficiently cut through concrete slabs, driveways, decorative concrete floors and many other structures in horizontal alignment. Diamond saws also let you cut through concrete roads overlaid with asphalt. Different floors demand different diamond blade and a different cutting procedure to be followed. In this article, you will read some general tips and safety guidelines for cutting concrete floors using a diamond saw. Tips You Need To Consider While Floor Cutting With A Diamond Saw Never think of playing loose with heavy diamond cutting machines. When deciding to use the diamond saw for concrete cutting, give top priority to safety. You must ensure that you have selected the right diamond sawing blade which is perfect for the kind of material you need to cut through. Make sure the floor saw and diamond blades you use are in most up-to-date condition. Check if there is no loose connection in the machine. If you are using wet cutting method for floor cutting, make sure you have arranged a source with an ample volume of water at the worksite. Supplying water to diamond blades during the operation will help prevent blades from overheating. Use of water as a coolant and lubricant help floor sawing London contractors get quality cuts. It also helps extend the lifespan of the blade. You need to wear protective gears to safeguard your body parts from any kind of physical injury while operating the machine. Manage to have ear, eye and head protection. Never wear loose clothing. And make sure you wear safety boots and a respirator mask to avoid inhaling silica from the dust particles produced during floor cutting. When cutting the floor using a diamond saw, never increase the pressure on the saw to boost speed. And remember, the diamond floor sawing machine always make straight cuts, you can’t steer it to cut curves. When you hold cutting, make sure you lock the machine or turn the power off properly. You need to be extra cautious when sawing on a steep surface. If you want to cut green concrete using diamond floor saw, do it within 24 hours of being poured. The selection of the diamond blade in the floor saw may vary based on the thickness and aggregate of the concrete structure that needs to be cut. For deep floor cutting, you will need to make multiple passes to obtain the desired depth. The thought of performing floor cutting on own doesn’t make sense unless you have the required skills and knowledge to accomplish the job with the best of industry-standard and safety guidelines. But you can always depend on a professional diamond floor sawing contractor in the town! Read More:  How To Salvage Your Furniture After A Flood List Of Most Durable Kitchen Flooring Hardwood Timber Flooring: Gives A Classic Look To Your Home

READ MOREDetails