Restaurant Chair Trends: Classic And Contemporary Styles

by

14 February 2023

Home & Garden

Restaurant Chair

Have you ever been to a restaurant and noticed the chairs?

Not only are they comfortable, but they can also speak volumes about the establishment. From classic styles to contemporary designs, restaurant chairs come in many different shapes and forms. Restaurant chair design has come a long way since its inception.

Today’s chairs offer more than just comfort; they lend their own unique character to an eatery’s atmosphere. Whether you’re looking for something classic or contemporary, there are numerous options on the market for both interior and outdoor seating. Let’s take a look at some of today’s popular trends in restaurant chair design.

From sleek leather designs to rustic wood creations, there is no shortage of styles available for restaurants looking to set the tone with their seating choices. Customers can choose from traditional wooden chairs with intricate carvings or opt for a more modern vibe with curved metal frames that provide both form and function. With so many restaurant chairs for sale, it's easy to create the perfect look for any dining space.

1. Understanding Restaurant Chair Styles

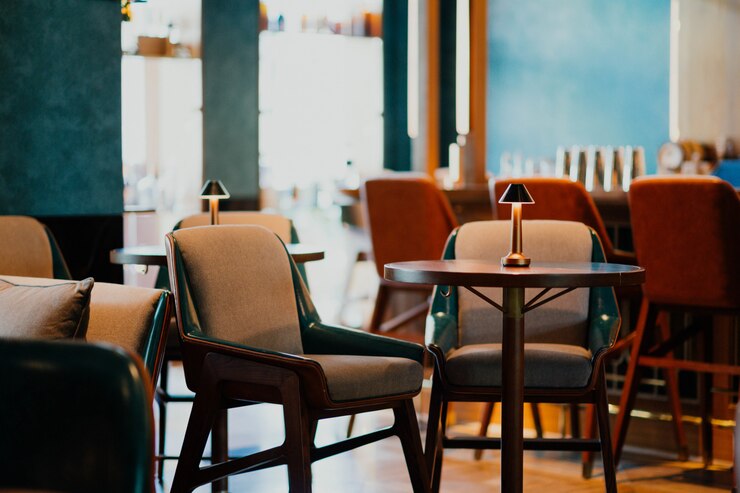
When it comes to furnishing a restaurant, chair selection is essential. Choosing the right style can make all the difference in creating an inviting atmosphere for guests. In this article, we'll explore the two main styles of restaurant chairs: classic and contemporary.

Classic restaurant chairs are characterized by elegant designs with intricate detailing and sturdy construction. These types of chairs typically feature rich fabrics, ornate carvings, and beautiful colors that will add warmth to any dining space. Plus, they often come with built-in cushioning for increased comfort. On the other hand, contemporary chairs offer a more modern look with sleek lines and sharp angles. They usually have metal or plastic frames and may be upholstered in bold colors or patterns that draw attention to the space.

Both classic and contemporary styles of restaurant chairs offer unique benefits, making either one a great choice depending on your individual needs and preferences. For instance, classic chairs provide a timeless elegance while contemporary ones bring an up-to-date vibe to any setting. Ultimately, it's important to consider carefully what type of design you're looking for when selecting restaurant chairs—as they can make or break your overall aesthetic!

2. Classic Restaurant Chair Styles

The first step to understanding restaurant chair trends is to understand the classic styles. Classic chairs are timeless designs that have been in existence for centuries, and they remain popular in restaurants. These chairs feature elegant curves and subtle lines, often crafted from wood or metal. They come in a variety of colors, finishes, and fabrics that can be customized to suit any decor scheme.

Classic chairs are known for their comfort and durability, making them an ideal choice for busy restaurants. They also provide guests with a sense of luxury and sophistication; many classic designs even incorporate carved details or decorative embellishments that add character to the space. Plus, these chairs won’t break your budget; classic designs tend to be more affordable than their modern counterparts.

From traditional dining areas to contemporary spaces, classic restaurant chairs offer timeless style and comfort that will last for years. With so many options available, you’re sure to find a design that perfectly complements your restaurant’s look and feel. Whether you choose an ornate design or something more modest and understated, these classic features will instantly elevate your space – without sacrificing quality or durability.

3. Contemporary Restaurant Chair Styles

When it comes to contemporary restaurant chair styles, the options are endless. With modern designs and materials, these chairs can often stand out from classic ones. There's something for every aesthetic and budget, so it's worth taking the time to explore all the possibilities.

One popular option is metal chairs. These sleek pieces of furniture often have a minimalist design with thin frames and curved or straight legs. They also come in various colors and finishes, such as brushed gold or chrome. Metal chairs are perfect for creating an industrial look in any restaurant space.

Wooden chairs are another great choice for a contemporary style. Whether they're made from light-colored woods like maple or darker woods like teak, wooden chairs can add warmth to a space while still maintaining a modern feel. Additionally, wooden chairs can be easily customized with paint or upholstery if desired.

No matter what type of chair you choose, it's important to make sure that it's comfortable as well as stylish. It should fit within your existing decor while providing guests with a place to relax during their meal. Taking these factors into consideration will ensure that your restaurant has the perfect seating for any occasion.

4. Practical Considerations For Restaurant Chairs

When it comes to selecting restaurant chairs, there are a few practical considerations to keep in mind. It's important to think about the size of the space, as well as the number of customers that will be dining.It's also crucial to consider how much wear and tear the chairs will experience — especially if you're looking at more delicate designs.

The material is another factor when it comes to practicality. Hardwood chairs may look beautiful but require regular maintenance, while metal or plastic chairs can be cheaper but may not have the same longevity. Comfort is obviously an important consideration too; after all, what good is a stylish chair if your guests won't want to sit in it?

Finally, the budget should also be taken into account. When it comes to furnishings for restaurants, there's usually a trade-off between style and cost. Ultimately, finding the right balance between these two factors is key to creating an inviting atmosphere that won't break the bank.

Related: The Basics of Restaurant Equipment Financing

When it comes to restaurant chairs, materials play an important role in style, comfort, and durability. While there's no one-size-fits-all material for restaurant chairs, there are a few popular options that you can consider when selecting the perfect chairs for your space. Let's take a closer look at some of the most popular materials for restaurant chairs.

Wood is often the first material people think of when shopping for furniture, and it's no surprise why—wooden chairs are timelessly stylish and easy to customize. They come in both classic and contemporary styles, allowing you to pick something that fits your design aesthetic. Plus, wood is a durable material that won't chip or dent easily and will last for years with proper maintenance.

Metal is another great option for restaurant chairs—it comes in many different colors and styles and will give your space an industrial feel. Metal is also lightweight yet strong enough to stand up to the wear and tear of daily use in busy restaurants. What's more, metal requires very little maintenance compared to other materials like wood or fabric.

No matter what type of restaurant chair you're looking for, there's sure to be a material that meets your needs and style preferences. From classic wooden designs to modern metallic looks, there are plenty of options available when it comes time to choose furniture for your dining room or patio area.

Conclusion

Restaurant chairs come in a variety of classic and contemporary styles, with the average cost depending on the style you choose. They're expected to have a long lifespan, and many are available in custom sizes. Additionally, many restaurant chairs are suitable for both indoor and outdoor use and can be easily cleaned and maintained.

When choosing restaurant chairs, it's important to consider your needs. Think about the space you have available, the type of clientele you serve, and how often they will be used. You'll also want to make sure the chairs are comfortable, as well as durable enough to withstand high-traffic areas.

Choosing the right chair for your restaurant is an important decision that can affect both its look and function. With a little research, you'll be able to find the perfect match for your space, whether it's a classic or contemporary style, and create a stylish atmosphere that customers will enjoy.

Read Also:

Arnab is a professional blogger, having an enormous interest in writing blogs and other jones of calligraphies. In terms of his professional commitments, He carries out sharing sentient blogs.

View all posts

Leave a Reply

Your email address will not be published. Required fields are marked *

Related

how to harvest dill

How to Harvest and Preserve Dill for Year-Round Use?

The tender, fern-like leaves of dill almost beg to be touched. If you want to cook them, trim the fresh dill foliage and gather the seeds for pickling. Or you can chop the feathery leaves and yellow umbels for attractive bouquets of homegrown flowers. In addition, black swallowtail caterpillars love to feed on it. Its tiny yellow blooms are great at drawing in a wide range of pollinators. Dill grows as an annual for summer harvests in USDA Hardiness Zones 2–8. In other parts, it may self-seed and is hardy in the winter in Zones 9–11. Here is everything you need to know about how to harvest dill. Keep reading for a comprehensive guide. How to Harvest Dill? Fresh dill clips easily, but it soon starts to droop. Sounds familiar to Cilantro, right? Its flower umbels may look lovely in a mixed bouquet, but after a few hours, don't be shocked if they start to wilt. When harvesting dill for recipes, use it as soon as possible because its flavor starts to fade after a few days. Cut off the flower stalks of dill after the yellow blooms have faded but before the seeds start to ripen and come away from the umbel. Cover the entire flower head with a small paper bag that has a few tiny holes for ventilation. Hang the plant upside down in a cool, dry place. Watch for the seeds to fall and collect them in the bag's bottom. The seeds should be kept in a cool, dry, and dark area in an airtight glass container. When and How to Plant Dill? Dill grows best outside and is simple to start from seed. Plant the seeds directly into the ground, 1/4 inch deep and spaced 1 to 2 inches apart, in the springtime following the last frost. If you want the dill plants to be able to self-sow, plant the seeds in tufts so the seeds can fall and sprout the following year. Or you can plant them in rows spaced about 6 inches apart. You might want to think about succession planting if you want a reliable supply of dill. During the growing season, start by planting a small number of seeds from the packet at a time and then a few more every week. Typically, seeds take 7 to 14 days to germinate. Also, dill can be grown from transplants grown in nurseries planted in the ground or in containers in spring. You can plant dill outside a few weeks before the last predicted spring frost because it can withstand light frost. To achieve lush growth and stop crowded seedlings from producing seed heads, which stops the production of foliage, thinning is essential. Every 12 to 24 inches, reduce the number of seedlings to just the strongest one once they reach 3 or 4 inches in height. As they get bigger, some start to flop. Plants can be kept upright by placing a stake or a sturdy twig in the ground close to the plant's base. To loosely secure the plant to the stake, use garden twine. You can start the dill seeds indoors four to six weeks prior to the last frost. And you can move the seedlings to the ground once the risk of frost has passed. Transplanting mature dill does not work well, so plant your seedlings where they will be able to grow and thrive. Where To Plant Dill? Dill should be planted in a spot with well-drained soil and at least 6 to 8 hours of daily full, direct sunlight. Particularly for cottage gardens, the delicate foliage gives garden beds and borders textural interest. Choose a location for your dill that will shield it from the wind if possible. Just like spinach, high winds can easily damage its stalks if you do not stake the dill. You can plant dill's fragrant foliage in perennial garden container plantings. Or you can plant them alongside other herbs or vegetables in a traditional kitchen garden. In an edible garden, cruciferous vegetables such as Brussels sprouts, collard greens, broccoli, and cabbage are good companion plants for dill. Dill draws beneficial insects like ladybugs and bees and drives away common brassica pests like loopers and cabbage worms. But avoid planting dill close to carrots. Carrots can be stunted by dill, and because they are closely related, dill can cross-pollinate with carrots to produce inferior hybrid plants. Planting dill close to tomatoes is also not recommended. Mature dill will probably stunt your tomatoes' growth, even though some studies have indicated that tomatoes and dill can be beneficial companions when they are young. How to Propagate Dill? Seed is the most effective method of dill propagation. Cuttings can also propagate Dill, though this isn't as dependable. Seed: Direct sow the dill seeds in early spring at a depth of 1/4 inch in a prepared garden bed. Dill does not tolerate transplanting well. Thin the seedlings so they are 12–24 inches apart when they are 3–4 inches tall. Cuttings: Using shears or scissors, cut off the stem with at least 3 to 4 inches of new growth to take a dill cutting. Place the cutting in a water-filled container, making sure to remove any leaves below the water's surface, and allow the roots to grow for two to three weeks. Fertilizer and rooting hormones are not required. Plant the dill in a container or on the ground once the roots are 2 to 3 inches long. Is Dill a Type of Weed? No, I am not talking about WEED weed (read: marijuana). Although dill isn't technically a weed, some individuals and spice companies call the plant dill weed, possibly due to its feathery leaves. Dill weed is a dried or fresh foliage plant. Flower umbels are yellow and used to make dill seeds. How Should Dill Be Stored for Optimal Quality? You can keep fresh dill in the fridge by wrapping its leaves in a moist paper towel. Or you can tuck its stems into a container of water. Fresh dill can be frozen by submerging it in water in ice cube trays. Place the cubes in cooked dishes that have enough moisture to withstand them. Dill seeds and leaves can also be easily dried for later use, though the flavor is a lot more muted. Water and Soil Sow dill in soil that is moist but well-drained. If there is a lot of clay in your soil, add organic matter to the top few inches to aid in drainage. If you have trouble with poor soil drainage, plant this herb in raised beds or containers. Growing dill requires proper irrigation. As the seeds germinate, keep the soil evenly moist. Dill plants require one to two inches of rain or extra water each week once they begin to grow. Humidity and Temperature Dill tolerates temperatures as low as 25ºF, but 70ºF is the ideal temperature for it. Dill often bolts, sending up flower stalks to set seeds when temperatures rise. This annual herb dies after it flowers and produces seeds. Get rid of the flowers to prolong the plant's growing season. Apply Fertilizer While most herbs, including dill, don't require extra fertilizer, you can give them once or twice during the growing season by applying a balanced 10-10-10 fertilizer. When planting, either mix a liquid fertilizer with water or etch a time-release fertilizer into the soil. Refer to the product label for instructions on how much to use. Trimming Dill should be pruned early in the growing season to prevent limb bending. Cut off the top leaves of the plant to promote more growth of the lower leaves. Food preparation and cooking can be done with anything that has been pruned. Repotting and Potting You can grow dill in pots on a sunny balcony or deck, even if you don't have an outdoor garden. Due to the deep taproot that dill plants have, choose a container that is at least 12 inches deep. Because clay and terracotta pots don't retain as much moisture as plastic or glazed ceramic pots. They are ideal for growing dill. Make sure the container you select has good drainage and is big enough to allow you to space your plants 12 to 24 inches apart. It is best to start over in a new, larger container. Especially if your dill plant outgrows its current one because it does not take well to transplant. If the temperature where you are planting is not too high, you can keep planting seeds into the summer. Types of Dill Dills can be of many types with each of their distinct looks and flavors. Here are the three different types of dill you can grow in your kitchen or backyard. Long Island Mammoth Also known as Long Island Mammoth this one is an old-time favorite. Its fern-like leaves can be dried and stored for a long time, or they can be harvested fresh. It produces big clusters of yellow flowers with flat tops. They turn into brown seed heads, and they can reach a height of five feet. Fernleaf Grown to a height of only 18 inches, Anethum graveolens, or Fernleaf, is a highly productive dwarf variety. It works well in container gardens or small in-ground beds. Its feathery, delicate foliage has a great flavor of dill. From midsummer into fall, it blossoms. Bouquet The 'Bouquet' cultivar produces plants up to thirty inches tall with fine bluish-green foliage. The enormous, six-inch-diameter yellow flower heads are ideal for drying, creating an enduring arrangement. Or you could chop them for fresh floral arrangements. How to Keep New Dill Fresh? Dill weed quickly wilts after harvesting and gradually loses its distinctive flavor and aroma. If you know how to store your freshly harvested dill, this shouldn't be a problem. Here are two straightforward techniques that you can use: Put It in the Crisper Drawer of the Refrigerator Loosely wrap the recently cut and cleaned leaves in damp kitchen towels before putting them in a container or sealed bag. Put the container in the crisper drawer of the refrigerator, which has a lower humidity than the other sections of the appliance. Utilize the herbs before they begin to wilt and dry out, which should happen in a few days. Put It in Water To make this method function, when harvesting the herb, you must cut off the entire stem. After gathering the stems, put them in a glass of water and seal the opening with a plastic bag. Every day, change the water. Unlike potatoes, dill leaves can remain fresh for up to a week when stored in this manner. How to Freeze Fresh Dill? Freezing is the best way to preserve extra dill for later use if you've harvested more than you can use at once or in a few days. Dill freezes most effectively when chopped into smaller pieces and added to ice cube trays with just enough water to cover the freshly minced dill. This allows the herbs to be kept for four months or longer. This will ensure you always have dill on hand for when a recipe calls for it. How to Dry Fresh Dill? Dried fresh dill is a popular method if you're searching for another way to store dill for a long time. The herb has many uses, even though it won't have as much flavor as when it's fresh or frozen. All year long, you can use it as a herb in cooked dishes or to make tea. Stick to hang-drying if you don't want much of the flavor to be lost. This is a very easy method to use. All you must do is gather a few dill leaves and then bind them with a string. Later, place them in an area with adequate ventilation upside down.  Place them in an airtight container once they're crumbling and dry. Even though fresh dill is always preferable, make sure to save some for later use. Particularly if you don't have a year-round indoor herb and spice garden. Wrapping Up Growing dill is a great way to add flavor to fish and seafood dishes. A little goes a long way because fresh dill leaves have a strong licorice flavor. It is best that you add dill toward the end of cooking, in salads, or as a garnish for soups. Because once cooked, it tends to lose its flavor. If you have thoughts to share or questions to ask about how to harvest dill, please leave a comment below. We would love to hear from you! Read Also: Asparagus 101: When, How, And How Often To Harvest? How To Harvest Sunflower Seeds: A Fun And Easy Activity For The Whole Family How TO Harvest Lemongrass: Tips AND Tricks FOR Growing AND Using This Versatile Herb

READ MOREDetails
Apartment

6 Types Of Signs Every Apartment Resident Should Know About

Signage plays a crucial role in communicating important information and guiding residents and visitors at apartment complexes. From practical wayfinding signs to eye-catching banners advertising available units, the right signs can make all the difference.  This blog explores the array of sign options that apartment managers have at their disposal to effectively convey messages, improve accessibility, and enhance curb appeal. We’ll look at everything from illuminated “Vacancy” signs to inform potential renters of availability to parking designation signs that help maintain order in lots. Metal laser cut signage like building and unit number markers also make it easier for emergency responders, delivery drivers, and visitors to navigate complexes. Plus, promotional banners can attract interest from passersby. With a thoughtful signage strategy, managers can ensure their apartment community puts its best face forward while helping residents and guests seamlessly get where they need to go. Effective Safety Signage for Apartment Complexes Strategic safety signs are a must for any apartment community, helping to mitigate risk and give residents peace of mind. Required by law in many cases, these symbols and warnings serve an important function by alerting residents and visitors to potential hazards, emergency resources, and proper protocols.  Exit signs with directional arrows provide critical guidance in the event of a fire or other emergency evacuation. Highly visible hazard signs denoting slippery floors or wet paint caution people to avoid dangerous conditions. Signs indicating the locations of safety equipment like fire extinguishers and defibrillators can save critical seconds in an emergency. Parking and traffic signs help maintain order in complex lots and garages. Warning symbols for loud noises, falling objects, or other construction hazards around work zones keep passersby safe. When properly placed around an apartment community, these simple but essential signs convey a message of preparedness and attention to safety that gives residents confidence in their building management. Contemporary Signage for an Inviting Apartment Atmosphere An apartment community's signage makes a strong first impression on prospective residents. To keep pace in a competitive market, modern, stylish signs are a must in showcasing an up-to-date, inviting atmosphere.  Sleek, backlit LED signs at a complex's entrance identify the property while seamlessly blending contemporary aesthetics. Likewise, stylish building IDs with minimalist lettering and colors that pop evoke modern tastes. Parking signs with clean lines and high-visibility reflective vinyl or thermoplastic lettering also exude a contemporary vibe.  Inside leasing offices, wayfinding signage with intuitive pictograms, sans-serif fonts, and bright accent colors speaks to today's sensibilities. Outdoor banners sporting vibrant images, short impactful phrases, and a distinctive modern style attract the gaze of passersby. Signs with polished, contemporary finishes appeal aesthetically and communicate professionalism and quality. By partnering with an innovative sign company, apartments can keep their image fresh, memorable, and inviting for new generations of renters. Promotional Signage for Apartment Events Special events help apartment communities build a sense of togetherness and camaraderie among residents. To generate buzz and boost participation, targeted signage is an invaluable promotional tool. Eye-catching vinyl banners prominently displayed at a complex's entrance build anticipation and awareness of upcoming holiday parties, poolside barbecues, and other resident events. Sandwich boards stationed in high-traffic common areas like mailrooms spread the word on everything from movie nights to fitness classes. For events like trick-or-treating or a pet parade that will draw outside visitors, roadside signs posted nearby grab attention from passersby.  Temporary signage like corrugated yard signs, A-frame sidewalk signs, and posters hung in common spaces ensure residents receive frequent reminders leading up to each event. The vibrant, festive designs set a fun tone. After an event concludes, a thoughtful "Thank You" sign shows appreciation for those who participated. With the right signage strategy, apartment managers can generate buzz and bring their community together around special activities and gatherings year-round. Clear Identification Signs for Apartment Buildings A clear signage strategy is essential in any apartment community to help residents and guests easily identify buildings, units, and common spaces. Proper identification guides traffic, minimizes confusion, and improves the overall living experience.   Illuminated building numbers and address signs ensure emergency responders can quickly locate the correct structures. Unit number signs on floors and doors give each residence a sense of identity. Room ID signs labeled with easy-to-read text and icons help differentiate laundries, fitness centers, lobbies, and other shared amenities. Custom room name signs add personality to spaces like game rooms or theaters.  Well-designed identification signage also reinforces security. Authorized access signs for private lobbies or gated garages deter unwanted visitors. And placards labeling restricted areas like electrical rooms or roof access help keep people safe.  Finally, a clear wayfinding signage strategy with directionals pointing to different building exits or parking areas simplifies navigation. With thoughtful placement and durable materials, identification signage provides clarity, security, and convenience for years of daily use. Accessible Signage for ADA Apartment Compliance In apartment complexes, proper ADA-compliant signage is a legal requirement to accommodate residents and guests with disabilities. Following ADA guidelines help ensure equal access and inclusion for all. Signs must have high visual contrast between lettering and background without glare or shadows. Grade 2 braille placed below the text provides accessibility for the blind and visually impaired. Raised characters and pictograms allow signs to be interpreted non-visually by touch.  Accessible signs use simple, intuitive icons that transcend language barriers. Directional signs assist with wayfinding. Room signs identify amenities. Informational signs indicate accessible routes, entrances, exits, and areas of rescue assistance. Stairway signs guide users towards ramps.  By law, permanent spaces like unit entrances and common rooms require ADA signs. Temporary signs like parking warnings should also follow recommendations. With a thoughtful sign plan incorporating contrast, braille-raised characters, and icons, apartment complexes demonstrate their commitment to creating a welcoming, navigable environment for all residents and visitors. Intuitive Wayfinding Signage for Apartment Complexes A clear wayfinding signage strategy is essential for any apartment community, allowing residents and guests to seamlessly navigate between buildings, amenities, and parking areas. Intuitive signs reduce frustration and reflect thoughtful management. Directional signs posted at complex entrances and key intersections point visitors toward leasing offices, guest parking, and specific buildings. Trailblazer signs on main walkways provide ongoing orientation. Arrows, international symbols, and maps further aid navigation at junctions.  Building directories found in main lobbies centralize location information for amenities like fitness centers, pools, and business centers. Illuminated unit number signs outside stairwells and elevators confirm users are on the correct floor. Parking signs with color coding and space numbers help distinguish lots and spaces.  With thoughtful placement and highly visible reflective materials, wayfinding signage ensures visitors quickly find their destination. This cuts down on circling, enhances first impressions, and communicates a resident-focused environment. Simply put, good wayfinding equals good management. Conclusion An effective signage plan is invaluable for any apartment community, serving practical and aesthetic purposes. From illuminating building numbers that assist emergency response to wayfinding signage guiding foot traffic, signage provides orientation, security, accessibility, and visual appeal. Managers must consider permanent signage needs like room IDs and ADA compliance and options for changeable messaging to promote leasing availability or resident events. The finishes and design details of all signs should align with the complex's contemporary style and branding. Utilizing sign types from digital displays to sidewalk A-frames provides flexibility. With the help of an experienced sign company, managers can develop a comprehensive signage strategy tailored to their complex's specific spaces, needs, and aspirations. From influencing first impressions to sustaining long-term functionality, signage positively impacts apartments in countless ways. When thoughtfully designed, fabricated, and placed, signage cements an apartment community's identity as an inviting, navigable place residents are proud to call home. Read Also: How to Make Your Student Apartment Feel Like Your Own House? Things You Can Do to Your Apartment to Raise Its Value 5 Interior House Painting Tips

READ MOREDetails
Garden During Winter

How to Maintain a Bright and Beautiful Garden During Winter

Throughout the year our gardens are constantly changing from season to season, which creates a fresh and exciting feel every month. From beautiful blooms in the spring to crisp, frosty layers during the winter, our gardens always provide a captivating aesthetic to enjoy. When it comes to the winter months, many people neglect their gardens and wait until the warmer days arrive again, but this shouldn’t be the case. There are lots of ways to keep your garden looking its best throughout the winter, including adding a deer fence to protect your garden and property from animals and wildlife, and here’s other tips… Invest in a Greenhouse Greenhouses are a must for anyone keen to continue gardening during the winter months and maintain a beautiful garden aesthetic. From the moment you introduce a greenhouse, you open up your gardening options, giving you the chance to work on all kinds of wonderful projects. You’ll also find that a greenhouse helps to bring character to the garden, adding to the overall look of your outdoor space. A greenhouse also enables you to work on projects that may need a little encouragement in a warm environment, before adding them back to your garden to help brighten the area and enhance the aesthetic. Take a look at Two West’s wide selection of greenhouses here to find the right fit for your garden. Embrace Winter Colour Keep your garden looking bright and colorful by adding a selection of winter-blooming plants to your pots and beds. From winter-blooming daphne to pansies and cyclamen, you can bring an assortment of gorgeous winter colors to really bring life to your garden. Whether you opt to plant these bloomed plants during the winter for instant color, or you decide to plant your seeds earlier in the year for winter blooms, you can create a stunning aesthetic and add a trendy feel to your garden. Find the perfect winter blooms here available at Dobies to bring a seasonal touch to your garden. Install Outdoor Lighting Having a display of outdoor lighting can really help to illuminate your exterior, not only adding to the overall aesthetic but also enhancing your home's security. There are lots of different ways to introduce lighting, from subtle lights positioned neatly along the outskirts of your lawn or along the path, to brighter lights that stand tall and brighten the whole space. Do a little research into different types of outdoor lighting to see which would work best with your home's style and layout and invest in the best style for you. It’ll be much easier to enjoy your garden on those darker evenings once you have your outdoor lighting fitted. Visit Lights.co.uk here to find inspiration for outdoor lighting to introduce to your home and garden. Frequently Sweep Up Leaves   Many people see sweeping up the leaves in the garden to be a pointless task, as sooner or later they’ll be back to sweep up again. This may be the case, but by sweeping up the leaves you are able to keep your garden looking its best, even during the winter. Leaves and generic debris can create a very messy, untidy look for the garden so it’s always beneficial to keep on top of sweeping them off to the side or removing them from flower beds and your lawn area. You’ll be amazed how much of a difference this small but practical task will make! Read Also: How to Maintain Your Garden Railings? Grow these flowering plants in your home garden 5 Best Vegetables You Should Try Growing In Your Garden Looking for a Gardener: 8 Questions to Ask Before Hiring a Professional

READ MOREDetails