Published on: 16 October 2023
Last Updated on: 11 February 2026
When it comes to renovating or building a new space, one of the most crucial aspects is the flooring installation process. The type of flooring you choose can significantly impact the overall aesthetics, functionality, and durability of your space. In this comprehensive guide, we will walk you through the intricate process of flooring installation toronto, providing valuable insights and tips to ensure a successful transformation.
Selecting The Right Flooring Material
The first step in the flooring installation process is choosing the right material. Whether you opt for hardwood, laminate, vinyl, tile, or carpet, each material has its unique features and benefits. Consider factors such as your budget, the room's purpose, and your design preferences when making this decision.
Measuring And Preparing The Space
Before the installation begins, accurate measurements of the room are crucial. This step ensures that you purchase the right amount of flooring material. Additionally, you'll need to prepare the space by removing any existing flooring, baseboards, and furniture. A clean, level surface is essential for a smooth installation.
Acclimating The Flooring
Many flooring materials, especially hardwood, need to acclimate to the room's temperature and humidity levels before installation. This process prevents the flooring from warping or expanding after installation. Follow the manufacturer's recommendations for acclimation time.
The Installation Process
Subfloor Preparation
A stable subfloor is the foundation of a successful flooring installation. Ensure that the subfloor is clean, dry, and free of any irregularities. Repair any damaged areas and add an underlayment if necessary.
Layout And Design
Planning the layout of your flooring is crucial for achieving a polished look. Decide whether you want a diagonal, herringbone, or straight pattern, depending on your design preferences. This step is especially important for tile and hardwood installations.
Cutting And Fitting
Precise cutting and fitting of the flooring material are essential for a seamless finish. Use the appropriate tools, such as a saw or cutter, to trim the material to fit the room's dimensions accurately. Pay special attention to corners and edges.
Installation Method
The installation method varies depending on the type of flooring you've chosen. For example, hardwood may be nailed or glued down, while laminate often features a click-and-lock system. Follow the manufacturer's guidelines and use the appropriate adhesives or fasteners.
Finishing Touches
After the main installation is complete, it's time for the finishing touches. Install baseboards and transitions to create a polished look. Seal gaps and joints to prevent moisture and dirt from seeping underneath the flooring.
Maintenance And Care
Cleaning And Maintenance
Proper maintenance is crucial to ensure the longevity of your new flooring. Regularly sweep or vacuum to remove dirt and debris. Use manufacturer-recommended cleaning products to maintain the flooring's finish.
Repairing Damage
Accidents happen, and flooring can get damaged over time. Whether it's a scratch on hardwood or a chipped tile, knowing how to repair minor issues can extend the life of your flooring. Consult with professionals for major repairs.
The flooring installation process is a transformative journey that adds beauty and functionality to your space. By carefully selecting the right material, preparing the space, and following the installation steps, you can achieve stunning results that will stand the test of time.
Ankita Tripathy loves to write about food and the Hallyu Wave in particular. During her free time, she enjoys looking at the sky or reading books while sipping a cup of hot coffee. Her favourite niches are food, music, lifestyle, travel, and Korean Pop music and drama.
Today, clothing sizes often lead people to believe they are smaller than their actual size. This is called “vanity sizing”. For instance, "a size 8 dress today is nearly the equivalent of a size 16 dress in 1958," according to a report.
Because clothing can create the illusion of a slimmer appearance, many people now desire larger bathrooms as well. The trend of vanity sizing is influencing the design and functionality of bathrooms. From wider toilet stalls to more spacious showers, bathrooms are being changed to match people's distorted self-image.
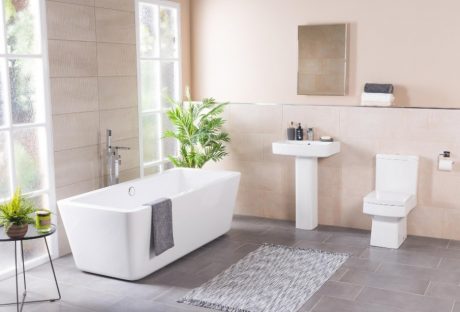
What is Vanity Sizing For Bathrooms?
Vanity sizing is when something is made bigger than normal to make people feel better about themselves. Just like size 6 jeans that actually fit someone who usually wears size 8 jeans.
In bathrooms, vanity sizing means making the room and fixtures bigger than what works for real bodies. Such as extra-wide shower stalls, two-person bathtubs, or oversized sinks. They make us feel skinnier, but take up a lot of space!
Factors To Consider When Choosing Vanity Size
The main thing you should consider when choosing your vanity is the size of your bathroom which is a major factor in changing the look and feel of your bathroom. So, carefully review common bathroom vanity sizes and measurements before selecting. Look at the data below that shows the common vanity width that fits the bathroom sizes:
Data Source: Forbes
1. Consider Floor Space
Will counters, cabinets, and toilets still squeeze in if you supersize your bathroom? Make sure giant fixtures don't crowd out other necessary stuff!
2. Watch Door Openings Too
That cool two-person tub won't do you any good if it gets stuck trying to fit through the bathroom doorway! Double-check entrances.
3. Check Plumbing Locations
Expanding your bathroom means dealing with pipes inside walls too. Make sure water lines still reach sinks or toilets when they move.
4. Price For Extreme Upgrades
Going big in bathrooms means spending big bucks too! Make sure your wallet can handle all that bonus tile, lighting, high-tech toilets, and other swanky stuff before pulling the trigger.
5. Future Homeowners Too
What seems huge and perfect for your family now may scare off buyers down the road. Keep future practicality for the next folks in mind.
6. Consider Resale Value
Even if you adore your 47 jet massaging tub, will someone else want to pay big money for your over-the-top bathroom later when you sell?
7. Extra Cleaning Responsibilities
The bigger the bathroom, the longer the cleaning day takes! Make sure you want to put in elbow grease for giant showers and his ‘and her everything.
8. Watch Wet Floor Safety
Oversized sinks and tubs mean leaks or splashes cover larger areas. Pay attention to slip-proof surfaces so no one goes crashing down.
9. Visiting Guest Comfort
Even if space permits, older relatives may feel uneasy navigating a huge bathroom with their walkers or canes. Consider all who will use it.
10. Separate Private Toilet Room
Rather than one giant open space, smaller vanity bathrooms with a separate water closet for the toilet allow privacy.
Choosing The Right Vanity Size For Your Bathroom’s Look
The dimensions of your bathroom vanity change how open, crowded, or balanced your space appears. An overgrown vanity makes small rooms feel stuffed. But one too tiny turns your bathroom into a messy pile-up of products without enough organizer drawers or counter area.
Here’s how to get vanity sizing just right for your ideal bathroom design style:
In Itsy Bitsy Bathrooms
When dealing with snug powder rooms or half baths, keep your vanity narrow in the 24 to 30-inch range so it doesn’t hog up the entire floor. Any wider starts making moving around impossible! Select wall-mounted styles instead of boxy cabinets to save precious inches. Or opt for floating vanities that have air rather than chunky boxes below to give the illusion you have more breathing room.
Another decorating trick for a petite bathroom is going big with mirrors or using reflective tiles and chrome finishes. When tiny rooms sparkle and shine, they seem to double in size instantly! Just avoid dark paint shades, clutter, and heavy fabrics that make small salons feel even more closed in.
For Middle-of-the-Road Bathroom Sizes
If your washroom dimensions fall somewhere in that just-right not-too-big, not-too-small middle zone, standard vanity widths from 30 to 48 inches tend to fit nicely without limiting movement. This gives your average family plenty of surface space to spread out self-care must-haves each morning and store all those lotions and potions in handy drawers below.
When organizing your cabinet and counter goods, be sure to keep at least 9 to 12 inches of space around the vanity perimeter. You’ll still need elbow room to get in there for clean-ups without bonking walls, doorway frames, or light switches! Beyond functional inches, defining your vanity area with cool lighting designs or eye-catching tile shapes helps contain the space in a neat square for a balanced, soothing aesthetic.
When You’ve Got Room to Spare
Lucky enough to be working with a big old bathroom complete with soaring ceilings and a giant footprint? Then you’ve got options to install his and her double-wide vanities ranging from 60 to a whopping 72 inches. This creates the dramatic appearance of dual stations without the need for significant construction to physically divide your spacious room into two separate spaces.
FAQs:-
Q1. What is the standard width of a bathroom vanity? Ans: The standard width for a single-sink bathroom vanity is 24 to 48 inches. For a double sink vanity, it’s 60 to 72 inches. Q2. How do I choose the right vanity size for my bathroom? Ans: Consider your existing bathroom size, number of users, and required storage space when selecting the ideal vanity. Allow proper clearance between the vanity and walls. 3. What are some common mistakes to avoid when choosing a bathroom vanity size? Ans: Avoid sizing too small and creating limited functionality or choosing an oversized vanity that makes the bathroom feel confined. Failing to measure properly and allowing adequate wall clearance are also common mistakes.
Conclusion
Vanity dimensions significantly influence the visual enhancement and practical use of any bathroom. By factoring in room size, user needs, and required storage, you can achieve an optimally designed and functional space that suits your lifestyle beautifully. By paying attention to critical measurements and clearances, you can avoid common mistakes. With some planning and foresight, you’ll love your new bathroom for years to come.
Additional Reading:
3 Best Indoor Plants For The Dining Room
Stunning Bathroom Vanities For An Instant Makeover
Storage Units Your Ultimate Guide To Organized Living
Maintaining a clean and organized workplace is a must for your well-being and productivity. However, it is no secret that office cleaning is a daunting task.
There are so many things you need to consider, not to mention different areas and surfaces require different cleaning methods. Often, different methods require different cleaning equipment and cleaning supplies.
In this entry, we will share with you the best practices and processes that the best commercial cleaning services use in their office cleaning service. Here's a commercial cleaning checklist to keep your workplace spotlessly clean.
The basics of office cleaning services
Before diving into the checklist, it is important that you understand the basic processes of commercial cleaning and how commercial cleaning companies deliver these practices.
Most of these things are pretty self-explanatory. However, there is a reason why professional cleaners from commercial cleaning companies are efficient in their job – they know how to do things right. Knowing these practices will help you understand how to do them right too.
Dusting
Dirt, dust, and allergen particles accumulate quickly. If not removed from the business premises, these particles can get mixed into the indoor air and cause various health problems such as allergies, respiratory problems, headaches, etc.
Commercial cleaning plans for office cleaning often include exhaustive dusting of all surfaces. This includes desks, shelves, electronics, windowsills, etc. A good commercial cleaning company uses microfiber cloth and a feather duster to remove dust effectively and safely.
Vacuuming
Vacuuming is the most efficient way to keep workplaces clean. It removes dirt, dust, and various outdoor debris from carpets, mats, rugs, etc.
The advantage of hiring cleaning services is that a commercial cleaning company has access to industrial-grade and powerful vacuum cleaning machines that can truly and efficiently remove dirt, dust, and various debris.
Nevertheless, when vacuuming your workplace, include cleaning the hard-to-reach areas, such as under the desks, tables, and chairs. Since they are hard to reach, these spots often trap foreign debris.
Mopping
Mopping is the best way to keep hard floors clean and shiny. It removes dirt, dust, and grime buildup from the floor. However, there is more to mopping than simply sliding the mop head back and forth on the surface of the floor.
When mopping the floor, use a cleaning solution that is recommended for the type of floor you have.
To ensure that all areas are covered, you need to mop in a back-and-forth motion.
Trash removal and disposal
No building maintenance will ever be complete without taking the trash out.
When removing trash from your commercial premises, make sure to replace the bin liners as well. And when replacing the liner, make sure you clean the interior of the trash bin.
Commercial cleaning services often include weekly disinfection of the trash bin. This is incredibly important in preventing bacteria buildup and odour in your trash bin.
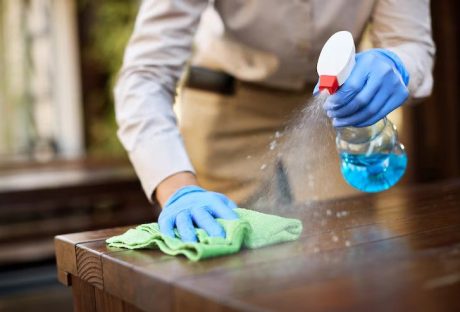
Disinfecting surfaces
Another crucial aspect of commercial cleaning is surface disinfection. Disinfecting surfaces helps prevent the spread of disease-causing germs and bacteria in the workplace.
When disinfecting your workplace, make sure you use a disinfectant spray or antibacterial wipes to clean surfaces. This includes desks, chairs, tables, countertops, light switches, office appliances buttons, and doorknobs. Commercial cleaning services often include disinfection and sanitation of surfaces in their cleaning service.
Also, commercial cleaners, in particular, pay close attention to high-touch areas and surfaces, which are often breeding grounds for bacteria. These surfaces include hand railings, elevator buttons, light switches, and more.
Bathroom cleaning
Bathrooms are often the dirties and smelliest areas for commercial spaces. With that said, it is not surprising that they have become breeding grounds for bacteria and germs.
When cleaning bathrooms, make sure you clean and disinfect high-touch spots and items such as faucets, sinks, toilets, and even mirrors.
Commercial cleaners often include towel replacement, hand soap refill, and bathroom supplies restocking to ensure your office bathrooms are clean and convenient to use.
Breakroom cleaning
The breakroom is where employees often gather to chit-chat, eat their food, drink their beverages, and rest. For this reason, breakrooms can become breeding grounds for bacteria and germs. Thus, when taking care of your breakrooms, make sure you include the appliances, countertops, sink, tables, and chairs.
Glass window cleaning
Often, business owners neglect their windows, thinking they cannot clean surfaces they can’t reach. This is particularly true for tall building establishments.
Professional commercial cleaners, however, have access to the right cleaning equipment and materials you need for a thorough and efficient window cleaning. They have tall ladders, power washers, longer hoses, and the right safety equipment and gears for a thorough clean.
Floor care
Floors, whatever type of flooring material it uses, must be swept daily to remove dirt and debris. Moreover, make sure you use the right floor cleaner that is recommended for the type of flooring material your business premises has.
Carpet and upholstery cleaning
Carpets and rugs are basically dirt traps. Aside from completing the look of a certain room, carpets function as dirt traps to minimize and even stop dirt and dust from entering the premises.
While regular vacuuming can help, most office vacuums are not strong enough to rid carpets of deep-seated stains and bacteria. This is why commercial cleaning services invest in high-quality equipment so they can tackle difficult cleaning jobs like deep carpet cleaning.
And like carpets and rugs, upholstered furniture is dirt, dust, and allergen traps too. Regular vacuuming of upholstery removes foreign debris. However, to ensure your carpets are actually clean, fresh, and disinfected, you can ask professional cleaners to take care of them.
Most commercial cleaning service companies would suggest deep cleaning for carpets and furniture upholstery once or twice a year.
Air vent cleaning
Another incredibly important process for comprehensive commercial cleaning services includes air vent cleaning.
Air vents accumulate allergens, dust, and foreign debris over time. When there is too much buildup of these particles in your air vent system, your indoor air quality will drop, leading to health issues such as respiratory problems such as asthma attacks.
The Ultimate Commercial Cleaning Checklist for Your Workplace
Daily Tasks:
Desk and Surfaces
Wipe down your desk and other surfaces daily with a disinfectant spray or wipe to remove any dirt, dust, or germs.
Trash
Empty your trash can daily, and ensure all rubbish is disposed of correctly.
Floors
Sweep or vacuum your floors daily to remove any dirt or debris.
Kitchen/Breakroom
Clean and sanitize all surfaces, including countertops, sinks, and appliances, daily.
Weekly Tasks:
Dusting
Dust all surfaces, including shelves, pictures, and light fixtures.
Glass and Mirrors
Clean all glass surfaces, including windows and mirrors, to remove any fingerprints or smudges.
Upholstery
Vacuum all upholstery, including chairs and couches, to remove any dirt or debris.
Disinfecting
Disinfect all high-touch areas, including doorknobs, light switches, and handles.
Floors
Mop or steam-clean your floors weekly to remove any stains or buildup.
Monthly Tasks:
Windows
Clean your windows inside and out to let in more natural light and improve the appearance of your workspace.
Carpets
Have your carpets cleaned by professionals to remove any deep-seated stains and odours.
Deep Cleaning
Perform a deep clean and complete disinfection of your entire workspace, including hard-to-reach areas and appliances.
Office Equipment
Clean and sanitize all office equipment, including computers, printers, and phones.
Restrooms
Thoroughly clean and sanitize your restroom, including the toilet, sink, and floors.
Seasonal Tasks:
Outdoor Maintenance
If you have an outdoor space, clean and maintain it seasonally to keep it looking its best.
HVAC Maintenance
Have your HVAC system inspected and cleaned seasonally to ensure proper airflow and reduce allergens.
Furniture Maintenance
Have any upholstered furniture professionally cleaned seasonally to extend its lifespan?
The Takeaway
As you can see, office cleaning is not a one-time thing. It is a continuous never-ending process. You can save yourself from all these troubles and opt for professional office cleaning instead.
Cleanworks cleaning services is one of the few professional commercial cleaning companies that actually deliver the highest quality professional service. They have been in the industry of professional commercial cleaning for more than two decades, thus they have the track record to say they have “been there, done that”.
Cleanworks cleaning services have a fully trained, extensively experienced, and completely equipped cleaning team to handle all sorts of cleaning. Their office cleaners are fully insured and up-to-date with the latest local cleaning requirements and COVID cleaning guidelines.
Call Cleanworks commercial cleaning services now and get free quotes for your commercial cleaning needs. Their professional staff will be more than willing to help you.
Read Also:
Why Is A Janitorial Service For Commercial Establishments?
10 Pro Tips To Minimize Commercial Door Repair & Maintenance Cost
The Hidden Damages In Workspaces: 5 Steps To Reduce The Risk Of Workplace Injuries!
Are you planning to design a dining room in your home, but don't know where to start? You've come to the right place! Designing a dining room is a fun and rewarding experience that can enhance both the look and atmosphere of any house.
There are many elements that go into making an impressive dining space; from choosing the right shape and size of the table to selecting comfortable seating, there are many factors to take into account.
This post will walk you through each step of creating a beautiful and functional space for entertaining loved ones or just relaxing with family at mealtime. So let's get started on your new dream dining room!
Choose the right shape and size of table for your space
One of the most important decisions when designing a dining room is choosing the right size and shape of the table. Consider the shape and size of the room, the number of people you plan on hosting, and the atmosphere you want to create.
Round tables are great for intimate gatherings, while rectangular tables offer more space for seating. Keep in mind that the size of the table should be proportionate with the size of the room to avoid overcrowding or undersized furniture.
Decide on a style
The style you choose for your dining room will set the tone and ambiance of the space. Whether modern, traditional, or rustic, it is important to choose a style that is consistent with the look and feel of the rest of your home.
You can match your style with your favorite furniture pieces, color scheme, or personal taste.
Consider textures
Textures in your dining room can add depth and character to the space. Consider using different mediums such as wood, fabric, and metal to create contrast and interest.
You can upgrade your dining room with an elm dining table as a wooden table can bring a natural, rough texture while a plushy rug can soften the look. A metallic vase or wall decor can add a glamorous touch. Experiment with textures until you find the combination that best suits your style.
Select comfortable seating
The seating in your dining room is crucial to the enjoyment of your guests. It is important to choose seating that is not only comfortable but also aesthetically pleasing. Consider using a mix of chairs, benches, and stools to vary the look and add interest to your space.
Upholstered seating is great for long dinners, while stools are perfect for more casual gatherings. The key is to ensure that your guests are comfortable and able to enjoy their meals.
Accessorize with table linens and plants
Table linens and plants can bring a fresh and inviting feel to your dining room. Experiment with tablecloths, table runners, and placemats to add pops of color and texture. Don’t forget to add greenery!
Plants and flowers can add life and character to your space. A vase of fresh flowers or a potted plant can be the perfect finishing touch to your dining room.
Hang artwork or wall décor to add character to the room
Artwork and wall décor can add personality and character to your dining room. Consider hanging a statement piece above the table or a gallery wall on the opposite wall.
Framed artwork or prints can add color and interest to the space. Don’t be afraid to mix different styles and mediums for a unique and eclectic look.
Read Also:
How to Choose LED Lights for Every Room in Your Home
3 Reasons Why The Dining Room Is Always Important
Should You Get A Dining Bench


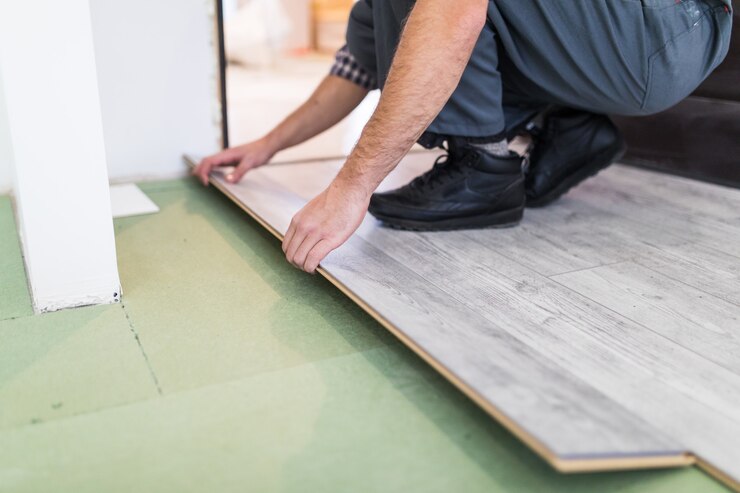
 The first step in the flooring installation process is choosing the right material. Whether you opt for hardwood, laminate, vinyl, tile, or carpet, each material has its unique features and benefits. Consider factors such as your budget, the room's purpose, and your design preferences when making this decision.