Commercial Air Conditioning Systems: What Businesses Need to Know

Published on: 04 July 2023 Last Updated on: 16 August 2023
Air Conditioning Systems

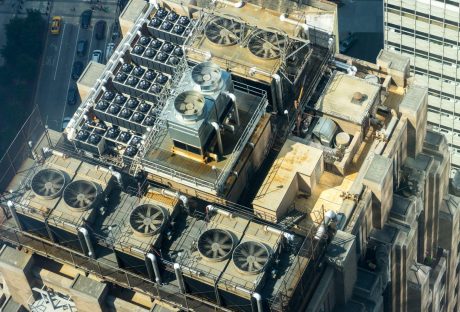
As the temperature rises, businesses must ensure a comfortable environment for their employees and customers. A reliable commercial air conditioning system plays a vital role in achieving this goal. In this comprehensive guide, we shall explore the primary considerations a business should bear in mind while choosing and maintaining commercial air conditioning systems.

The importance of a well-functioning commercial air conditioning system cannot be overstated when creating a conducive work or shopping environment. Whether it’s an office, retail store, restaurant, or any other commercial space, maintaining an optimal indoor temperature is crucial for productivity, customer satisfaction, and overall well-being.

This article will delve into the essential aspects of commercial air conditioning systems that every business should know.

Choosing the Right System

Selecting the right commercial air conditioning system for your business can be daunting. Consider the following factors to make an informed decision:

1. Size and Capacity: 

Assess the size of the space that needs to be cooled. A particular system that is quite small will require help to regulate the desired temperature. On the other hand, an oversized system will lead to excessive energy consumption. Consult with HVAC professionals to determine your commercial space’s appropriate size and capacity.

2. Energy Efficiency: 

Opt for energy-efficient systems to reduce operating costs and minimize environmental impact. Look for air conditioning units with certifications and efficiency ratings related to high energy, such as the Energy Star label. Such systems are generally designed to provide optimal cooling while consuming less energy.

3. Weather and Climate: 

India’s summer season might get a little too hot sometimes. This is particularly true during mid-summer when it becomes difficult to thrive in urban areas. But, the weather conditions across the country change from one region to another. Hence, opt for an air conditioner that keeps the temperature inside your house regulated accordingly.

4. Zoning and Control: 

Consider systems that offer zoning capabilities, allowing you to control different areas or zones separately. This feature enables you to adjust the temperature according to the specific needs of each space, maximizing comfort and energy efficiency.

Maintenance and Regular Servicing

Once you have installed a commercial air conditioning systems, it is crucial to maintain it properly to ensure its longevity and efficiency. Here are some maintenance tips:

A. Filter Cleaning and Replacement: 

Clean or replace air filters regularly to ensure proper airflow and prevent the accumulation of dust and debris. Clogged filters can restrict the system’s performance and lead to poor indoor air quality. The most significant maintenance task that ensures the efficacy of your AC is filter cleaning as well as its replacement. 

B. Coil Cleaning: 

Over time, the coils in your air conditioning system can accumulate dirt and grime, affecting its efficiency. Regular coil cleaning can enhance the system’s cooling capacity and reduce energy consumption. The dirt decreases airflow inside the air conditioner, which insulates the coil. If you want to mitigate this problem, inspect the evaporator coil each year. 

C. Professional Servicing: 

Schedule regular maintenance checks and servicing by qualified HVAC technicians. They will inspect the system, identify potential issues, and perform necessary repairs or adjustments. Regular servicing can help prevent major breakdowns and extend the lifespan of your air conditioning system.

Taking Care Of Your Air Conditioner: 6 Tips That Help

It is good to call in some professional help while cleaning your air conditioner. But it doesn’t harm to take care of it all by yourself. Given below are some tips to clean your AC all by yourself:

1. Change The Filters 

As mentioned above, dirty filters can stop the efficiency of your system. Hence, install a new filter every month when the cooling season for window and central units goes on. Check out the minimum efficiency reporting the value of your filter, which generally ranges between 1-12 for residential AC units. The higher this number is, the better filtration you will get!

2. Fix Leaks

Did you know that 30 percent of airflow can be lost if your ducts are leaked? Window AC units have notorious strength, which does not allow proper sealing. Locate leaks using the “smoke trick,” which goes back a long time. If you have a window unit, simply light an incense stick and hold it at the confluence of the window frame and the unit. 

3. Use Timers

It is not a good idea to blow your Air Conditioning Systems while you are working. If you have central units, make sure to install a programmable thermostat that allows you to set higher temperatures when you are away. Additionally, they set a cooler temperature while you are at home. New window units consist of adjustable thermostats as well as built-in timers. However, you can also purchase a timer. 

4. Keep The Air Cool With Insulation

Ducts in crawl spaces as well as hot attics must be wrapped to maintain the coolness of the room. For this purpose, you might make use of batt insulation, rigid foam, or spray insulation. Rigid insulation along with seal batt must go with foil tape. If you have tight space, wraps such as Reflectic provide an ideal insulation degree. 

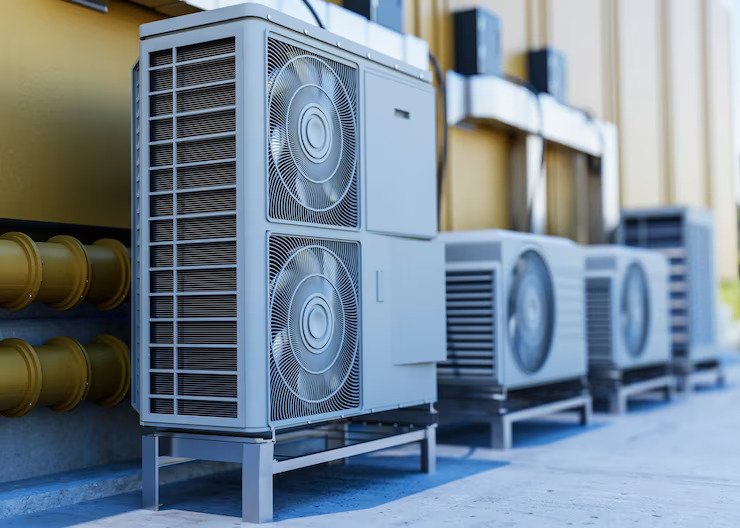
5. Service Condenser Or Compressor

The condenser and compressor of a central air conditioning system are generally located exterior of the house but very close to your base. Hence, it functions best if there is a clear space of about 24 inches in each direction. Make sure you get rid of tall trees, hanging branches, and shrubs nearby, 

6. Keep The Unit Cool

You can extend the lifetime of your air conditioning systems by keeping the room cool. Put down the shades and blinds when the sun is high. Or you might also opt for awnings installation and protect excessive UV rays from entering the south-facing windows.

Conclusion

A reliable commercial air conditioning system is essential for businesses to maintain a comfortable and productive working environment. You can ensure optimal cooling while minimizing energy consumption by considering factors such as size, energy efficiency, and zoning capabilities during the selection process. 

Regular maintenance and professional servicing will keep your system running efficiently and extend its lifespan. Prioritize the comfort of your employees and customers by making informed decisions about your commercial air conditioning needs.

Read Also:

Arnab is a professional blogger, having an enormous interest in writing blogs and other jones of calligraphies. In terms of his professional commitments, He carries out sharing sentient blogs.

View all posts

Leave a Reply

Your email address will not be published. Required fields are marked *

Related

Flooring Installation Process

Flooring Installation Process Transforming Your Space With Elegance

When it comes to renovating or building a new space, one of the most crucial aspects is the flooring installation process. The type of flooring you choose can significantly impact the overall aesthetics, functionality, and durability of your space. In this comprehensive guide, we will walk you through the intricate process of flooring installation toronto, providing valuable insights and tips to ensure a successful transformation. Selecting The Right Flooring Material The first step in the flooring installation process is choosing the right material. Whether you opt for hardwood, laminate, vinyl, tile, or carpet, each material has its unique features and benefits. Consider factors such as your budget, the room's purpose, and your design preferences when making this decision. Measuring And Preparing The Space Before the installation begins, accurate measurements of the room are crucial. This step ensures that you purchase the right amount of flooring material. Additionally, you'll need to prepare the space by removing any existing flooring, baseboards, and furniture. A clean, level surface is essential for a smooth installation. Acclimating The Flooring Many flooring materials, especially hardwood, need to acclimate to the room's temperature and humidity levels before installation. This process prevents the flooring from warping or expanding after installation. Follow the manufacturer's recommendations for acclimation time. The Installation Process Subfloor Preparation A stable subfloor is the foundation of a successful flooring installation. Ensure that the subfloor is clean, dry, and free of any irregularities. Repair any damaged areas and add an underlayment if necessary. Layout And Design Planning the layout of your flooring is crucial for achieving a polished look. Decide whether you want a diagonal, herringbone, or straight pattern, depending on your design preferences. This step is especially important for tile and hardwood installations. Cutting And Fitting Precise cutting and fitting of the flooring material are essential for a seamless finish. Use the appropriate tools, such as a saw or cutter, to trim the material to fit the room's dimensions accurately. Pay special attention to corners and edges. Installation Method The installation method varies depending on the type of flooring you've chosen. For example, hardwood may be nailed or glued down, while laminate often features a click-and-lock system. Follow the manufacturer's guidelines and use the appropriate adhesives or fasteners. Finishing Touches After the main installation is complete, it's time for the finishing touches. Install baseboards and transitions to create a polished look. Seal gaps and joints to prevent moisture and dirt from seeping underneath the flooring. Maintenance And Care Cleaning And Maintenance Proper maintenance is crucial to ensure the longevity of your new flooring. Regularly sweep or vacuum to remove dirt and debris. Use manufacturer-recommended cleaning products to maintain the flooring's finish. Repairing Damage Accidents happen, and flooring can get damaged over time. Whether it's a scratch on hardwood or a chipped tile, knowing how to repair minor issues can extend the life of your flooring. Consult with professionals for major repairs. The flooring installation process is a transformative journey that adds beauty and functionality to your space. By carefully selecting the right material, preparing the space, and following the installation steps, you can achieve stunning results that will stand the test of time. Read Also: How To Pick The Perfect Flooring For Your New Home How to Protect Your Wood Flooring in a Busy Household List of Most Durable Kitchen Flooring

READ MOREDetails
Drywall

Elevate Your Home With Unique Ceiling Textures

Drywalls are those construction materials that are used to create walls and ceilings in your home. Not all that, but drywalls also come in handy if you want to create design features like eaves, arches, or any mind-blowing architectural requirements!!! Do you know the best part about drywalls? These are super easy to install, highly durable, and only require simple repairs when damaged. So, drywall is a flat component composed of calcium sulfate dihydrate, typically between thick sheets of backer paper, and facer, used to construct interior ceilings. Let’s talk about the ceiling textures and the drywall options you can choose for your home!!! The Ceiling Textures And Your Drywall Options Decorating your home can be a real challenge for many !!! Therefore, choosing the right drywall finish or texture can prove to be a hard nut to crack. And it’s very natural to get in a state of indecision if you are handpicking it for your new home or renovation project. There are so many options that it feels like you are “searching for a pearl in an ocean.” Making up your mind about whether or not to go texturing your ceiling can be a tough job. And even if you choose to texture your ceilings, there are chances you’ll be confused about which one to go for!!!! And remember, getting the drywall right is the first step of tiling projects?”. But No Need to Worry!! This article will guide you in choosing the perfect texture and drywall option for your ceilings to look more elegant than ever!! 1. Sheetrock Texture: Old Is Gold Sheetrock ceiling texture is a drywall ceiling texture that has been famous since 1917. The reason this drywall texture is so awesomely renowned is because of the artistic look that it gives to your ceiling And the best part is you don’t need to use any sort of spray paint in this case. You can achieve this texture by using your artistic hand technique and without using any special brushes. This texture is perfect for any room. There are no restrictions on the use of this ceiling texture. 2. Stipple Brush Texture: A Test Of Your Skill This texture is not as easy as it seems. You need skills to create this texture. To create this texture, you need a roller and slap brush. The fascinating fact about this texture is it can cover the bumps and holes on your ceiling. And if you have the skills, then this texture can surely make your ceiling look gorgeous than ever!! 3. Swirl Texture: Creativity Taken To A New Level To achieve this texture, you need either a roller or sprayer. You can also do this by using a technique called “the basic swirl” method. But one thing that you need to keep in mind is while creating this texture, you’ll need a lot of patience to get the best result. And the difficult part is you need to create the pattern before the mud dries. So, make sure to have a helping hand by your side. Overall, the texture can really give that awesome look on your ceilings if you do it in the right way!!! 4. Orange Peel Texture: A Color Of Choice The name suggests all the colors of orange skin, but sometimes it’s also called “an eggshell” ceiling texture. If you really love this color, then this can be on the top of your favorite lists. To create this texture, you need to apply thin mud to the ceiling using a spray gun set at very high pressure. The more artistic mind you have, the more artistic look it has got!!!! 5. Smooth Textures: Choice Of Many If you are someone who wants the best at a cheap cost, then this texture is just the right choice for you. Moreover, you don’t need to have many skills to create this texture design. The look of this texture is just mind-blowing, and if you are someone who likes things to be consistently gorgeous, then this is the texture you can have for your ceiling. This texture is effortless to remove and is also perfectly suited for any room. 6. Tree Bark Texture: Beauty Of Nature If you are someone who loves nature and wants to bring the reflection of nature inside your home, then this textured style is just the option you can have. This ceiling has the look of a tree. You can create this texture just by using a heavy roller. The texture might look simply, but it’s very artistic and can surely catch the eyes of many. If you have a farmhouse, then this texture will double the beauty!!!!! 7. Slap Brush Texture: Slap The Beauty Out Artistic, gorgeous, beautiful, and elegant are the nicknames you can give to this texture. A complete package of beauty!!!! To get this texture, you’ll need a brush with very stiff bristles and thin mud. Firstly, you have to cover your ceiling with mud using a roller, then take the brush and slap the ceiling from the edge. This can be a hard nut to crack because if you don’t get it right on the first shot, the whole ceiling might end up looking messy. 8. Popcorn Texture: Cottage Cheese This texture, also known as the “cottage cheese” or “acoustic” ceiling texture, is probably one of the most famous ceiling textures ever!!! If you look closely, you’ll see it’s kind of a look-alike of “popcorn.” That’s why it’s called “popcorn texture.” To achieve the correct texture, you need to use a sprayer to apply to your ceiling. This contains Styrofoam with mud which gives that puffy effect. But it will require you to have a lot of skill to achieve this effect. That’s because the “popcorn texture” is both challenging to apply and remove. I hope this article will help you to know about the needs of ceiling textures and drywall options. And now I believe you’ll be able to get yourself the perfect texture for your ceilings. How Can I Remove Old Ceiling Textures Safely? Removing old ceiling textures can be a big job, but it doesn’t have to be intimidating! If you want to update your ceiling and get rid of that outdated texture, I’m here to help. No matter if you have popcorn, stipple, or another type of texture, this process takes a little bit of care, but don’t worry! Here’s a step-by-step guide on how to remove an old ceiling texture without breaking your back or the bank. Step 1: Test For Asbestos Before you get out any tools…safety first!  Remember, many older ceilings (especially those with popcorn texture installed prior to 1980) contain asbestos. Before doing anything else, have your ceiling tested for asbestos. You can hire a pro to test the ceiling or buy a self-test kit. If asbestos is present, halt all work and consult pros immediately. Asbestos removal is not a do-it-yourself job because it poses serious health risks if mishandled. Step 2: Clear The Room If there’s no asbestos present, it’s time to get the room ready. Cover all the furniture. You’d be amazed at how far a fine mist of water, compound, and paint can travel! Also, plastic should be removed from the floors, and tape should be around any ceiling fans or lights that are not being removed. I can personally tell you we didn’t do this. We found dried white dust on our bedspread when we were stripping the wallpaper in our bedroom, and we had to clean up all the residual dust a little too late. It was wild! Step 3: Soften The Texture For Better Finish Here’s where the fun starts! To make that texture easier to remove, you’ll need to soften it. Fill a spray bottle with warm water and mist the ceiling. You don’t want to drench it. If you put too much water on the ceiling, it could end up damaging the drywall underneath. Allow the water to sit for about 15–20 minutes or so, giving it time to penetrate and loosen up that texture material. Don’t rush this step. It’ll only cause more work for you in the long run. Step 4: Clean Your Work Grab a wide putty knife or scraper and start scraping off the texture. Do small sections at a time, and scrape at a shallow angle so that you don’t gouge the drywall underneath. If it’s not coming off well, spray some more with the water bottle and let it sit for a little longer. This step can be kind of messy and time-consuming, but have patience because, in the end, you will have a nice smooth ceiling. Step 5: Patch & Sand Once the texture is gone, you may notice a few dings or dents in the ceiling. Don’t worry! Just fill them with some joint compound, sand it smooth, wipe away any dust and you’re ready for a new ceiling. And that’s it! A fresh, smooth ceiling in no time! Read Also: Here’s How to Turn Your Garage into a Bedroom on a Budget! Turn your attic into a living space

READ MOREDetails
bedroom house plans

Living Ideas In Small Bedroom House Plans With Efficient House Designs

In small bedroom house plans, a one-bedroom house plan is for individuals who want to live alone due to some reasons. Small bedroom plans can be done according to the couple’s interests and their preferences on behalf of the limited space. Get useful inspirations about one-bedroom house plans, which have great importance for small families or couples.  In small home planning, normally guest houses, accessory dwelling units, and retirement home ideas are best. Living in all-bedroom house plans normally represents budget-friendly ideas that require less maintenance. There are several reasons to choose the small house plans.  Why Are People Driving To One Bedroom House Plans? Choices of the different options for perfect bedroom house plans depend upon the personal interests of the people and their preferences to proceed with standards approaching styles. Every time the big space in your bedroom designs plans is not necessarily. Modern people, especially those leading a fast life, are more likely to choose a small cozy, well-ventilated, balanced interior room as their bedroom. Here are some advantages of the small one-bedroom house plan for the modern fast-forwarding people. The less square footage planning can be done with the help of experienced and well-acknowledging experts who know planning very well.  Some people live alone due to their job purpose, so they need small bedroom house plans instead of large spaces. So buying small house plans and design small living houses can be cost-effective for such people who want to live alone and take an interest in living in a peaceful environment.  Less maintenance and fewer expenses are required for modern 1 bedroom house floor plans to meet your objectives as well as to live with peace.  You do not need to waste money on the decorations of unused home areas. Because the small house plans can cover the empathy space and match your interest’s levels, the compact house plans are minimizing the cost of unused decorative items. Planning of a single person or living with your spouse can be a cost-effective and wise decision-making plan to achieve your objectives and to approach with smart choices to get the best and verified response at the time of your needs.  One Bedroom Design Is Always Meet Up the Objectives  One-bedroom homes are considered more effective and safer as compared to multiple-story homes. Due to having lots of expensive materials, bigger home plans are not considered the best and perfect as small homes.  Bigger homes are for the luxury life, and more space means more time for maintenance. And fewer working professionals have extra time during your working age. This is the main reason working professionals and students always keep voting for the one-bedroom house plans. Here are the points which make the one-bedroom house plans the most robust one. 1 The bedroom house plan is an instant and reliable source for interested communities to meet their objectives and then proceed with easy and simple approaching plans.  Get some help from professional house planners who have the experience to design small homes. Getting started with small house plans with efficient house design can be cost-effective and a nice plan to proceed with smart choices.  One-bedroom home ideas need less space but proper planning to design homes according to the interests and trust levels of the interested people.  Style of 1 bedroom house plans can always impress its residents to meet with their objectives and then proceed through fast and easily accessible resources.  You have to know how to get satisfied and how to match up with your innovative interior interests. The straightforward strategies are always the most effective way to improve your modern small bedroom house plans. Conclusion: From the modern-day aspects, the small is beautiful. This is the reason the tiny house and one-bedroom house concepts are introduced. Good ventilation, well Insulated, Thermal Windows, and Airtight Construction can play a vital role in meeting your objectives. There is a massive range of ideas and valuable inspirations that can proceed to approach the intelligent feature small bedroom house plans and make sure how to get satisfied from the practical, inspiring feature plans.  Read Also: Five Bedroom Rug Ideas – Area Rugs and Decorating Ideas 3 Tips on How To Plan The Best Cheap and Fabulous DIY Bedroom Makeover Seven Simple Ways for Achieving Cozy Bedroom Environment

READ MOREDetails