The Importance of Electrical Infrared Thermography Inspections

by

21 December 2024

Technology

The Importance of Electrical Infrared Thermography Inspections

The world runs on electrical systems, and many things would stop without them. When something goes wrong, people only notice how critical electrical systems are. They must be safe, reliable, and effective, and electrical infrared thermography inspections ensure they are.

Regular Infrared thermography inspections are very important preventive maintenance for electrical systems. Electrical thermal imaging is utilized for these inspections, which can further detect all the potential issues early on. Moreover, it helps to prevent them from escalating into serious problems. 

This very provocative approach is useful for the improvement of safety, reduction of energy costs and further extending equipment lifespan.

What is an  Electrical Infrared Thermography Inspection?

Technicians can uncover heat patterns and electrical systems through an infrared thermography inspection. This non-invasive technology detects temperature variations and possible problems behind walls, under floors, and in ceilings. 

The problem may be a loose connection, an overloaded circuit, or a faulty component that could lead to significant issues. The inspection allows these problems to be caught early before they become expensive repairs or cause accidents or injuries.

This technology is accurate and safe because the individual completing the inspection never comes into contact with the electrical system. By finding inconsistencies and heat distribution, they can uncover potential problems before they escalate. The technology is used in structural systems, mechanical systems, medicine, and environmental science.

So how does it work?

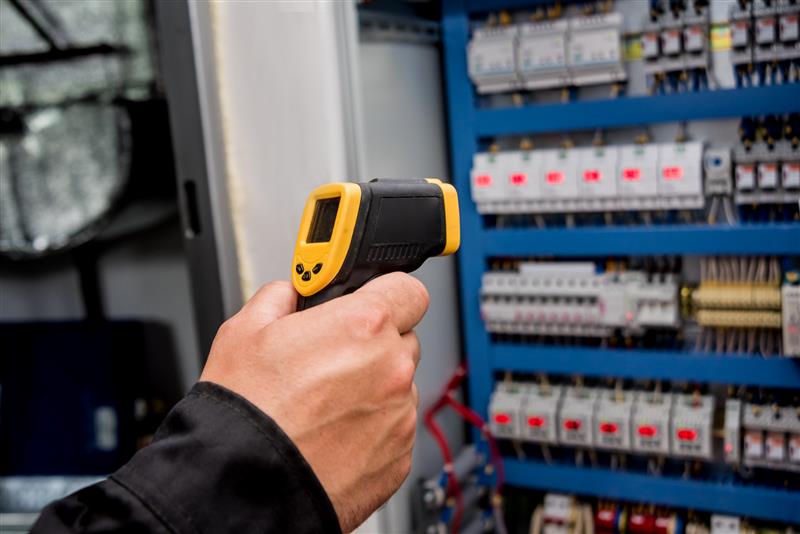
The trained technicians use these electrical infrared thermography cameras to capture all the images. This is also called a thermogram that shows surface heat variations.

Infrared thermography can detect all issues, such as faulty electrical connections, overloaded circuits as well as bearing failures. Electrical problems can cause costly shutdowns, severe property damage, and, lastly, business interruption.

Infrared thermography can help prevent all these issues by identifying problems before they even become serious.

How Does Infrared Find Electrical Problems?

Infrared cameras, or thermal imagers, can be called special eyes that “see” heat. Everything around emits some heat, and this camera detects the heat and pictures it according to the difference in temperature.

So, how do these help in diagnosing electrical issues?

Component Temperatures At Greater than Normal Operating Levels: As the electrical components are overstressed, faulty, or defect-prone, they usually produce temperatures above those obtained at normal operating temperatures. 

An infrared camera would catch this type of abnormal temperature that can indicate some issues before there is a fire breakout or equipment failure.

Loose Connections: Wires or terminals not properly connected are a source of resistance that leads to heating. Infrared cameras can spot these loose connections, thereby preventing arcing, sparking, and fire.

Overloaded Circuits: If a circuit draws more current than its rating, the wires and elements in the circuit get so hot. Infrared cameras will spot such overloaded circuits that might create dangerous conditions.

There are a few advantages that you can achieve, such as:

Early Detection: Early Detection-Infrared cameras are used for the diagnosis of problems at an initial stage, and hence do not require huge repair services.

Safety: Upon the identification of possible fire hazards through infrared cameras, safety features in domestic, commercial as well as industrial environments improve.

Reduced Downtime: Infrared cameras quickly identify problems, reducing equipment downtime and keeping businesses running smoothly.

(In the next section, I will be discussing the major benefits of Electrical Infrared Thermography)

In summary? The infrared camera is an indispensable instrument in the inspection and fault-finding of electrical systems. The cameras produce the necessary effects which are useful in detecting a fault without necessarily damaging the equipment.

The Benefits of Electrical Infrared Thermography Inspections

As previously mentioned, electrical infrared thermography inspections are highly beneficial because they catch problems early before they become significant issues.

Electrical systems are exposed to continuous wear and tear, which can lead to degradation. Improper installation and environmental conditions can also cause problems within these systems.

The technology captures thermal images to uncover abnormalities. The technician can conduct this inspection without halting the system.

This inspection is often part of a more extensive preventative maintenance program, helping reduce unexpected downtime while extending the lifespan of costly electrical parts. Problems are fixed before they escalate.

System performance improves when regular inspections are conducted. These inspections ensure the electrical system is performing at optimal levels. The business owner saves money by not paying for costly repairs or early replacements. Furthermore, efficient systems use less energy.

These thermal inspections ensure the safety of electrical systems. Electrical fires can quickly cause significant damage to a property. The inspections ensure that all components work as intended. The technician also identifies hazardous hot spots to be corrected before catastrophe strikes.

Business owners must comply with safety and operational standards, and thermography inspections help them achieve this goal. Conducting these inspections reduces the risk of the company being fined or encountering a legal or liability issue.

It also shows that the company remains committed to safety and operational excellence, which can help its reputation. Furthermore, these inspections may lower insurance premiums because they show that the business complies with these standards.

Common Uses 

Industrial plants often use thermography inspections to monitor machinery and panels and ensure they aren’t overheating. Commercial buildings benefit from these inspections because they confirm all electrical systems are performing optimally. 

On top of that, homeowners may request a thermography inspection to ensure no electrical shorts could harm their families or properties. Utility companies also use this technology to monitor their power lines and transformers.

Contact a licensed electrician today to schedule a tomography inspection. The technician reviews the system’s layout to determine which parts need to be inspected. Then, when the system is operating, they use a specialized camera to scan the electrical panel circuits and other equipment.

The thermal images captured by this camera are analyzed to identify hot spots and heat distribution issues. Upon completion of this review, the technician alerts the owner to any potential problems so they can be rectified and the electrical system can be safe again.

Read More:

Ankita Tripathy loves to write about food and the Hallyu Wave in particular. During her free time, she enjoys looking at the sky or reading books while sipping a cup of hot coffee. Her favourite niches are food, music, lifestyle, travel, and Korean Pop music and drama.

View all posts

Leave a Reply

Your email address will not be published. Required fields are marked *

Related

Alexa device issue

How To Troubleshoot The Alexa Not Responding Issue? [Fixed]

Alexa is a virtual assistant, which works with an echo dot in order to fulfill all the demands of its users. With its thousands of attractive features, Alexa has made the life of its users super easy and also entertaining at the same time.  With its hi-tech features, Alexa can do almost everything from controlling smart home lights to set reminders, playing songs, jokes, news, quizzes, and much more things. But due to some reasons, you may find your Alexa not responding to the commands that you are giving it.  Do not worry if you are facing the Alexa not responding issue. Here we have the most effective and easiest troubleshooting steps to fix this issue.  Troubleshoot The Alexa Not Responding Issue: Here are the troubleshooting steps that you need to follow for solving the Alexa not responding issue with your echo dot. There are a bunch of reasons for what you may be facing this Alexa not working issue.  So, let’s head towards the troubleshooting steps.  1. Check The Microphone Button There are many instances when we find that the reason behind Alexa not responding is because the microphone is damaged or we forget to turn the button on. The microphone button is one of the most common reasons for this issue.  So, check the microphone button first. If the issue persists and it seems that everything is totally fine there. You can step to the next process.  2. Reboot The Device This is one of the most effective and easiest ways in the whole troubleshooting process of Alexa is not responding issue. There is not much trouble, all you need to do is just restart the device and the issue will get resolved. But this restarting has a definite name called power drain, and it is more than just powering off the power button and power on it again.  Here is the step-by-step guide for the power drain process. First, you need to check the power light. In case it is showing blue light, that means the device is able to hear you but simply the Alexa device is unresponsive to your commands.  Disconnect the power cable from the power source for at least 30 seconds. Wait for a little while, and after that, connect the power cord again with the power outlet. Now, when your device is ready completely, try to give it any command again. If the issue is resolved, then it is fine. But in case the issue of Alexa not responding continues, head to the next step.  3. Echo Dot Hard Reset In case the above described troubleshoot does not work for your echo dot. Here is the step-by-step guide to hard reset. You will find the reset button at the bottom of the device. You can use a pin to press the button. As soon as you press the button, the device will power off. Here, you need to wait for a little and then power the device on again. All the settings of the device will then reset to the original.  4. Disable And Enable Alexa Privacy If Alexa not responding after all the above-mentioned troubleshooting steps, now is the time to enable Alexa privacy and in order to do so, follow the below steps. You will find a button at the end of Alexa’s nucleus screen. You need to press the button. This button is to enable the privacy of Alexa. If you press the button again, the device will hear you again. Give a command to Alexa in order to check whether the issue is resolved or not.  5. Check Your WiFi Connection Behind the “Alexa not responding” issue, there is a huge chance that maybe your wifi connection is not working properly. That is why Alexa is finding it difficult to respond to your commands.  Well, let me tell you that if you do not have a proper internet connection, there will be no use for this Alexa device. So, check the router now. In case you find anything wrong, contact your network service provider.  6. Try Changing The Position  In case you have placed your echo dot device far from your router or in someplace where it is having issues connecting with the router. This can be the main reason why you are experiencing “Alexa not responding.”  Make sure that you are placing Alexa within the wifi range. The place should be accessible to yours as well so that your echo dot device can connect with the network properly and also can hear you clearly.  7. Set Echo And Smartphone On The Same Network Always keep in mind that the smartphone that you are using and Alexa have to be connected within the same network. In case they are connected with different routers or your phone is not connected with the router’s network, you will face the “Alexa not responding issues.” Connect both of them on the same router’s network in order to resolve the issue.  8. WiFi Congestions If you have connected a lot of devices within the same router’s network, it may create the “Alexa not responding” issue. Due to excessive wifi congestions, your echo dot is not able to respond to your given commands. Remove or disconnect some other devices, and then try to give your device command and check if the issue is resolved.  Still Alexa Not Responding? All the steps that I have told you in this troubleshooting guide are enough for resolving Alexa not responding to voice issue. But if you face the same problem after performing all the troubleshooting steps. You should contact Alexa customer care. Call on the Alexa helpline number and ask for help.  More Resources:  Benefits Of Having A Cordless Vacuum Cleaner At Home What is type c cable, and is it worth buying

READ MOREDetails
Best eSIM Plans

The Best eSIM Plans For Budget Travelers In The USA 

Hey there, fellow adventurers! If you're dreaming of epic road trips, exploring new cities, or just having a blast while traveling, you're in for a treat. We're diving into the world of eSIM plans, those magical cards that keep you connected without breaking the bank. So, buckle up, grab your favorite snack, and let's explore the best eSIM plans for budget travelers in the USA! What's An eSIM, Anyway? Okay, before we jump into the cool stuff, let's chat about eSIMs. They're like your regular SIM card but smaller and way more high-tech. Instead of a physical card you can touch, eSIMs live in your phone's digital world. Just imagine it as a tiny wizard that magically connects you to the internet wherever you go! Why Choose eSIMs For Budget Travel? Now, you might wonder, why bother with eSIMs when there are traditional SIM cards? Well, friend, eSIMs are the superheroes of the connectivity world. They're super easy to use, and you can switch between different plans without swapping cards. This flexibility makes eSIMs a budget traveler's best friend when looking for the cheapest esim plan usa. Key Benefits That Make eSIMs Perfect  The convenience of activating plans remotely and only paying for the data you use makes eSIMs a great choice for finding the cheapest esim plan usa. No Roaming Charges: You can switch between affordable local data plans at each destination rather than paying expensive roaming fees. Flexibility: Pause or renew plans anytime. Only pay for the data you actually use. Convenience: Activate plans remotely in just a few taps without locating a store. Multi-network capabilities: Use dual SIM functionality to manage multiple plans or providers. Enhanced security: Reduced risk of SIM card theft or damage compared to physical SIM cards. Clearly, the flexibility and convenience offered by eSIMs give budget-conscious travelers the freedom to stay connected anywhere in the world without incurring expensive international roaming charges. Top eSIMPlans For Budget Travelers  T-Mobile Connect Prepaid eSIM T-Mobile has your back with its Connect Prepaid eSIM plan. It's like having a secret weapon for staying connected on a budget. With this plan, you get a chunk of data and unlimited talk and text – perfect for sharing all those awesome travel stories with your pals. Plus, T-Mobile's got a strong network, so you won't be left stranded without a signal. Google Fi – Your Travel Buddy Google Fi is like that buddy who knows all the cool spots in town. It works with multiple networks, jumping between them to find the best signal. And the best part? You only pay for the data you use. So, if you're chilling at a beach or hiking a trail and not using much data, your wallet stays happy too! FreedomPop – Freedom To Explore If you're all about freedom (it's in the name, after all), then check out FreedomPop's eSIM plans. They offer free plans with a decent amount of data each month. Yes, you heard it right – free! Of course, if you need more data or extra perks, there are affordable options to choose from. It's like having your very own treasure chest of data at your fingertips. Airalo – Global Adventures Await For the globetrotters out there, Airalo's eSIM plans are a dream come true. They offer eSIMs for multiple countries, so you can stay connected wherever your wanderlust takes you. No need to stress about buying a new SIM card every time you cross a border – just keep exploring! Tips For Choosing The Right eSIM Now that you've got the lowdown on some awesome eSIM plans, how do you choose the one that suits your travel style? Here are a few tips to help you make the best decision: Check Coverage Maps: Before you commit to an eSIM plan, make sure to check the coverage maps. You wouldn't want to find yourself in a dead zone with no bars and no way to share that breathtaking sunset pic! Data, Data, Data: Think about how much data you really need. If you're a social media guru, you might want a plan with more data. But if you're more of a "disconnect and enjoy the moment" type, a smaller data plan could be just right. Flexibility Matters: Look for eSIM plans that let you change or cancel without too much hassle. Life on the road can be unpredictable, and you want a plan that rolls with the punches. Key Takeaways eSIMs are like Digital Magic Cards: eSIMs are like those tiny magic cards that live in your phone and connect you to the internet wherever you go. No more hunting for SIM card trays – just tap, and you're good to go! Budget-Friendly Adventures with T-Mobile: T-Mobile's Connect Prepaid eSIM is your budget superhero. It gives you data, unlimited talk, and text – all the essentials for sharing your cool travel stories without spending too much. Google Fi – Pay for What You Use: Google Fi is like your travel buddy. It works with different networks, finds the best signal, and the best part? You only pay for the data you use. So, your wallet stays happy while you enjoy your adventures. FreedomPop – Free Data Treasure Chest: FreedomPop's eSIM plans are all about freedom. They have free plans with a good amount of data each month. If you need more, they've got affordable options. It's like having a treasure chest of data without breaking the bank. Airalo – Stay Connected Globally: Airalo is for the global explorers. They offer eSIMs for different countries, so you can stay connected wherever you travel. No stress about buying new SIM cards – just keep exploring! Conclusion So, there you have it – the scoop on the best eSIM plans for budget travelers in the USA. These eSIMs are like your trusty sidekick, helping you stay connected without spending too much money. Whether you're road-tripping or flying across the globe, these digital magic cards are ready for your adventure. Happy travels! Frequently Asked Questions (FAQs) What's the difference between eSIMs and regular SIM cards?  eSIMs are like tiny digital wizards that live in your phone, while regular SIM cards are physical cards you insert. eSIMs are super easy to use – just a few taps on your phone, and you're connected! Why choose eSIMs for travel?  eSIMs are perfect for travel because they're flexible and don't require swapping cards. You can switch plans easily, and some even work globally, saving you the trouble of buying new SIM cards in every country. How do I know which eSIM plan is right for me?  Check coverage maps to make sure your eSIM works where you want to go. Think about how much data you need – more for social media lovers, less for those who prefer to disconnect and enjoy the moment. Can I change or cancel my eSIM plan easily?  Look for eSIM plans that offer flexibility. Life on the road can be unpredictable, so having a plan that lets you change or cancel without much hassle is a plus. Do all eSIM plans work the same way?  No, each eSIM plan is a bit different. Some offer more data, some are free with basic features, and some work globally. Choose the one that fits your travel style and budget the best! Read Also: Transform Your Garage into a Home Office Seasonal Unemployment – Definition, & Examples [Complete Details] How Does Creativity Help In Entrepreneurship?

READ MOREDetails
com.android.phone has stopped

How To Fix Com.Android.Phone Has Stopped Error In Your Phone?

We all have a mobile phone, and it almost runs smoothly until and unless there some glitches or issues happen. And com.android.phone has stopped is one of them. Are you also facing these issues? Are you looking for ways to fix it? Here, in this article, I will guide you with some easy and simple steps that you can try at home really quickly for fixing this issue. Generally, at the time of receiving a call, this com.android.phone has stopped issue occurs and shows an error message “unfortunately the process com.android.phone has stopped.” Fix Com.Android.Phone Has Stopped Error In Your Phone Here, I will tell you the easy steps to fix the com.android.phone has stopped the issue. You can try all these techniques on any android phone, including Samsung, Xiaomi, and many more. So, let’s get started with the fixes.  1. Reboot Your Phone When you are sending a text message or making calls, or opening any app, this com.android.phone has stopped eros happens. In case you are facing this issue for the first time, you can try restarting your device. After you have done rebooting your phone, check whether the eros is still there or not. In case the error still persists, do not worry; I have some more options to fix this error. So, let’s look into other available options.  2. Clear App Data And Cache Clearing your cache and data for the phone app can help you in fixing the com.android.phone has stopped error. Follow the steps to perform this solution. To open the apps list, click on the Menu option. Select the Settings icon from the list. Go to the Devices section. Search and tap on Apps, or App Manager, or Application Manager.  Now select the app for which you want to clear data from the App window. Once the Storage section opens, tap on the option names Clear Data. Tap on the Clear Cache button under the Cache section. Reboot your phone. Check if the issue is solved or not. If the issue is still there, go on to the next option. 3. Clear Data And Cache Of The SIM Toolkit If you are facing com.android.phone has stopped error, you can try to fix the issue by clearing the cache and data of the SIM toolkit. Follow the below-mentioned steps to do this. Go to the Settings menu. Select Apps. Tap on SIM Toolkit. Tap on Clear Data and also on Clear Cache. Reboot your phone. Now check if the issue is fixed or not. In case you are still facing the issues, try the next option. 4. Stop Automatic Updates Some users also state that stopping the automatic date option has solved the com.android.phone has stopped error. In order to do that, follow the below-mentioned steps. Tap on Play Store. Now tap on the Menu icon. Tap on the Settings option. Now tap on Auto-update apps. Choose the option of Do not auto-update apps. Reboot your phone. Once your phone turns on, check whether the issue is still there or not. If the error continues to show, try the following option to fix it. 5. Wipe The Cache Partition Wiping the cache partition also has helped many users to fix com.android.phone has stopped error. Sometimes, if caches get corrupted, but the system keeps using them continuously, some issues like this happen.  As you can not delete the cache one by one, you need to delete the entire directory in order to solve this issue. And for doing that, you need to follow the steps that I have mentioned here. Power off your phone. Now, press and hold the Home and Volume Up keys. Now press and hold the Power key. Now release the Power key but keep holding the Home and Volume Up keys.  Now release both the buttons and wait for around 30 seconds to 60 seconds until the Android logo shows. Using the Volume Down key select the option Wipe cache partition.  Now press the power key for selecting the option. Now using the Volume Down key go to the Yes option and again press the power button to select it. Now, wait till the time wiping your cache partition finishes. After it completes, no go to the Reboot system now, and for selecting it, press the power button. It will take longer to reboot your phone. Once your phone reboots, check if the problem is fixed or not. If the issue is still there, here is another option for you to try.  6. A Factory Reset If you have tried all the fixing options that I have mentioned till now and still you are facing com.android.phone has stopped error, there is one last option for you. You can factory reset your phone to fix this error.  In case you do not know the process of factory reset your phone, follow the steps below. First, you need to power off your android phone. Now press and hold the Home key, Volume Down button, and Power button at the same time. Your phone will boot into recovery mode. Now use the Volume Up and Volume Down button to scroll through the entire menu. Go to the option, Wipe Data or Factory Reset. To select it, press the Power button. For confirming the reset, go to the option Yes and select it.  Once the reset process is complete, and the same recovery mode menu screen will open. Select the Reboot system now option. I believe this will fix the com.android.phone has stopped error.  Final Tips If you are facing com.android.phone has stopped error in your phone, try all the fixing options that I have mentioned here in this article. Any one of these 6 options will surely fix the issue you are facing, and your phone will be back again into proper functioning. Make sure you are backing up all the necessary data before starting with all these steps.   FAQ( Frequently Asked Questions)  How do you can cast from Firefox to Chrome cast?  If you want to enable the casting you can connect to the Wifi on the Chromecast. You can connect to the cast Icon of the video. Choose the device to cast too. How do you can cast Firefox on your TV?  All you need to do is to send the Cast to play button on the device Icon to play the playback controls on the URL. Where is the Cast button on Firefox?    There are certain steps you have to follow for playing the video to view the control buttons. First, you need to start the videos and you need to view the cast or the control button. Click on the top of the screen tap on the cast button. From the menu option select the fire TV device. The video will start playing on the Fire TV.   More Resources:- Best iPhone Spy Apps Without Jailbreaking. 8 Incredible Tricks That You Didn’t Know Your iPhone Can Perform. How To Use Chromecast From Firefox – Step By Step Guide In 2021

READ MOREDetails