A Complete Guide on Using IRON on Transfer Paper

Published on: 15 August 2019 Last Updated on: 05 September 2019
IRON-on Transfer Paper

Iron-on transfer paper, commonly known as T-shirt paper, is used to print designs on T-shirts. This is often used to transfer images or texts onto T-shirts or any other fabric of choice. This paper can be used to imprint images and texts on cotton bags, tablecloths, bedsheets, and even hard surfaces like wood tables and ceramics.

This blog post offers you a complete guide on how to use an iron on transfer paper and get it printed on various objects.

A Complete Guide on Using IRON-on Transfer Paper:

The ink to be used:

The first confusion that comes to the minds of first-time users is the kind of ink that needs to be used in order to get the image transferred on to the fabric.

The answer to this concern is simple: the ink in their home or office inkjet printer is just perfect for this work. The secret of this process lies in the paper rather than the ink used.

Hence, as long as your transfer paper is of the correct type and good quality, and an inkjet printer is used, normal ink is good enough.

Image reversal before printing:

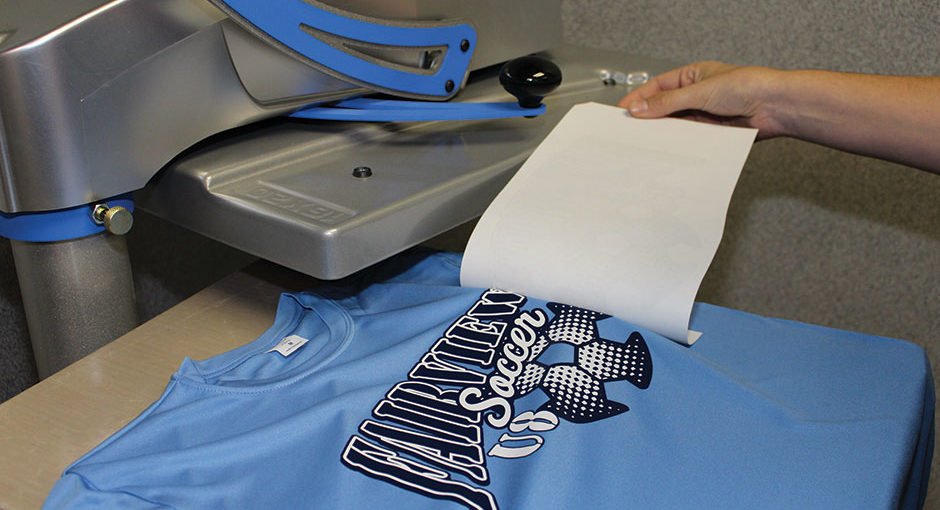
A common mistake is not reversing the image before printing it out. This is a costly mistake since the cost of the paper is quite high. While using a light transfer paper, it’s essential to reverse the image and print using the mirror mode. The image is placed face down on a piece of cloth during the process. Once the printing is done, the final image appears the right way round.

However, while using dark transfer paper, image reversal is not needed. During this process, the image is placed face-up on the garment, which makes the final image appear the right way round. These steps are crucial for both light and dark transfer papers to ensure correct and proper printing.

The Process:

  1. Take the transfer paper and print any image or text on the blank side, in the mirror mode.
  2. Once the image is printed, keep it aside.
  3. Take the garment or cloth to be printed.
  4. Put the image face down on the garment and start ironing.
  5. The thermal indicators on the transfer paper will turn brown once you have ironed for a sufficient time period.
  6. Remove the iron as well as the transfer paper, and the image will be printed on the garment or T-shirt.

In the case of dark-colored fabrics, print the image or text without the reverse or mirror mode.

  1. First, iron out the area of the cloth where you want the image to be placed.
  2. Place the image or text with the face-up and cover it with a silicon paper.
  3. Start ironing over the paper with gentle, equal pressure.
  4. Remove the silicon paper to get the image imprinted successfully.

Washing the Garments:

The durability of the shirt or cloth on which the print has been done depends on the care you take, and how well the print has been made. To increase the durability of the images or texts after the transfer, place a plain sheet of paper on the image and iron the top of it gently. This removes the excess ink and helps retain the color and durability of iron-on transfer paper printed fabrics.

Common mistakes to avoid:

Here are some common mistakes that people make while using iron-on transfer paper. These can be expensive, frustrating, and can ruin the garments as well.

  1. It’s important to reverse the image and print on the mirror mode. Forgetting this step will ruin the garments.
  2. The printing should be done using inkjet printer ink. Using any other kind of ink is not recommended.
  3. The garment or T-shirt should be placed on a flat surface, and equal pressure needs to be applied on all sides to get it imprinted perfectly.
  4. Do not use an iron that is not hot enough.
  5. Not ironing for a long enough duration can make the image transfer improperly, with some places being perfect and the others left with just a hint of color.
  6. Washing the printed T-shirt or pillow cover immediately after printing can ruin the print.

The use of iron-on transfer paper is now a trend in the market and is a popular choice for personalized gifting. People can print any image or message on T-shirts, pillow covers, etc., and use them as personalized gifts for various occasions.

You can choose both light and dark colored fabrics to get the images and messages imprinted on to make a personalized gift that the receiver will cherish forever.

Read Also:

featured image: richardcastle.net

Content Rally wrapped around an online publication where you can publish your own intellectuals. It is a publishing platform designed to make great stories by content creators. This is your era, your place to be online. So come forward share your views, thoughts and ideas via Content Rally.

View all posts

Leave a Reply

Your email address will not be published. Required fields are marked *

Related

hair cutting

6 stunning long hairstyles for oval faces

Oval face shape is an attractive shape which may turn into more attractive by applying some tricks of getting the long hairstyles that will turn suitable for them. Ladies who are curious o know the ways of getting some change should move onto the next line as here being a beautician I would like to tell the secret that most salon hairstylists apply to the oval faces to make them more pretty and loveable.6 stunning long hairstyles can make your hair look different from the crowed. Why should you have long styles? Long styles have their own charm and no any style can compete with it. Oval faces if carry short bob style they will not look attractive. No doubt, we all know the beauty of the long hair to the personality of the women. And, what if, a woman can make her long hair in a very stylish way. Long hairs cutting The front tresses and the layers cutting off the whole long hair give you an outstanding perfect shape not only for your hairstyle but also for your personality making. You will need 6 stunning long hairstyles for oval faces if you want to fetch some air of change in you. Messy hair in the wrong proportions of each side of the ear makes the oval face look a bit round. When you take up messy hairstyles these add volumes in your hair if you have thin hair. Before going to choose any style you must know the ABC of that hairstyle that, will it dazzle your face or not? If you want to know more about hairstyles that will suit your face, you can visit our website fashonik A good cutting If your hair cutting is good then you will not need anything else to do with your hair, however, if your hair has not been cut in better shape then you will have to take cutting first and then you will be able to proceed further. Classy long layer curls You will need just some pins, brush and hairspray to set the shape. Yes, also a curler. See, curler is not bad to use if you are using it juts to curl your ending layers. It will not go to harm your hair in any way. You just keep your hair simply open and make them curl from the ends. Set your cutting with pins so that the short layers could come on the front. Similarly, you can take shaggy straight hairstyle: In this, you just need to take a hair cut of shaggy style in which the layers will be cut haphazardly from around the head. Simply make them straight and keep them on a front. It will make your face pretty good. Long sassy curls with no tresses: While cutting, don’t take tresses from the front and just take a simple straight cutting. Then just give them a long loose curl and keep the one-sided layer on the front and other on the back. It is one of the best among the 6 stunning long hairstyles. Side swept classy layers Here, you will need to take a side on one side. It’s your wish what side you choose. Simply, keep all the hair on the front from aside and bring your layers and bangs on another front. Means, you must take both things on the alternative side. Curl tousled layer Tousled carry all the layers in a spreading manner. There is no symmetry yet it arranges in symmetry in the eye of a beautician. Definitely, it will give you a fresh look. Scrunched hairstyle Lastly, it is the one which we all girls want to achieve and this comes when we make our hair a bit wet and tousled. In this, you just need freshly washed hair and you will get this look by applying the gel and cream of hair after a bath. Not to take a low blow dryer. Final Take Away   Hence, if you are impressed with these kinds of hairstyling then you can try these 6 stunning long hairstyles which can make you look gorgeous. Beautiful and long hairs are the ornament of the woman and you deserve the best. You can make use of these hair styles to make your hair look attractive and gorgeous. Do not make your choices in grey as it can lead to hair damage if you do not seek the right care of your hair. To know more: A Brief Guide On Applications Of Spray Dryers

READ MOREDetails
Maternity wardrobe

How to Save Money on Your Maternity Wardrobe

Being pregnant is truly a blessing, even though it can be annoying and exhausting at times. This is the time when you spend hours doing research about what is best for you and your baby, and prepare your living space for an additional family member. Being a mom makes it a priority to stay healthy for the sake of you and your baby, but you also want to look good. Modern moms-to-be like to stay true to their unique style, and luckily this has never been easier. Do I Have to Change My Style? Remember seeing in the movies pregnant women dressed in what looked a flowy tent? This is because baby bumps were considered unattractive and women felt like they had to hide themselves until they get their pre-pregnancy bodies back. Luckily, those days are way behind us, and women all over the world are showing of their growing bellies and look amazing. You know that you will not be able to wear all of your clothes, but when going out to buy something new, choose items that wrap around your middle, since these will look stylish and will not restrict your movements. If you feel like hiding your stomach a bit, choose darker colors like navy or black because these will make you look slimmer. Read More: Yoga For Pregnant Women Layer Up! Listen, the more fabric, the less flattering it will look on you, so try to find a middle ground somewhere. The best decision is to layer up since you can choose the items and combine them to get the best look. All those lovely open-fronted cardigans and stylish denim or leather jackets can be worn over tunics, dresses, and jeans, and not only will they keep you warm but you can choose to wear ones in pastels or adorable prints which will show your sense of style and trends, but will still be wonderfully comfortable. The best thing is that you won’t have to go out buying new clothes, you can wear your old items and simply leave them open in the front. Remember, you will not be able to imagine life without your comfy maternity jeans, so choose them carefully. Thrift Stores? By All Means Yes! You are not going to be pregnant forever (thank God), so the clothes that you choose to wear n those months you will probably not wear later on. Instead of going out shopping and spending hundreds of dollars on clothes you will only wear for a few brief months. Try finding good maternity clothes on websites like eBay and swap.com; women who sell their maternity clothes probably didn’t wear them for a very long time and certainly don’t need them anymore. What you can do after childbirth is to collect all of your maternity clothes and simply give it to someone who needs it, or sells them to a thrift shop. This way you will not only be earning a few extra bucks, but you will allow someone in need to save a few as well. It is difficult not to compare yourself to so many celebrity moms and their perfect pregnancy and post-pregnancy bodies, but keep in mind that all of them have teams of experts to help them stay fit and get back in shape. What is important is to stay healthy and be comfortable, because your baby feels good when you feel good. Luckily, ‘comfortable’ does not exclude ‘stylish’, so go ahead experiment, and don’t hesitate to show off your lovely baby bump. See also 1. Wardrobe Dreams: Statement Pieces to Last

READ MOREDetails
Materials Used in Making Jewellery

Types of Materials Used in Making Jewellery

Silver: You have different choices regarding the materials used in making jewellery. The material dictates the price of the jewellery and if it will be perfect for you. These are the most common materials, and why they might be perfect for you. Sterling silver is one of the most popular choices. It contains 92.5% silver, and the rest is copper. It is a good option for wedding rings and bracelets. The good thing about silver is that it can match anything. It does not matter whether you are heading to a formal event or a casual party. You will look great with silver. You might consider a fingerprint necklace UK jewellery retailers offer if you are planning to attend a special occasion. The fingerprint on the necklace makes it look even more special. It takes time to create the jewellery, but the results areunique. Silver-filled: If you can't afford to buy silver, this is the best option. It is way cheaper, but it does not contain full silver. Using heat and pressure, a base of cheap metal will combine with a layer of silver on top. Despite not being total silver, the jewellery still looks good. To the naked eye, it won’t be easy to tell the difference. Gold: It will always be an aclassic option for jewellery. Experts in jewellery measure gold in terms of carats. The number describes the proportion of authentic and pure gold with that of other metals. With higher carats, you can expect the price to go up.The maximum is 24K which is the most expensive, but not highly recommended. At that point, the jewellery becomes too soft and malleable. However, 14K gold would be perfect given its appearance and strength. You can choose from various types of gold, including yellow gold, white gold and rose gold. Platinum: It is one of the rarest metals used for jewellery. It is also among the most expensive metals on Earth. If jewellers have to work with platinum, they need to melt it at a hightemperature before working on the design. Platinum is perfect for wedding bandsand pendants. You can buy platinum mixed with other metals, which becomes cheaper. However, the combination with other metals helps improve itsdurability. Titanium: If you have enough budget to splurge for jewellery, you can choose titanium. It is hard and tough. It will last long. It puts other materials to shame. It is scratch-resistant and lightweight. It also has a unique colour, making it a fantastic choice for jewellery. As long as you have the budget to purchase it, you can start shopping now. You consider differentfactors before you finalise your decision on the jewellery to purchase. Ofcourse, the cost is a significant consideration. If you intend to buy a weddingring, you might want to choose either silver or gold. They are among the mostpopular choices that come at an affordable cost. Determine the purpose ofbuying the jewellery and how much you are willing to pay. Read Also: How To Buy & Sell Jewelry Online Save Money Buying Engagement Rings And Wedding Bands Using These Ingenious Tips

READ MOREDetails